Configuring Check Point VPN for PingID multi-factor authentication
This procedure details the configuration required in your Check Point VPN for integrating PingID multi-factor authentication (MFA).
Prerequisites
-
You have installed Check Point VPN, including Check Point SmartConsole and SmartDomain Manager.
-
You have configured the necessary settings in PingOne and PingFederate. For more information, see:
-
Configuring PingOne for Multi-Factor VPN Authentication
-
Configuring PingFederate for Multi-Factor VPN Authentication
-
About this task
The following video describes the Check Point VPN process.
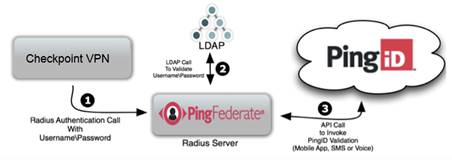
The following image represents a general flow. Actual configuration will vary according to individual company infrastructure considerations and policies.
Processing steps
-
When a user opens their IPSec or SSL VPN login window and enters a user name and password, their details are sent to the RADIUS Server on PingFederate through the VPN.
-
PingFederate authenticates the user’s credentials against the LDAP Server as first-factor authentication.
-
After LDAP authentication approval, the RADIUS server initiates second-factor authentication with PingID. If authentication is denied, the user’s VPN window displays an error message.
Configuring Global Properties
To configure Check Point VPN for PingID multi-factor authentication (MFA), you must configure Global Properties.
Steps
-
From the Windows Start menu, open the Checkpoint SmartDashboard.
-
Enter your username and password and click Login.
-
In the Check Point SmartDashboard, in the Checkpoint menu bar, click the Menu icon (
 ). Go to Policy → Global Properties.
 -
Click Smart Dashboard Customization.
-
Click Configure.
-
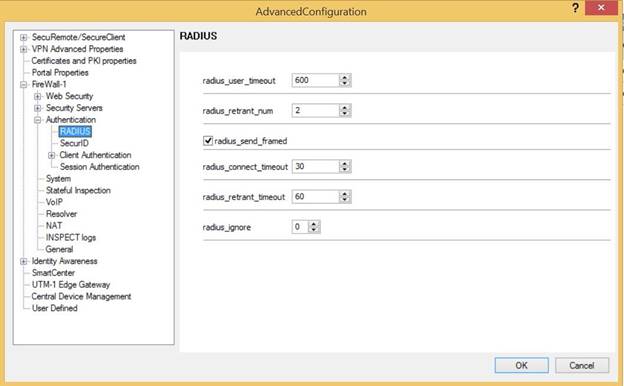
Open the configuration tree, and go to FireWall-1 → Authentication → RADIUS.
-
Configure the following settings:
-
radius_user_timeout: 600
-
radius_retrant_num: 2
-
radius_send_frames: Select the check box.
-
radius_connection_timeout: 30
-
radius_retrant_timeout: 60
-
radius_ignore: 0
-
-
Click OK.
Configuring the RADIUS host
To configure Check Point VPN for MFA, you must configure the RADIUS host.
Steps
-
In the Network Objects toolbar, click the Network Objects tab (
 ).
). -
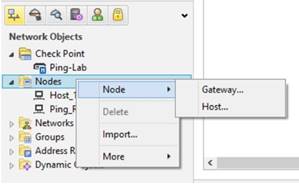
In the Network Objects tree, right-click Nodes, and then go to Node → Host…
-
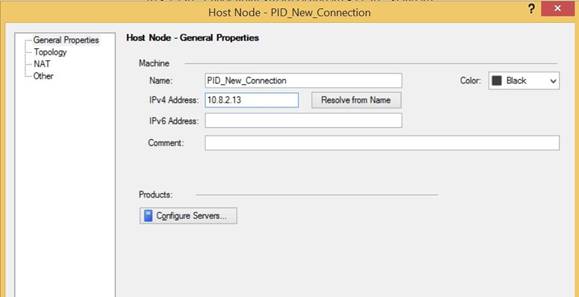
In the Host Node dialog box, in the Host Node navigation tree, click General Properties.
-
In the Name field, enter the RADIUS host name.
-
In the IPv4 Address field, enter the RADIUS password credential validator (PCV) IP address.
-
Click OK.
Creating a UDP entry
Create two UDP entries, one for the authentication port and one for the accounting port.
Steps
-
In the Network Objects toolbar, click the Services tab (
 ).
). -
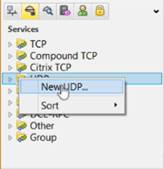
In the Network Objects tree, right-click on UDP and select New UDP…
-
In the UDP Service Properties - NEW-RADIUS window, enter the following information:

-
In the Name field, enter a name for the UDP service.
-
In the Port field, enter the port number.
The default port is 1812.
The port number must match the one defined in your RADIUS PCV configuration.
-
-
Click OK.
-
Repeat the process to create a UDP service for the RADIUS accounting port.
The RADIUS accounting port number should be the next consecutive number to the port number used for the authentication port.
Creating the VPN RADIUS server
To configure Check Point VPN for PingID MFA, you must create the VPN RADUS server.
Steps
-
In the Network Objects toolbar, click the Servers and OPSEC tab (
 ).
). -
In the Network Objects tree, right-click on Servers and go to New → RADIUS….
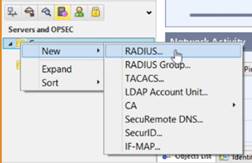
The following window is displayed:
-
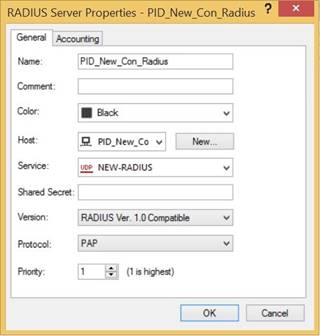
On the General tab, enter the following information.
-
In the Name field, enter a RADIUS server name.
-
From the Host list, select the RADIUS host that you created previously.
For more information, see Configuring the RADIUS host.
-
From the Service list, select the RADIUS service that you created previously.
For more information, see Create a UDP Entry.
-
In the Shared Secret field, enter the shared secret.
The shared secret must match the one configured in the RADIUS server PCV.
-
From the Version list, select RADIUS Ver. 1.0 Compatible.
-
From the Protocol list, select PAP.
-
-
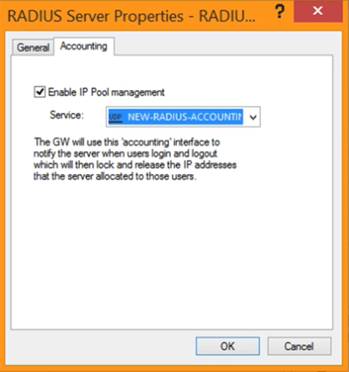
Click the Accounting tab.
-
On the Accounting tab, enter the following information:
-
Select the Enable IP Pool Management check box.
-
From the Service drop-down menu, select the RADIUS accounting service you created earlier.
For more information, see Create a UDP Entry.
-
-
Click OK.
Configuring a RADIUS user profile
To configure Checkpoint VPN for PingID multi-factor authentication (MFA), you must configure a RADIUS user profile.
Steps
-
In the Network Objects toolbar, click
 .
. -
In the Network Objects tree, expand External User Profiles.
-
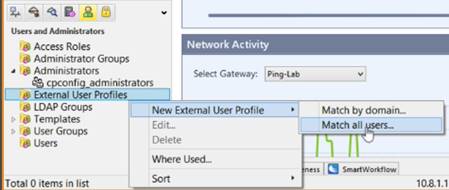
Double-click the generic* user profile.
If the generic* user profile is not listed, right-click on External User Profiles, and select New External User Profile → Match all users….
-
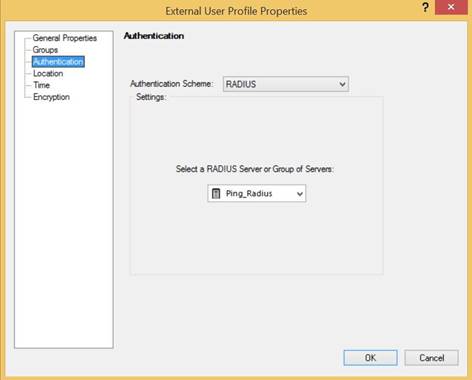
In the External User Profile Properties window, from the navigation tree, click Authentication.
-
In the Authentication window, enter the following information:
-
From the Authentication Scheme list, select RADIUS.
-
From the Select a RADIUS Server or Group of Servers: list, select the RADIUS server that you created previously.
For more information, see Create the VPN RADIUS server.
-
-
Click OK.
-
In the Network Objects tree, right-click User Groups, and select New Group….
-
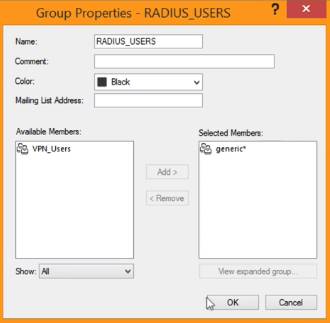
In the Group Properties - RADIUS_USERS window, enter the following information:
-
In the Name field, enter a name for the RADIUS group.
-
From the Available Members pane, select generic*. Click Add.
Result:
The generic member is added to the Selected Members list.
-
-
Click OK.
Setting the participating gateways
To configure Checkpoint VPN for PingID multi-factor authentication (MFA), you must set the participating gateways.
Steps
-
In the Checkpoint toolbar, click the IPSec VPN tab.
-
In the left navigation pane, click Communities.
Result:
The available communities are listed.
-
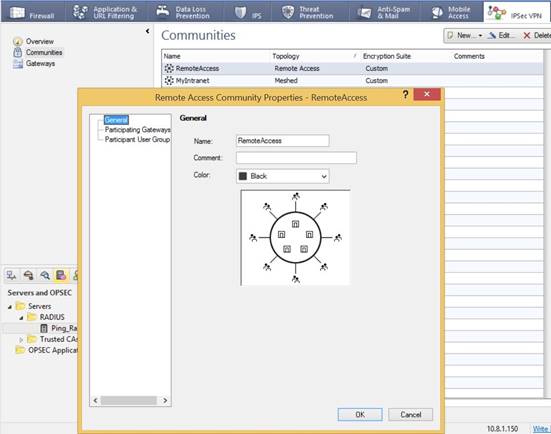
Double-click the RemoteAccess community.
-
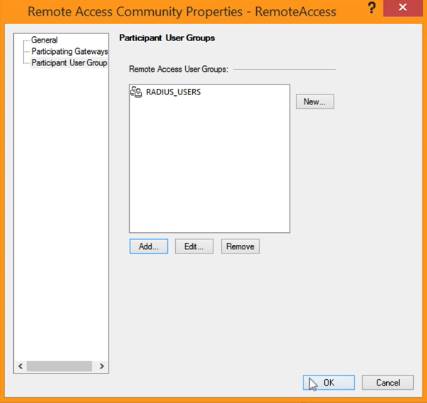
In the Remote Access Community Properties window, in the navigation tree, click Participating Gateways.
-
If your checkpoint VPN gateway does not appear in the Participant Gateway list, click Add, and then select your VPN Gateway.
-
In the Remote Access Community Properties tree, click Participant User Groups.
-
If the user group you created is not listed, click Add and select the group from the list.
-
Click OK.
Adding a RADIUS rule
To configure Checkpoint VPN for PingID multi-factor authentication (MFA), you must add a RADIUS rule.
Steps
-
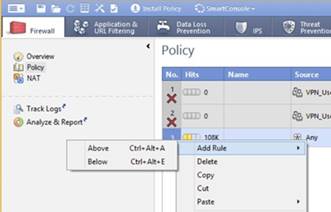
In the Checkpoint toolbar, click the Firewall tab.
-
In the upper left-hand tree, click Policy.
Result:
The rules of the existing policy are listed.
-
In the row for Any, in the No. column, right-click and select Add Rule → Above.
Result:
A new row is added to this policy.
-
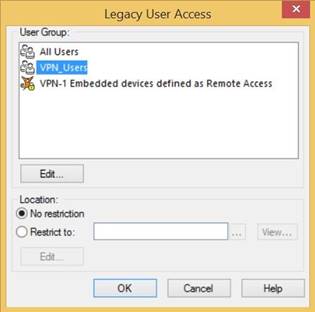
In the new row, in the Source column, right-click Any, and then go to Add Objects → Add Legacy User Access.
-
In the Legacy User Access window, select the RADIUS user configured earlier. Click OK.
For more information, see Configure a RADIUS user profile.
-
In the Destination column, right-click Any and select Network Object.
-
In the Add Object window, select the VPN network configured by your network administrator. Click OK.

-
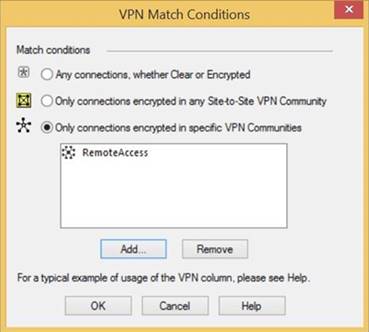
In the VPN column, right-click Any Traffic, and then click Edit Cell.
-
In the VPN Match Conditions window, select Only Connections Encrypted in Specific VPN Communities.
-
Add the RemoteAccess community to the rule.
-
In the VPN Match Conditions window, click Add.
-
Select RemoteAccess. Click OK.
-
To return to the main menu, click OK.
-
-
In the Action column of your RADIUS rule, right-click and select Accept.
-
In the Track column of your RADIUS rule, right-click None, and then select Log.

Defining a Mobile Access rule
The Mobile Access rule triggers when the authentication process approves a user’s credentials. It defines the landing page that the user sees when they sign on.
Steps
-
In the Checkpoint toolbar, click the Mobile Access tab.
-
In the upper left-hand tree, click Policy.
Result:
The existing policy is listed.
-
Right-click the No. column and select New Rule.
Result:
A new row is added to the list of rules.
-
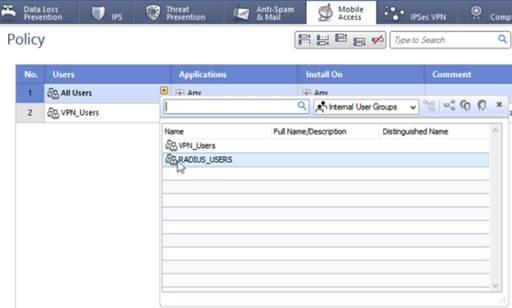
In the Users column, click the Plus icon (
 ) and select the Radius Users group that you previously created.
For more information, see Configure a RADIUS user profile.
Committing the changes
To apply the configuration, commit the changes.
Steps
-
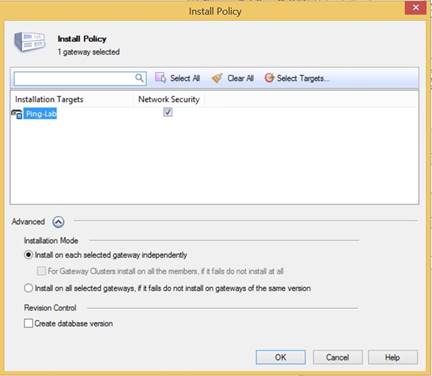
In the Checkpoint menu bar, click Install Policy.
-
Ensure that the Install on Each Selected Gateway Independently option is selected, and then click OK.
Result:
The configuration is verified and installed. A message appears when the policy installation is complete.
Signing on to the Check Point VPN for the end user
When the PingID RADIUS password credential validator (PCV) multi-factor authentication (MFA) configuration is complete, sign on to your Check Point VPN.
Steps
-
Open a browser and enter the URL of your Check Point external IP SSL VPN address, as configured in Configure the RADIUS host.
Enter the URL with a format of https://<IP address or Check Point Hostname>/sslvpn.
For example, https://PID_New_Connection/sslvpn or https://10.8.2.13/sslvpn.
-
Enter your organization’s credentials and click Sign In.
Result:
You will receive a push notification to your mobile device.
-
To approve the authentication request, in the PingID mobile app, swipe the slider up.
This might differ according to the organization’s approved MFA devices.
Result:
PingID acknowledges the return notification from your mobile device, and access is granted.