Configuring the PingID desktop app (legacy)
|
This section documents the legacy PingID desktop app. Learn how to configure the most up-to-date version for a consistent PingID desktop app passwordless experience in PingID desktop app in the PingOne documentation. |
Enable and configure the PingID desktop app (legacy) so that your users can install and authenticate.
You can optionally:
-
Require users to enter a 4 or 6-digit PIN code to access the PingID desktop app (legacy). Learn more in Configuring the PingID desktop app (legacy ) PIN.
-
Disable automatic updates. When you enable the PingID desktop app (legacy), automatic software updates are enabled by default. To disable automatic updates, refer to Enabling or disabling PingID desktop app automatic updates.
-
Configure the PingID proxy for the desktop app (legacy), and enable or disable PingID proxy for end users. You can allow PingID desktop app (legacy) to work with a proxy using a self-signed certificate, or local Certificate Authority (CA)-signed certificate. You can also give users the option to temporarily disable their proxy. Learn more in Configuring PingID Proxy for the PingID desktop app (legacy).
-
Install the PingID desktop app (legacy) using the Windows CLI. Learn more in Installing the desktop app (legacy) using the Windows CLI.
Steps
-
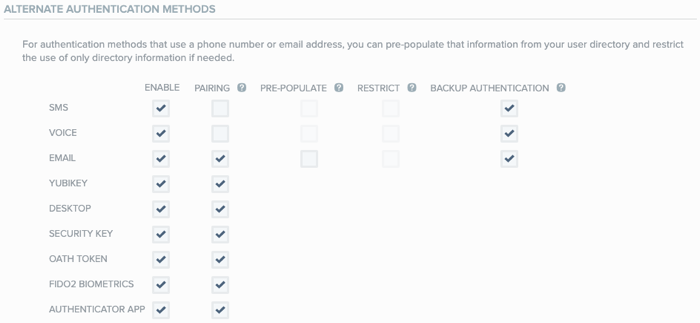
In the PingID admin portal, go to Set > PingID > Configuration.
-
Go to the Authentication > Alternate Authentication Methods section.
-
In the Desktop row, select the Enable checkbox. The Pairing checkbox is selected automatically.
Result:
The ability to pair and authenticate with PingID desktop is enabled for all users in that organization, and the Desktop Security PIN field is displayed.
-
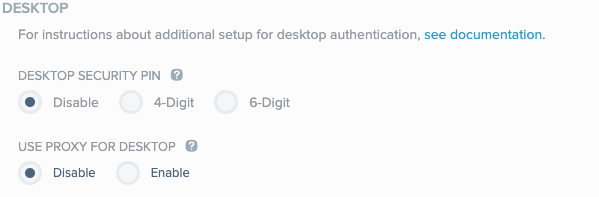
Optional: To require users to enter a PIN code when accessing the desktop app, from the Desktop Security PIN section, select one of the following options:
Choose from:
-
4-Digit: Require the user to enter a 4-Digit code in order to access the desktop app.
-
6-Digit: Require the user to enter a 6-Digit code in order to access the desktop app.
-
Disable: The user isn’t prompted to enter a PIN code when launching the desktop app. This is the default setting.
Learn more in Configuring the PingID desktop app (legacy ) PIN.
-
-
Optional: Configure the PingID proxy for the desktop app. Learn more in Configuring PingID Proxy for the PingID desktop app (legacy).
-
Click Save.
Configuring the PingID desktop app (legacy ) PIN
As an extra layer of security, you have the option to require users to enter a 4 or 6-digit PIN code to access the PingID desktop app (legacy).
About this task
If this option is enabled:
-
A user is prompted to create a PIN code when they pair the PingID desktop app (legacy). The PIN code must include at least 3 or 4 different digits for PIN lengths of 4 and 6 digits, respectively. Digits must not be in ascending or descending sequence, such as 1234 or 4321.
-
A user is prompted to enter the PIN code each time they launch the PingID desktop app (legacy).
-
The PingID desktop app (legacy) is locked after 3 minutes of inactivity, and the user is required to enter the PIN to unlock it.
-
In the event of three consecutive incorrect PIN entries, the user is blocked from accessing the app for 2 minutes. This applies to both the PIN entry and the PIN change windows. Lockdown takes effect from the time of the lock, irrespective of whether the PingID desktop app (legacy) remains open or is closed and relaunched.
-
The PingID desktop app (legacy) must be online for a user to pair the app. However, a user who is offline can still create a PIN, enter the PIN to access the PingID desktop app (legacy), or change their PIN.
-
The PingID desktop app (legacy) must be online for a change in PIN configuration to take effect, such as enabling or disabling the PIN or changing its length.
-
If a user pairs the PingID desktop app (legacy) to more than one organization, the user must create only one PIN, according to the most restrictive organization requirements. For example:
-
If only one organization has enabled the Desktop Security PIN feature, the user is required to enter their PIN to use the PingID desktop app (legacy) for authentication to all organizations, including those which do not require the PIN.
-
If one organization requires a 4-Digit PIN and a second organization requires a 6-Digit, the user will be required to enter a 6- digit PIN.
-
-
If the PIN code is already enabled, and the administrator changes the length of the PIN code required, users must first enter the app using the old PIN and then create a new PIN of the new length.
Steps
-
In the admin portal, go to Setup → PingID → Configuration.
-
Go to the Alternate Authentication Methods section and in the Desktop row, select Enable.
-
In the Desktop Security PIN section, click either 4-Digit or 6-Digit to indicate the PIN length. Click Save.

Result
If an administrator edits the PingID desktop configuration to require a PIN code, changes are implemented at the user level according to the PingID version and the user flow.
-
Users installing the PingID desktop app for the first time are prompted to create a PIN at the end of the PingID desktop app (legacy) pairing flow.
-
Users with the PingID desktop app 1.4 or later already paired are prompted to define a PIN code the next time the user opens the PingID desktop app (legacy) while online.
-
Users with the PingID desktop app earlier than 1.4 already paired must update it for the changes to take effect. The user is prompted to define a PIN code the next time they launch the new version of the PingID desktop app (legacy).
Resetting a user’s desktop app PIN
About this task
For users running PingID desktop app 1.74 or later, it is not possible for them to reset their own PIN. To help a user create a new PIN, do the following:
Steps
-
Ask the user to uninstall the desktop app from their local machine.
-
Unpair the user’s device from the PingID service. For more information, see Unpairing a user’s device from the PingID service
Result:
The user’s desktop app service is unpaired.
-
The user should install and pair the desktop app again and create a new PIN code. For more information, see Setting up PingID desktop app.
Enabling or disabling PingID desktop app automatic updates
PingID:resourceid: pingid_desktop_app_auto_updates
Configure the PingID desktop app to check for software updates automatically. This feature is enabled by default.
About this task
You can enable or disable automatic updates manually, or create a script. The process varies between Mac, Windows desktop app 1.5 and later, and Windows desktop app 1.4 and earlier.
-
If the
autoupdatemodeparameter has any value other thandisable, or has not been defined, thenautoupdatemodeassumes the value ofenableon that PC or Mac. -
The desktop app references the
autoupdatemodeparameter at startup. If theautoupdatemodevalue is changed, the change is only reflected the next time the desktop app is started. -
The
autoupdatemodeparameter is configured at machine level. If there are multiple instances of the desktop app installed on a machine, the setting of theautoupdatemodeis applied to all instances.
|
For sample scripts for each PingID desktop app version, see the Ping Identity GitHub. All scripts require administrator privileges to run them. |
Steps
-
To enable or disable automatic updates:
Choose from:
-
Mac:
-
Create a new preferences file:
/Library/Preferences/com.pingidentity.pingid.plist. -
In the
/Library/Preferences/com.pingidentity.pingid.plistpreferences file, create a key and name itautoupdatemode, with the valueenableordisable. -
Convert the
/Library/Preferences/com.pingidentity.pingid.plistfile to binary.plutil -convert binary1 /Library/Preferences/com.pingidentity.pingid.plist
-
From the preferences file, load the
autoupdatemodeparameter (enableordisable) as its active setting.defaults import /Library/Preferences/com.pingidentity.pingid.plist/Library/Preferences com.pingidentity.pingidplist
-
-
Windows with desktop app 1.5 and later:
-
Open the
props.fileprefsfile.-
32-bit:
\Program Files (x86)\Ping Identity\PingID\app\props.fileprefs -
64 bit:
C:\Program Files\Ping Identity\PingID\app\props.fileprefs
-
-
Add the following code to the
props.fileprefsfile.-
To enable automatic updates:
com.pingidentity.pingid.pctoken.PRODUCTION.autoupdatemode=enable
-
To disable automatic updates:
com.pingidentity.pingid.pctoken.PRODUCTION.autoupdatemode=disable
-
-
Save and then close the file.
-
-
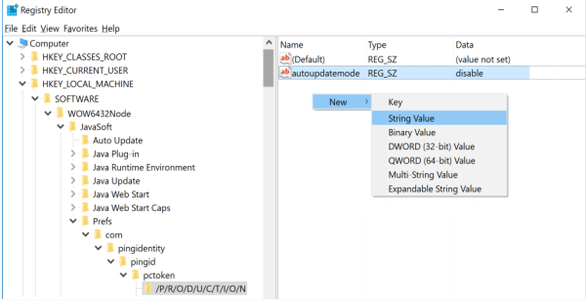
Windows with desktop app 1.4 and earlier:
-
In the Windows registry, create the
autoupdatemodeparameter as aString Value.-
32-bit:
HKEY_LOCAL_MACHINE\SOFTWARE\JavaSoft\Prefs\com\pingidentity\pingid
\pctoken\/P/R/O/D/U/C/T/I/O/N\autoupdatemode
-
64-bit:
HKEY_LOCAL_MACHINE\SOFTWARE\Wow6432Node\JavaSoft\Prefs\com\
\pingidentity\pingid\pctoken\/P/R/O/D/U/C/T/I/O/N\autoupdatemode
-
-
-