Installing the PingID integration for Windows login
Install PingID integration for Windows login using the UI wizard or using the command-line interface (CLI).
For large scale deployments of PingID Integration for Windows login, use a deployment management platform for automatic distribution and update, such as Microsoft System Center Configuration Manager (SCCM).
|
There are several references to the PingID properties file ( Don’t use the properties file that’s generated with the button in the Integrate with PingFederate and other clients section. |
Learn more about the prerequisites needed before installing PingID integration for Windows login, in Prerequisites for installing PingID integration for Windows login.
If you’re installing PingID integration for Windows login through PingFederate, make sure you have completed all steps in Integrating through PingFederate.
You can install the PingID integration for Windows login in two ways:
Prerequisites for installing PingID integration for Windows login
The PingID integration for Windows login should be installed individually on each Windows machine requiring the PingID authentication service.
If you’re installing PingID integration for Windows login through PingFederate, make sure you have completed all steps in Integrating through PingFederate before installing PingID integration for Windows login on the Windows machine.
Adding any multi-factor authentication (MFA) is a procedure that carries the risk of being locked out of the machine. Before proceeding with the installation, consider the following:
-
If third-party credential providers are in use on the target machine or server, you must remove them manually before installing the PingID integration for Windows login. PingID for Windows login isn’t compatible with most third-party credential providers, and they can cause the installation to fail.
-
To check for third-party credential providers that aren’t PingID or the default Windows provider, use the Registry Editor (
regedit) with administrator privileges to go toHKEY_LOCAL_MACHINE\SOFTWARE\Microsoft\Windows\CurrentVersion\Authentication\Credential Provider Filters\. -
Only test compatibility between various credential providers on lab machines that don’t hold important information.
-
-
Several verifications are done on the parameters supplied for the installation, to minimize any locking. The PingID integration for Windows login permits recovery from a lockout scenario, by restarting the machine in safe mode.
-
To avoid restarting the machine because of lockout, keep an open session with admin permissions.
-
Restart the machine on successful completion of the installation process.
-
For the UI wizard: The UI installation wizard prompts the installer to restart (default). Admins can select the option to defer the restart.
-
For the CLI: By default, on completion of a successful installation through the CLI, the machine automatically restarts. Admins can add the command-line option
/NORESTARTto prevent the automatic restart.
-
The installation of PingID requires the following prerequisites:
-
Administrator privileges on the target Windows machine.
-
An active internet connection on the target Windows machine.
-
A copy of the organization’s
pingid.propertiesfile (generated with the button in the Integrate with Windows login section). Learn more about the properties file in Managing the PingID properties file.
Installing the PingID integration for Windows login using UI wizard
Before you begin
|
Adding multi-factor authentication (MFA) is a procedure that carries the risk of being locked out of the machine. See Prerequisites for installing PingID integration for Windows login before proceeding. |
About this task
To install the PingID integration for Windows login using the UI wizard:
Steps
-
On the PingID Downloads page, go to Integrations, and download and extract PingID for Windows login.
If your version of Windows login is more than two versions behind the current version listed on the downloads page, you must uninstall your current version of PingID for Windows login before you install the new version.
-
Double-click the
PingIDWindowsLogin<version>.exefile to launch the setup wizard, and then click Next.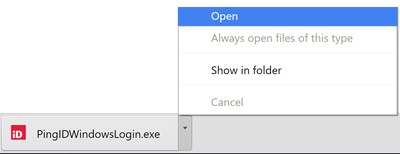
-
Review the Software License Agreement, click I accept the agreement, and then click Next.
-
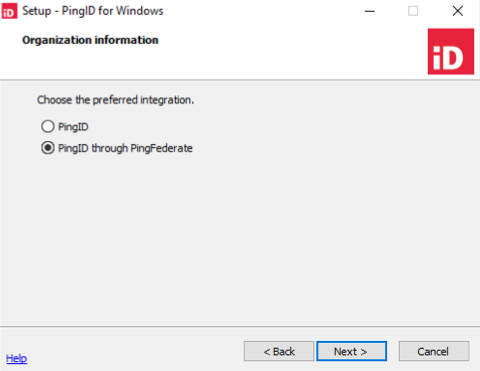
In the Organization Information window, select either:
Choose from:
-
PingID: Integrate PingID directly with Windows login.
-
PingID through PingFederate: Integrate PingID with Windows login through PingFederate.
-
-
In the Organization Information window, click Browse, and then select the
pingid.propertiesfile that you want to use.When integrating with PingFederate, for security reasons it is recommended that you use the
Windows and Mac login PingID properties filein both the PingID Adapter, and in the Windows Login installation.
-
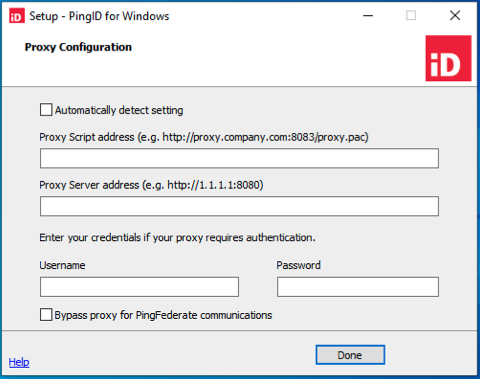
If your connection is behind a proxy: click Configure Proxy and then configure the options relevant for your proxy. If you prefer to have the communication with PingFederate not go through the proxy, click the Bypass proxy for PingFederate communications check box.
-
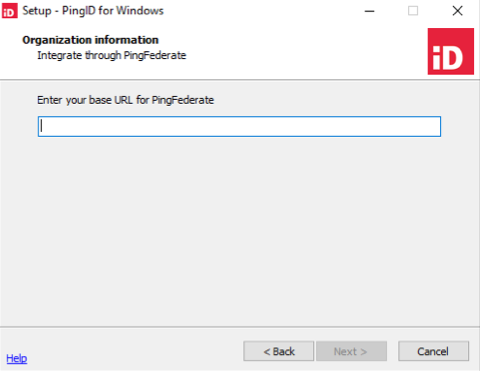
For PingID through PingFederate integration only: In the base URL field, enter the PingFederate base URL, and then click Next.
-
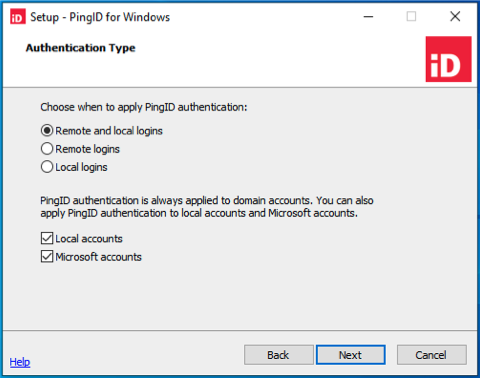
In the Authentication Type window:
-
Select when you want to apply PingID authentication. Choose from:
-
Remote and local login: Users are required to authenticate with PingID when connecting to Windows login locally or remotely.
-
Remote logins: Users connecting to the Windows login machine remotely are required to authenticate with PingID. Users bypass PingID authentication when logging in locally.
-
Local logins: Users connecting to the Windows login machine locally are required to authenticate with PingID. Users bypass PingID authentication when signing on remotely.
-
-
(Optional) Select the relevant check box to apply PingID to Local accounts, Microsoft accounts, or both.
-
Local accounts: User accounts that are stored on the local machine.
-
Microsoft accounts: Microsoft account used to access Microsoft devices and services associated with a specific user. For example,
johndoe@outlook.com. The PingID integration for Windows recognizes all types of Microsoft accounts.
-
-
Click Next. The Manual Authentication Methods window is displayed.
-
-
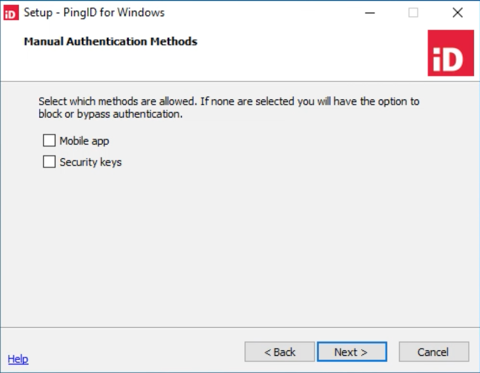
If PingID server is unavailable or the user is offline, for example, the connection with the PingID server can’t be verified at the time of sign on, either enable or disable manual authentication:
Choose from:
-
Enable manual authentication:
-
In the Manual Authentication Methods window, select at least one manual authentication method and then click Next. The Authentication Type window displays offline authentication options.
-
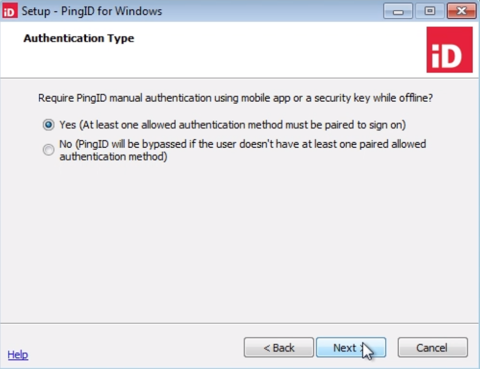
In the Authentication Type window, select whether to use PingID offline MFA or allow the user to bypass PingID MFA if the user is offline, such as no internet connection. Select one of the following and then click Next:
-
Yes: The user is prompted to authenticate through the manual (offline) authentication flow. At least one offline authentication method must be paired for the user to authenticate, otherwise the user is blocked.
-
No: If the user does not have at least one offline authentication method paired with their account, PingID bypasses MFA during sign on.
-
-
-
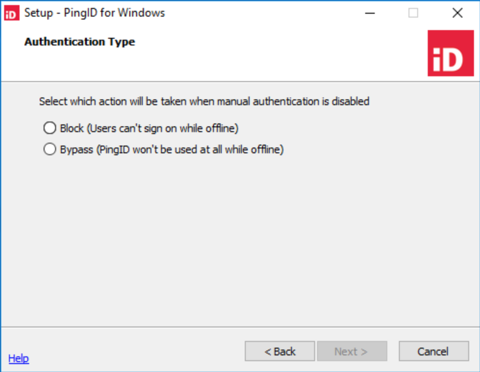
Disable manual authentication and define behavior when the PingID server is offline:
-
In the Manual Authentication Methods window, leave all check boxes cleared and click Next. The Offline Authentication page displays a list of options when the user is offline.
-
In the Authentication Type window, select one of the following, and then click Next:
-
Block: The user cannot sign on while offline.
-
Bypass: Bypass MFA with PingID, allowing user to complete sign on.
-
The PingID offline MFA feature is available from PingID integration for Windows login 2.0 or later, with a paired mobile device using PingID mobile app 1.8+.
-
Pairing and use of a security key for offline authentication requires PingID integration for Windows login 2.3 or later. If using PingID integration for Windows login 2.2 or earlier, security key for offline authentication is not permitted, and the flow is different.
-
-
-
-
-
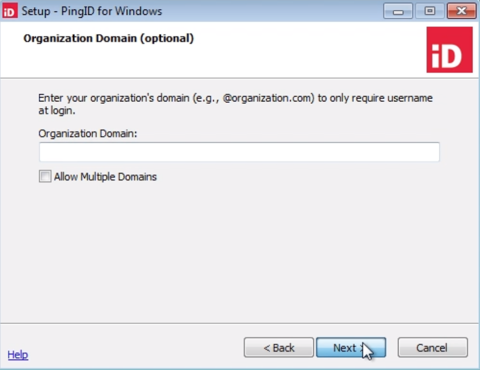
In the PingID Username Mapping window:
-
In the Legacy username parsing convention field:
-
Specify your organization’s default domain. Domain format should be:
-
@domainname, such as@somewhere.com. -
Maximum of 50 characters.
-
The string entered in this field is appended to the username during sign on.
If specified, users can enter their username, such as
jsmith, rather than entering full user and domain name, as injsmith@pingidentity.com.-
If you select this option without providing a default domain, the SAMAccountName is used.
-
This option is not recommended in environments with multiple domains, or environments where PingID is also used to sign on locally.
-
-
-
(Optional) Select Allow Multiple Domains to allow the user to sign on from any domain in addition to the default domain. If the user specifies a domain, that domain is used, otherwise the default domain is used. This option is available with PingID for Windows login 2.2 and higher.
-
Do not use this option if you did not specify a default domain in the Legacy username parsing convention field.
-
If you selected Allow Multiple Domains, users should use only the UserPrincipalName format (and not the samAccountName).
-
If you applied PingID authentication to local or Microsoft accounts, the recommended username mapping is objectSID.
-
-
-
In the Specific username mapping field, select the attribute that you want to use to verify the user account.

Examples showing how the username is mapped in PingID:
-
objectSid: Use the object SID.
S-1-5-21-668608636-2615149724-2645577550-1111
-
userPrincipalName: Use the userPrincipalName.
jsmith@domain.com
-
sAMAccountName (DOMAIN\UserName): Use the Domain Name as prefix, or the computer name when logged in locally, and then the SAM Account Name.
DOMAIN\jsmith
-
sAMAccountName (UserName only): Use only the SAM Account Name.
jsmith
For security reasons, when using Windows login in a multiple domain environment, it is recommended that you use specific username mapping rather than the legacy username parsing convention.
-
-
Click Next.
-
-
In version 2.8 of the Windows login integration, an improved implementation was introduced for the use of security keys while offline. If the installation program detects security keys that were paired prior to this change, you are presented with the following options:
-
Allow: Allow users to continue using these keys (this option is not recommended)
-
Inform: Allow users to continue using these keys, but inform them that these keys should be manually deleted
-
Delete: Automatically delete the keys that were paired before the change was introduced
-
-
To select the folder in which to install PingID, click Browse, select the destination folder or accept the default, and click Next.
-
Click Install.
-
When the installation is complete, click Yes to restart the computer and apply the changes.
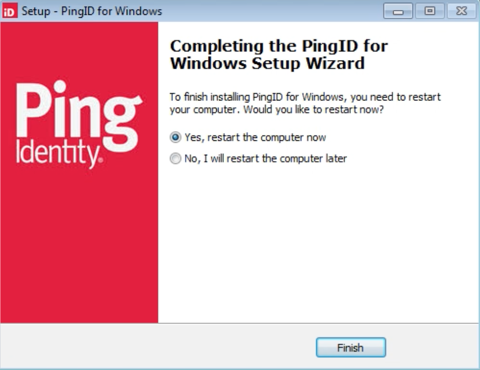
The next time the user signs on to the Windows machine, they will need to authenticate with PingID.
-
Delete the downloaded
pingid.propertiesfile after the installation has completed.The
OrgData1,OrgData2, … fields in theHKEY_LOCAL_MACHINE\SOFTWARE\Ping Identity\PingId\PingIdCredProvregistry are encrypted and should not be edited. -
To verify the installation was successful, test that the user can sign on to the Windows machine using their password and PingID MFA.
Installing the PingID integration for Windows login using CLI
Install PingID integration for Windows login through the command-line interface (CLI).
Before you begin
|
Adding any multi-factor authentication (MFA) method is a procedure that carries the risk of being locked out of the machine. See Prerequisites for installing PingID integration for Windows login before proceeding. |
About this task
Running the installer program for PingID integration for Windows login from the command line is useful for deploying to multiple machines in batch mode.
Steps
-
On the PingID Downloads page, go to Integrations, and download and extract PingID for Windows login.
-
Using the parameters table below, from the Command Prompt, create a
.bator.cmdfile containing the command for the PingID integration for Windows with the parameters you require. Alternatively, run the installer directly from the command prompt for a list of parameters.To integrate PingID integration for Windows login through PingFederate, you must include the
/PingFedAddress=<baseurl> parameter.Choose from:
-
Install using the
pingid.propertiesfile to supply parameter values.<Full filepath of the installer for PingID integration for Windows>\PingIDWindowsLogin_<ver>.exe/SILENT /VERYSILENT /SUPPRESSMSGBOXES /SP- /LOG=<Full output log filepath>/orgSettingsFilePath=<Full pingid.properties filepath> /OfflineAuthType /OfflinePolicy<[Optional parameters]> -
Install without using the
pingid.propertiesfile and supply the/orgAlias,/orgKey,/authenticatorAddress,/idpUrl, and/tokenparameter values on the command line.<Full filepath of the installer for PingID integration for Windows>\PingIDWindowsLogin_<ver>.exe/VERYSILENT /SUPPRESSMSGBOXES /SP- /LOG=<Full output log filepath>/orgAlias=<organization's alias string> /orgKey=<organization's key string> /authenticatorAddress=<URL of PingID data center> /idpUrl=<URL of server used for PingID API requests> /token=<API key identifier> /OfflineAuthType /OfflinePolicy <[Optional parameters]>Example:
C:\Users\Admin\Downloads\PingIDWindowsLogin_28.exe/VERYSILENT /SUPPRESSMSGBOXES /SP- /LOG=C:\Users\Admin\Temp\Logs\PingIDWindowsLogin.log/orgSettingsFilePath=C:\Users\Admin\Downloads\pingid.properties /OfflineAuthType=3 /OfflinePolicy=0 /NORESTARTThis example instructs the installer to configure the PingID integration for Windows login, with the following settings:
-
Run the installer executable, located in the
Downloadsfolder. -
Do not display the background window and installation progress window (
/VERYSILENTparameter). -
Do not display message boxes and prompts (
/SUPPRESSMSGBOXESand/SP-parameters). -
Retrieve settings from the organization’s
pingid.propertiesfile, located in theDownloadsfolder (/orgSettingsFilePathparameter). -
Send the log output to a customized destination (
/LOGparameter). -
Allow PingID Mobile App and FIDO2 security key for offline (manual) authentication
(/OfflineAuthTypeparameter). At least one manual authentication type must be paired for the user to authenticate (/OfflinePolicyparameter). -
Do not automatically restart the machine at the end of the installation process (
/NORESTARTparameter).The command-line parameters are described in the following table.
Parameter Description /SILENTIf a restart is necessary and the
/NORESTARTcommand isn’t used, it prompts with aReboot now?message box. When using this parameter, the installation progress window is displayed./VERYSILENTIf a restart is necessary and the
/NORESTARTcommand isn’t used (see below), it reboots without asking. When using this parameter, the installation progress window is not displayed./SP-Disables the
This will install… Do you wish to continue?prompt at the beginning of the installation./SUPPRESSMSGBOXESInstructs the installer to suppress message boxes. It only has an effect when combined with
/SILENTor/VERYSILENT. The default response in situations where there’s a choice is:-
YesinKeep newer file?situations. -
NoinFile exists, confirm overwritesituations. -
AbortinAbort/Retrysituations. -
CancelinRetry/Cancelsituations. -
Yes(continue) inDiskSpaceWarning, DirExists, DirDoesntExist, NoUninstallWarning, ExitSetupMessage,andConfirmUninstallsituations. -
Yes(restart) inFinishedRestartMessageandUninstalledAndNeedsRestartsituations.
/LOG=<Full output log filepath>-
/LOGwithout an assigned value causes the installer to create a log file in the user’sTEMPdirectory, detailing file installation and actions taken during the installation process. -
/LOG=<Full output log filepath>allows you to specify a fixed path or filename to use for the log file. If a file with the specified name already exists, it is overwritten. If the file cannot be created, the installer aborts with an error message.
/orgSettingsFilePath=<Full pingid.properties filepath>The full filepath of the PingID
properties file. For example,C:\Users\admin\Downloads\pingid.properties. The PingIDproperties fileis referenced from this location during the installation process. It is mandatory to specify either:-
/orgSettingsFilePath
Or all of the following parameters:
-
/orgAlias -
/orgKey -
/authenticatorAddress -
/idpUrl -
/token
If any of the above parameters are specified, and
/orgSettingsFilePathis also specified on the command line, then the values are retrieved from thepingid.propertiesfile only, and the values of these other parameters specified on the command line are ignored./orgAlias=<organization’s alias string>The organization’s alias. This value is an entry in the PingID
properties file. If the/orgSettingsFilePathparameter is not specified, it is mandatory to provide the/orgAliasparameter. If both the/orgSettingsFilePathand/orgAliasare specified, the value is retrieved from thepingid.propertiesfile, and the value of the/orgAliasparameter is ignored./orgKey=<organization’s key string>The organization’s base64 key. This value is an entry in the PingID
properties file. If the/orgSettingsFilePathparameter is not specified, it is mandatory to provide the/orgKeyparameter. If both the/orgSettingsFilePathand/orgKeyare specified, the value is retrieved from thepingid.propertiesfile, and the value of the/orgKeyparameter is ignored./authenticatorAddress=<URL of PingID data center>The URL of the PingID data center to which the organization is associated. It is the URL that is listed on the line in the
pingid.propertiesfile that begins withauthenticator_url=. If the/orgSettingsFilePathparameter is not specified, it is mandatory to provide the/authenticatorAddressparameter. It is ignored if/orgSettingsFilePathis also specified.When the
/orgSettingsFilePath=<Full pingid.properties filepath>parameter is not supplied, the /authenticatorAddress value defaults to the North America data center. Administrators of organizations using the Europe or Australia and New Zealand data centers should ensure that they provide the relevant/authenticatorAddressvalue on configuration./idpUrl=<URL of server used for PingID API requests>URL of the server used for PingID API requests. Take this value from the idp_url entry in the PingID
properties file. If the/orgSettingsFilePathparameter is not specified, it is mandatory to provide the/idpUrlparameter. It is ignored if/orgSettingsFilePathis also specified./token=<API key identifier>The identifier of the API key. This value is an entry in the PingID
properties file. If the/orgSettingsFilePathparameter is not specified, it is mandatory to provide the/tokenparameter. It is ignored if/orgSettingsFilePathis also specified./proxyAutoDetect=<0 or 1>Automatically detect the proxy settings. Possible values:
-
0= Disabled -
1= Enable automatic detection of proxy settings
/scriptProxyAddress=<URL>When the organization uses a PAC script for automatic proxy configuration, the
/scriptProxyAddress parameter should be specified using the http:// or https:// convention./scriptProxyAddressis the proxy script URL, for example,http://proxy.company.com:8083//proxy.pac./proxyAddress=<proxy’s URL>When the connection is behind a proxy, the
/proxyAddressparameter must be specified using thehttp://orhttps://convention./proxyAddressis the URL address of the proxy, for example,http://1.1.1.1:8080.If the proxy requires credentials for authentication, the
/proxyUserNameand/proxyPasswordparameters must be specified./proxyUserName=<proxy’s username>When the connection is behind a proxy, and the proxy requires credentials for authentication, the
/proxyUserNameand/proxyPasswordparameters must be specified.The proxy’s username must be supplied as the value of the
/proxyUserNameparameter./proxyPassword=<proxy’s password>When the connection is behind a proxy, and the proxy requires credentials for authentication, the
/proxyUserNameand/proxyPasswordparameters must be specified.The proxy’s password must be supplied as the value of the
/proxyPasswordparameter./proxyBypassList=<comma-separated list of IP addresses or DNS names>The
/proxyBypassListoption can be used to specify that the communication with PingFederate should not go through the proxy that you configured. The value should be a list of one or more computers, separated with commas. The format can be domain name or IP address. For example,/proxyBypassList="pingfed.example.com"or/proxyBypassList="pingfed.example.com,250.15.147.17"./ignoreConnectionErrorsThe installer attempts to address the PingID authenticator heartbeat as an initial part of the installation flow, to confirm connectivity. When there is no response, the installer ends the flow with an error status, before installing any of the elements. The
/ignoreConnectionErrorsparameter may be used to bypass this status, and to continue the installation, even without connectivity./authenticationType=<0, 1 or 2>/authenticationTypeconfigures the installation for when to apply PingID authentication on logins via the PingID integration for Windows. Possible values:-
0: Both RDP and local logins (default, when not specified). -
1: Only RDP logins. -
2: Only local logins.
Any other value causes the installation to abort.
/excludeLocalUsers=<0 or 1>/excludeLocalUsersconfigures whether to apply PingID authentication to local user logins. Possible values:-
0: Local users must authenticate with PingID. -
1: Disable PingID authentication for local users.
-
This parameter is now replaced by
/excludeLocalAccountsand/excludeMicrosoftAccounts. -
If
1,/excludeLocalUsersis set to1,/excludeLocalAccountsand/excludeMicrosoftAccountsare automatically set to1. -
Domain users are always required to authenticate using PingID.
/excludeLocalAccounts=<0 or 1>/excludeLocalAccountsdefines whether to apply PingID authentication to local user logins:-
0: Use PingID authentication for local user logins as well -
1: Do not use PingID authentication for local user logins
/excludeMicrosoftAccounts=<0 or 1>/excludeMicrosoftAccountsenables you to include or exclude Microsoft accounts used to access the Microsoft devices and services associated with a specific user.-
0:Apply PingID authentication to Microsoft accounts. -
1: Do not apply PingID authentication to Microsoft accounts.
/offlineAuthType=<0, 1, 2 or 3>The
/offlineAuthTypespecifies whether to allow PingID offline (manual) MFA, and defines the manual authentication methods that can be used. Possible values:-
0: Do not allow MFA for offline authentication. -
1: Allow offline MFA using PingID mobile app only. -
2: Allow offline MFA using a FIDO2 security key only. -
3: Allow offline MFA using either PingID mobile app or a FIDO2 security key.
This parameter is only available when installing PingID integration for Windows login v2.3 or later.
/RSA_PADDING=<oaep or none>-
Use
oaepto specify that OAEP padding should be used in the encryption for offline authentication (default). -
If you do not want to use OAEP padding for offline authentication, use none.
/offlinePolicy=<0, 1>/offlinePolicyconfiguration defines whether it is possible to bypass MFA if the user is offline. Options available for this parameter depend on the values selected in the/offlineAuthTypeparameter as follows:-
If
/offlineAuthType=0: offline (manual) authentication is not allowed and the/offlinePolicyoptions are:-
0: The user is blocked. -
1: PingID bypasses MFA during sign on.
-
-
If
/offlineAuthType=1, 2, or 3: offline (manual) authentication is allowed and/offlinePolicyoptions are:-
0: At least one allowed authentication method must be paired for the user to authenticate with offline MFA, otherwise the user is blocked. -
1: If the user does not have at least one allowed authentication method for offline authentication paired with their account, PingID bypasses MFA during login.
-
This parameter is only available when installing PingID integration for Windows login 2.3 or later.
/domainPostfix=<@organization’s domain name>/domainPostfixconfigures the installation to append the value supplied in this parameter, to the username at login time. A suffix, such as@domain.com, can be defined, however, a prefix, such asdomain\, cannot be defined.Enter the leading "@" before the domain name, for example
[.parmname]/domainPostfix=@somewhere.com. This parameter has a maximum length of 50 characters, including the leading "@"./MultipleDomain=<0 or 1>/MultipleDomainallows the user to log in from multiple domains. This option is available with PingID for Windows login 2.2 and later. Options include:-
0: Use of multiple domains is not permitted. (default) -
1: Multiple domains are permitted. This option should not be used when/usernameMappingis set toNoneand a/domainPostfixis not specified.
/usernameMapping==UPN/SAM/SID/UserName/NoneSelect the attribute that you want to use to identify the user. The examples show how the username is mapped in PingID
-
None(default): Use the legacy username parsing convention. This can be either with or without/domainPostfix. Example:-
/domainPostfixset to @domain.com:jsmith@domain.com -
/domainPostfixnot specified:jsmith
-
-
If you don’t specify
/domainPostfix, do not set the/MultipleDomainsparameter to1. -
This option isn’t recommended in environments with multiple domains or environments where PingID is also used to sign on locally.
-
SID: Use the objectSID. For example,S-1-5-21-668608636-2615149724-2645577550-1112 -
UPN: Use the userPrincipalName. For example,jsmith@domain.com -
SAM: Use the Domain Name as prefix, or the computer name when logged in locally, and then the SAM Account Name. For example,DOMAIN\jsmith -
UserName: Use the SAM Account Name only. For example,jsmith
/DIR=<installation destination folder’s full filepath>The default installation location for the PingID integration for Windows login is
C:\Program Files\Ping Identity\PingID\WindowsLogin. If you want the installation in a different folder, specify the/DIRparameter with the destination value./PingFedAddress=<baseurl>The PingFederate Base URL used to integrate PingID for Windows login through PingFederate. This field must be included when integrating through PingFederate, as in the following example.
+
/PingFedAddress=https://10.132.102.92:9031
/CPWhiteList={CP_GUID1};{CP_GUID2}Enables you to exclude one or more credential providers that are not PingID credential provider (CP) from being filtered out by PingID integration with Windows login. Enter the credential provider GUID for each credential provider that you want to exclude, separated by a semicolon. PingID MFA does not work with any credential provider that is on the CP allow list.
/thirdPartyCredentials=<0 or 1>Enables integration with a third party credential provider, such as McAfee Drive Encryption credential provider. Options include:
-
0: Do not integrate (default). -
1: Integrate with McAfee Drive Encryption credential provider.
/HttpRequestTimeout=<timeinms>Defines the HTTP request timeout value. Possible values between 1000-30000 ms.
The value configured for HTTP Timeout does not influence the timeout for embedded browser requests.
/NORESTARTPrevents the installer from restarting the system following a successful installation.
The
/NORESTARTparameter is not an override. In some cases, the operating system (OS) will still require a restart to proceed with installation because of events like the OS installing a newer version of software, such as Visual C++ Runtime. If a restart is required, the installation logs will display the following:The computer needs to be restarted before the setup can continue. Please restart the computer and run the PingID setup again.+
The
/NORESTARTparameter allows the user to continue working without restarting their machine. Windows login client is not fully installed until the machine is restarted. To prevent issues when the user locks their machine (prompting Windows login client to start functioning), is recommended that the user restart their machine as soon as possible after the installation.If the
/NORESTARTparameter is omitted, a successful installation automatically triggers a machine restart./DeprecatedSecurityKeys=<Allow, Inform, or Delete>In version 2.8 of the Windows login integration, an improved implementation was introduced for the use of security keys while offline. The
/DeprecatedSecurityKeysparameter allows you to specify how PingID should relate to the security keys paired previously:-
Allow: Allow users to continue using these keys (this option isn’t recommended)
-
Inform: Allow users to continue using these keys, but inform them that these keys should be manually deleted
-
Delete: Automatically delete the keys that were paired before the change was introduced
If the
/DeprecatedSecurityKeysparameter is omitted, the default behavior is Inform./AllowFullPermissionsPropertiesFileIf you include the
/AllowFullPermissionsPropertiesFileoption during installation, PingID will allow you to use the full-permissions properties file (rather than the restricted-permissions properties file intended for use with Windows login). However, it is strongly recommended that you refrain from doing so. Using the full-permissions properties file with Windows login is a security risk (for details, see CVE-2022-23717)./SkipMFAGracePeriodInclude
/SkipMFAGracePeriodif you want to define a period following authentication during which the user isn’t asked to authenticate again if they lock their computer. The maximum period is 15 minutes. The period is defined in seconds so the range of values you can use is 1-900.Use this option with caution because it leaves the computer with a lower level of protection for the defined period. Result:
-
The next time the user signs on to the Windows machine, they must authenticate with PingID.
-
-
Optional: The downloaded
pingid.propertiesfile can be deleted once the installation has completed.The
OrgData1,OrgData2,…fields in theHKEY_LOCAL_MACHINE\SOFTWARE\Ping Identity\PingId\PingIdCredProvregistry are encrypted and should not be edited. -
To verify the installation was successful, test that the user can sign on to the Windows machine using their password and PingID MFA.