Configuring Juniper for PingID multi-factor authentication
Configure Juniper VPN to work with PingID multi-factor authentication (MFA).
Configuring Juniper for MFA involves the following tasks:
The following video describes the Juniper VPN configuration process.
How it works
The following image represents a general flow. The actual configuration varies depending on your organizational infrastructure considerations and policies.
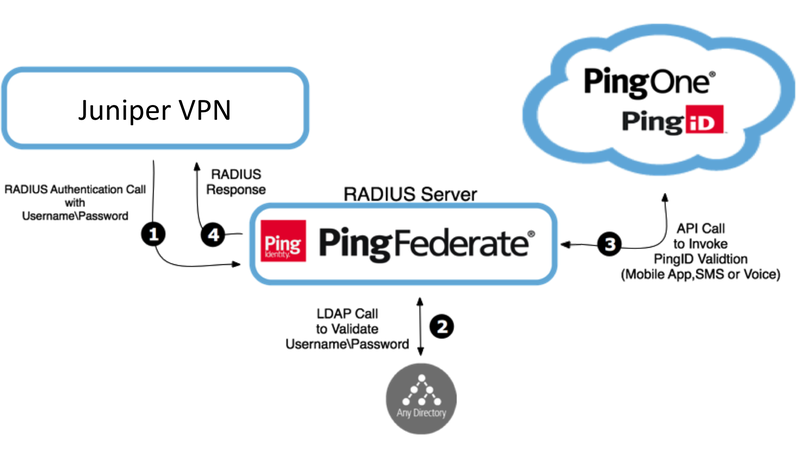
Processing steps
-
When a user opens their Juniper IPSec or SSL VPN sign-in window and enters a username and password, their details are sent to the RADIUS Server on PingFederate through the VPN RADIUS client.
-
PingFederate authenticates the user’s credentials with the LDAP Server as first-factor authentication.
-
Upon LDAP authentication approval, the RADIUS server initiates second-factor authentication with PingID.
-
The RADIUS server returns a response to the Juniper VPN. If authentication is denied or an error occurs, the user’s VPN window displays an error message.
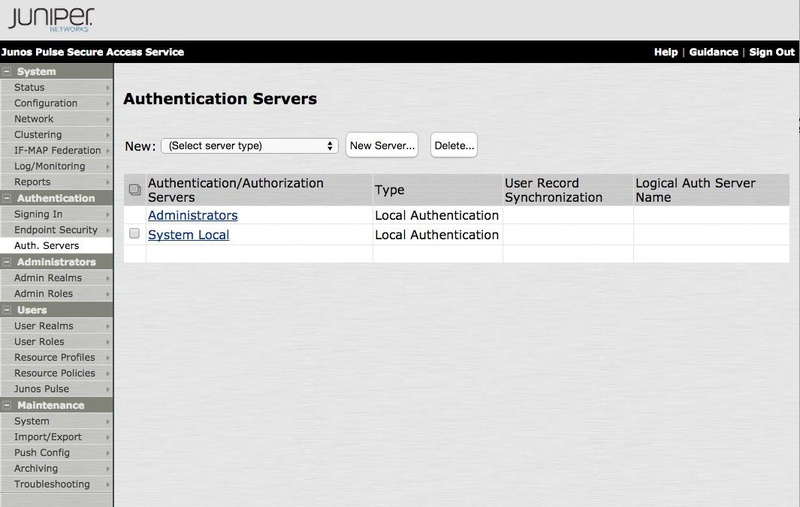
Adding a RADIUS Server
To configure Juniper for PingID multi-factor authentication (MFA), you must add a RADIUS server.
Steps
-
Sign on to Juniper with your administrator ID and password.
-
In the left-hand navigation pane, go to Authentication → Auth. Servers.
-
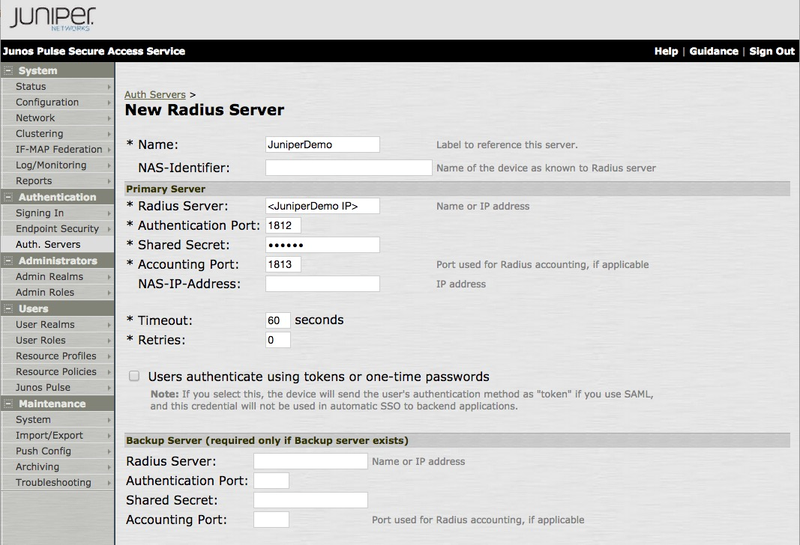
From the New list, select RADIUS Server, and then click New Server.
Result:
TheNew Radius Server window opens.
-
In the New Radius Server window, enter the following information:
-
In the Name field, enter the RADIUS Server name.
-
In the NAS-Identifier field, enter the name of the device as known to the RADIUS server.
-
In the Radius Server field, enter the DNS name or IP address of the RADIUS server password credential validator (PCV).
-
In the Authentication Port field, enter the port configured in the RADIUS server PCV. The default value is
1812. -
In the Shared Secret field, enter the shared secret configured in the RADIUS server PCV.
-
In the Accounting Port field, enter the port used for RADIUS accounting.
The default value is
1813and should not be changed. -
In the Timeout field, enter
60.The default value is
30.The Timeout field determines the amount of time in seconds before the connection is timed out.
-
-
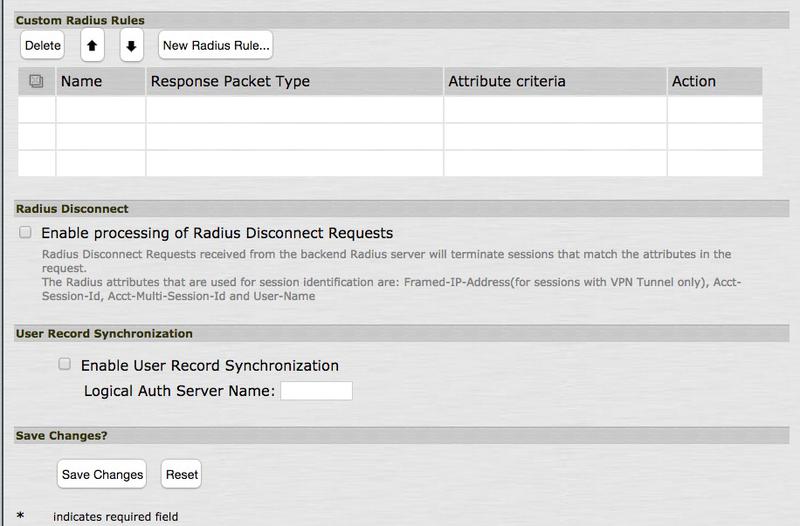
Click Save Changes.
Result:
The Custom Radius Rules section is enabled.
-
Click New Radius Rule.
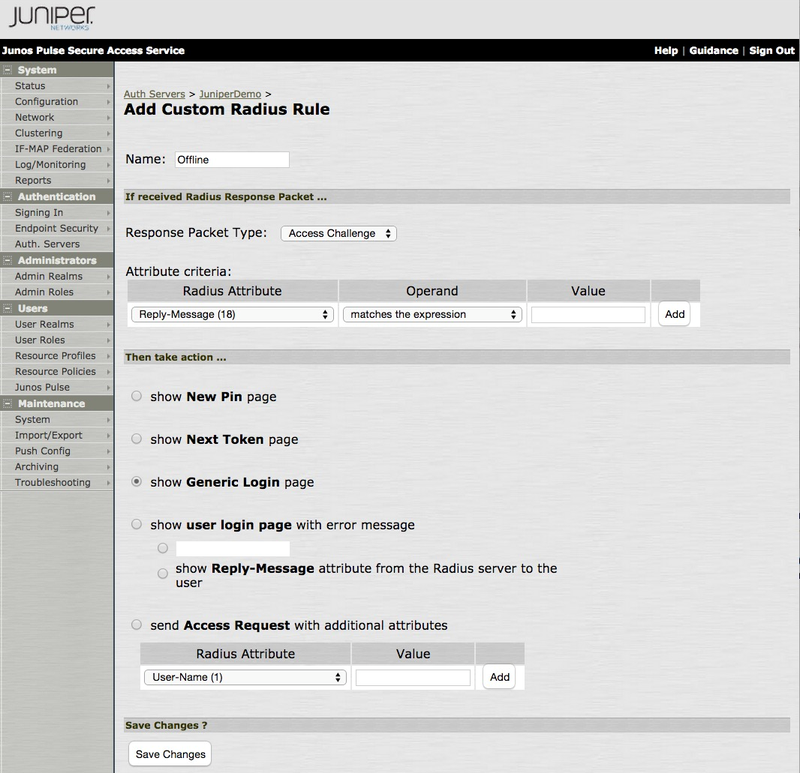
The following window is didplayed:
-
In the Add Custom Radius Rule window, enter the following information:
-
In the Name field, enter
Offline. -
From the Response Packet Type list, select Access Challenge.
This is the default value.
-
Select the Show Generic Login Page check box.
-
-
Click Save Changes.
Adding a New Authentication Realm
To configure Juniper for PingID multi-factor authentication (MFA), you must add a new authentication realm.
Steps
-
In the left-hand navigation pane, go to Users → User Realms → New.
Result:
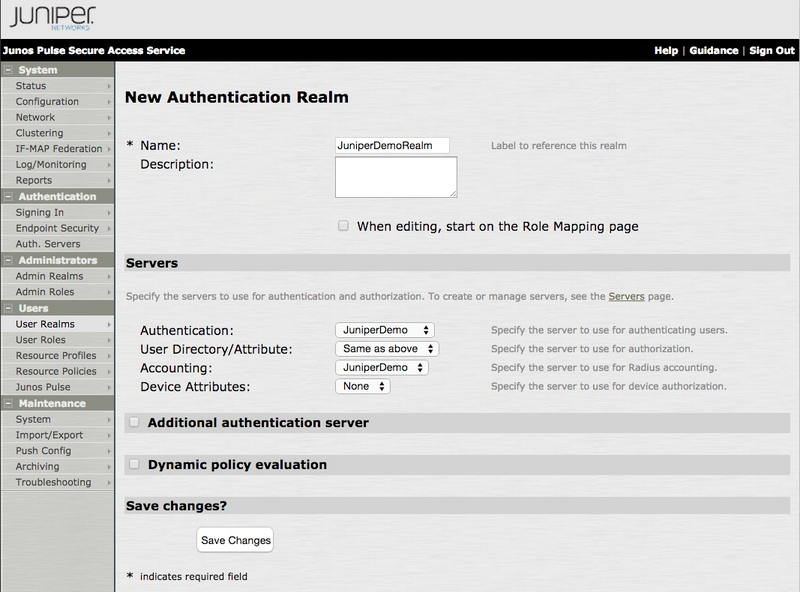
The New Authentication Realm window opens.
-
In the Name field, enter a name for the Authentication Realm.
-
In the Servers section, enter the following information:
-
From the Authentication list, select the name of the RADIUS server created in Adding a RADIUS Server.
-
From the User Directory/Attribute list, select Same as Above.
-
From the Accounting list, select the name of the RADIUS server created in Adding a RADIUS Server.
-
From the Device Attributes list, select the default value of None.
-
-
Click Save Changes.
Result:
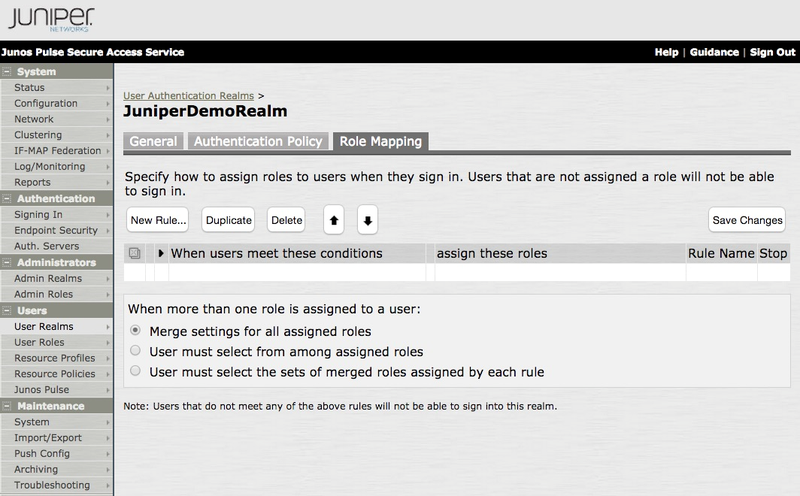
The Authentication Realm is saved and three additional tabs appear.
-
On the Role Mapping tab, click New Rule.
Result:
The Role Mapping Rule window opens.
-
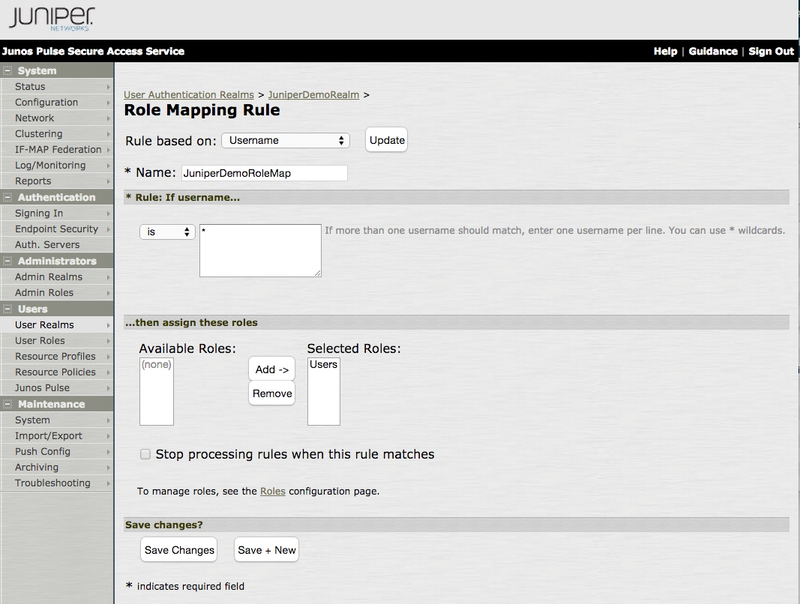
In the Role Mapping Rule window, enter the following information:
-
From the Rule Based On list, select Username.
This is the default value.
-
In the Name field, enter a name for the rule.
-
In the * Rule: If Username… section, select is from the list, and then enter
*in the text box. -
In the …Then Assign These Roles section, select Users in the Available Roles list, and then click Add.
Result:
The Users role is added to the Selected Roles list.
-
-
Click Save Changes.
Result:
The Authentication Realm is saved.
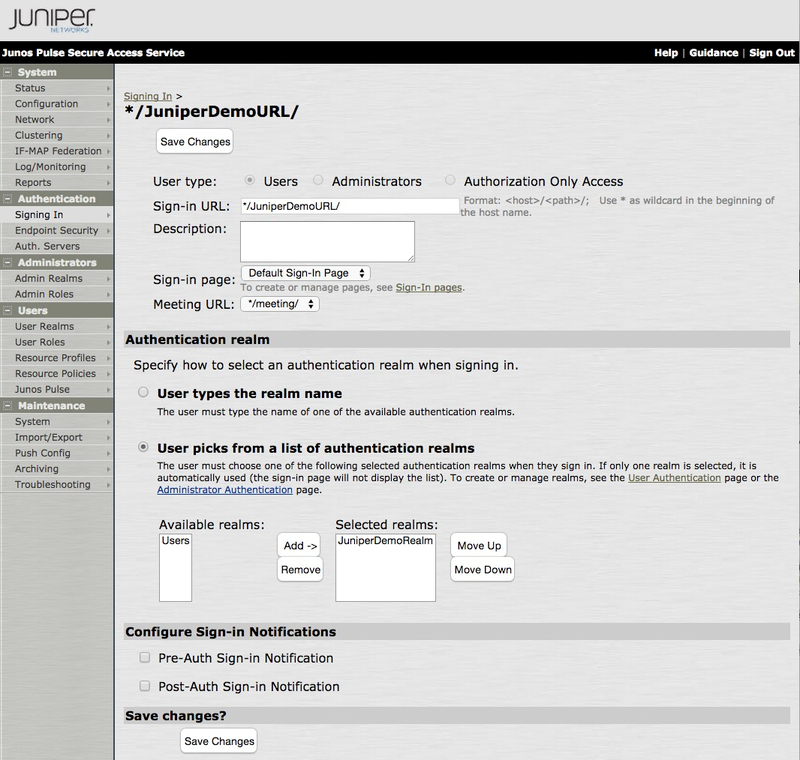
Configuring a Signing In Policy
To configure Juniper for PingID multi-factor authentication (MFA), you must configure a sign in policy.
Steps
-
In the left navigation pane, in the Authentication section, click Signing In.

Result:
The Signing In window opens.
-
In the Signing In window, click New URL….
Result:
The next section of the Signing In window opens.
-
In the User Type section, click Users.
-
In the Sign-in URL field, enter the sign-in URL in the format of
<host>/<path>/.Example:
*/JuniperDemoURL/ -
In the Authentication Realm section, enter the following information:
-
Click User Picks from a List of Authentication Realms.
-
From the Available Realms list, select the realm created in Adding a New Authentication Realm, and then click Add. The realm is added to the Selected Realms list.
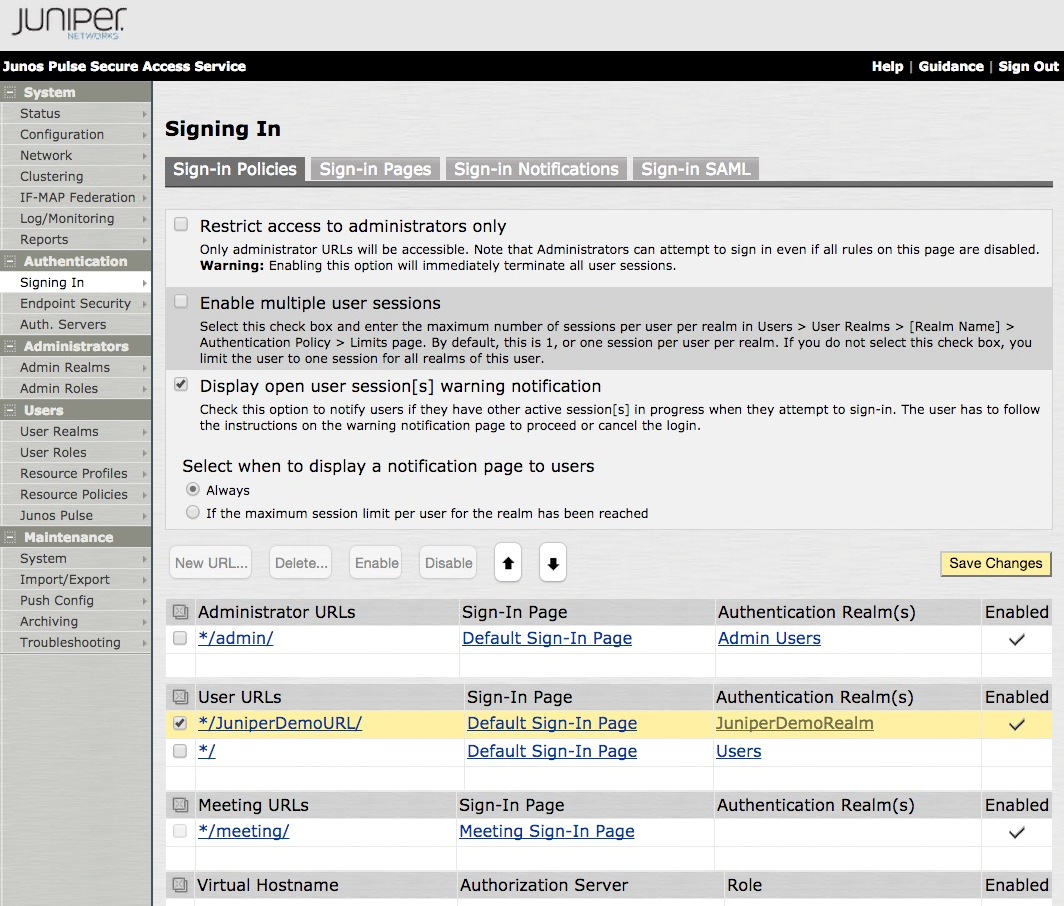
Result:
The Signing In window is displayed, and the User URL list contains the new URL.
-
-
Click Save Changes.
-
From User URLs list, select the check box next to the URL you just created.
-
To move the URL to the top of the list, click the Up Arrowicon (
 ).
).
-
Click Save Changes.
Result:
The Juniper VPN is now configured to use the PingFederate RADIUS password credential validator (PCV) server.
Signing on
Sign on to your user URL page.
Steps
-
In a web browser, enter the user URL you previously created in Configuring a Signing In Policy.
-
Authenticate with your username and password.
-
Perform your second-factor authentication using PingID.
Configuring Juniper as first factor authentication
Configure Juniper 8.0 as the first-factor ID provider using LDAP and PingFederate with PingID RADIUS password credential validator (PCV) as the second factor.
Steps
-
Configure PingFederate with a PingID RADIUS PCV, and leave the Delegate PCV section empty.
For more information, see Integration for devices using a RADIUS server.
-
In the Juniper admin portal, create and configure the PingID RADIUS configuration.
For more information, see Configuring Juniper for PingID multi-factor authentication.
-
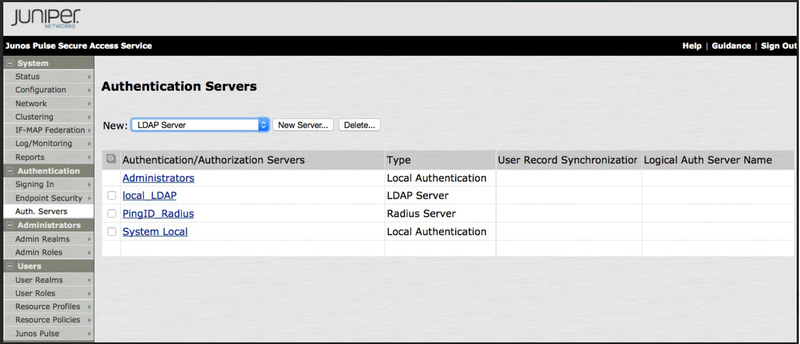
Go to Authentication → Authentication Servers.
-
From the New drop-down list, select LDAP Server, and then click New Server.
-
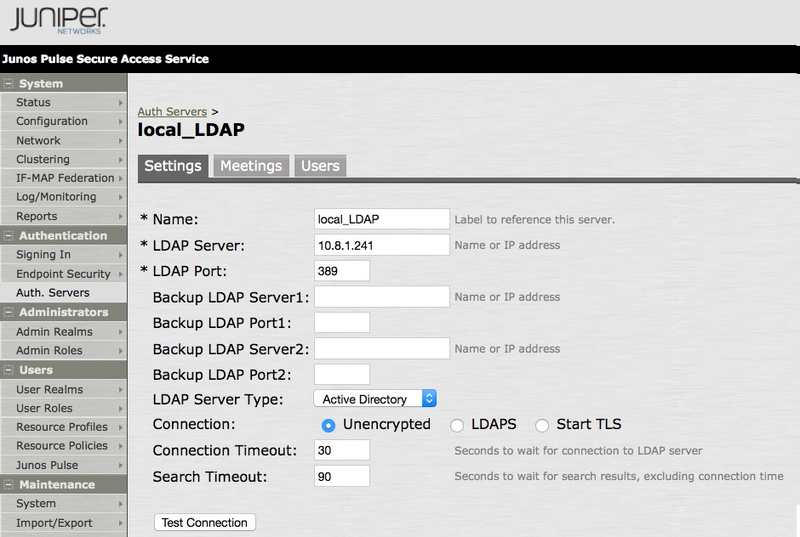
In the Settings tab, complete the following fields:
-
In the Name field, enter a name for the server.
-
In the LDAP Server field, enter the IP address or hostname of the LDAP server.
-
In the LDAP Port field, keep the default value of
389, or change it according to the LDAP configuration. -
From the LDAP Server Type list, select Active Directory.
-
From the Connection options, keep the default value of
Unencrypted, or change it to match the LDAP configuration. -
In the Connection Timeout field, enter
30. -
In the Search Timeout field, enter
90. -
Leave all other fields empty.
-
-
To confirm that the connection is valid before continuing, click Test Connection.
-
In the Authentication Required? section, complete the following fields:
-
Select the Authentication Required to Search LDAP check box.
-
In the Admin DN field, enter the admin DN.
For example,
CN=Administrator, CN=Users, DC=Accells, DC=Lab. -
In the Password field, enter the admin password.

-
-
In the Finding User Entries section, complete the following fields:
-
In the Base DN field, enter the Base DN.
For example,
CN=Users, DC=Accells, DC=Lab. -
In the Filter field, enter
samaccountname=<USER>.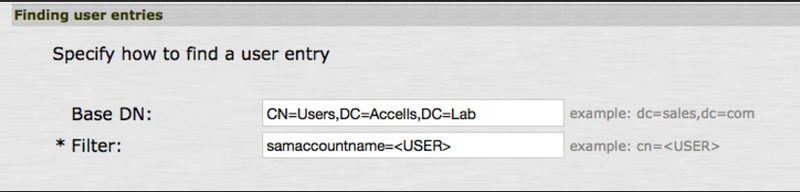
-
-
In the Determining Group Membership section, complete the following fields:
-
In the Base DN field, enter the Base DN.
For example,
CN=Users, DC=Accells, DC=Lab.-
In the Filter field, enter
CN=<GROUPNAME> -
In the Member Attribute field, enter
member.
-
-
Click Save Changes.
-
Go to Authentication → Signing In → Sign-in Policies, and ensure that the first entry on the User URLs list is
*/.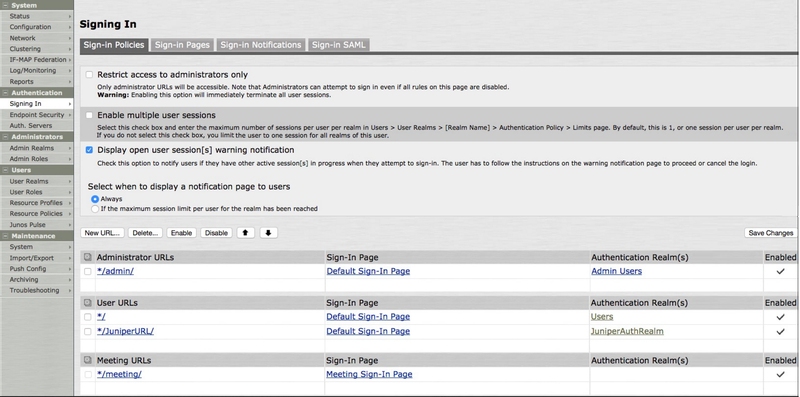
This differs from the instructions in the RADIUS PCV documentation.
-
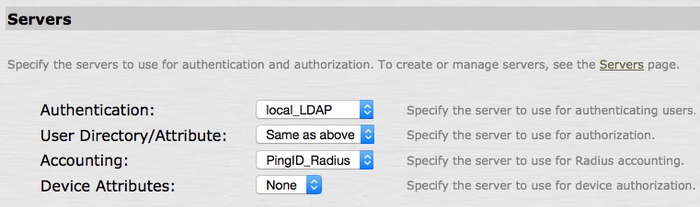
Go to Users → User Realms → Users and in the Servers section, complete the following fields:
-
From the Authentication list, choose the LDAP authentication server created earlier.
For example, local_LDAP.
-
From the User Directory/Attribute list, select Same as Above.
-
From the Accounting list, select the Juniper RADIUS authentication server created earlier.
For example, PingID_Radius.
-
-
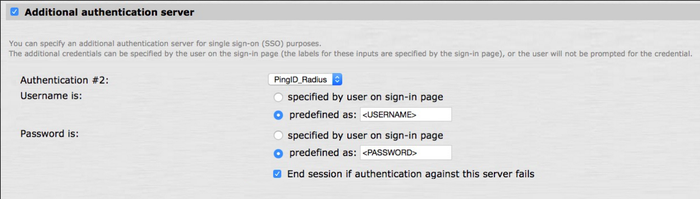
Select the Additional Authentication Server check box, and then complete the following fields:
-
From the Authentication #2 list, select the Juniper RADIUS authentication server created earlier.
For example, PingID_RADIUS.
-
In the Username is: section, click Predefined as and enter
<USERNAME>. -
In the Password is: section, click Predefined as and enter
<PASSWORD>. -
Select the End Session if Authentication Against this Server Fails check box.
-
-
Click Save Changes.
-
To sign on to Juniper while using the Juniper LDAP configuration as the first-factor for authentication, use the default user URL.
Example:
https://<juniper IP>, https://<juniper hostname>, or https://10.8.1.240/