Configuring an app or group-specific authentication policy
Create a web authentication policy and apply it to one or more applications, one or more user groups, or both.
Configure various policies that are tailor-made for your system. For example, you can configure a policy for your Human Resources (HR) group that applies to several sensitive HR-related apps only. You could create three different policies for a high security app, giving different authentication policies to the Management group, the General User group, and the Contractor group.
If an app or group belongs to multiple policies, only the first policy that matches is applied. When a user accesses an application that doesn’t have a specific policy, the global policy (default policy) applies.
|
The following apps appear in the Policy Apps list by default:
-
AD FS: Enables you to apply an authentication policy to users when Microsoft AD FS is the identity provider (IdP). Learn more in Integrate PingID with AD FS.
-
Admin Portal: Enables you to apply an authentication policy to admins when accessing the admin portal.
-
Azure AD: Enables you to apply an authentication policy to users when Microsoft Azure AD is the IdP. Learn more in Integrate PingID with Azure AD.
-
Device Management: Enables you to apply an authentication policy to users when they authenticate to PingID’s out of the box Devices page. The Devices page is used to add, remove, or change the devices a user has associated with their account. Learn more in Managing your devices in the PingID user guide documentation.
-
Password Reset: Enables you to apply an authentication policy to users requesting a password reset using the self-service password-reset service from PingFederate. This service is accessed through the password-reset link that appears on the sign on page when PingFederate is the IdP. Learn more in Configuring self-service password management in the PingFederate documentation.
|
The default policy is a global policy that defines the rules that will be applied to any application in your organization where an application-specific policy isn’t defined. Learn more in Configure a global authentication policy. |
Steps
-
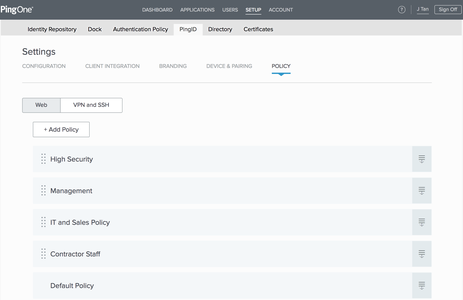
In PingOne, go to Setup > PingID > Settings > Policy.
-
Click Add Policy.
Result:
The New Policy wizard opens.
-
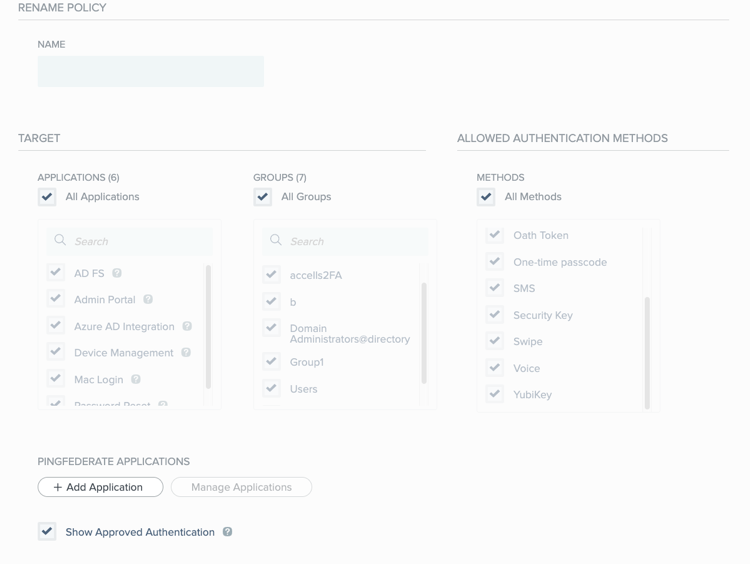
In the Name field, enter a name for the policy.
-
In the Applications section, use the controls to select the applications to which the policy should apply. You must select at least one application. By default, the list shows the applications that you have defined in PingOne. To add PingFederate applications to the list, click the Add Application button. Learn more in Adding a PingFederate application.
-
List display items are limited to 300 for Applications and Groups. Use the search box to search for a specific application or group.
-
The All Applications/Groups/Methods checkbox selects all existing items and automatically applies any additional items that are added to PingID in the future.
App-specific policies require the PingID Adapter 1.4 or later.
-
-
In the Groups section, select the checkbox for each group to which you want the policy to apply. You must select at least one group. If you want to apply the policy to all user groups, select the All Groups checkbox.
When defining a policy that also applies to Windows login for specific user groups, keep the following in mind:
-
The integration with Windows login must be through PingFederate.
-
You must use version 2.4.2 or later of the Windows login integration.
-
You must provide information for the Group attribute when configuring the PingID Adapter instance. Learn more in Configuring a PingID Adapter instance (Windows login).
-
-
In the Allowed Authentication Methods section:
Choose from:
-
Select one or more authentication methods to make available in this policy.
-
Select the All Methods checkbox to allow all current authentication methods and automatically include any new methods added to PingID in the future.
The rule’s Actions list is limited to the authentication methods you select here.
If you’re configuring a rule that’s based on the PingID mobile app, Mobile App Biometrics, Number matching or One-time passcode must be included as an allowed authentication method.
-
-
To hide the authentication approval screen for PingID policy events in which the user is automatically approved and no challenge is sent to or requested from the user, clear the Show Approved Authentication checkbox.
By default, this checkbox is selected.
This option only applies to:
-
Relevant policy rules where the rule action Approve is selected.
-
PingID out of the box UI. It is not applicable to the PingID authentication API.
-
-
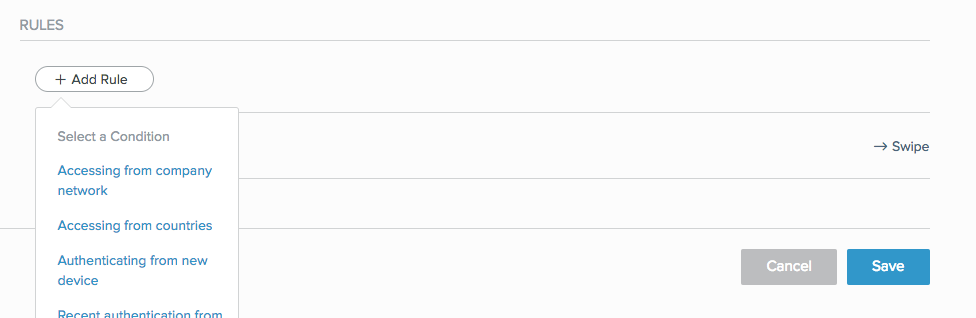
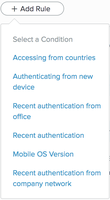
In the Rules section, click Add Rule for each rule that you want to add, and select the rule from the list.
-
Configure the rules that you want to include in the policy:
-
Within the policy, click and drag the rule to place it in the order you want it.
If a policy has multiple rules, arrange them in the order you want them to execute, as they execute sequentially.
-
After adding and configuring all the rules you want to add, click Save.
-
If more than one policy displays in the Policy list, click and drag the new policy, and place it in the order you want it. Click Save Order.
Next steps
To ensure the policy is applied to your organization, go to PingID > Configuration and ensure Enforce Policy is set to Enabled.
Configuring an accessing from company network rule (web policy)
About this task
Use this rule to define:
-
The authentication action to prompt the user with if the web accessing device is within the company network, such as requiring a specific authentication method when within the company network, like Mobile App Biometrics or Swipe, or allowing silent authentication when within the company network.
-
Optionally require the user’s mobile authenticating device to be located within a defined office location during authentication with the Authenticating Device in Company Offices option. If this option is enabled, to sign on:
-
The user’s authenticating device must be in a company office location.
-
The user’s accessing device must originate from an IP address within the company network.
-
When creating this rule, you must specify the IP addresses that define the company network or define the geographic location of one or more offices around the world or both.
When a proxy is used, it masks the user’s original IP address. As a result, PingID can’t accurately verify the user’s location, and this rule won’t function as expected.
|
If you’re using PingOne DaVinci to orchestrate your PingID flows, the authenticating device in company offices section isn’t included in the policy evaluation. |
Steps
-
In PingOne, go to Setup > PingID > Policy.
-
From within the relevant policy, click Add Rule, and in the rule list, select Accessing From Company Network.
Result:
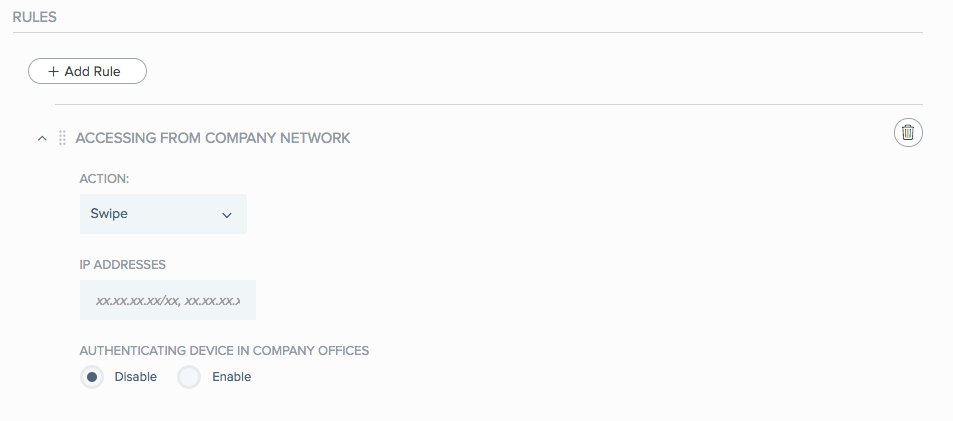
The Accessing From Company Network configuration wizard opens.
-
From the Action list, select the authentication action to use if the rule conditions are met.
Choose from:
-
Approve: Approve access without requiring PingID authentication.
-
Authenticate: Allow the user to authenticate using any of the authentication methods available to the user, and allowed at the policy level.
-
Allowed Methods: Click Allowed Methods to reveal a list of authentication methods allowed by this policy, and then select the checkbox of each authentication method that you want to allow for this rule. Learn more in Rule authentication actions for description per authentication type.
-
-
In the IP Addresses field, enter a list of external IP addresses or the IP range that belongs to the company network.
Enter the IP addresses and ranges using CIDR notation with each entry on its own line.
-
To require a user’s authenticating device to be in the company offices when signing on from within the company network:
-
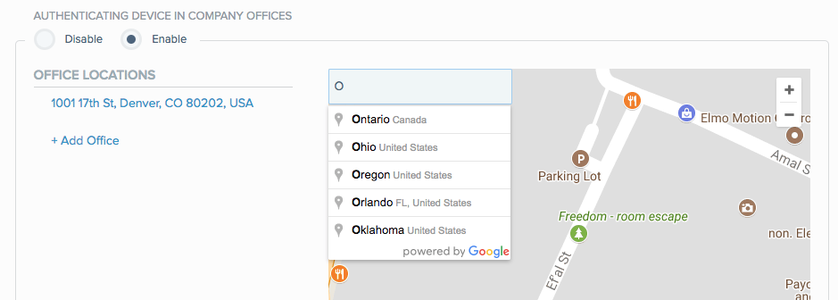
Go to the Authenticating Device In Company Offices section.
-
Click Enable.
-
Define one or more company office locations.
If the authenticating device is located within one of the defined areas, it’s considered to be inside a company office.
If you’re including a company office location in this rule, Swipe, Mobile App Biometrics, or a One-time passcode must be defined as an Allowed Authentication Method to ensure location-based information can be collected from the user.
Result:
The Office Locations wizard opens enabling you to define one or more office locations.
-
-
To define additional office locations:
-
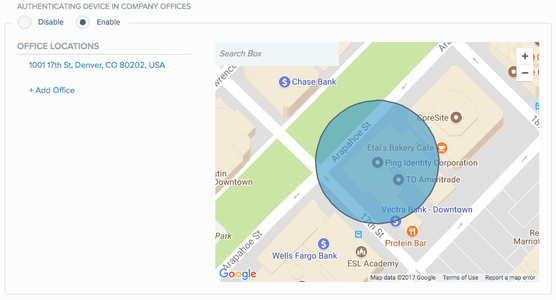
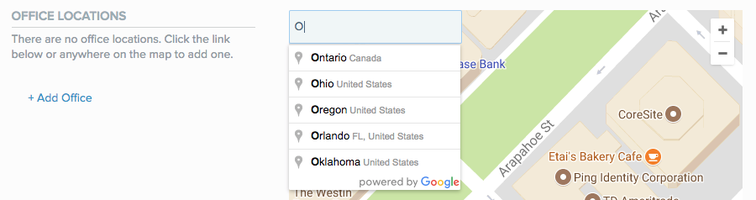
Click Add Office or enter an address in the search box.
Result:
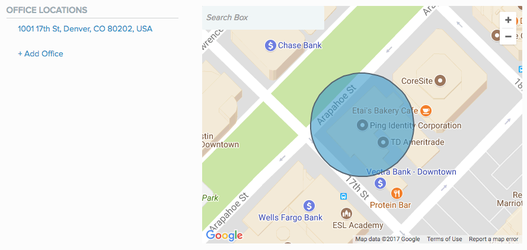
A blue circle displays on the map defining the office area.
-
Use the white dots on the circle to fine-tune the geofence:

-
To reposition the circle, click and drag the white dot at the circle’s center to the wanted location.
-
To resize the circle, click and drag any white dot on the circle’s rim.
-
To add another office location, click a location outside the circle. A new circle is added.
-
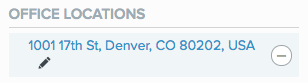
To edit an office location, click the Pencil icon (
 ) and edit the name.
By default, the location is named after its street address.
-
To delete an office address, click the Minus icon (
 ).
).If you edit or delete offices in the Office Locations list, changes are applied to all rules that specify office locations.
-
-
-
To save the rule and apply it to the relevant policy, click Save.
-
To rearrange and save the new policy order, in the policy list, click and drag the new policy and place it in the order in which you want it to be considered. Click Save Order.
Next steps
To ensure the policy is applied to your organization, go to PingID > Configuration and ensure Enforce Policy is set to Enabled.
Configuring an access from specific countries rule (web policy)
Define which authentication action to prompt the user with on the machine used for web access, according to country.
About this task
|
The country is determined by the IP address of the accessing device and not by the authenticating device. |
Steps
-
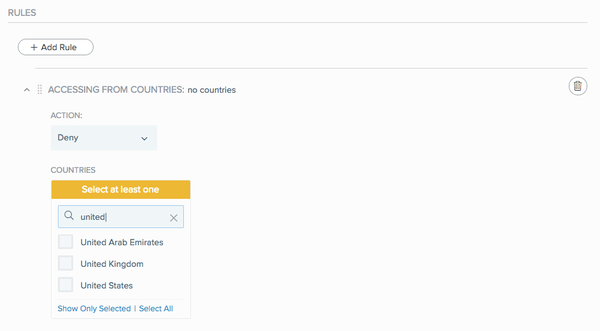
From within the relevant policy, click Add Rule and from the list, select Accessing From Countries.
Result:
The Accessing From Countries rule wizard opens.
-
From the Action list, select the action to use when signing on in the selected countries.
Choose from:
-
Deny (default): Deny access for authentication requests originating from the selected countries.
-
Authenticate: Allow the user to authenticate using any of the authentication methods allowed at the policy level.
-
Allowed Methods: Click Allowed Methods to reveal a list of authentication methods allowed by this policy, and then select the check box of each authentication method that you want to allow for this rule. See Rule authentication actions for description per authentication type.
-
-
From the Countries list, select the check box next to each country that you want to include in the rule.
Action Description Search by name
In the Search box, enter a string or part of a string to search for a specific country.
The list of countries is filtered to display only countries containing the string.
View only the selected countries
Click Show Only Selected.
Select all countries in the list
Click Select All.
Clear all selections
Click Unselect All.
-
Click Save.
-
If you have more than one policy listed, in the Policy list, click and drag the new policy and place it in the order in which you want it to be considered. Click Save Order.
Next steps
To ensure the policy is applied to your organization, go to PingID → Configuration and ensure Enforce Policy is set to Enabled.
Configuring an authenticating from new device rule (web policy)
Define which authentication action to prompt the user with when a user signs on through the web and attempts to authenticate with a new device for the first time.
Steps
-
From within the relevant policy, click Add Rule and select Authenticating From New Device.

Result:
The Authenticating From New Device rule is added to the policy.
-
From the Action list, select the action to use when authenticating with a device for the first time.
Choose from:
-
Authenticate: Allow the user to authenticate using any of the authentication methods allowed at the policy level.
-
Allowed Methods: Click Allowed Methods to reveal a list of authentication methods allowed by this policy, and then select the check box of each authentication method that you want to allow for this rule. See Rule authentication actions for description per authentication type.
-
-
Click Save.
-
In the Policy list, click and drag the new policy and place it in the order in which you want it to be considered. Click Save Order.
Next steps
To ensure the policy is applied to your organization, go to PingID → Configuration and ensure Enforce Policy is set to Enabled.
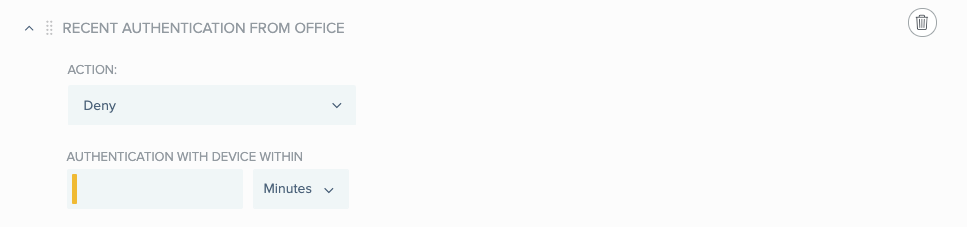
Configuring a recent authentication from office access rule (web policy)
Use this rule to waive PingID authentication if the last successful authentication request occurred in the office and within a given time period, such as within the last 30 minutes.
About this task
This rule defines which authentication action to prompt the user with if the previous authentication request:
-
Occurred within the defined period of time.
-
Originates from the same accessing device that was used for the previous authentication request.
-
Used an authentication method that is one of the allowed authentication methods included in this policy.
-
The authenticating device’s mobile location is the office.
If the previous request was made at an office location, you might want to define less strict authentication requirements. For example, a user signed on from a specific office within the last 30 minutes using their mobile device.
|
|
To use this rule at least one of the mobile app authentication method must be selected in the Allowed Authentication Method section, such as Swipe, Mobile App Biometrics, or One-time passcode. If this rule does not appear in the Add Rule list, ensure at least one of these authentication methods check boxes is selected. |
Steps
-
From within the relevant policy, click Add Rule and select Recent authentication from office.
-
From the Action list, select which action to use if the previous authentication request was at an office location and within the time specified.
Choose from:
-
Deny (default): Deny access for authentication requests originating from the selected countries.
-
Approve: Approve access without requiring PingID authentication.
-
Authenticate: Allow the user to authenticate using any of the authentication methods allowed at the policy level.
-
Allowed Methods: Click Allowed Methods to reveal a list of authentication methods allowed by this policy, and then select the check box of each authentication method that you want to allow for this rule. See Rule authentication actions for description per authentication type.
-
-
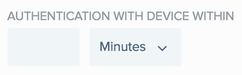
To define the time period that applies to the Action setting, from the Authentication With Device Within list, select the unit of time in Minutes, Hours, Days, or Weeks, and then enter the numerical value in the text box.
-
To define additional office locations:
The Office Locations wizard displays a list of the office locations currently defined. If the authenticating device is located within one of the defined areas, it is considered to be inside a company office.
-
Click Add office or enter an address in the search box.
Result:
A blue circle appears on the map, defining the office area.
-
Use the white dots on the circle to fine-tune the geofence:
-
To reposition the circle, click and drag the white dot at the circle’s center to the desired location.
-
To resize the circle, click and drag any white dot on the circle’s rim.
-
To add another office location, click a location outside the blue circle. A new circle is added.
-
To edit an office location, click the Pencil icon (
) and edit the name.By default, the location is named after its street address.
-
To delete an office address, click the Minus icon (
).If you edit or delete offices in the Office Locations list, changes are applied to all rules that specify office locations.
-
-
-
Click Save.
-
In the Policy list, click and drag the new policy and place it in the order in which you want it to be considered. Click Save Order.
Next steps
To ensure the policy is applied to your organization, go to PingID → Configuration and ensure Enforce Policy is set to Enabled.
Configuring a recent authentication access rule (web policy)
Use this rule to waive PingID authentication if the last successful authentication request occurred within a given time period, such as within the last 30 minutes.
About this task
This rule defines which authentication action to prompt the user with if the previous authentication request:
-
Occurs within the defined time period.
-
Originates from the same accessing device that was used for the previous authentication request.
-
Uses an authentication method that is one of the allowed authentication methods included in this policy.
Steps
-
From within the relevant policy, click Add Rule, and select Recent authentication.
-
From the Action list, select the action to use if the previous authentication request was within the time specified.
Choose from:
-
Deny (default): Deny access for authentication requests originating from the selected countries.
-
Approve: Approve access without requiring PingID authentication.
-
Authenticate: Allow the user to authenticate using any of the authentication methods allowed at the policy level.
-
Allowed Methods: Click Allowed Methods to reveal a list of authentication methods allowed by this policy, and then select the check box of each authentication method that you want to allow for this rule. See Rule authentication actions for description per authentication type.
-
-
To define the time period that applies to the Action setting, from the Authentication With Device Within list, select the unit of time in Minutes, Hours, Days, or Weeks, and then enter the numerical value in the text box.
-
Click Save.
-
In the Policy list, click and drag the new policy and place it in the order in which you want it to be considered. Click Save Order.
Next steps
To ensure the policy is applied to your organization, go to PingID → Configuration and ensure Enforce Policy is set to Enabled.
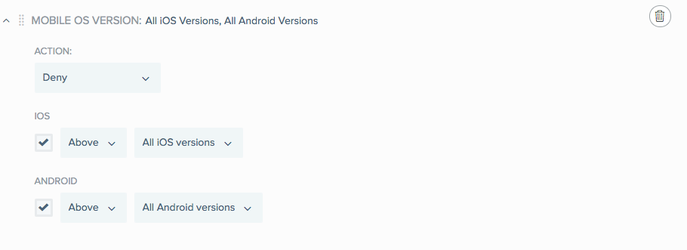
Configuring a mobile OS version access rule (web policy)
Use this rule to define which authentication action to prompt the user with for the defined mobile OS versions.
About this task
You might want to define stricter authentication requirements for older, more vulnerable OS versions.
|
To use this rule, at least one mobile app authentication method must be selected in the Allowed Authentication Method section, such as Swipe, Mobile App Biometrics, or One-time passcode. If this rule does not appear in the Add Rule list, ensure at least one of these authentication methods is selected. |
|
If you are using PingOne DaVinci to orchestrate your PingID flows, this rule is not evaluated. |
Steps
-
From within the relevant policy, click Add Rule and from the list, select Mobile OS Version.
Result:
The Mobile OS Version rule wizard opens.
-
From the Action list, select which authentication action to use for OS versions meeting the defined criteria.
Choose from:
-
Deny (default): Deny access for authentication requests originating from the selected countries.
-
Approve: Approve access without requiring PingID authentication.
-
Authenticate: Allow the user to authenticate using any of the authentication methods allowed at the policy level.
-
Allowed Methods: Click Allowed Methods to reveal a list of authentication methods allowed by this policy, and then select the check box of each authentication method that you want to allow for this rule. See Rule authentication actions for description per authentication type.
-
-
To define the minimum or maximum permitted mobile operating system versions and associated action:
-
Select the check boxes next to the OS that you want to include in the rule: iOS, Android, or both.
-
For each OS that you want to include, select either:
-
Above, and then select the minimum permitted operating system version from the list.
-
Below, and then select the minimum permitted operating system version from the list.
-
-
-
Click Save.
-
In the Policy list, click and drag the new policy and place it in the order in which you want it to be considered, and then click Save Order.
Next steps
To ensure the policy is applied to your organization, go to PingID → Configuration and ensure Enforce Policy is set to Enabled.
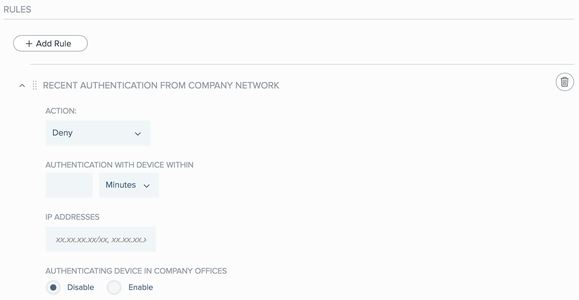
Configuring a recent authentication from company network rule
Use this rule to waive PingID authentication if the last successful authentication request occurred within a specific IP range in the company network and within a given time period, such as within the last 30 minutes.
About this task
This rule defines which authentication action to prompt the user with if the previous authentication request:
-
Occurs within the defined period of time.
-
Originates from the same accessing device that was used for the previous authentication request.
-
Uses an authentication method that’s one of the allowed authentication methods included in this policy.
-
The authenticating device’s mobile location is within the specified IP range in the company network.
-
Optional: You can require the user’s mobile authenticating device to be located within a defined office location during authentication. Learn more about this option in the Configuring device location rules step.
If this option is enabled, to sign on:
-
The user’s authenticating device must be in a company office location.
-
The user’s accessing device should originate from an IP address within the company network.
-
When creating this rule, you must specify the IP addresses that define the company network and optionally define the geographic location of one or more offices around the world.
When a proxy is used, it masks the user’s original IP address. As a result, PingID can’t accurately verify the user’s location, and this rule won’t function as expected.
|
Steps
-
From within the relevant policy, click Add Rule, and from the list, select Recent authentication from company network.
Result:
The Recent Authentication From Company Network rule wizard opens.
-
From the Action list, select the action that you want to apply when authenticating, if the rule conditions are met.
Choose from:
-
Deny (default): Deny access for authentication requests originating from the selected countries.
-
Approve: Approve access without requiring PingID authentication.
-
Authenticate: Allow the user to authenticate using any of the authentication methods allowed at the policy level.
-
Allowed Methods: Click Allowed Methods to reveal a list of authentication methods allowed by this policy, and then select the checkbox of each authentication method that you want to allow for this rule. Descriptions for each authentication type are available in Rule authentication actions.
-
-
To define the time period that applies to the Action setting, in the Authentication With Device Within list, select the unit of time in Minutes, Hours, Days, or Weeks, and then enter the numerical value in the text box.
-
In the IP Addresses field, enter a list of external IP addresses or the IP range that belongs to the company network.
Enter the IP addresses and ranges using CIDR notation with each entry on its own line.
-
To require a user’s authenticating device to be in the company offices when signing on from within the company network, in the Authenticating Device In Company Offices section, click Enable.
If you’re defining a company office, in addition to an IP address, a mobile authentication method of Swipe, Mobile App Biometrics, or One-time passcode must be defined as an Allowed Authentication Method to apply this rule.
Result:
The Office Locations wizard opens, displaying a list of the office locations currently defined. If the authenticating device is located within one of the defined areas, it’s considered to be inside a company office. Define one or more company office locations.
-
To define one or more office locations:
-
Click Add office or enter an address in the search box.
A blue circle displays on the map, defining the office area.
-
Use the white dots on the circle to fine-tune the geofence:
-
To reposition the circle, click and drag the white dot at the blue circle’s center to the wanted location.
-
To resize the circle, click and drag any white dot on the circle’s rim.
-
To add another office location, click a location outside the blue circle and a new circle is added.
-
To edit an office location, click the Pencil icon (
) and edit the name.By default, the location is named after its street address.
-
To delete an office address, click the Minus icon (
).If you edit or delete offices in the Office Locations list, changes are applied to all rules that specify office locations.
-
-
-
To save the rule and apply it to the relevant policy, click Save.
-
In the Policy list, click and drag the new policy to the wanted position to set the evaluation order. Click Save Order.
Next steps
To ensure the policy is applied to your organization, go to PingID > Configuration and ensure Enforce Policy is set to Enabled.
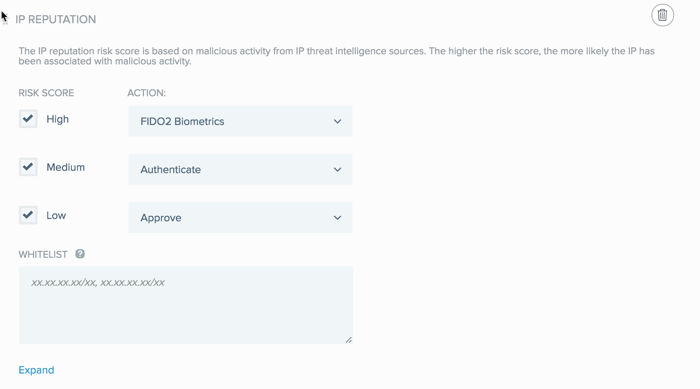
Configuring an IP reputation rule (web policy)
Use this rule to determine which authentication action to prompt the user with, based on the risk score of the IP address of the user’s accessing device.
About this task
PingID collects and analyzes IP address data from the user’s accessing device and enables you to apply different authentication actions to IP addresses according to their risk scores. IP addresses are grouped into the following levels of risk:
-
High: The IP address is considered high risk and might have recently been involved in numerous malicious activities, such as DDos attacks or spam activity.
-
Medium: The IP address is considered medium risk and might have been involved in malicious activities, such as DDos attacks or spam activity.
-
Low: The IP address is considered low risk.
You can define a different authentication for each risk group. Define more restrictive authentication for IP addresses in a higher risk group You can also define a whitelist of IP addresses that you want this rule to ignore.
|
The IP reputation rule is not applied if there is insufficient data to determine the IP address' risk score. |
Steps
-
From within the relevant policy, click Add Rule and from the list, select IP Reputation.
Result:
The IP Reputation rule wizard opens.
-
Select the check box of each Risk Score group to which you want to apply a rule action, and from the Action list, select the action that you want to apply to that risk score group.
Choose from:
-
Deny: Deny access for authentication requests originating from IP addresses in the selected risk score category. This option is selected for the High risk category, by default.
-
Approve: Approve access without requiring PingID authentication for authentication requests originating from IP addresses in the selected risk score category.
-
Authenticate: Allow the user to authenticate using any of the authentication methods allowed at the policy level.
-
Allowed Methods: Click Allowed Methods to reveal a list of authentication methods allowed by this policy, and then select the check box of each authentication method that you want to allow for this rule. See Rule authentication actions for description per authentication type.
-
-
In the Whitelist field, specify one or more IP address ranges that you want the rule to ignore.
Enter each IP address range in the format
XX.XX.XX.XX/XXand separate each IP address range with a comma. -
Click Save.
-
In the Policy list, click and drag the new policy and place it in the order in which you want it to be considered. Click Save Order.
Next steps
To ensure the policy is applied to your organization, go to PingID → Configuration and ensure Enforce Policy is set to Enabled.
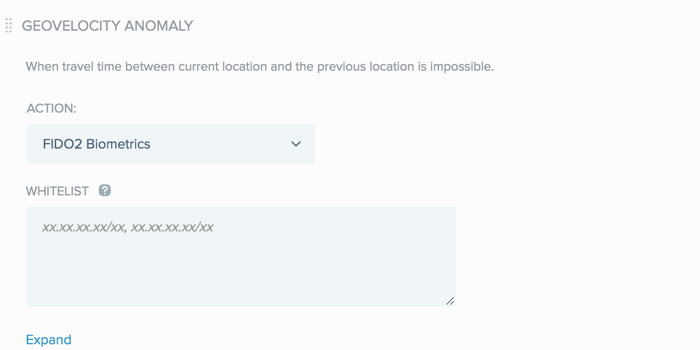
Configuring a geovelocity anomaly rule (web policy)
PingID analyzes location data and allows you to specify an authentication rule when the travel time between a user’s current sign on location and their previous sign on location is not possible in the time frame that has elapsed since the previous sign on. The location and resulting reputation classification are based on the user’s accessing device.
About this task
For example, if a user signs on from New York, USA at 12:00 p.m. and then attempts to sign on from London, UK two hours later, a geovelocity anomaly is detected and a rule action, such as Deny, is applied.
You can create a whitelist of IP addresses that you want this rule to ignore.
Steps
-
From within the relevant policy, click Add Rule and from the list, select Geovelocity Anomaly.
Result:
The Geovelocity Anomaly rule wizard opens.
-
From the Action list, select the authentication action that you want to apply in the event of a geovelocity anomaly.
Choose from:
-
Deny (default): Deny access.
-
Authenticate: Allow the user to authenticate using any of the authentication methods allowed at the policy level.
-
Allowed Methods: Click Allowed Methods to reveal a list of authentication methods allowed by this policy, and then select the check box of each authentication method that you want to allow for this rule. See Rule authentication actions for description per authentication type.
-
-
in the Whitelist field, specify one or more IP address ranges that you want the rule to ignore.
Enter each IP address range in the format
XX.XX.XX.XX/XX. Separate each IP address range with a comma. -
Click Save.
-
In the Policy list, click and drag the new policy and place it in the order in which you want it to be considered. Click Save Order.
Next steps
To ensure the policy is applied to your organization, go to PingID → Configuration and ensure Enforce Policy is set to Enabled.
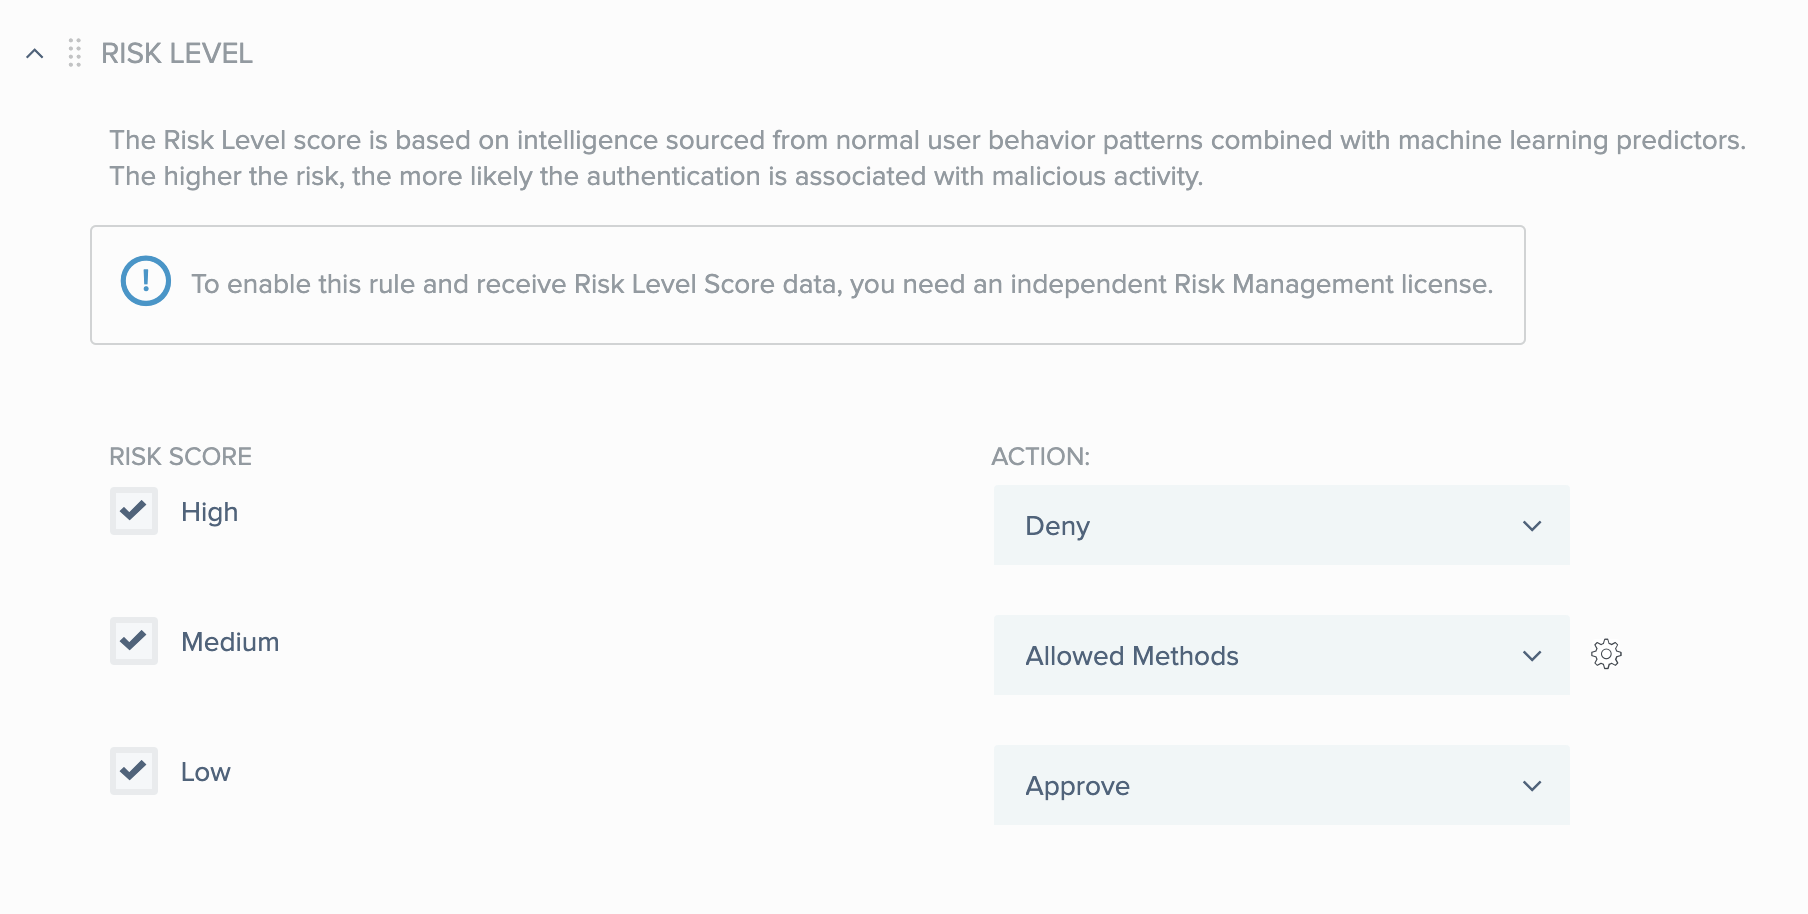
Configuring a risk level rule (web policy)
The PingOne Protect service combines a number of predictors such as user risk behavior, IP reputation, and geovelocity anomaly to calculate a single risk score. If you have a license for PingOne Protect, you can include the risk level that it calculates in your PingID policies. Find more information in Introduction to PingOne Protect.
Before you begin
Before adding a risk level rule, make sure that you have provided a value for the Resource ID field in the definition of the PingID adapter for PingFederate. For more information, see Configuring a PingID adapter instance. Version 2.11 or higher of the PingID adapter is required for this feature
|
You can also add a rule that uses the risk level provided by a supported third-party risk service. If you are using a third-party service, make sure that you have provided a value for the Risk Level field in the definition of the PingID adapter for PingFederate. |
Steps
-
Create a new policy, or open an existing policy for editing.
-
Click Add Rule.
-
Select Risk Level from the list of rules.
-
For each of the risk levels - high, medium, low - select the check box if you want to specify an MFA action for that level of risk.
-
For each risk level that you selected, use the list of actions to select the MFA action you want to use for that level of risk.
-
Click Save.
-
In the Policy list, click and drag the new policy and place it in the order in which you want it to be considered. Click Save Order.
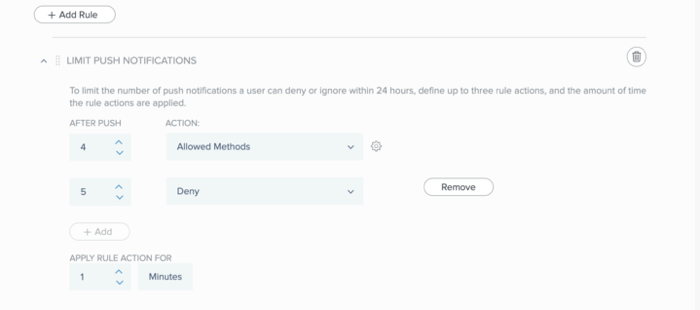
Configuring a limit push notifications rule
Use this rule to reduce the likelihood of a user acknowledging a malicious push notification as part of an MFA fatigue attack by limiting the number of push notifications the user can deny or ignore within a 24-hour period.
About this task
Specify an action from the list of allowed methods that are available, or choose to deny the user access. Then specify the time period for which the rule actions should be applied.
You can define an array of up to three push notification limits (subrules), and specify up to three actions that are triggered sequentially as the user reaches each limit. A rule defines the number of push notifications (ignored or denied) that must occur consecutively within a 24-hour period in order to trigger the rule action.
Each time the user authenticates successfully, the counter is reset.
For example, when applying the rule for 20 minutes:
-
After 5 push notifications, the user must authenticate with a security key for a period of 20 mins.
-
After 10 push notifications, the user must authenticate using biometrics, or number matching for a period of 20 mins.
-
After 15 push notifications, the user is denied access for a period of 20 mins.
|
Steps
-
From within the relevant policy, click Add Rule and from the list, select Limit push notifications.
Result:
The Limit Push Notifications rule wizard open
-
To define a push notification limit:
-
In the After Push field, select the number of push notifications after which the action is triggered, and then in the Action field, select the action that is triggered when the limit is reached. Choose from the following actions:
-
Deny: Deny access after the number of push notifications is reached.
-
Allowed Methods: Click Allowed Methods to reveal a list of authentication methods allowed by this policy, and then select the check box of each authentication method that you want to allow for this rule. See Rule authentication actions for description per authentication type.
-
-
To add another push notification limit, click Add and repeat substep a.
-
-
In the Apply Rule Action For field, set a duration for the rule actions to be applied after they’re triggered.
-
Click Save.
-
In the Policy list, click and drag the new policy and place it in the order in which you want it to be considered. Click Save Order.
Next steps
To ensure the policy is applied to your organization, go to PingID → Configuration and ensure Enforce Policy is set to Enabled.