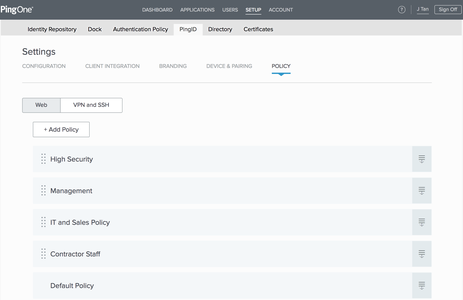
Managing app and group lists
You can apply a policy to any of the applications and groups that appear in the relevant list.
You can:
-
Manually add applications to the applications list. See Adding a PingFederate application.
-
Define a PingFederate application ID attribute. See Defining PingFederate application ID attributes.
-
Edit the applications list. See Editing the applications list.
-
Update the policy groups list. See Updating the policy groups list.
|
Adding a PingFederate application
You can add PingFederate applications to the applications list while creating a new policy.
About this task
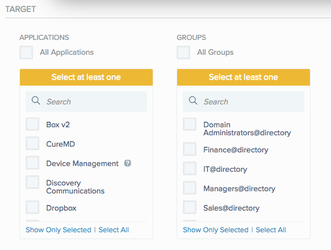
By default, the applications list includes the following applications:
-
Device Management: This application enables a user to manage their own devices, including adding, editing, or deleting multiple devices through the Devices page.
-
Password Reset: This application enables users to reset their own password.
|
App-specific policies require PingID Adapter 1.4 or later. |
Steps
-
In the admin portal, go to Setup → PingID → Policy, and click the Web tab.
Result:
A list of all the existing policies displays.
-
Click Add Policy.
Result:
The New Policy window displays with the Applications list.
-
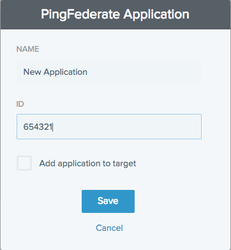
In the PingFederate Applications section, click Add Application.
Result:
The PingFederate Application window appears.
-
In the PingFederate Application window, enter the following information:
-
Name: Enter the name of the application (max. 20 characters).
-
ID: Enter the application ID for the application. See unique application ID.
-
Add application to target: Select this check box to add the application to the new policy that you just created.
-
-
Click Save.
Result:
The new application is saved and appears in the Applications list.
Defining PingFederate application ID attributes
Define an application policy by adding the Name and ID attributes.
Each application that you define in the PingID Policy tab must include the following information:
-
Name: The name of the application as it appears in the PingID policy application list. This attribute does not have to match the application name defined in PingFederate.
-
ID: The unique ID for the relevant application in PingFederate. This attribute must match the relevant PingFederate Application ID attribute as defined in the following table.
For more information, see the PingFederate documentation.
| Type of Target Application | Application Identifier |
|---|---|
SAML or WS-Federation (service provider connection) |
Partner Entity or Realm ID (Connection ID) |
OAuth or OpenID Connect (OAuth Client) |
OAuth Client ID |
Custom |
SP Adapter ID |
Editing the applications list
Rename a PingFederate application, change the unique ID, or delete an application.
About this task
Edit an application from the New Policy window.
Steps
-
In the admin portal, go to Setup → PingID → Policy, click the Web tab.
-
Click Add Policy.
Result:
The New Policy window displays with the Applications list.
-
In the Target section, from the Applications list, select the check box of the applications that you want to edit.
-
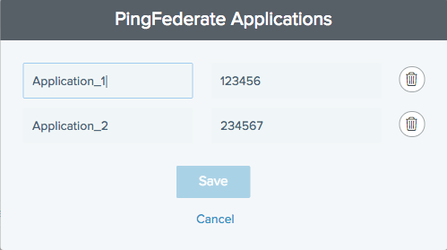
In the PingFederate Applications section, click Manage Applications.
Result:
The PingFederate Applications window opens, enabling the editing of the applications you selected and their Name and ID fields.
-
To edit the application Name or ID, click the relevant field and enter the new name or ID.
-
To delete an application, in the application listing, click the Delete icon (
 ).
). -
Click Save.
Result:
Your changes are saved. The Applications list is updated.
Updating the policy groups list
When a group is created in Active Directory, it does not automatically appear in the policy groups list. At least one user that is assigned to the group must successfully authenticate using PingID for the groups list to be updated.
Before you begin
To ensure Active Directory groups are populated in the policy groups list, configure your system so that all user groups that appear in your directory are included in a PingOne single sign-on (SSO) assertion or PingID authentication, such as using the PingID Adapter attribute mapping. For more details, see Registering the PingID service.
About this task
For an organizational user group to appear in the policy groups list, update the policy groups list.
Steps
-
Create a new user group in your local Active Directory.
-
Assign users to the directory group.
At least one user must be assigned to the group.
-
Ensure at least one of the users in the new group authenticates with PingID successfully or through SSO to PingOne.
-
In the PingOne admin portal, go to Setup → PingID → Policy. Refresh the Policy window.
Result:
The next time you create or edit a policy, the new group appears in the Groups list.