Configuring the CIBA Authenticator for PingID SDK
Create and configure a Client-Initiated Backchannel Authentication (CIBA) Authenticator for PingID SDK.
About this task
This procedure describes the process of creating and configuring a Client Initiated Backchannel Authentication (CIBA) Authenticator for the purpose of authenticating users via an out-of-band authentication method.
Prerequisites:
-
PingFederate 9.3+
-
PingID SDK Package v1.10+ (comprising PingID SDK Integration Kit v1.7+ and PingID SDK Adapter for PingFederate v1.6+)
|
Steps
-
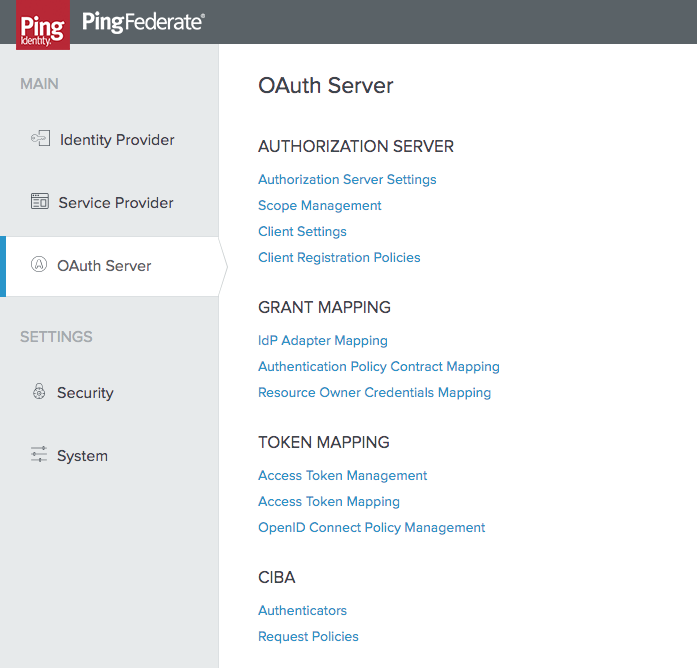
In the PingFederate admin console, select: OAuth Server → CIBA → Authenticators.

-
Click Create New Instance to create a new authenticator, or click on an existing authenticator to edit it.
-
Enter the CIBA authenticator’s initial instance definitions:
-
INSTANCE NAME: Enter a descriptive name for this authenticator.
-
INSTANCE ID: Enter a string which will be used as an ID for this authenticator. Spaces are not allowed.
-
TYPE: Select PingID SDK CIBA Authenticator from the dropdown options.
-
-
Click NEXT.
The CIBA authenticator’s Type step is displayed.

-
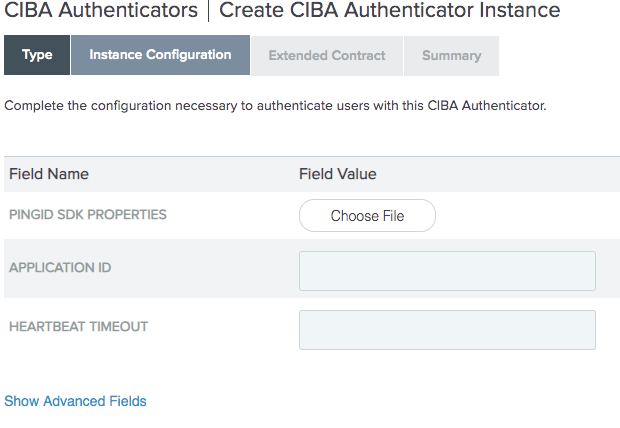
Enter the fields in the authenticator’s Type step:
-
PINGID SDK PROPERTIES: Upload the PingID SDK properties file from your PingOne admin console:
-
In the PingOne admin console, go to Setup → PingID → CLIENT INTEGRATION → INTEGRATE WITH PINGID SDK → SETTINGS FILE.
-
Click Download. You may want to provide the file with a more meaningful name.
-
The PingID SDK settings file should not be confused with the PingID properties file. -
APPLICATION ID: Enter the application ID that was generated by PingID SDK in your application configuration:
-
In the PingOne admin console, go to Applications → PingID SDK Applications, and copy the Application ID.
-
-
HEARTBEAT TIMEOUT: The duration in seconds that thePingID SDK CIBA Authenticator should wait for a heartbeat to verify PingID SDK services, before timing out (default 30 seconds).
-
-
Click Show Advanced Fields.
The Type step’s advanced fields are displayed.

-
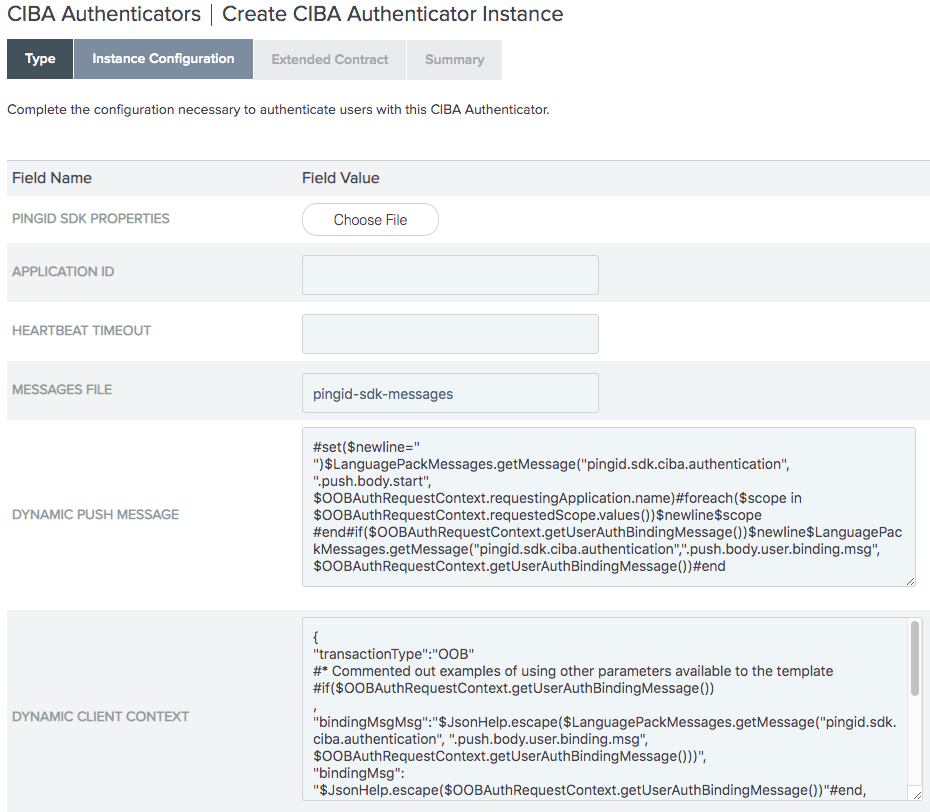
Enter the following advanced fields:
-
MESSAGES FILE: The prefix of the name of the PingID SDK messages file.
-
The default is
pingid-sdk-messages. This default value is applied even if this field is left empty. -
Templates are located at
/server/default/conf/language-packs. -
The file prefix (for example
pingid-sdk-messages) may be changed, but the suffix for the locale must be in the format “_<locale>.properties”, for example:pingid-sdk-messages_en.properties. -
The following parameters are required for the default values of the push message’s title and body texts in the DYNAMIC PUSH MESSAGE and DYNAMIC CLIENT CONTEXT fields:
-
pingid.sdk.ciba.authentication.push.title: populates thepushMessageTitleparameter. -
pingid.sdk.ciba.authentication.push.body.start: The default DYNAMIC PUSH MESSAGE template uses this key. -
pingid.sdk.ciba.authentication.push.body.user.binding.msg: The default DYNAMIC CLIENT CONTEXT template uses this key.These parameters may be replaced, or removed.
-
-
-
DYNAMIC PUSH MESSAGE: A velocity language template that PingID SDK uses to pass push authentication messages to the device. The template is used to populate the
pushMessageBodyparameter, using the following variables:-
OOBAuthRequestContext: Refer to the PingFederate developer documentation https://www.pingidentity.com/content/dam/developer/documentation/pingfederate/server-sdk/9.3/index.html?com/pingidentity/sdk/oobauth/class-use/OOBAuthRequestContext.html. -
LanguagePackMessages: Refer to the PingFederate developer documentation https://www.pingidentity.com/content/dam/developer/documentation/pingfederate/server-sdk/9.3/index.html?com/pingidentity/sdk/locale/LanguagePackMessages.html.
-
-
DYNAMIC CLIENT CONTEXT: A velocity language template that PingID SDK uses to pass push authentication messages to the device. The template is used to populate the
clientContextparameter, using the following variables:-
OOBAuthRequestContext: Refer to the PingFederate developer documentation https://www.pingidentity.com/content/dam/developer/documentation/pingfederate/server-sdk/9.3/index.html?com/pingidentity/sdk/oobauth/class-use/OOBAuthRequestContext.html. -
LanguagePackMessages: Refer to the PingFederate developer documentation https://www.pingidentity.com/content/dam/developer/documentation/pingfederate/server-sdk/9.3/index.html?com/pingidentity/sdk/locale/LanguagePackMessages.html. -
SimpleTitle: String. The push message’s title. -
SimpleBody: String. The push message’s body text. -
JsonHelp: Jose4j JSONValue class. Refer to https://javadoc.io/doc/org.bitbucket.b_c/jose4j/0.4.1/org/jose4j/json/internal/json_simple/JSONValue.html.
-
-
-
Save the configuration.
-
Optional: Configure a dynamic notification push category or dynamic application ID.
CIBA authenticators support dynamic notification push categories and dynamic application IDs, and their configurations are similar.
- Dynamic notification push categories
-
A CIBA authenticator can receive a notification push category as a dynamic attribute. This enables a single CIBA authenticator to work with multiple categories, and submit push notifications according to categories.
Dynamic notification push category configuration requires the following software versions:
-
PingFederate 9.3+
-
PingID SDK Package v1.13+ comprising:
-
PingID SDK Integration Kit v1.9+
-
PingID SDK Adapter for PingFederate v1.8+
-
PingID SDK CIBA Authenticator 1.1+
-
-
- Dynamic application IDs
-
A CIBA authenticator can receive an application ID as a dynamic attribute. This enables a single CIBA authenticator to work with multiple applications. The dynamic application ID overwrites the default application ID value (see APPLICATION ID configuration above). If the CIBA authenticator receives an invalid or non-existent application ID, an error is generated.
Dynamic application ID configuration requires the following software versions:
-
PingFederate 9.3+
-
PingID SDK Package v1.14.4+ comprising:
-
PingID SDK Integration Kit v1.11+
-
PingID SDK Adapter for PingFederate v1.8.1+
-
PingID SDK CIBA Authenticator 1.1.1+
-
-
-
In the PingFederate admin console, select: OAuth Server → CIBA → Authenticators.
-
In the authenticator’s Extended Contract step, under Extend the Contract:
Choose from:
-
To configure a dynamic notification push category, enter
pingIdSdkPushCategory -
To configure a dynamic application ID, enter
pingIdSdkApplicationIdClick ADD.
-
-
Click SAVE.
-
In the PingFederate admin console, select: OAuth Server → CIBA Request Policies.
-
Click Add Policy.
For more information, see Managing CIBA request policies and Defining issuance criteria for identity hint contract in the PingFederate Administration Guide.
-
In the Identity Hint Contract step, under Extend the Contract:
Choose from:
-
To configure a dynamic notification push category, enter
request.pingIdSdkPushCategory -
To configure a dynamic application ID, enter
request.pingIdSdkApplicationId
Click ADD.
-
-
Click NEXT.
The CIBA policy’s Identity Hint Mapping step is displayed.
-
Click Manage Fulfillment.
-
In the Identity Hint Mapping step:
Choose from:
-
To configure a dynamic notification push category, select
Requestin the Source column of therequest.pingIdSdkPushCategorycontract. -
To configure a dynamic application ID, select
Requestin the Source column of therequest.pingIdSdkApplicationIdcontract.
Click ADD.
-
-
Save the configuration.