Adding a RADIUS rule
To configure Checkpoint VPN for PingID multi-factor authentication (MFA), you must add a RADIUS rule.
Steps
-
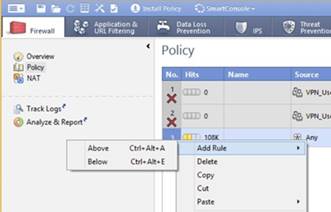
In the Checkpoint toolbar, click the Firewall tab.
-
In the upper left-hand tree, click Policy.
Result:
The rules of the existing policy are listed.
-
In the row for Any, in the No. column, right-click and select Add Rule → Above.

Result:
A new row is added to this policy.
-
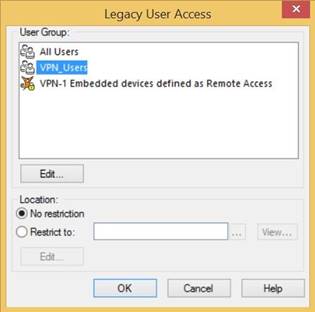
In the new row, in the Source column, right-click Any, and then go to Add Objects → Add Legacy User Access.
-
In the Legacy User Access window, select the RADIUS user configured earlier. Click OK.
For more information, see Configure a RADIUS user profile.

-
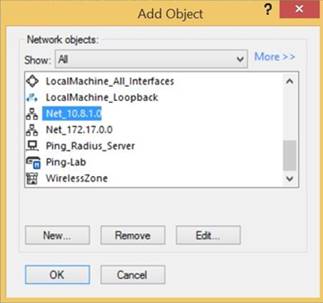
In the Destination column, right-click Any and select Network Object.
-
In the Add Object window, select the VPN network configured by your network administrator. Click OK.

-
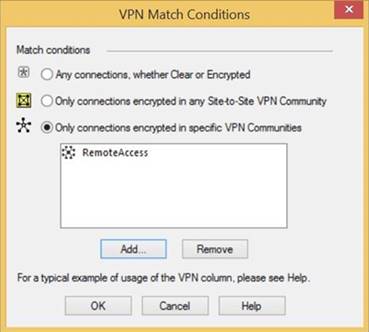
In the VPN column, right-click Any Traffic, and then click Edit Cell.
-
In the VPN Match Conditions window, select Only Connections Encrypted in Specific VPN Communities.

-
Add the RemoteAccess community to the rule.
-
In the VPN Match Conditions window, click Add.
-
Select RemoteAccess. Click OK.
-
To return to the main menu, click OK.
-
-
In the Action column of your RADIUS rule, right-click and select Accept.
-
In the Track column of your RADIUS rule, right-click None, and then select Log.
