Configuring a PingFederate policy for a consistent passwordless authentication experience
Configure a PingFederate policy to give your users a consistent passwordless authentication experience across browsers on Mac and Windows machines using the PingID desktop app. You can also use this policy to enable passwordless authentication with FIDO2 passkeys.
Requirements and limitations
Requirements
To configure PingID for passwordless authentication, you’ll need:
-
PingFederate 13.0.0 or later.
-
PingID Integration Kit 2.30 or later. You’ll need to copy the
pingid-passwordless.jsfile from/<pingfederate-integration-kit>/<pf-pingid-idp-adapter>.<2.18_or_later>/distto
<pf_install>/pingfederate/server/default/conf/template/assets/scripts/authenticators -
A PingID account managed in a PingOne environment. The PingID desktop app and passkey devices must also be associated with the same relying party ID (RPID) as the RPID to which the user signs in. To achieve this:
-
Define a PingOne custom domain. Learn more in Setting up a custom domain in PingOne in the PingOne documentation.
-
In the relevant PingOne FIDO policy (for passkeys), and multi-factor authentication (MFA) policy (for PingID desktop app), make sure Relying Party Domain is set to Custom Domain.
-
Create a connection between PingFederate and PingOne. Learn more in Creating connections to PingOne in the PingFederate documentation.
-
-
If you expect your users to use a Safari browser, you’ll need to configure the passwordless flow for Safari on macOS. Learn more in Establishing trust when using a custom domain in the PingOne documentation.
Limitations
-
Use of PingOne risk policy or legacy PingID policy isn’t supported for the passwordless authentication flow.
-
The list of fallback devices registered for offline authentication isn’t updated or backed up during the passwordless authentication flow.
Learn more in Configuring offline MFA (PingID Adapter).
About this task
To use PingID as a passwordless authentication solution for federated single sign-on (SSO) with PingFederate, in PingFederate, you’ll need to:
-
Configure a PingID Adapter instance.
-
Configure an HTML Form Adapter.
-
Create an authentication policy contract (APC).
-
Create an authentication policy.
Steps
-
Configure a PingID Adapter instance, including the PingOne Environment and Conditional UI.
Learn more in Configuring a PingID adapter instance.
-
Configure an HTML Form Adapter instance and on the IdP Adapter tab, go to Show Advanced Fields and in the Client Side Authenticator list select the PingID Adapter instance you created.
This enables the PingID Adapter to evaluate the user’s browser for passwordless options (such as passkeys, and the PingID desktop app) before falling back to the HTML form (traditional username and password).
Learn more in Configuring an HTML Form Adapter instance in the PingFederate documentation .
-
Create an APC.
-
Go to Authentication > Policies > Policy Contracts.
Learn more in Managing policy contracts in the PingFederate documentation.
-
Click Create New Contract.
-
In the Contract Name field, enter a name for the policy contract, and then click Next.
-
On the Contract Attributes tab, for each attribute you want to add, type the name of the attribute and then click Add.
You can find a list of PingID attributes in PingID authentication attributes.
-
To advance to the Summary tab and to review the contract, click Next. Click Save.
-
-
Create an authentication policy:
Learn more in Authentication policies in the PingFederate documentation.
-
Go to Authentication and then click Policies.
-
On the Policies tab, select the IdP Authentication Policies checkbox, and then click Add Policy.
-
In the Name field, enter a meaningful name for the authentication policy.
-
In the Policy list, select IdP Adapters and then select the HTML Form Adapter. A branch for the HTML form Adapter is added to the PingFederate policy tree, and Fail and Success lists are added.
-
In the HTML Form Adapter branch below the Fail list click Done.
-
In the HTML Form Adapter branch Success field list, select IdP Adapters and then select the PingID Adapter. Success and Fail fields are added to the branch.
-
Under the PingID Adapter entry, click Options and specify the following:
-
Source:
HTML Form Adapter -
Attribute:
Username -
Make sure the User ID Authenticated checkbox is selected, and then click Done.
-
-
In the PingID Adapter branch below the Fail list, click Done.
-
In the PingID Adapter branch Success list, select Policy Contract, and then select the policy contract you created earlier.
-
Under the PingID Adapter Success list, click Contract Mapping and complete the relevant contract mapping.
Learn more in Configuring contract mapping in the PingFederate documentation.
You can find a list of attributes that can be used upon successful authentication with PingID in PingID authentication attributes.
-
-
Click Save.
Result:
The Policies page shows the new authentication policy, which is automatically set to Enabled.
User Experience
Passwordless Sign On button behavior
When a passwordless authentication experience is configured, the sign-on form displays the Passwordless Sign On button.
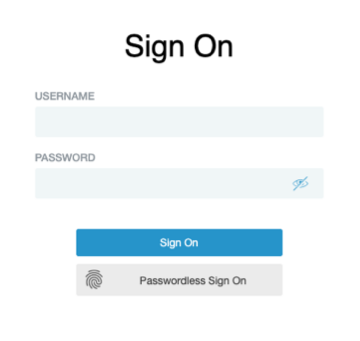
Passwordless sign-on button visibility
The Passwordless Sign On button will only appear if:
-
PingIDdesktop app or FIDO2 is enabled in the default MFA policy.
-
Offline authentication isn’t set to Enforce Offline Authentication.
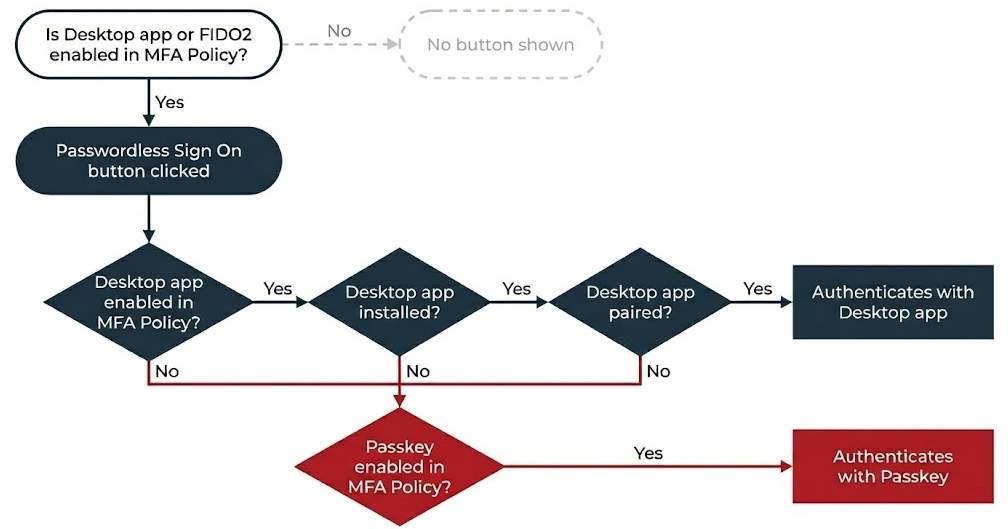
Authentication method selection
The authentication method presented to the user when they click Passwordless Sign On depends on their paired devices, as follows:
-
If the PingID desktop app is paired and available, it’s used by default.
If Conditional UI is set to either Optional or Conditional, users can also authenticate passwordless by selecting a passkey through the conditional UI. Learn more in Configuring a PingID adapter instance.
-
If PingID desktop app is not installed and paired:
-
If only a single passkey is paired, it’s used by default.
-
If multiple passkeys are paired, the user is presented with a list of available passkeys and must select the passkey they want to use.
-
Known limitations
Fallback to passkeys doesn’t occur for users on a Safari browser
If passkeys and PingID desktop app are enabled in the default MFA policy, but the user doesn’t have the PingID desktop app installed on their device, fallback to passkeys doesn’t work on a Safari browser. This behavior differs from that of a Chrome browser, where fallback to passkeys is automatic.