PingID Administration Guide

Creating an authentication profile

To configure Palo Alto Global Protect to work with PingID multi-factor authentication (MFA), you must create an authentication profile.

Steps

  1. Go to Device → Authentication Profile, and then click Add.

    Result:

    The Authentication tab of the Authentication Profile window is displayed.
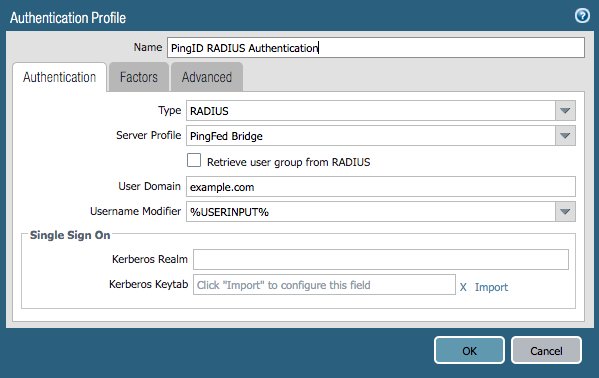
    A screen capture of the Authentication tab in the Authentication Profile window. At the top of the window is the Name field for the entire profile. The Authentication tab includes the fields for Type; Server Profile, which has a check box under it for the option to Retrieve user group from RADIUS; User Domain; and Username Modifier.. In the Single Sign On section that follows the Username Modifier field are fields for Kerberos Realm and Kerberos Keytab. To the right of the Kerberos Keytab field is a hyperlink option to Import. The bottom of the window shows the OK and Cancel buttons.
  2. In the Name field, enter a name for the profile.

  3. From the Type list, select RADIUS.

  4. From the Server Profile list, select the RADIUS profile that you previously created.

  5. In the User Domain field, enter your own domain name.

  6. From the Username Modifier list, leave the default selection of %USERINPUT%.

  7. Click Advanced.

    Result:

    The Advanced tab of the Authentication Profile window is displayed.
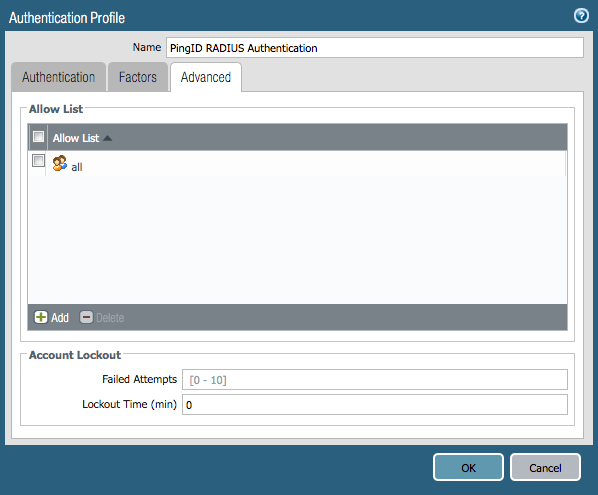
    A screen capture of the Advanced tab in the Authentication Profile window. The Advanced tab shows the Allow List section with a list of option to which the profile will apply. The bottom of the list as an Add plus sign button and a grayed out Delete minus sign button. The Account Lockout section follows the Allow List and shows the fields for Failed Attempts and Lockout Time (min). The bottom of the window shows the OK and Cancel buttons.
  8. In the Allow List section, select the group to which this authentication profile will apply. Click OK.