Installing the PingID integration for Windows login using UI wizard
Before you begin
|
Adding multi-factor authentication (MFA) is a procedure that carries the risk of being locked out of the machine. See Prerequisites for installing PingID integration for Windows login before proceeding. |
About this task
To install the PingID integration for Windows login using the UI wizard:
Steps
-
On the PingID Downloads page, go to Integrations, and download and extract PingID for Windows login.
If your version of Windows login is more than two versions behind the current version listed on the downloads page, you must uninstall your current version of PingID for Windows login before you install the new version.
-
Double-click the
PingIDWindowsLogin<version>.exefile to launch the setup wizard, and then click Next.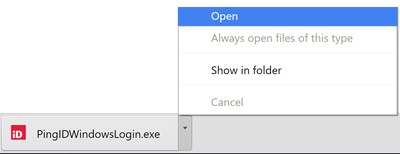
-
Review the Software License Agreement, click I accept the agreement, and then click Next.
-
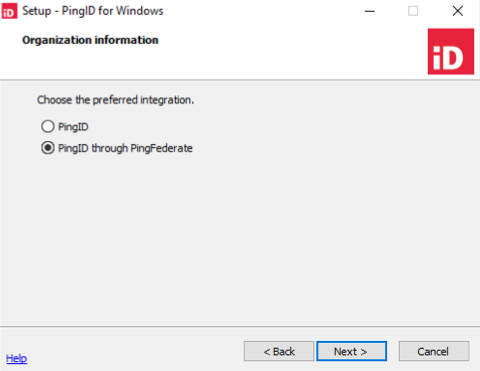
In the Organization Information window, select either:
Choose from:
-
PingID: Integrate PingID directly with Windows login.
-
PingID through PingFederate: Integrate PingID with Windows login through PingFederate.
-
-
In the Organization Information window, click Browse, and then select the
pingid.propertiesfile that you want to use.When integrating with PingFederate, for security reasons it is recommended that you use the
Windows and Mac login PingID properties filein both the PingID Adapter, and in the Windows Login installation.
-
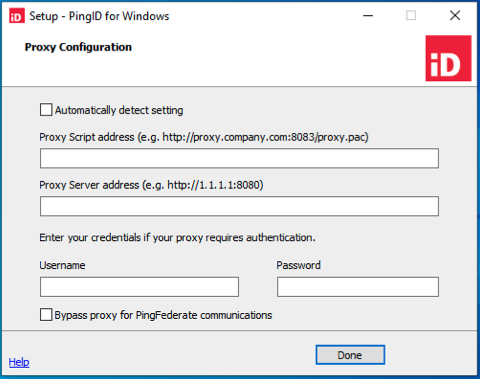
If your connection is behind a proxy: click Configure Proxy and then configure the options relevant for your proxy. If you prefer to have the communication with PingFederate not go through the proxy, click the Bypass proxy for PingFederate communications check box.
-
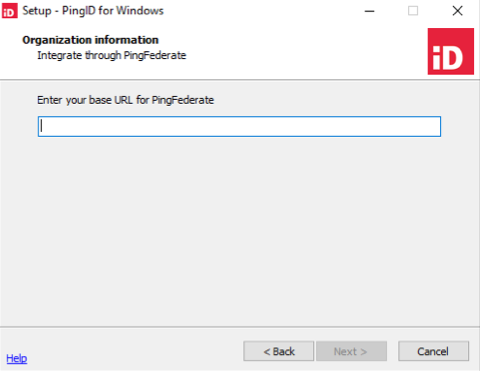
For PingID through PingFederate integration only: In the base URL field, enter the PingFederate base URL, and then click Next.
-
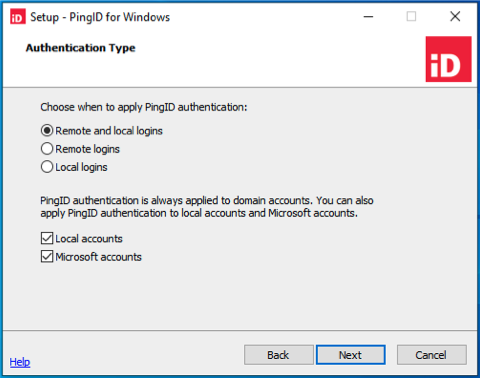
In the Authentication Type window:
-
Select when you want to apply PingID authentication. Choose from:
-
Remote and local login: Users are required to authenticate with PingID when connecting to Windows login locally or remotely.
-
Remote logins: Users connecting to the Windows login machine remotely are required to authenticate with PingID. Users bypass PingID authentication when logging in locally.
-
Local logins: Users connecting to the Windows login machine locally are required to authenticate with PingID. Users bypass PingID authentication when signing on remotely.
-
-
(Optional) Select the relevant check box to apply PingID to Local accounts, Microsoft accounts, or both.
-
Local accounts: User accounts that are stored on the local machine.
-
Microsoft accounts: Microsoft account used to access Microsoft devices and services associated with a specific user. For example,
johndoe@outlook.com. The PingID integration for Windows recognizes all types of Microsoft accounts.
-
-
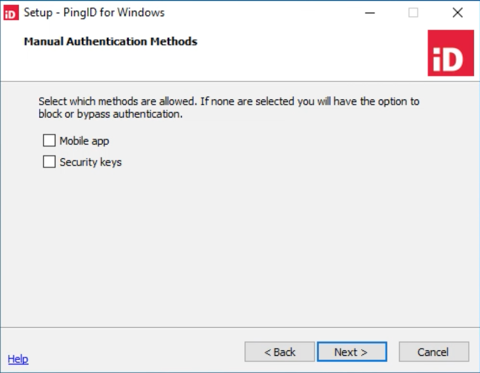
Click Next. The Manual Authentication Methods window is displayed.
-
-
If PingID server is unavailable or the user is offline, for example, the connection with the PingID server can’t be verified at the time of sign on, either enable or disable manual authentication:
Choose from:
-
Enable manual authentication:
-
In the Manual Authentication Methods window, select at least one manual authentication method and then click Next. The Authentication Type window displays offline authentication options.
-
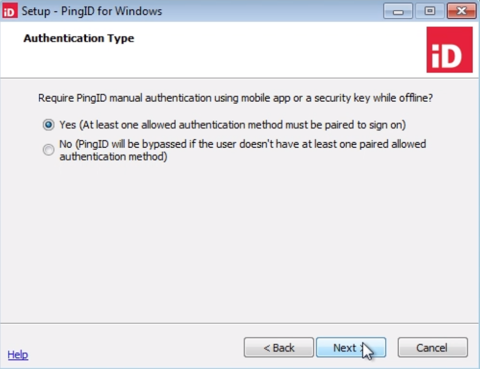
In the Authentication Type window, select whether to use PingID offline MFA or allow the user to bypass PingID MFA if the user is offline, such as no internet connection. Select one of the following and then click Next:
-
Yes: The user is prompted to authenticate through the manual (offline) authentication flow. At least one offline authentication method must be paired for the user to authenticate, otherwise the user is blocked.
-
No: If the user does not have at least one offline authentication method paired with their account, PingID bypasses MFA during sign on.
-
-
-
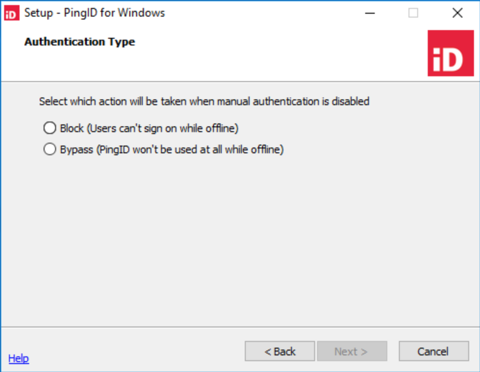
Disable manual authentication and define behavior when the PingID server is offline:
-
In the Manual Authentication Methods window, leave all check boxes cleared and click Next. The Offline Authentication page displays a list of options when the user is offline.
-
In the Authentication Type window, select one of the following, and then click Next:
-
Block: The user cannot sign on while offline.
-
Bypass: Bypass MFA with PingID, allowing user to complete sign on.
-
The PingID offline MFA feature is available from PingID integration for Windows login 2.0 or later, with a paired mobile device using PingID mobile app 1.8+.
-
Pairing and use of a security key for offline authentication requires PingID integration for Windows login 2.3 or later. If using PingID integration for Windows login 2.2 or earlier, security key for offline authentication is not permitted, and the flow is different.
-
-
-
-
-
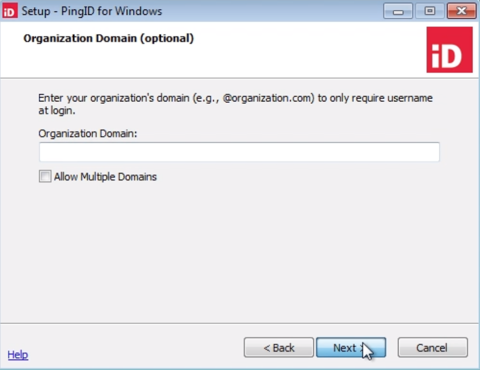
In the PingID Username Mapping window:
-
In the Legacy username parsing convention field:
-
Specify your organization’s default domain. Domain format should be:
-
@domainname, such as@somewhere.com. -
Maximum of 50 characters.
-
The string entered in this field is appended to the username during sign on.
If specified, users can enter their username, such as
jsmith, rather than entering full user and domain name, as injsmith@pingidentity.com.-
If you select this option without providing a default domain, the SAMAccountName is used.
-
This option is not recommended in environments with multiple domains, or environments where PingID is also used to sign on locally.
-
-
-
(Optional) Select Allow Multiple Domains to allow the user to sign on from any domain in addition to the default domain. If the user specifies a domain, that domain is used, otherwise the default domain is used. This option is available with PingID for Windows login 2.2 and higher.
-
Do not use this option if you did not specify a default domain in the Legacy username parsing convention field.
-
If you selected Allow Multiple Domains, users should use only the UserPrincipalName format (and not the samAccountName).
-
If you applied PingID authentication to local or Microsoft accounts, the recommended username mapping is objectSID.
-
-
-
In the Specific username mapping field, select the attribute that you want to use to verify the user account.

Examples showing how the username is mapped in PingID:
-
objectSid: Use the object SID.
S-1-5-21-668608636-2615149724-2645577550-1111
-
userPrincipalName: Use the userPrincipalName.
jsmith@domain.com
-
sAMAccountName (DOMAIN\UserName): Use the Domain Name as prefix, or the computer name when logged in locally, and then the SAM Account Name.
DOMAIN\jsmith
-
sAMAccountName (UserName only): Use only the SAM Account Name.
jsmith
For security reasons, when using Windows login in a multiple domain environment, it is recommended that you use specific username mapping rather than the legacy username parsing convention.
-
-
Click Next.
-
-
In version 2.8 of the Windows login integration, an improved implementation was introduced for the use of security keys while offline. If the installation program detects security keys that were paired prior to this change, you are presented with the following options:
-
Allow: Allow users to continue using these keys (this option is not recommended)
-
Inform: Allow users to continue using these keys, but inform them that these keys should be manually deleted
-
Delete: Automatically delete the keys that were paired before the change was introduced
-
-
To select the folder in which to install PingID, click Browse, select the destination folder or accept the default, and click Next.
-
Click Install.
-
When the installation is complete, click Yes to restart the computer and apply the changes.

The next time the user signs on to the Windows machine, they will need to authenticate with PingID.
-
Delete the downloaded
pingid.propertiesfile after the installation has completed.The
OrgData1,OrgData2, … fields in theHKEY_LOCAL_MACHINE\SOFTWARE\Ping Identity\PingId\PingIdCredProvregistry are encrypted and should not be edited. -
To verify the installation was successful, test that the user can sign on to the Windows machine using their password and PingID MFA.