Create authentication trees
Create a tree in the UI
-
In the AM admin UI, go to Realms > realm name > Authentication > Trees and click Create Tree.
-
Enter a tree name, for example
myAuthTree, and click Create.The authentication tree designer displays with the Start entry point connected to the Failure exit point.
The authentication tree designer provides the following features on the toolbar:
Authentication tree designer toolbar Button Usage 
Lay out and align nodes according to the order they’re connected.

Toggle the designer window between normal and full screen layout.

Remove the selected node. You can’t delete the Start entry point.
-
Add a node to the tree by dragging the node from the Components panel on the left-hand side, and dropping it into the designer area.
The list of authentication nodes is divided into categories. Click the category title to expand and collapse the categories.
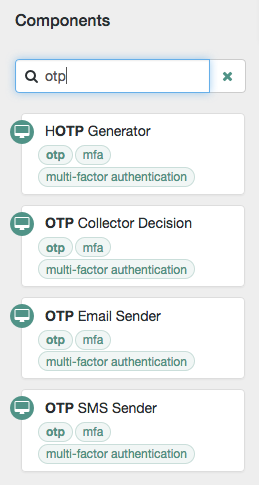
Use the filter text field to restrict the list of authentication nodes. This will match on the node’s name and any tags applied to the node:
-
Configure the node properties by using the right-hand panel.
You can find more information on the available properties for each node in Node reference.
-
Connect the node to the tree as follows:
-
Select and drag the output connector from an existing node and drop it onto the new node.
-
Select and drag the output connector from the new node and drop it onto an existing node.
Nodes have one or more connectors, displayed as dots on the node. Unconnected connectors appear red until you connect them to other nodes in the tree.
Input connectors appear on the left of the node, output connectors appear on the right. A line is drawn between the connectors of connected nodes, and the connectors no longer appear red.
-
-
To change a connection, select and drag the green connector in the connection and drop it onto the new location.
-
Continue adding, connecting and removing nodes until the tree is complete, then click Save.
-
Test your authentication tree by navigating to a URL similar to the following:
https://am.example.com:8443/am/XUI/?realm=/alpha&service=myAuthTree#login
Create a tree over REST
To create an authentication tree over REST, send individual PUT requests to create each node. Then send a PUT request to create the tree, specifying a tree ID and including all the nodes in the tree. You can find information on the required parameters in the online REST API reference, and the latest node definitions in List latest node definitions.
Consider the following when creating authentication trees using the REST API:
-
You must re-create each node when creating a new authentication tree.
-
Include the version of the node you want to create in the request URL.
If the version doesn’t exist, an HTTP 404 Not Found status code is returned, as follows:
{
    "code": 404,
    "reason": "Not Found",
    "message": "Resource 'n.0' not found"
}
To find the latest version for a node, send a POST request to the realm-config/authentication/authenticationtrees/nodes/node-nameendpoint with_action=getLatestTypeas the query string parameter. -
Each node must have a valid UUID as its identifier. You can generate UUIDs online, for example, using the Online UUID Generator.
If you don’t use a valid UUID, authentication will fail with the following error:
ERROR: Could not get SMS service: authenticationTreesService java.lang.IllegalArgumentException: Invalid UUID string: 12345
-
The
entryNodeIdfield specified when creating the authentication tree is the UUID of the first node in the tree. -
The
outcomefield specified when creating the authentication tree is the UUID of the next node. This allows you to move between nodes. -
The Success and Failure nodes have the following static UUIDs:
-
Success node:
70e691a5-1e33-4ac3-a356-e7b6d60d92e0 -
Failure node:
e301438c-0bd0-429c-ab0c-66126501069a
These UUIDs remain constant across all authentication trees and AM versions.
-
Example
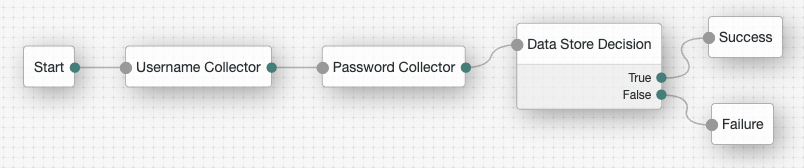
Complete these steps to create a simple authentication tree consisting of three nodes: Username Collector node, Password Collector node, and Data Store Decision node.
-
Generate UUIDs for each of the nodes you want to create. This example uses the following UUIDs:
-
Username Collector node:
8f9d2280-caa7-433f-93a9-1f64f4cae60a -
Password Collector node:
54f14341-d1b7-436f-b159-d1f9b6c626eb -
Data Store Decision node:
3fc7ce22-fc79-4131-85f2-f1844709d042
-
-
Authenticate to AM as the
amAdminuser:$ curl \ --request POST \ --header "Content-Type: application/json" \ --header "X-OpenAM-Username: amadmin" \ --header "X-OpenAM-Password: password" \ --header "Accept-API-Version: resource=2.0, protocol=1.0" \ 'https://am.example.com:8443/am/json/realms/root/realms/alpha/authenticate' { "tokenId":"AQIC5wM…TU3OQ*", "successUrl":"/am/console", "realm":"/alpha" } -
Create a version 2 Username Collector node, where the UUID is the one you generated in step 1:
$ curl \ --request PUT \ --header "iPlanetDirectoryPro: AQIC5wM…TU3OQ*" \ --header "Content-Type: application/json" \ --header "Accept-API-Version: protocol=2.1,resource=3.0" \ --header "If-None-Match: *" \ --data '{ "_id": "8f9d2280-caa7-433f-93a9-1f64f4cae60a", "_type": { "_id": "UsernameCollectorNode", "name": "Username Collector" } }' \ "https://am.example.com:8443/am/json/realms/root/realms/alpha/realm-config/authentication/authenticationtrees/nodes/UsernameCollectorNode/2.0/8f9d2280-caa7-433f-93a9-1f64f4cae60a" { "_id": "8f9d2280-caa7-433f-93a9-1f64f4cae60a", "_rev": "280717409", "prepopulate": false, "_type": { "_id": "UsernameCollectorNode", "name": "Username Collector", "collection": true, "version": "2.0" }, "_outcomes": [ { "id": "outcome", "displayName": "Outcome" } ] } -
Create a version 1 Password Collector node, where the UUID is the one you generated in step 1:
$ curl \ --request PUT \ --header "iPlanetDirectoryPro: AQIC5wM…TU3OQ*" \ --header "Content-Type: application/json" \ --header "Accept-API-Version: protocol=2.1,resource=3.0" \ --header "If-None-Match: *" \ --data '{ "_id": "54f14341-d1b7-436f-b159-d1f9b6c626eb", "_type": { "_id": "PasswordCollectorNode", "name": "Password Collector" } }' \ "https://am.example.com:8443/am/json/realms/root/realms/alpha/realm-config/authentication/authenticationtrees/nodes/PasswordCollectorNode/1.0/54f14341-d1b7-436f-b159-d1f9b6c626eb" { "_id": "54f14341-d1b7-436f-b159-d1f9b6c626eb", "_rev": "792175357", "_type": { "_id": "PasswordCollectorNode", "name": "Password Collector", "collection": true, "version": "1.0" }, "_outcomes": [ { "id": "outcome", "displayName": "Outcome" } ] } -
Create a version 1 Data Store Decision node, where the UUID is the one you generated in step 1:
$ curl \ --request PUT \ --header "iPlanetDirectoryPro: AQIC5wM…TU3OQ*" \ --header "Content-Type: application/json" \ --header "Accept-API-Version: protocol=2.1,resource=3.0" \ --header "If-None-Match: *" \ --data '{ "_id": "3fc7ce22-fc79-4131-85f2-f1844709d042", "_type": { "_id": "DataStoreDecisionNode", "name": "Data Store Decision" } }' \ "https://am.example.com:8443/am/json/realms/root/realms/alpha/realm-config/authentication/authenticationtrees/nodes/DataStoreDecisionNode/1.0/3fc7ce22-fc79-4131-85f2-f1844709d042" { "_id": "3fc7ce22-fc79-4131-85f2-f1844709d042", "_rev": "2145625368", "_type": { "_id": "DataStoreDecisionNode", "name": "Data Store Decision", "collection": true, "version": "1.0" }, "_outcomes": [ { "id": "true", "displayName": "True" }, { "id": "false", "displayName": "False" } ] } -
Create the authentication tree with these three nodes, where the UUIDs are the ones you used to create the nodes. Make sure you set
entryNodeIdto the UUID of the first node, include the node versions, and set theoutcomeof each node to the UUID of the next node:$ curl \ --request PUT \ --header "iPlanetDirectoryPro: AQIC5wM…TU3OQ*" \ --header "Content-Type: application/json" \ --header "Accept-API-Version: protocol=2.1,resource=3.0" \ --header "If-None-Match: *" \ --data '{ "entryNodeId": "8f9d2280-caa7-433f-93a9-1f64f4cae60a", "nodes": { "8f9d2280-caa7-433f-93a9-1f64f4cae60a": { "displayName": "Username Collector", "nodeType": "UsernameCollectorNode", "version": "2.0", "connections": { "outcome": "54f14341-d1b7-436f-b159-d1f9b6c626eb" } }, "54f14341-d1b7-436f-b159-d1f9b6c626eb": { "displayName": "Password Collector", "nodeType": "PasswordCollectorNode", "version": "1.0", "connections": { "outcome": "3fc7ce22-fc79-4131-85f2-f1844709d042" } }, "3fc7ce22-fc79-4131-85f2-f1844709d042": { "displayName": "Data Store Decision", "nodeType": "DataStoreDecisionNode", "version": "1.0", "connections": { "false": "e301438c-0bd0-429c-ab0c-66126501069a", "true": "70e691a5-1e33-4ac3-a356-e7b6d60d92e0" } } } }' \ "https://am.example.com:8443/am/json/realms/root/realms/alpha/realm-config/authentication/authenticationtrees/trees/myNewTree" { "_id": "myNewTree", "_rev": "2061817222", "entryNodeId": "8f9d2280-caa7-433f-93a9-1f64f4cae60a", "innerTreeOnly": false, "noSession": false, "mustRun": false, "enabled": true, "transactionalOnly": false, "uiConfig": {}, "nodes": { "8f9d2280-caa7-433f-93a9-1f64f4cae60a": { "displayName": "Username Collector", "nodeType": "UsernameCollectorNode", "version": "2.0", "connections": { "outcome": "54f14341-d1b7-436f-b159-d1f9b6c626eb" } }, "54f14341-d1b7-436f-b159-d1f9b6c626eb": { "displayName": "Password Collector", "nodeType": "PasswordCollectorNode", "version": "1.0", "connections": { "outcome": "3fc7ce22-fc79-4131-85f2-f1844709d042" } }, "3fc7ce22-fc79-4131-85f2-f1844709d042": { "displayName": "Data Store Decision", "nodeType": "DataStoreDecisionNode", "version": "1.0", "connections": { "false": "e301438c-0bd0-429c-ab0c-66126501069a", "true": "70e691a5-1e33-4ac3-a356-e7b6d60d92e0" } } } } -
Verify the tree has been created in the AM admin UI. It should look similar to this: