AM as a RADIUS server
The RADIUS server service provides a RADIUS server within AM. The server authenticates users connecting from external RADIUS clients using an authentication journey.
The following diagram illustrates the flow of packets between an external RADIUS client and AM (the RADIUS server) during an authentication conversation, where the RADIUS server requests a one-time password (OTP) from the user:

Create an authentication journey
Create journeys to authenticate users connecting to the RADIUS server from external RADIUS clients. Each RADIUS client configuration in the RADIUS server service must specify a journey to use for authentication.
The RADIUS protocol is more limited than a browser-based HTTP flow. As a result, consider the following constraints when designing your journeys for RADIUS authentication:
-
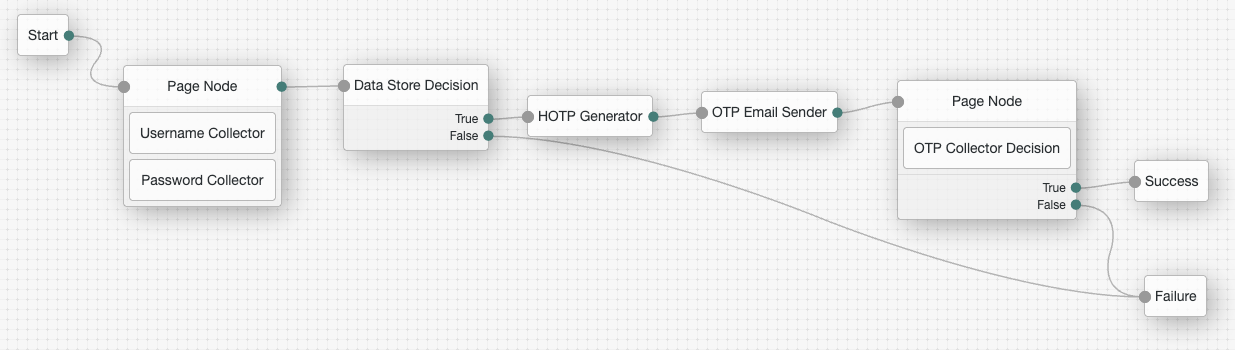
The first interactive node must be a Page node
The RADIUS server requires the username and password together in the initial
Access-Request. To achieve this, the journey must start with a Page node that contains both a Username Collector and a Password Collector node. -
Journeys can only include compatible nodes
Compatible nodes
Only the following nodes are compatible with the RADIUS protocol:
-
Scripted nodes can only use compatible callbacks
Compatible callbacks
Only the following callbacks are compatible with the RADIUS protocol:
-
Use Page nodes to customize
Access-ChallengemessagesNodes that prompt for user input, such as the OTP Collector Decision node, send a simple default message (for example,
One-time Password) in theAccess-Challenge.To provide more context or instructions, place the node inside a Page node. You can then use the Page node’s Page Header property to define custom text, which will prepend the default prompt.
OTP Example
This example demonstrates how to customize the
Access-Challengemessage displayed when using an OTP Collector Decision node to request an OTP for MFA.-
Include the OTP Collector Decision node in a Page node as shown in the example journey.
-
Configure the Page node as follows:
- Page Header
-
Please check your email, we have sent you a code:
The following message is shown to the user when the RADIUS server sends an
Access-Challengepacket requesting the OTP:Please check your email, we have sent you a code: One-time Password -
Configure the RADIUS server service
For each RADIUS client that’s connecting to the AM RADIUS server, create a separate client configuration within the service, and specify the journey to use for authentication. After you have created the RADIUS clients, you can configure and enable the RADIUS server service.
-
In the AM admin UI, go to Configure > Global Services > RADIUS Server.
-
On the Secondary Configurations tab, click Add a Secondary Configuration.
-
Enter the Name and Client Secret for the RADIUS client configuration, and click Create.
-
Configure the remaining properties for the RADIUS client, ensuring you specify the realm and journey in Handler Class Configuration Properties. For example:
realm=/alpha
tree=RADIUS-ClientA-Journey
Find more information about these properties in RADIUS server service.
-
Click Save Changes.
-
If you have multiple RADIUS clients connecting to the AM RADIUS server, create a client configuration for each one.
You don’t need to configure all your RADIUS clients when you configure the RADIUS server service initially. You can add and remove clients over time as needed.
-
Return to the Configuration tab in the RADIUS server service.
-
Configure the properties for the RADIUS server, ensuring you set the Enabled field to
YESto start the RADIUS server.Find more information about these properties in RADIUS server service.
-
Click Save Changes.
The RADIUS server starts immediately when you save the configuration if the Enabled field is set to YES.
|
By default, AM caches up to 5,000 RADIUS clients concurrently. You can change the maximum number of RADIUS clients that can be cached concurrently by setting the |