Task 9: Integrate an OIDC application for SSO
| Unlike previous tasks, this is a conceptual walkthrough. It explains how to integrate an application, but you won’t be required to configure a live application yourself. |
This task walks you through integrating an OpenID Connect (OIDC) application with Advanced Identity Cloud to enable single sign-on (SSO). By delegating authentication to Advanced Identity Cloud, you can secure your applications without building your own sign-on pages or managing passwords.
After an end user signs on through Advanced Identity Cloud, they can access all of your connected applications without re-entering their credentials. This trust is established using secure ID tokens (JWTs), which prove an end user’s identity to your application without it ever handling a password.
In this task, you’ll learn these integration skills:
The Best practices and next steps section offers guidance and resources for integrating OIDC apps in your production environments, after you’ve mastered the basics.
Configure Advanced Identity Cloud as an OpenID Provider
-
In the Advanced Identity Cloud admin console, go to Applications > Custom Application > OIDC - OpenId Connect > Web.
-
On the Application Details page, add the following configuration and click Next:
Field Value Name
demo_oidc_appDescription
Demo OIDC application for getting startedOwners
Select an owner
-
On the Web Settings page, add the following configuration, and then click Create Application:
Field Value Client ID
demo_oidc_appClient Secret
Enter a secure password for the application.
-
Click the Sign On tab, add the following configuration and click Save:
Field Value Sign-in URLs
Grant Types
Authorization CodeScopes
openid,profile,email -
Note the following values from your application configuration. You’ll see how they’re used in the next section:
-
Client ID:
demo_oidc_app -
Client Secret: The password you created
-
Authorization endpoint:
https://<tenant-env-fqdn>/am/oauth2/alpha/authorize -
Token endpoint:
https://<tenant-env-fqdn>/am/oauth2/alpha/access_token -
Userinfo endpoint:
https://<tenant-env-fqdn>/am/oauth2/alpha/userinfo
-
Application configuration example
|
This task uses a demonstration application to show OIDC concepts. For production integrations, refer to the specific documentation for your application framework. |
The values you configured in Advanced Identity Cloud are used by your application developer to set up an OIDC client. While the exact code depends on the programming language, the concepts are universal. The client needs to know:
-
Who is the authority? (
Issuer URL) -
What application is this? (
Client IDandClient Secret) -
Where should users be sent back to? (
Sign-in URL,callbackURL)
The following is an example of how those values are used in a typical configuration for a Node.js application. This example is for illustration only.
const clientID = process.env.OIDC_CLIENT_ID || 'demo_oidc_app';
const clientSecret = process.env.OIDC_CLIENT_SECRET; // Load from environment in production
const issuer = process.env.OIDC_ISSUER || 'https://<tenant-env-fqdn>/am/oauth2/alpha';

passport.use('oidc', new OidcStrategy({
  // By providing the issuer, the library can automatically discover the other endpoints
  issuer: issuer,
  clientID: clientID,
  clientSecret: clientSecret,
  callbackURL: 'http://localhost:3000/callback',
  scope: 'openid profile email',
  // Using PKCE is a security best practice, even for confidential web clients
  pkce: true,
  // The 'state' parameter is also a security best practice, enabled by default
  state: true
}, (issuer, profile, done) => {
  // In a real app, you would find or create an end user in your database here
  return done(null, profile);
}));
Understand the authentication flow
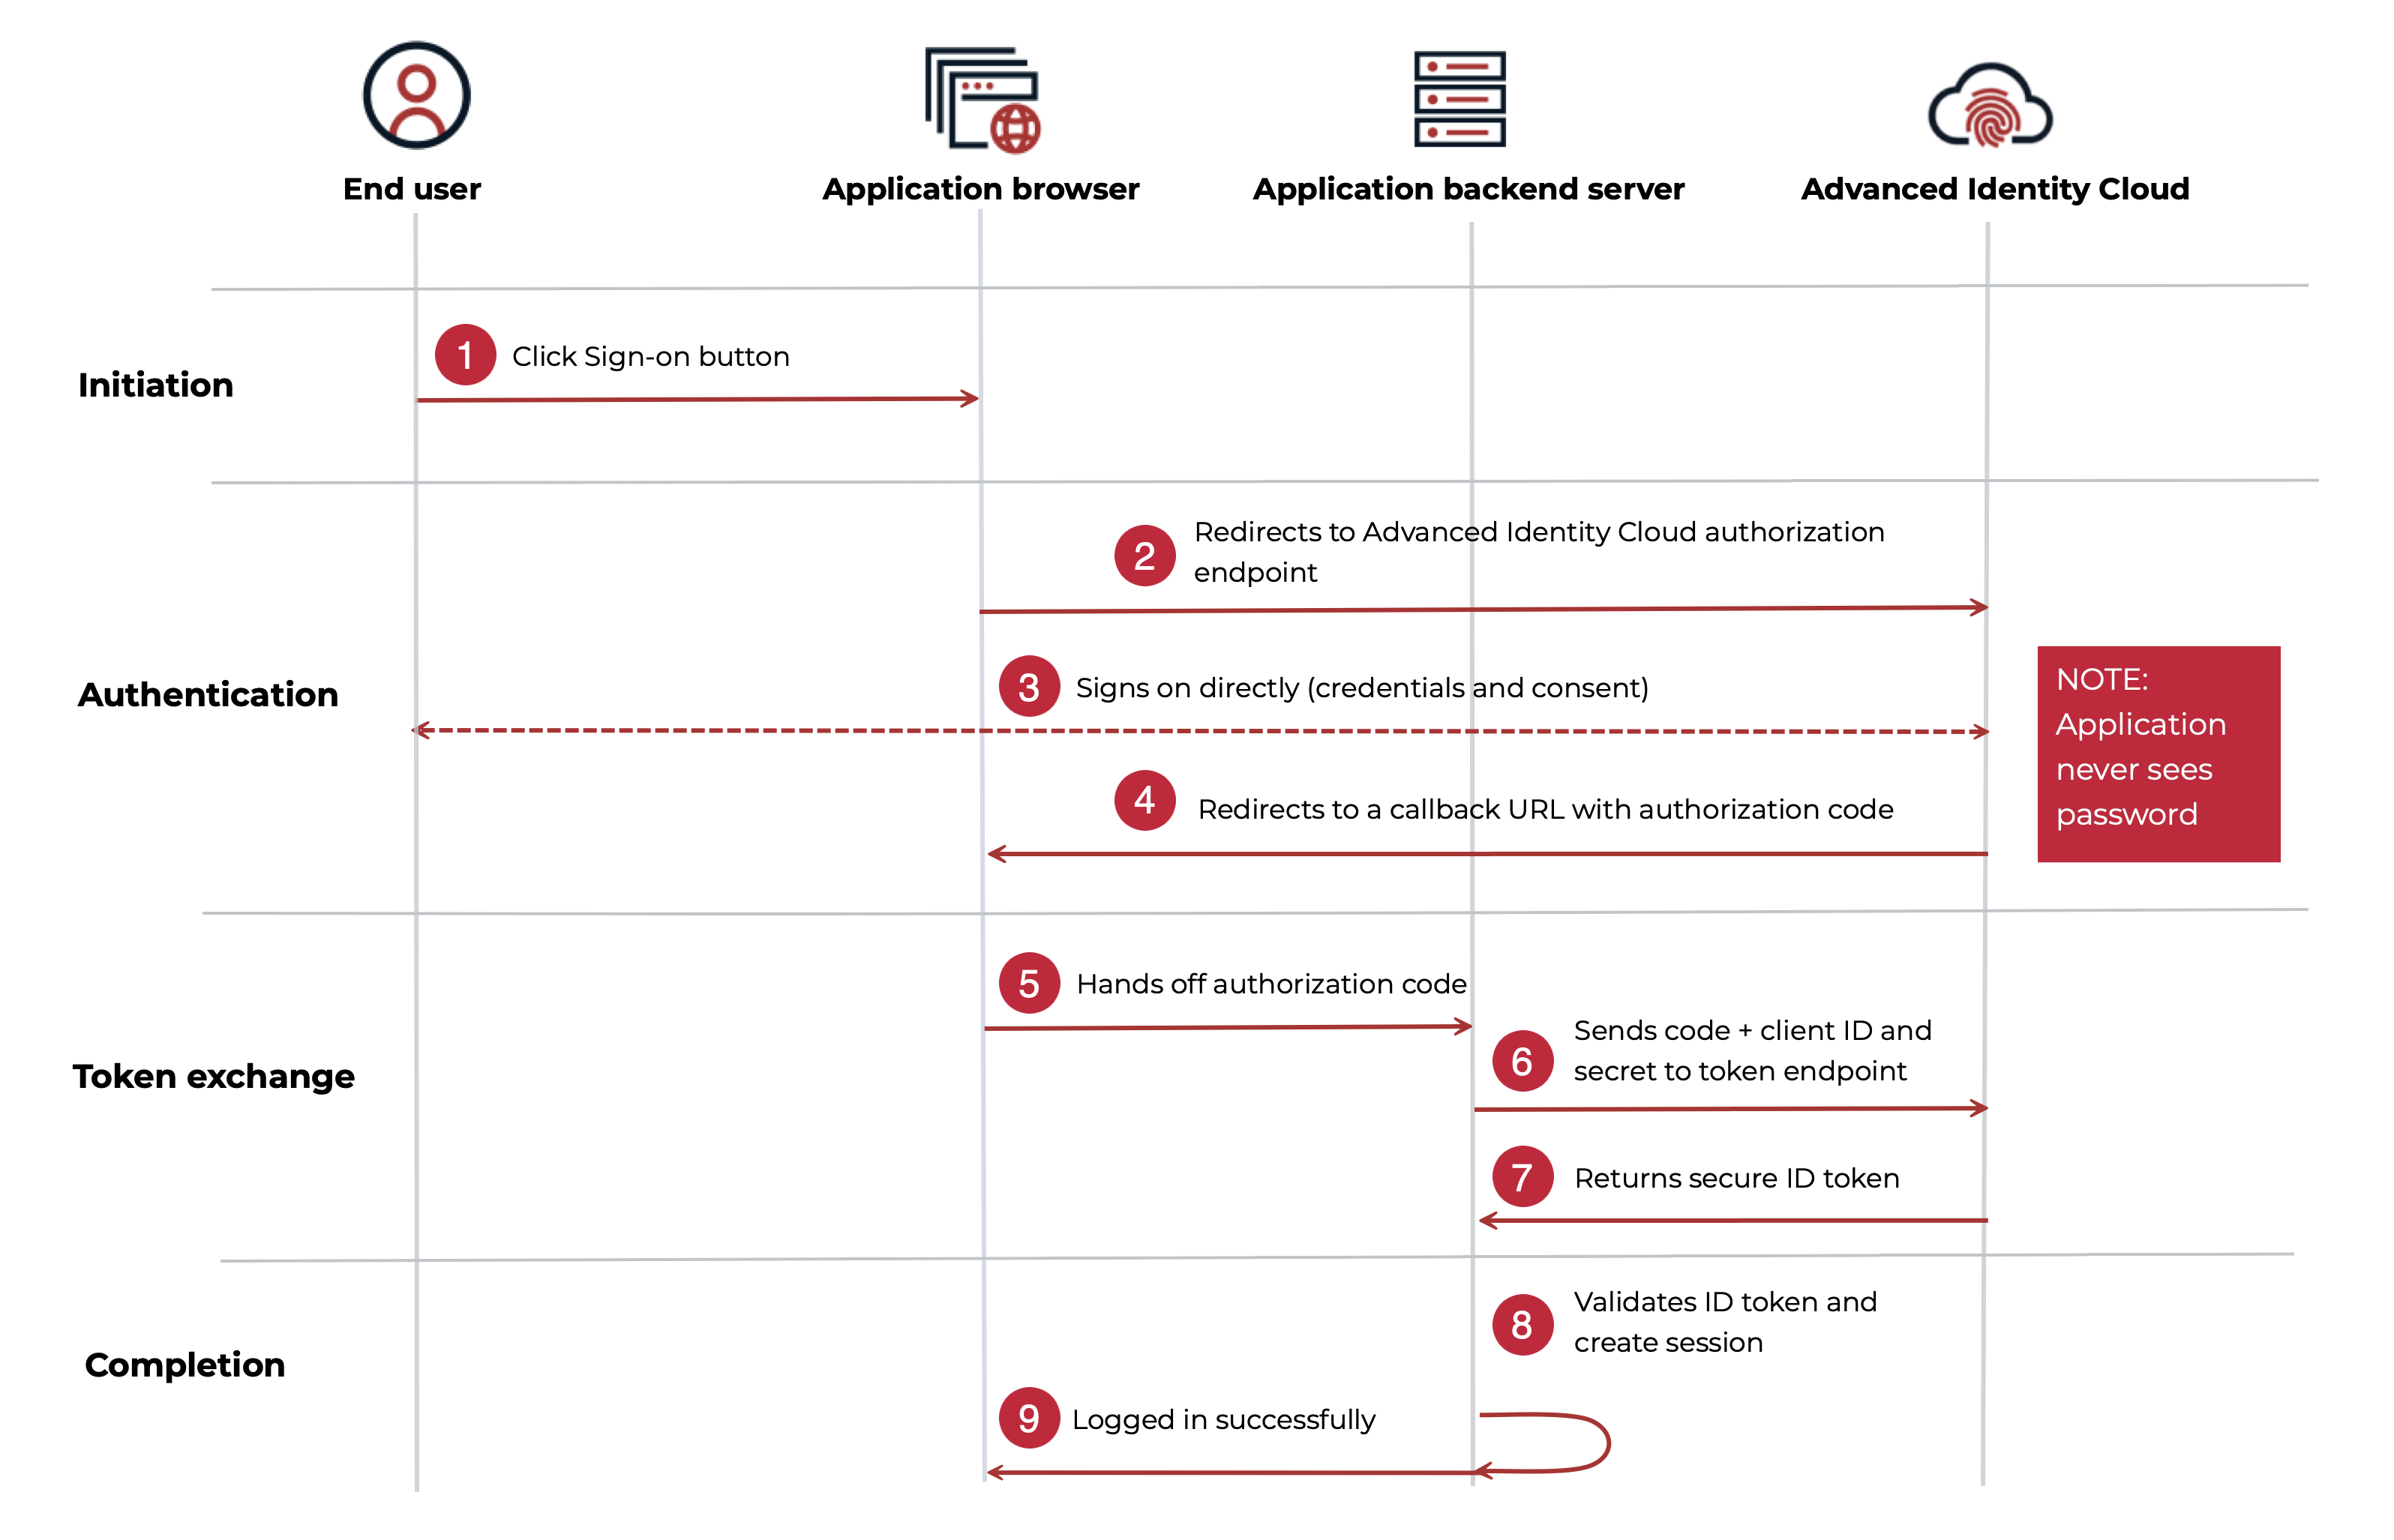
With the application configured, the sign-on process follows the OAuth 2.0 authorization code flow. This is a secure sequence of redirects that establishes trust between the application and Advanced Identity Cloud.
-
1 An end user clicks a sign-on button in the application.
-
2 The application redirects the end user’s browser to the Advanced Identity Cloud authorization endpoint.
-
3 The end user signs on directly with Advanced Identity Cloud, which authenticates them and checks for consent. The application never sees the end user’s password.
-
4 After a successful sign-on, Advanced Identity Cloud redirects the end user back to the application’s sign-in URL (
callbackURL). -
5 The application browser provides a temporary, one-time-use authorization code to the backend server.
-
6 The application’s backend server securely sends the authorization code, along with its
Client IDandClient Secret, to the Advanced Identity Cloud token endpoint. -
7 Advanced Identity Cloud validates the code and credentials, then returns a secure ID token to the application.
-
8 The application validates the ID token’s signature and claims, confirming the end user’s identity.
-
9 The application creates a session for the end user, completing the sign-on process.
This flow ensures that sensitive tokens are passed directly between servers and aren’t exposed in the end user’s browser, providing a high level of security.
Best practices and next steps
Consider these best practices when integrating OIDC applications with Advanced Identity Cloud:
-
Validate ID tokens: An ID token is a claim of identity, but it must be verified. Your application should always validate the token’s signature, issuer, and audience (
aud) claim. This is a critical security step to confirm the user’s identity and ensure the token was issued by Advanced Identity Cloud and intended for your application. Learn more in Token validation. -
Use PKCE for enhanced security (PKCE): PKCE is a security extension that prevents authorization code interception attacks. While it’s mandatory for public clients like single-page applications (SPAs) and mobile apps, it’s also a recommended best practice for confidential web applications as a security measure. Learn more in PKCE.
-
Implement logout: To achieve single logout (SLO), the application should redirect the end user to the Advanced Identity Cloud OIDC
endSessionendpoint. This terminates their central session, ensuring they’re also signed out of all other applications they accessed. Learn more in Session management. -
Request custom scopes and claims: The standard
openid,profile, andemailscopes are great for basic user information. For application-specific data (such as roles, permissions, or a department ID), you can create custom scopes and configure Advanced Identity Cloud to include corresponding custom claims in the ID token. Learn more in OIDC claims. -
Manage sessions with refresh tokens: Access tokens are intentionally short lived to limit the damage if one is compromised. For an application to maintain access to a protected API without forcing the user to sign on again, it should use a refresh token. For example, if your application has a dashboard that automatically refreshes every 15 minutes by calling a secure API, the initial access token may expire. In that case, the application’s backend can use a stored refresh token to silently get a new access token from Advanced Identity Cloud. Learn more in Refresh tokens.