Task 4: Design user self-registration experiences
Advanced Identity Cloud includes a preconfigured default registration journey that lets end users create their own account for an app or service. Although this provides a functional starting point, most real-world implementations require additional customization.
This task guides you through adapting the default journey to create a more robust and user-friendly flow. You’ll test the default journey, then modify it to include common features, such as prompting for a password only after email verification and sending a welcome email to new users.
The Best practices and next steps section then offers guidance and resources for enhancing these experiences after you’ve mastered the basics.
Test the default registration journey
To preview the default journey and register a new end user:
-
In the Advanced Identity Cloud admin console, go to Journeys > Journeys and click the Registration journey.
-
Click the ellipsis icon () and select Edit to view the journey.
-
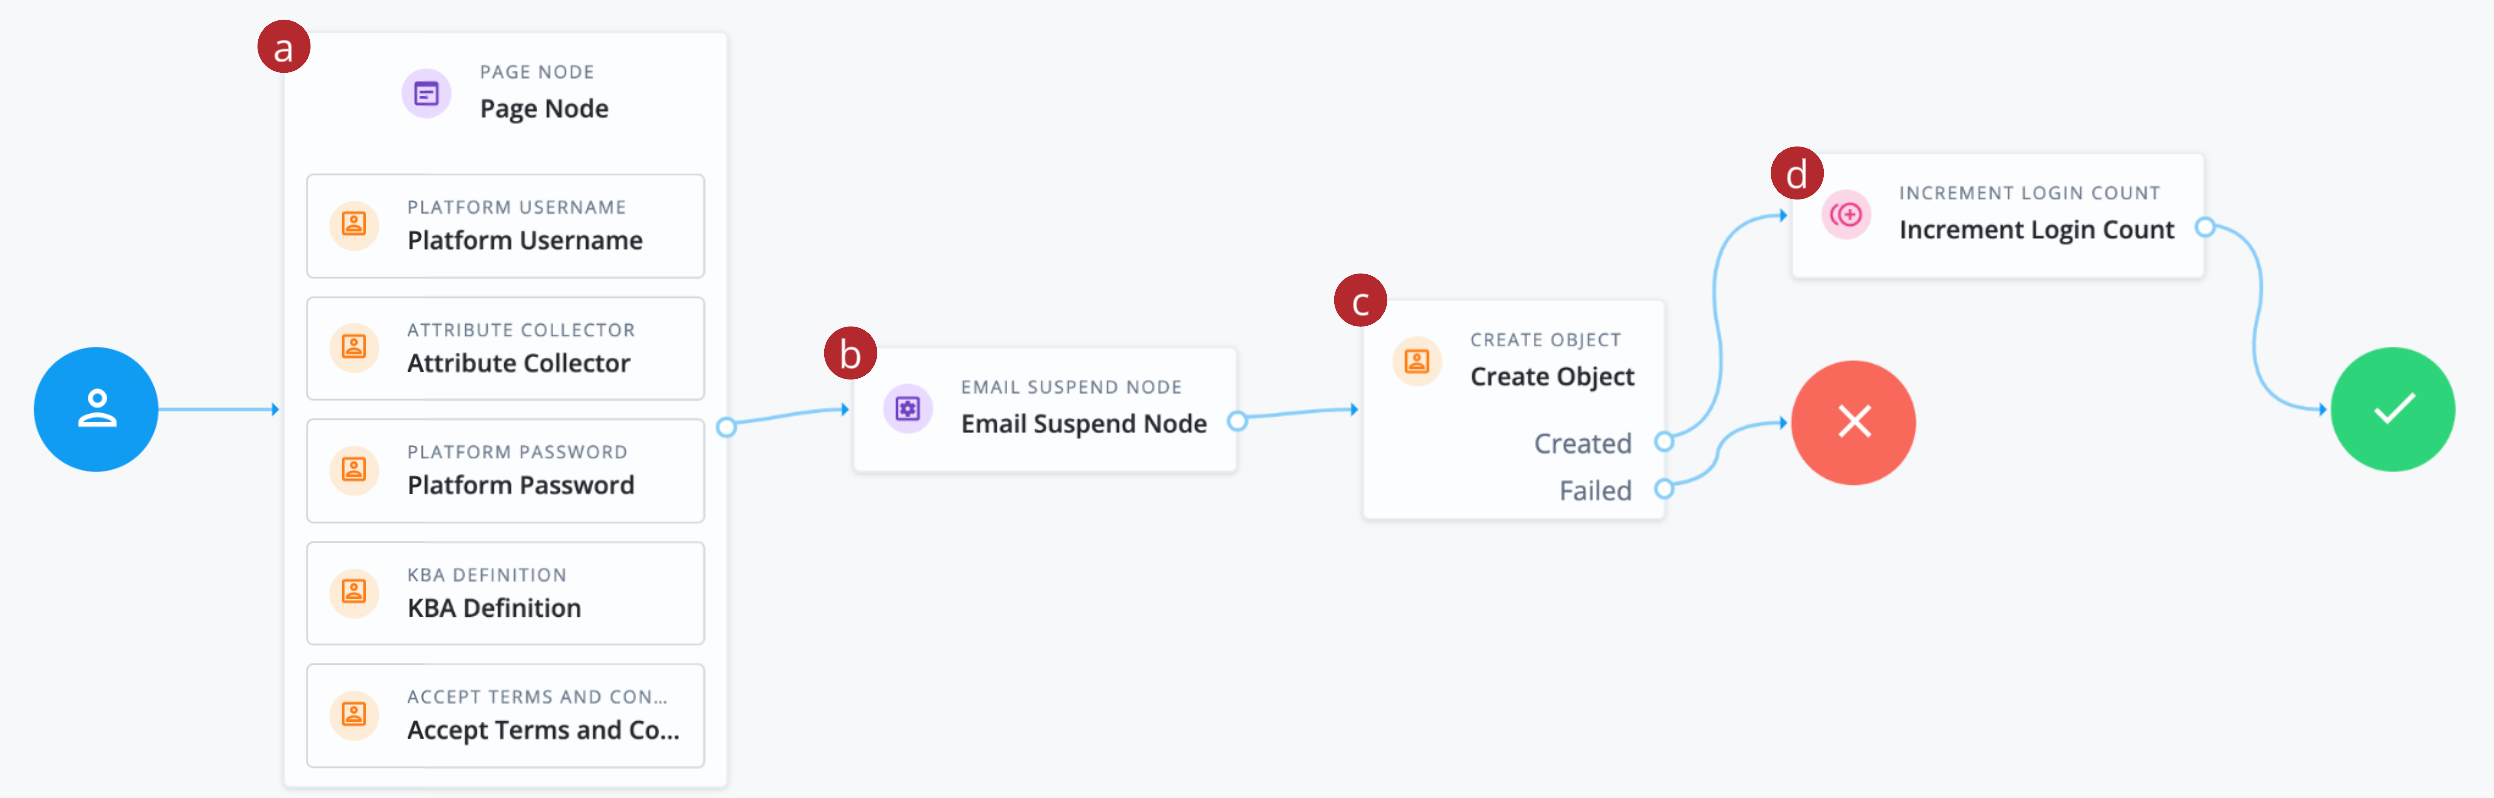
a Collects the username, user details, password, security questions (KBAs), and terms and conditions, and presents them on the same page.
-
b Emails the end user so they can confirm their email address.
-
c Creates the new end user in Advanced Identity Cloud.
-
d Increments the successful login count property for the end user.
-
-
In the Preview URL field, click and paste the URL into an incognito window.
Use incognito mode for testing to avoid caching issues and so that no current sessions interfere with your test. The Sign Up page opens.
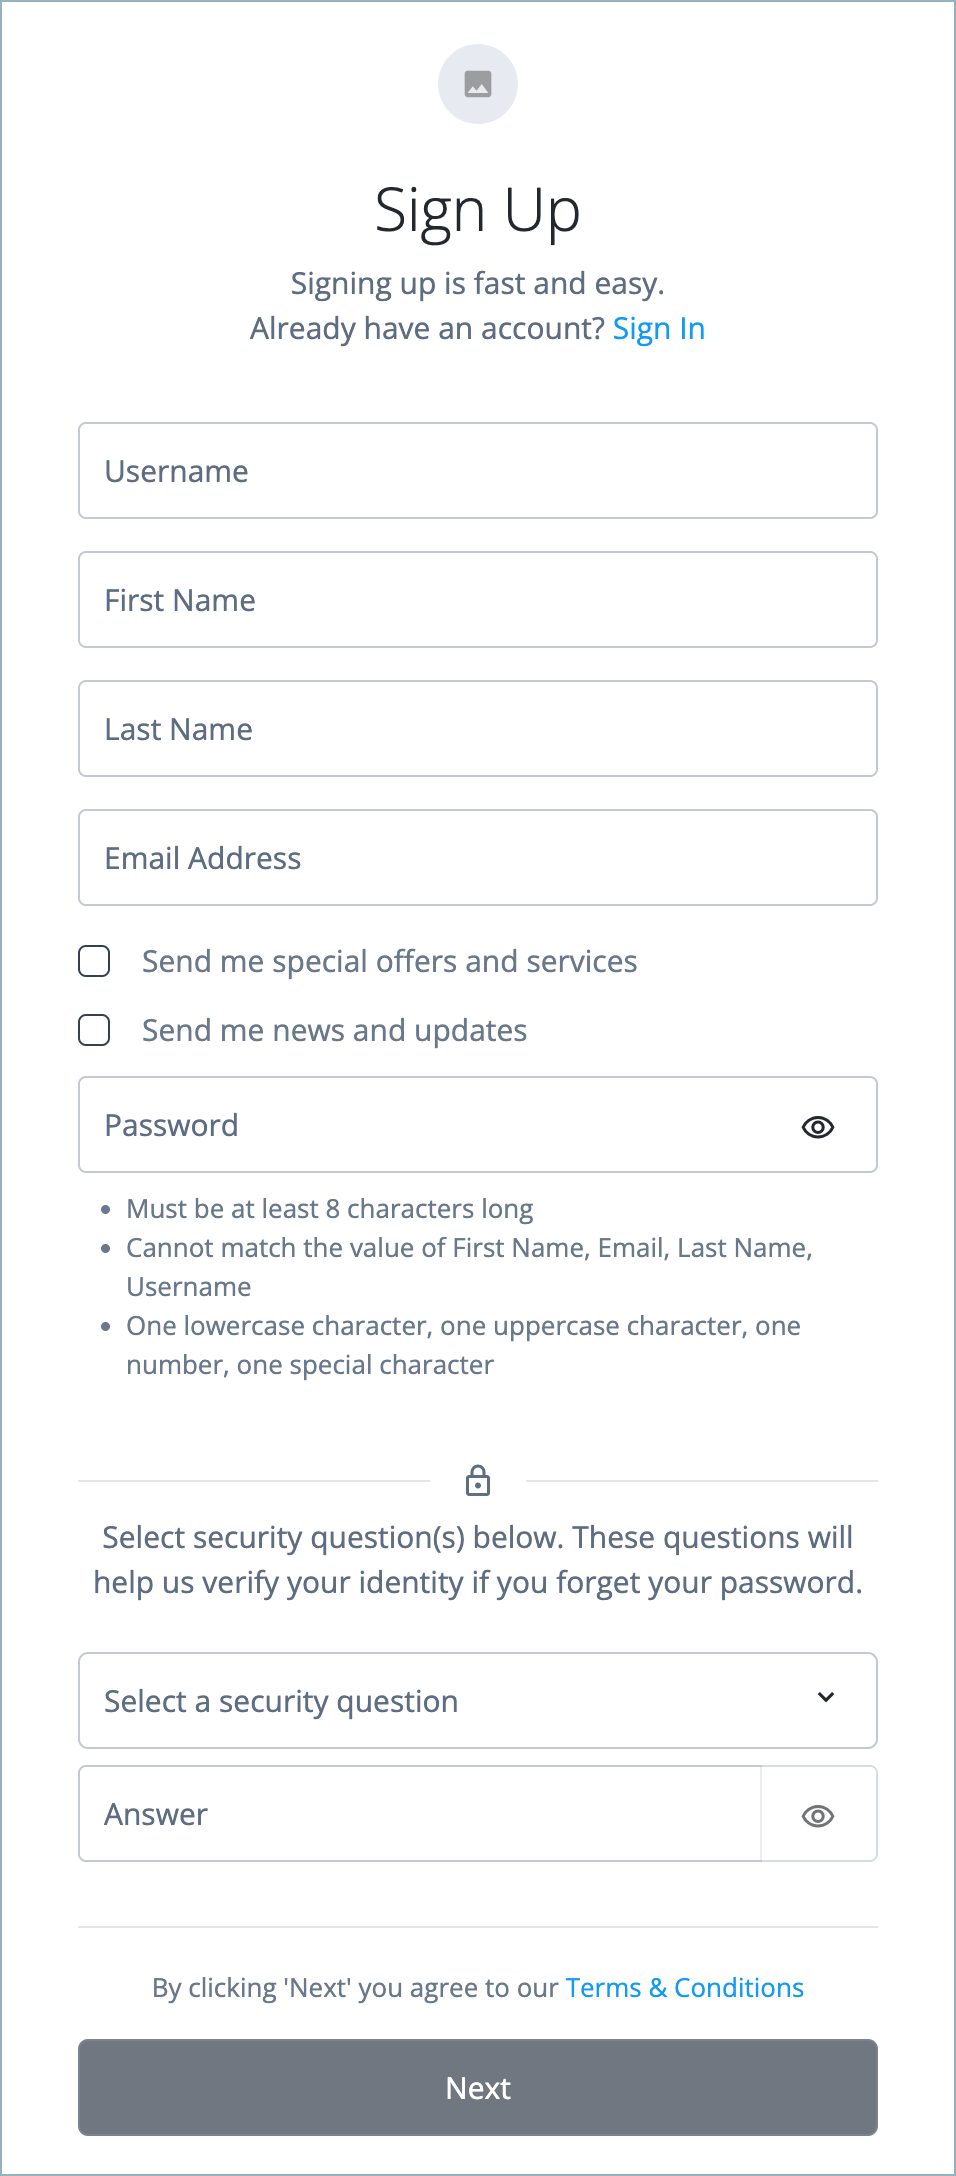
Show the page
-
On the Sign Up page, complete the fields and click Next.
Ensure you enter an email address that you can access. An email is sent to the email address you entered, with the subject
Register new account. -
Open the email and click the email verification link. This creates the new user account in Advanced Identity Cloud.
-
In the Advanced Identity Cloud admin console, go to Identities > Manage.
The newly created end user is shown with the details you entered above.
Adapt the registration journey
In this section, you’ll modify the journey to:
-
Remove the security questions (KBA) step.
-
Prompt for a password after a verification email has been sent.
-
Send a welcome email upon successful registration.
| This task uses email templates for sending emails to end users. Learn more in Email templates. |
Duplicate the journey
-
In the Advanced Identity Cloud admin console, go to Journeys > Journeys.
-
On the Journeys page, click the ellipsis icon () for the
Registrationjourney and select Duplicate. -
In the Duplicate Journey modal, enter the following details:
Field Value Name
User RegistrationIdentity Object
Alpha realm - Users
managed/alpha_userDescription
Updated user registration journey. -
Click Save.
The journey editor opens displaying a visual workspace known as the journey canvas. This is where you’ll arrange nodes to define the user registration experience.
Modify the journey
-
In the journey editor, select the KBA Definition node in the Page Node and click the delete icon () to delete this node.
This removes the security questions from the registration process.
-
Select the Platform Password node in the Page Node and drag it out of the node on to the journey canvas.
-
Configure the following connections:
-
Connect the Email Suspend Node outcome to the Platform Password node input.
-
Connect the Platform Password node outcome to the Create Object node input.
-
-
In the Filter nodes field in the upper left, search for the Email Template Node and drag it on to the journey canvas.
The Email Template Node sends a welcome email to the end user after they’ve registered.
Click the Email Template Node to review the default settings. The default email template is welcome. -
Configure the following connections:
-
Connect the Created outcome of the Create Object node outcome to the Email Template Node input.
-
Connect the Email Sent outcome of the Email Template Node to the Increment Login Count node.
-
Connect the Email Not Sent outcome of the Email Template Node to the Failure node.
-
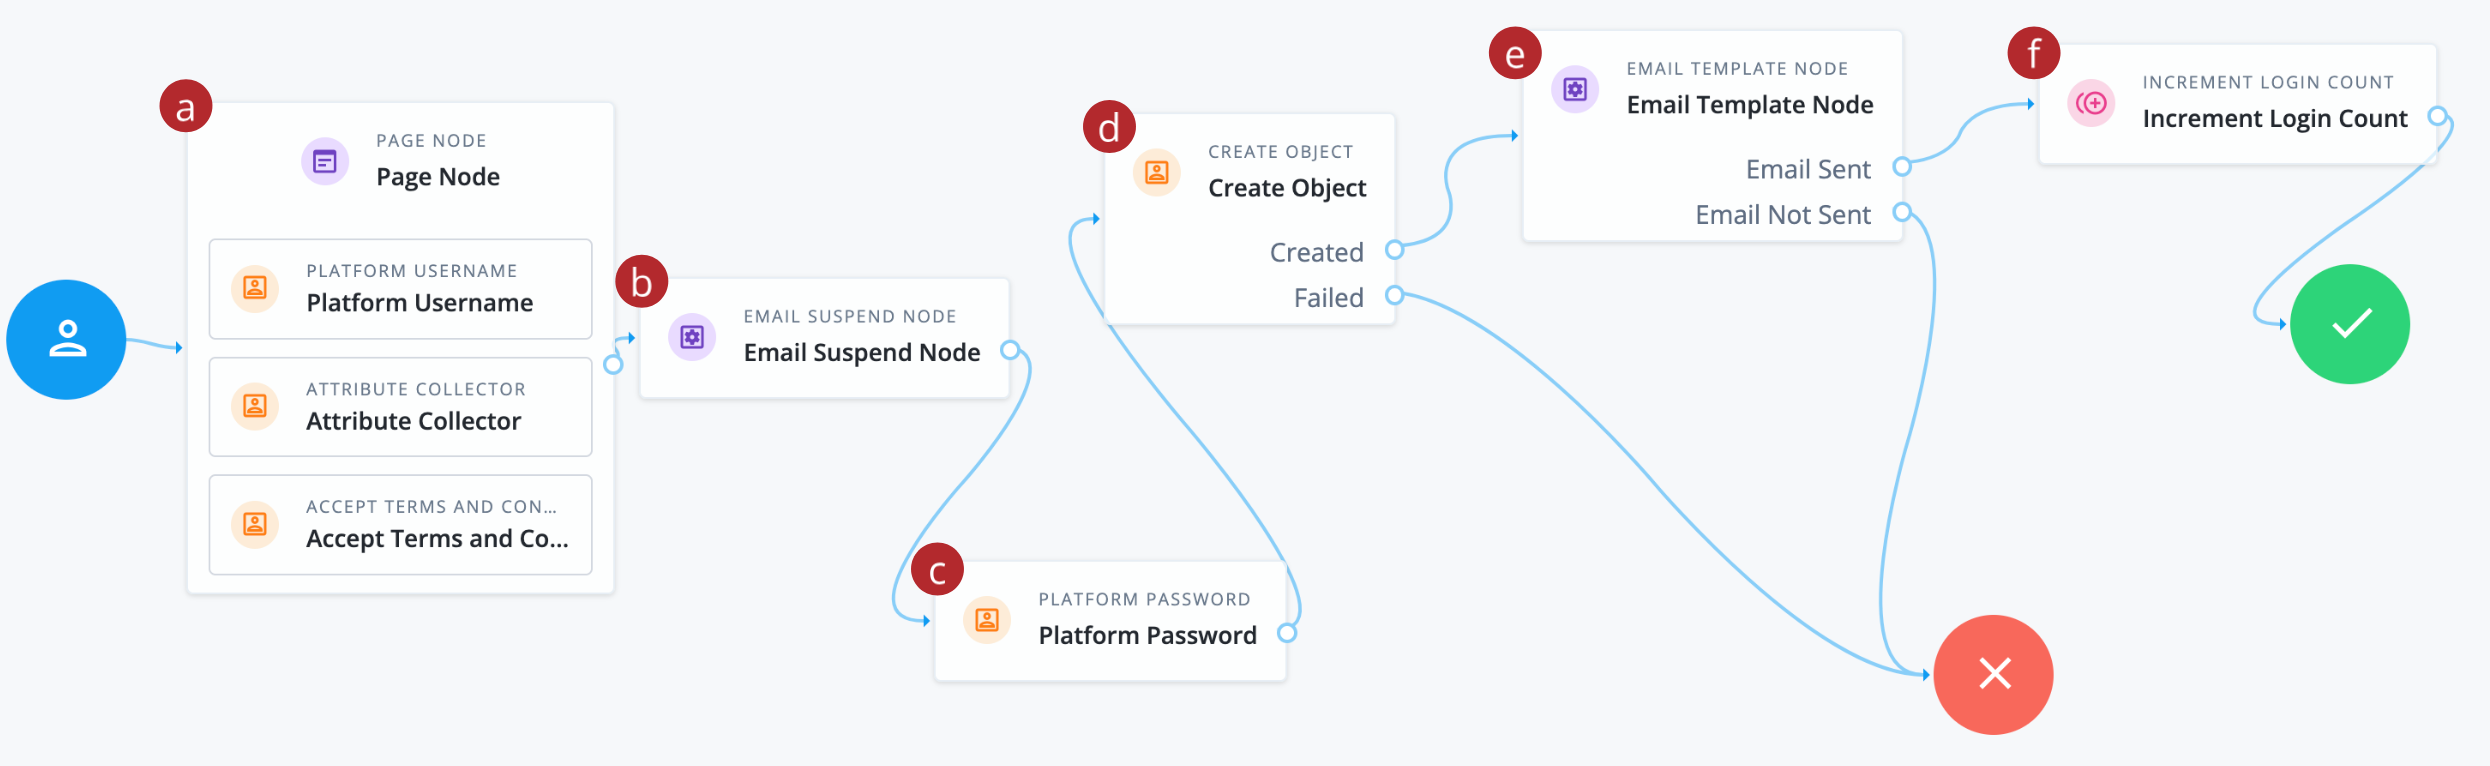
a Collects the username, user details, and terms and conditions, and presents them on the same page.
-
b Emails the end user so they can confirm their email address.
-
c After confirmation, collects the end user’s password.
-
d Creates the new end user in Advanced Identity Cloud.
-
e Sends a welcome email to the end user.
-
f Increments the successful login count property for the end user.
-
-
Click Save to save the journey.
| You can annotate journeys with comments and sticky notes to help explain the purpose of each node and the overall flow. |
Test the adapted journey
Now that you’ve created a new user registration journey, you’re ready to test it out.
-
In the Advanced Identity Cloud admin console, go to Journeys > Journeys and click on the
User Registrationjourney you’ve just created. -
In the Preview URL field, click and paste the URL into an incognito window.
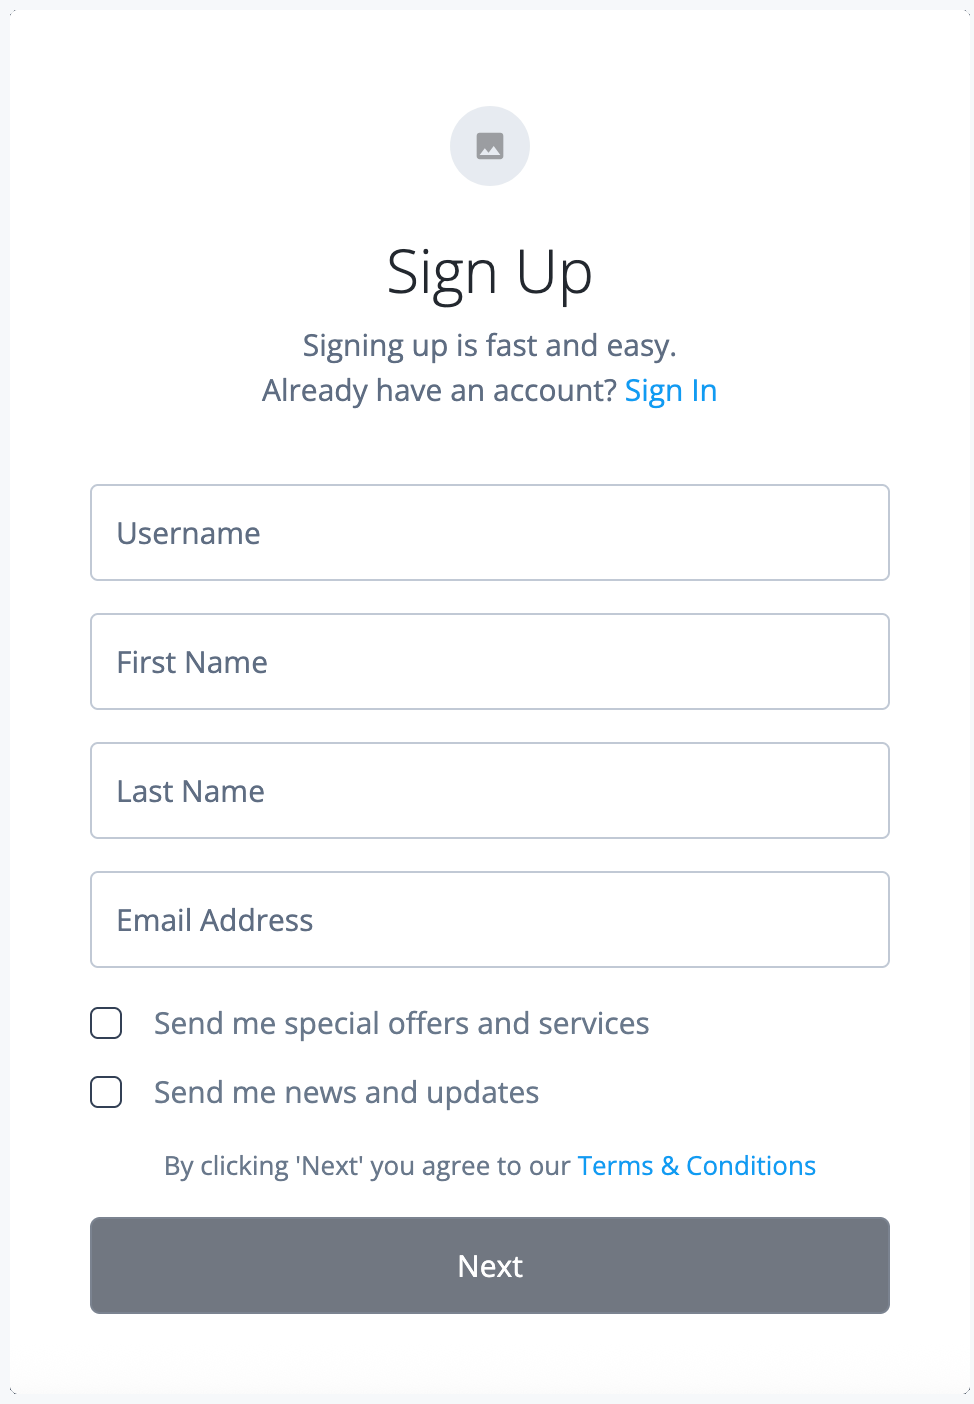
The Sign Up page opens.
-
Complete the fields and click Next.
Ensure you enter an email address that you can access. An email is sent to the email address you provided.
-
Open the email and click the email verification link.
-
Enter a password and click Next.
-
Check your email account and confirm you have received a welcome email with the subject
Your account has been created. -
In the Advanced Identity Cloud admin console, go to Identities > Manage.
The end user is displayed with the details you entered above.
Best practices and next steps
To enhance security and reduce friction in the registration flow, consider these common enhancements when designing your registration journeys:
-
Identity verification: For higher-security applications, integrate an identity verification service such as PingOne Verify to confirm that a user is who they claim to be by checking government issued ID. This is crucial for preventing fraud and meeting regulatory requirements (such as KYC) in banking and healthcare industries. Learn more in Use PingOne Verify for identity verification and proofing capabilities.
Advanced Identity Cloud also includes many third-party identity verification services using marketplace nodes, which you can incorporate into your journeys. -
Progressive profiling: Keep the initial registration form short and simple. Ask for additional user information later, such as when they sign on for a second time or access a specific service. By asking only for essential information upfront, you dramatically reduce friction and increase conversion rates. Learn more in Progressive profile.
-
Social registration: Allow users to register with their existing social media accounts, such as Google or Facebook. This simplifies the sign-on process, reduces password fatigue, and can increase user adoption by using familiar credentials. Learn more in Social authentication.