Money transfer journey
The Ping Identity Marketplace includes a prebuilt money transfer journey. The journey provides secure financial transactions by applying dynamic, context-aware multi-factor authentication (MFA). By evaluating the risk of each money transfer in real time, the journey can step up security when needed, preventing fraud while maintaining a smooth user experience.
The journey is intended as a template. Review and adapt it to meet your organization’s specific security policies and business requirements before deploying to a production environment.
| Journey name | Version | Download |
|---|---|---|
Money transfer |
1.0 |
About the money transfer journey
This solution uses a main journey and inner journeys to evaluate the risk level of a user’s sign-on attempt. Authenticated users can make secure money transfers between their savings and checking accounts.
Example use case
A bank wants to secure money transfer transactions and prevent fraud without creating unnecessary friction for customers. To do this, they want a journey that provides adaptive security by evaluating risk signals in real time across various end-user actions, from sign-on to financial transactions. The solution would allow routine, low-value money transfers from a known device to proceed seamlessly, while automatically triggering MFA for high-value transfers or suspicious activity to verify the user’s identity.
Journey components
The money transfer journey includes one main journey and four inner journeys.
| Journey | Description | Configuration required? | ||
|---|---|---|---|---|
Money Transfer - Main Journey |
Orchestrates a secure money transfer by managing user authentication, performing risk analysis, and stepping up security when necessary. Show detailsThis journey starts by checking if the user has an active session. If not, it directs them through a sign-on process by calling the Money Transfer SignOn - Inner Journey. It then identifies the user and confirms their account is active. The journey then performs the following steps:
|
Yes |
||
Money Transfer - Threat Detection - Inner Journey |
Performs real-time threat detection using PingOne Protect to assess session risk. Show detailsGathers behavioral data from the user’s session and determines a risk level. Depending on the assessed risk, the journey takes different paths:
|
Yes |
||
Money Transfer - Inner Journey |
Manages the money transfer process for an authenticated user. Show detailsThe journey starts by identifying the user. After successful identification, the user can proceed to enter the details of the money transfer. The journey validates the input using the PingOne Authorize node to assess the transaction risk.
The journey includes paths to handle various errors, such as invalid input or insufficient balance, which typically redirect the user back to the transfer page to make corrections. |
Yes |
||
Money Transfer - MFA Authentication - Inner Journey |
Orchestrates the MFA process. It prompts the user to select an MFA method (such as OTP, push, or WebAuthn) and handles the subsequent verification flow. Show detailsThe journey starts by identifying an existing user and then prompts them to select an authentication method. The journey proceeds with one of the following MFA flows:
For most methods, if the user fails to authenticate, they’re given a limited number of retry attempts before the journey fails. The journey also includes paths for users to authenticate using a recovery code if other methods are unavailable. |
Yes |
||
Money Transfer SignOn - Inner Journey |
Manages the initial user sign-on, including credential validation, email verification, and security checks. Show detailsThe journey performs the following checks:
After all checks complete successfully, the journey concludes, and the user is granted access. |
No |
Show the Money Transfer journey (main journey)
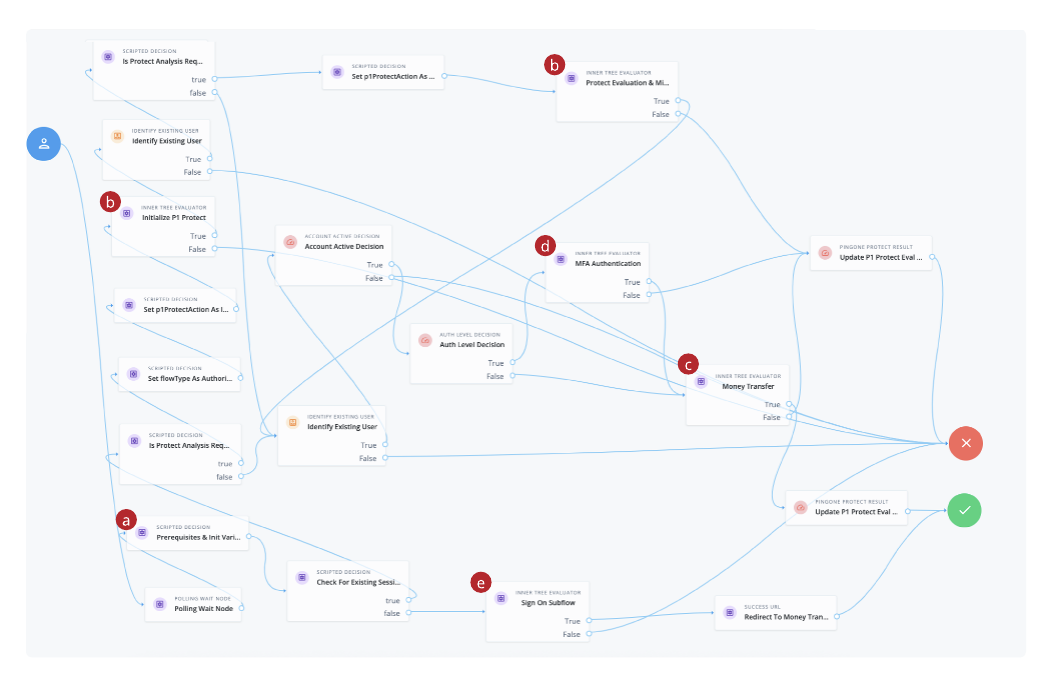
-
a A Scripted Decision node containing the initialize variables used in the authentication flow.
-
b The first call to the PingOne Protect Money Transfer -Threat Detection - Inner Journey
-
c The second call to the PingOne Protect Money Transfer -Threat Detection - Inner Journey for risk evaluation
-
d A call to the Money Transfer - MFA Authentication - Inner Journey
-
e A call to the Money Transfer SignOn - Inner Journey
Before you begin
To implement the sample money transfer journey, you must have these prerequisites:
-
Tenant administrator access to your Advanced Identity Cloud development environment.
-
For PingOne Protect:
-
PingOne Protect enabled in your PingOne environment. Learn more in Getting started with PingOne Protect.
-
PingOne Protect integrated with Advanced Identity Cloud. Learn more in Use PingOne Protect for risk-based authentication and fraud detection.
-
-
For PingOne Authorize:
-
PingOne Authorize enabled in your PingOne environment. Learn more in Getting started with PingOne Authorize.
-
Your PingOne Authorize decision endpoint.
-
-
Your PingOne Worker Service ID. Learn more in Set up PingOne product connections.
The worker application associated with the PingOne Worker Service must be granted the necessary permissions to interact with both the PingOne Protect and PingOne Authorize services. -
For MFA:
-
An SMTP email server. Required for email-based MFA.
-
If you’re using Twilio for phone-based MFA, a Twilio account with access to Twilio Verify.
-
-
A test user in your Alpha realm with a registered email address. It’s also useful to have other MFA methods configured for testing.
-
A basic understanding of journeys and the Scripted Decision node.
Task 1: Prepare your tenant environment
To get the journey working, you must first perform some setup tasks in your Advanced Identity Cloud tenant environment.
Add custom attributes to the alpha_user managed object
Several additional user attributes are required by the money transfer journey.
Add the following custom attributes to the alpha_user managed object.
Learn more in Customize user identities using custom attributes.
|
When adding new attributes, use the advanced options to specify view and edit permissions:
|
| Name | Label | Type | Description |
|---|---|---|---|
|
|
String |
Confirms the user has verified their email address. |
|
|
String |
The city from which the user attempts to authenticate. This attribute is used in the |
|
|
String |
The state from which the user attempts to authenticate. This attribute is used in the |
|
|
String |
The OS of the device from which the user attempts to authenticate. |
|
|
Array |
Stores the user’s registered MFA devices. |
|
|
String |
The most recently used registered MFA device. |
|
|
Number |
The user’s savings account balance after money transfer. |
|
|
Number |
The user’s checking account balance after money transfer. |
|
|
String |
The user’s preferred currency. Select User Editable to allow end users to change this value. |
(Optional) Set an ESV variable for PingOne Protect analysis
The Prerequisites & Init Variables node in the parent journey contains a script that uses the protectAnalysisRequired variable to determine if PingOne Protect analysis is enabled.
By default, this variable is set to true in the script.
To override this variable and control how PingOne Protect analysis is performed in different environments, you can set an Environment Secret & Variable (ESV) variable.
-
In the Advanced Identity Cloud admin console, go to Tenant Settings > Global Settings > Environment Secrets & Variables.
-
On the Variables tab, click + Add Variable.
-
In the Add a Variable modal, enter the following information:
Name
p1-protect-analysis-requiredType
stringDescription (optional)
PingOne Protect analysis requiredValue
true -
Click Save to create the variable.
-
Restart Advanced Identity Cloud services by applying updates in the Advanced Identity Cloud admin console.
Create the email templates
You’ll need to create the following email templates, which are used by Scripted Decision nodes to send emails at various points in the money transfer journey.
| Email template | Description | Example email body |
|---|---|---|
accountDisabled |
Email sent when PingOne Protect detects critical risk associated with the account. |
Show example |
newDeviceDetected |
Email sent when PingOne Protect detects a sign-on from a new device. |
Show example |
suspiciousActivity |
Email sent when PingOne Protect detects suspicious activity associated with the account. |
Show example |
welcome |
Email sent when a new user account is created. |
Show example |
otp |
Email containing the user’s one-time passcode (OTP). |
Show example |
Learn more about creating email templates in Email templates.
Task 2: Create a PingOne Authorize policy
To perform risk-based authorization for transfers, you’ll need to create an authorization policy in PingOne Authorize. This policy evaluates a payment’s amount against the user’s transaction limits.
Define the amount attribute
-
In the PingOne admin console, go to Authorization > Trust Framework.
-
On the Attributes tab, click + Add new Attribute and configure it as follows.
Attribute name Value type amountNumber -
Click Save Changes.
Create the payment check policy
-
In the PingOne admin console, go to Authorization > Policies.
-
Click the Plus icon () and select Add Policy.
-
In the Name field, enter
Payment checks. -
Add the following rules to the policy in order.
Rule 1: Deny payments over the threshold-
Name:
Deny payments over 10,000 -
Applies When:
amountGreater Than10000 -
Effect:
Deny
Rule 2: Permit payments under the threshold-
Name:
Permit payment less than 1,000 -
Applies When:
amountLess Than1000 -
Effect:
Permit
Rule 3: Require approval between thresholds-
Name:
Payments more than 1,000 but less than 10,000 -
Applies When:
-
amountGreater Than Or Equal1000 -
amountLess Than Or Equal10000
-
-
Effect:
Permit -
Statements: Add a statement with the following values:
-
Name:
Approval required when amount is in this range -
Code:
APPROVAL_REQ
-
-
-
Click Save Changes.
Task 3: Download and import the journey
Download the journey
-
Go to Money Transfer journey on the Ping Identity Marketplace.
-
Click Download Integration to download the
Money Transfer - Main Journey.jsonfile. This JSON file contains the parent journey and inner journeys, scripts, and email templates required for the authentication flow.
Import the journey
-
In the Advanced Identity Cloud admin console, click Journeys > Journeys.
-
Click Add Journey, select Import, and then click Next.
-
Click either Download Backup or Skip Backup. Learn more in Import journeys.
-
On the Import Journeys page, browse to and select
Money Transfer - Main Journey.json. -
Select Alpha realm users because the journey is configured for the alpha realm.
-
In the Conflict Resolution section, choose how the system resolves import conflicts:
-
Overwrite all conflicts (default)
-
Manually pick conflict resolution
-
-
Click Next.
-
Click Start Import.
-
On the Import Complete page, click Done.
-
On the left panel of the Journeys page, click Money Transfer (5) to view the money transfer journeys and inner journeys.
Task 4: Configure the journey components
Configure the money transfer main journey
-
On the Journeys page, click Money Transfer - Main Journey and click Edit.
-
In the journey editor, configure the journey as follows:
-
Click Save.
| To save your progress, periodically click Save in the top right of the journey editor. If you don’t save, you’ll lose your work if the page reloads or if you lose your network connection. |
Review and set the initialize variables
The Money Transfer - Main Journey includes a Scripted Decision node containing the initialize variables used later in the authentication flow. This script lets you:
-
Set the allowed MFA types:
FIDO2,OATH,PUSH,EMAIL,SMS,VOICE. -
Enable or disable PingOne Protect analysis.
-
Enable or disable magic link.
To review and set the initial variables:
-
Click the Prerequisites & Init Variables node.
-
In the Script field, click the Pencil icon () to open the
Money Transfer - Initialize Variablesscript. -
Review the script and make changes if needed.
-
Click Save and Close.
| You don’t need to update the values in the Script Outputs field of the Prerequisites & Init Variables node. |
Configure the Threat Detection - Inner Journey
-
On the Journeys page click Money Transfer - Threat Detection - Inner Journey and click Edit.
-
In the journey editor, configure the journey as follows:
-
Click the PingOne Protect Initialize node.
-
In the PingOne Worker Service ID field, select the ID of the PingOne Worker Service for connecting to PingOne. Learn more in PingOne Protect Initialize node.
-
Click the Auth: PingOne Protect Evaluation node and enter the following:
-
PingOne Worker Service ID: Select the ID of the PingOne Worker Service for connecting to PingOne.
-
(Optional) Risk Policy Set ID: Enter the ID of the risk policy in PingOne. Learn more in PingOne Protect Evaluation node
-
-
Click the Reg: PingOne Protect Evaluation node and enter the following:
-
PingOne Worker Service ID: Enter the ID of the PingOne Worker Service for connecting to PingOne.
-
(Optional) Risk Policy Set ID: Enter the ID of the risk policy in PingOne. Learn more in PingOne Protect Result node.
-
-
-
Click Save.
Configure the Money Transfer - Inner Journey
-
On the Journeys page, click Money Transfer - Inner Journey and click Edit.
-
In the journey editor, configure the journey as follows:
-
Click the PingOne Authorize node and enter the following:.
-
PingOne Worker Service ID: Select the ID of the PingOne Worker Service for connecting to PingOne.
-
Decision Endpoint ID: Enter the decision endpoint ID from the service in PingOne Authorize.
-
attributelist: Enter
amount. -
Statement Codes: Enter
APPROVAL_REQ.
-
-
-
Click Save field.
-
In the Decision Endpoint ID field, enter the decision endpoint ID from the service in PingOne Authorize
Learn more about the PingOne Authorize node
-
-
Click Save.
Configure the MFA Authentication - Inner Journey
This configuration is required if SMS, or VOICE are opted in the allowedMFATypes array in the Money Transfer - Initialize Variables script in the Prerequisites & Init Variables node in the parent journey.
-
On the Journeys page, click MFA Authentication - Inner Journey and click Edit.
-
In the journey editor, update the required fields in the following nodes:
-
Click Save.
Task 5: Validate the journey
After configuring the journey, validate the different paths to ensure the risk-based security policies work as expected. The following steps demonstrate a low-risk transfer and a higher-risk transfer that requires approval.
|
To trigger different risk evaluations, you may need to adjust your risk policies in PingOne Protect for sign-on, or your PingOne Authorize policies for the transaction itself. You can also simulate higher risk by signing in from a new device or a VPN. |
Before you begin, ensure you have a test user in the alpha realm with a starting balance. For example, set the custom_savingsBalance attribute to 10000.
Test a low-risk transfer
This test validates the user experience when a transfer is evaluated as low risk.
-
In the Advanced Identity Cloud admin console, go to Journeys.
-
Click Money Transfer - Main Journey.
-
In the Preview URL field, click the copy icon () and paste the URL into an incognito browser window.
The Advanced Identity Cloud end-user UI displays the Sign In screen.
-
Enter the test user’s username and password and click Next.
Because the sign-on is evaluated as low risk, the user is authenticated and redirected to the Money Transfer page.
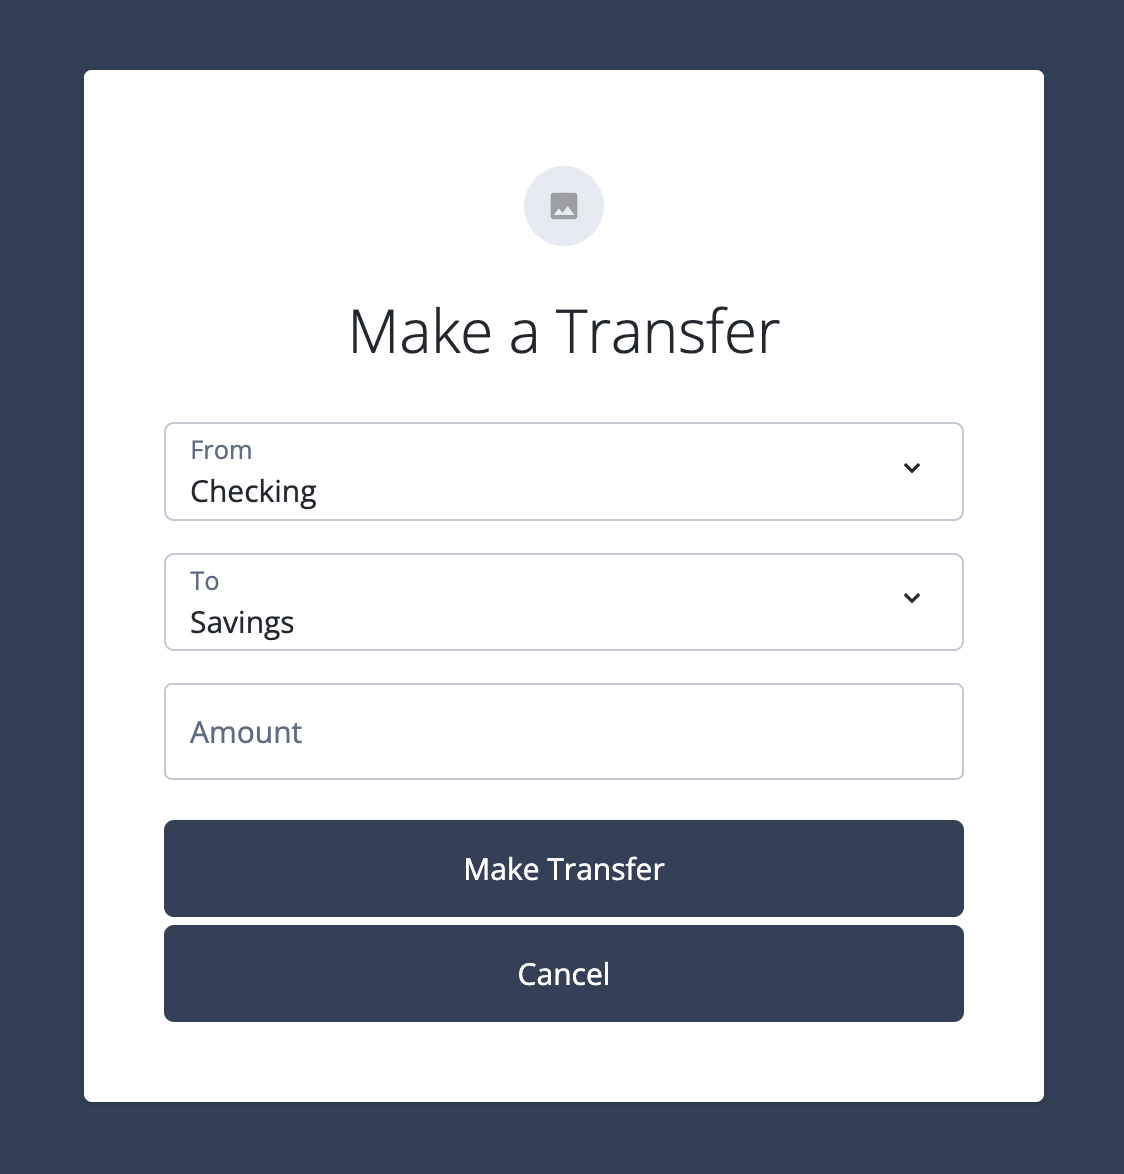
-
Enter a small amount (for example,
100) and click Make Transfer.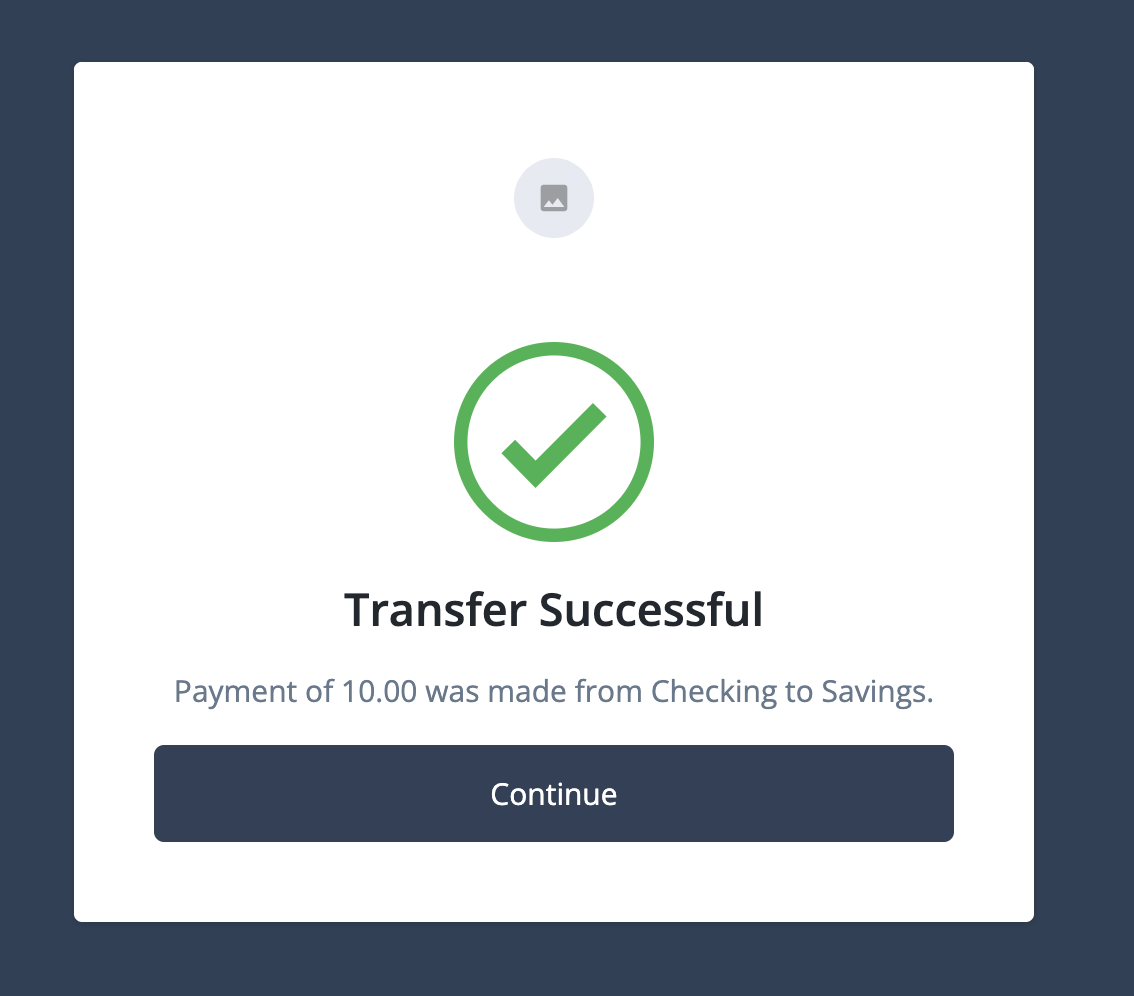
Expected result: The transfer is successful. The page confirms the transaction was completed, and the user’s account balance is updated.
Test a higher-risk transfer
This test validates that the journey requires additional user approval for a transfer that the PingOne Authorize policy evaluates as higher risk.
-
If you’re not already signed on, follow steps 1 - 4 in Test a low-risk transfer to sign on as your test user.
-
Enter a large amount that exceeds your policy’s approval threshold (for example,
5000). -
Click Make Transfer.
Expected result: An email is sent to the user asking for approval. After the transfer is approved using the link in the email, the transaction is processed. This confirms that the step-up approval path is triggered for higher-risk transactions.
Best practices
This sample journey provides a strong foundation for a money transfer journey. When preparing to use it in a production environment, consider the following best practices:
-
Treat as a template: Remember that this is a sample journey. Always adapt and harden it to meet your specific security policies and business requirements before deploying to production.
-
Use ESVs: Avoid hardcoding sensitive information like API keys and IDs directly in your journey scripts. Use ESVs to manage these values securely.
-
Test extensively: Validate all possible user paths, including low, medium, and high-risk scenarios, as different MFA registration and authentication flows. Ensure the user experience is smooth and the security responses are correct for each case.
-
Review PingOne Protect policies: Fine-tune your risk policies in PingOne Protect to align with your organization’s risk tolerance.