Authenticate using a device with WebAuthn and passkeys
WebAuthn lets users authenticate by using an authenticator device, for example, the fingerprint scanner on their laptop or phone.
The user’s browser communicates with the authenticator device. Advanced Identity Cloud can request that the browser activates authenticator devices with specified criteria. Example criteria are that the authenticator device must be built-in, not a USB device that the user can eject, or that the device must verify the user’s identity, not just the user’s presence.
Passkeys are a form of WebAuthn credential. They let users sign in without a password by using a built-in authenticator, such as Face ID, Touch ID, or Windows Hello, or a hardware security key. Passkeys can be synced across devices using a platform provider, such as iCloud Keychain or Google Password Manager, making them both phishing-resistant and easy to use.
Advanced Identity Cloud supports passkeys through the WebAuthn Authentication and WebAuthn Registration nodes. You can configure passkeys for standard two-factor authentication, for passkey autofill (conditional UI), or for usernameless, passwordless authentication.
To use WebAuthn with Advanced Identity Cloud, users must first register their authenticators. If recovery codes are enabled, users should copy their codes on successful registration.
Registration involves the selected authenticator creating, or minting, a key pair. The public key of the pair is returned to Advanced Identity Cloud and stored in the user’s profile. The private key is stored securely in the authenticator itself or in the platform managing the authenticators. The private key does not leave the client at any time.
When authenticating with WebAuthn, the authenticator device locks data with its stored private key and sends it to Advanced Identity Cloud. Advanced Identity Cloud verifies the data using the public key stored in the user’s profile. If the data verification succeeds and passes any attestation checks, Advanced Identity Cloud considers the authentication successful.
|
Advanced Identity Cloud supports WebAuthn for the following user agents on the specified platforms:
| Browser(1) | Platform |
|---|---|
Google Chrome |
Desktop |
Android |
|
Safari |
Desktop |
iOS |
|
Microsoft Edge |
Desktop |
Mozilla Firefox |
Desktop |
(1) Latest stable versions are supported.
Common use cases
WebAuthn suits deployments that need strong, phishing-resistant authentication:
-
Phishing-resistant workforce sign-on: Users sign on with a built-in authenticator, such as Windows Hello or Touch ID, or a hardware security key. The private key isn’t exposed to Advanced Identity Cloud or the website. Depending on the authenticator, credentials are bound to a single device or synchronized across a user’s devices.
-
Passkey autofill (conditional UI): Users who have saved a passkey in their browser see it offered in the username field’s autofill list; users who haven’t saved one fall back to their password or another method. This suits gradual passkey adoption alongside existing credentials. Learn more in Configure WebAuthn conditional UI.
-
Usernameless sign-on: Users authenticate with a resident-key credential and an authorization gesture, without entering a username or password. This suits users signing on from their own devices who want a sign-on experience with nothing to type. Learn more in Configure usernameless authentication.
-
Platform authenticator deployments: Built-in authenticators, such as fingerprint scanners, suit users who sign on from managed laptops and phones.
-
Recovery codes: Users who replace or lose their authenticator can sign on with recovery codes and register a new device. The original registration journey must enable and generate recovery codes.
Journeys for WebAuthn
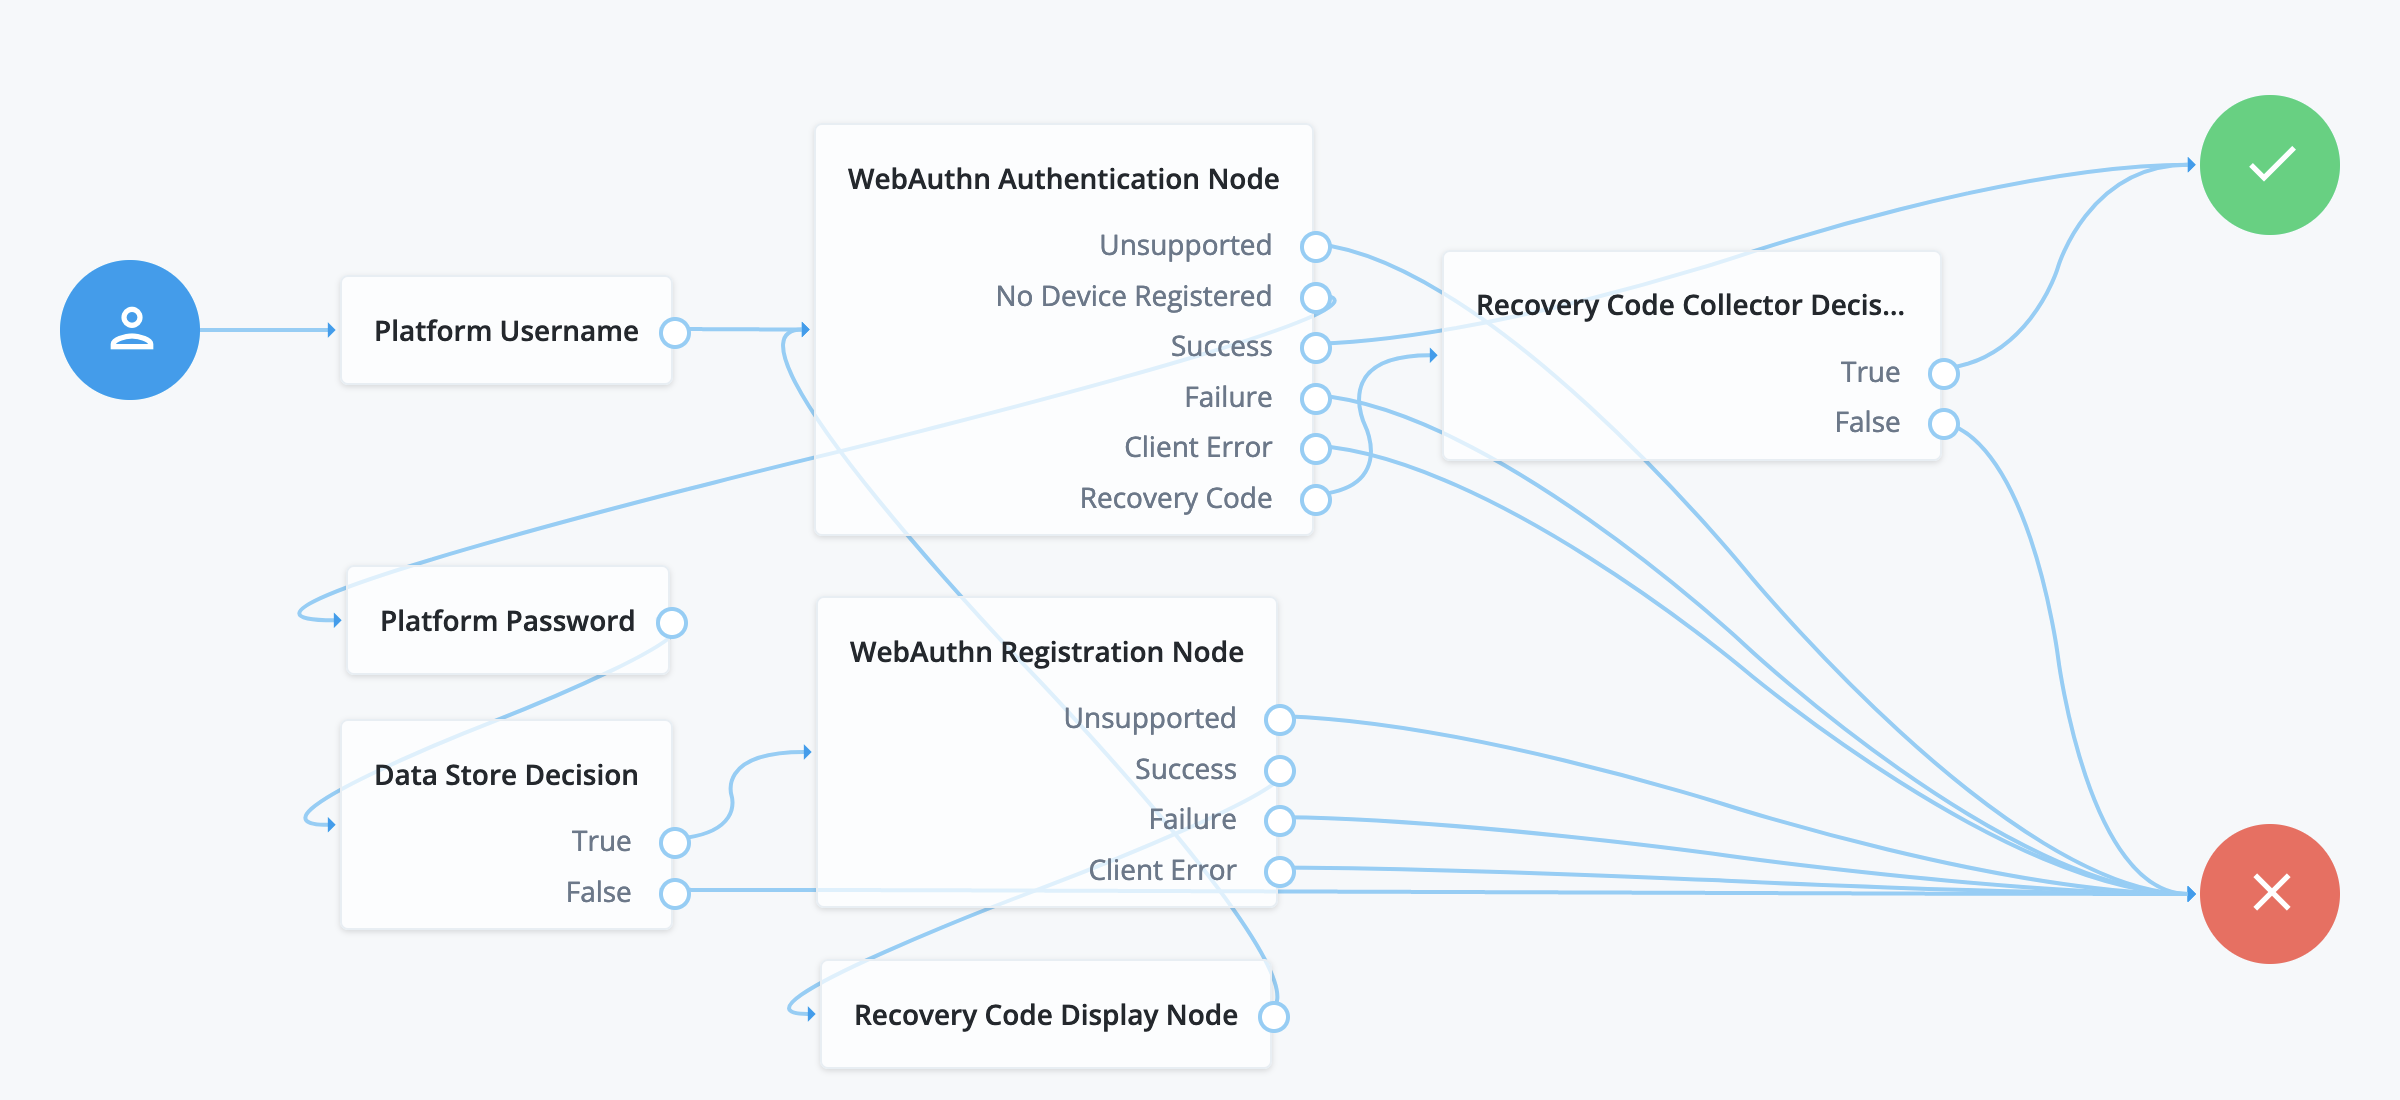
The example journey that follows registers the user’s device if necessary, and authenticates the user with the device. If the user has already registered their device, they only need to enter their username, and then perform the authorization gesture with their registered device to complete authentication.
If the user doesn’t have a registered device, they must provide both their username and their password. The Data Store Decision node confirms their identity before allowing them to register their device. The user then authenticates with the new device to complete authentication.
|
This sample journey doesn’t include user-friendly features, such as letting the user retry their password if they mistype it. |
Create the WebAuthn journey
-
In the Advanced Identity Cloud admin console, create a custom journey for WebAuthn.
Learn more in Custom journeys.
-
Add the following nodes to your journey:
-
Connect the nodes as demonstrated in the following figure:
-
On the WebAuthn Authentication node, select Allow recovery codes.
-
On the WebAuthn Registration node, select Generate recovery codes.
-
Save your changes.
Test the WebAuthn journey
After creating the journey, test it as follows:
-
Register a test user account unless you have already done so.
-
Copy and paste the Preview URL into a browser in incognito mode.
A login screen prompts for the username.
-
Enter the username for the test user account.
-
If the user doesn’t have a registered device:
-
Enter the test user’s password when prompted.
-
Register a WebAuthn authenticator by performing an authorization gesture.
For example, press the button on a connected YubiKey or scan your fingerprint.
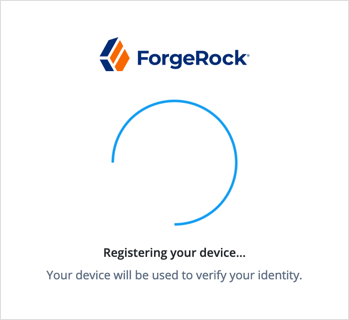
The browser may present a consent pop-up to allow access to the available authenticators.
When you grant consent, the browser activates the relevant authenticators, ready for registration.
If the device registration is successful, the journey returns to the WebAuthn Authentication node.
-
-
When prompted, authenticate by performing an authorization gesture with a registered device.
The UI displays the user profile page.
-
Browse to Edit Your Profile > 2-Step Verification > Change.
The UI displays a list of the registered devices that you can rename or delete.
The default name for a new WebAuthn device is
New Security Key.
Configure WebAuthn conditional UI
The WebAuthn conditional UI, also known as passkey autofill, lets users sign in with a passkey if they’ve previously saved one in their browser. If they don’t have a suitable passkey, the browser lets them authenticate using a different method, such as their username and password or social authentication.
This feature provides a more seamless login experience to end users and can help increase the adoption of passkeys.
To provide the conditional UI functionality, create a WebAuthn journey with the following configuration:
-
Include a v2.0 or later WebAuthn Authentication node with the following settings:
-
Username from device:
Enabled -
Mediation:
CONDITIONAL -
Authentication Button: Optionally, enable this option if you want to show users a Sign in with a passkey button.
-
-
Place the WebAuthn Authentication node in a v2.0 or later Page node.
-
Optionally, include a v2.0 or later WebAuthn Registration node. If included, it must have the following setting:
-
Username to device:
Enabled
-
-
Optionally, configure the following if you want to include passkey autofill suggestions when the user is prompted for their username:
-
Place the Platform Username node in the same Page node as the WebAuthn Authentication node.
-
In the Platform Username node, configure the following autocomplete values:
username
webauthnThe autocomplete values must be in this order.
-
Create a journey for WebAuthn conditional UI
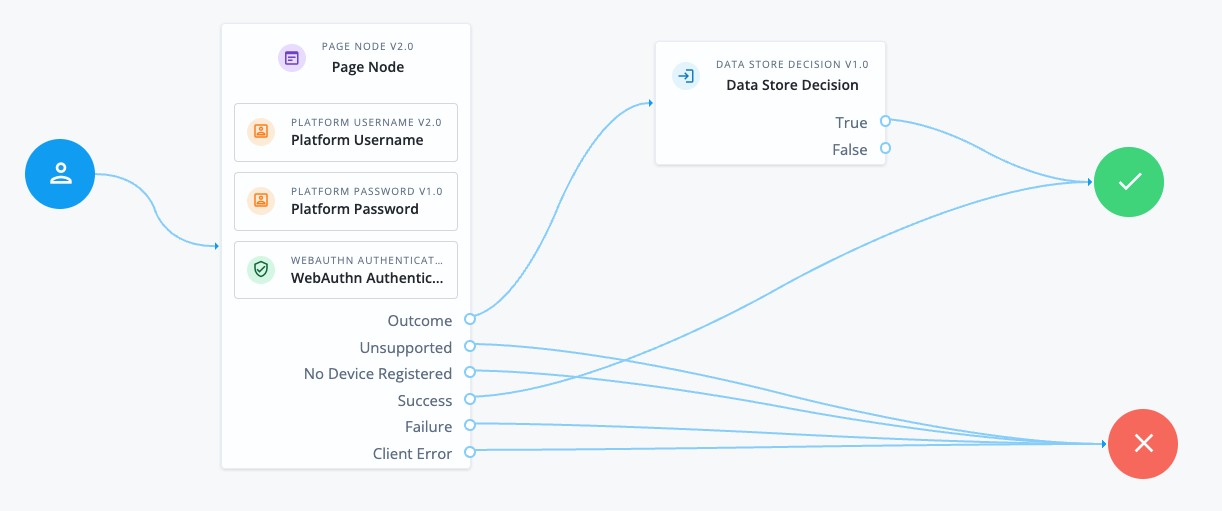
The following example journey provides WebAuthn conditional UI functionality with passkey autofill suggestions and a Sign in with a passkey button:
-
In the Advanced Identity Cloud admin console, create a custom journey for WebAuthn.
Learn more in Custom journeys.
-
Add the following nodes to your tree:
-
Page node (v2.0 or later)
-
WebAuthn Authentication node (v2.0 or later)
-
-
Connect the nodes as demonstrated in the following figure:
-
On the Platform Username node:
-
Add the following values to the Autocomplete Values field:
username
webauthn
-
-
On the WebAuthn Authentication node:
-
Enable Username from device.
-
Select
CONDITIONALin the Mediation field. -
Enable Authentication Button.
-
-
Save your changes.
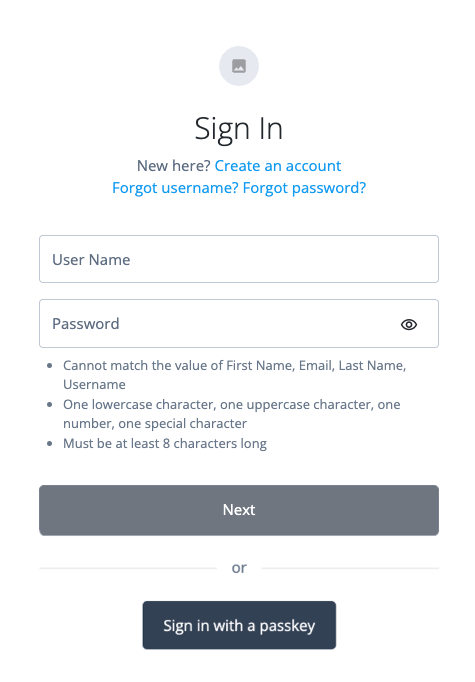
The user will see a sign in page similar to the following:
Configure usernameless authentication
Advanced Identity Cloud lets you create a secure and seamless login experience by authenticating end users with any credential on their device that supports FIDO2 WebAuthn.
You can also extend passwordless authentication to include usernameless authentication with popular authenticators that support resident keys; for example, Windows Hello (biometric authenticators).
To use usernameless authentication, the end user must:
-
Register an authenticator that supports resident keys in their profile.
-
Enable the option to associate a certificate on their device with their username.
When registered, the end user can use that device to authenticate, without having to provide their credentials; they need to select the appropriate entry to use from the list their device provides.
To configure usernameless authentication:
-
Create a web authentication registration journey to associate a device that supports resident keys with an end user.
-
Create a second journey that lets users authenticate to Advanced Identity Cloud without entering their username or password.
|
The journeys shown in these examples don’t include user-friendly features, such as allowing retries or redirecting for further help on failures. |
Create a usernameless registration journey
-
Configure WebAuthn Storage & Encryption settings for the realm if you haven’t already done so.
-
In the Advanced Identity Cloud admin console, create a custom journey for usernameless registration.
Learn more in Custom journeys.
-
In the Advanced Identity Cloud admin console, add the following nodes to your journey:
-
(Optional) Scripted Decision node
By default, the WebAuthn Registration node stores the journey’s shared state variable
usernameon the device. During authentication, this value later identifies the user.Use a Scripted Decision node to customize the display name or string to be saved in the shared state.
Script to set the display name-
Next-generation
-
Legacy
var user = nodeState.get('username');
var identity = idRepository.getIdentity(user);

var displayName = '';

var givenName = identity.getAttributeValues('givenName')[0];
var surname = identity.getAttributeValues('sn')[0];
var email = identity.getAttributeValues('mail')[0];

if (givenName) {
  displayName += givenName;
}

if (surname) {
  displayName += ' ' + surname;
}

if (email) {
  displayName += ' (' + email + ')';
}

if (displayName) {
  nodeState.putShared('displayName', displayName);
} else {
  nodeState.putShared('displayName', user);
}
action.goTo("true");
var fr = JavaImporter(org.forgerock.openam.auth.node.api.Action); var user = nodeState.get('username').asString(); var displayName = ''; var givenName = idRepository.getAttribute(user, 'givenName'); var surname = idRepository.getAttribute(user, 'sn'); var email = idRepository.getAttribute(user, 'mail'); if (givenName) { displayName += givenName.toArray()[0]; } if (surname) { displayName += ' ' + surname.toArray()[0]; } if (email) { displayName += ' (' + email.toArray()[0] + ')'; } if (displayName) { nodeState.putShared('displayName', displayName.toString()); } else { nodeState.putShared('displayName', user.toString()); } outcome = 'true'; action = fr.Action.goTo("true").build(); -
-
Connect the nodes as demonstrated in the following figure:
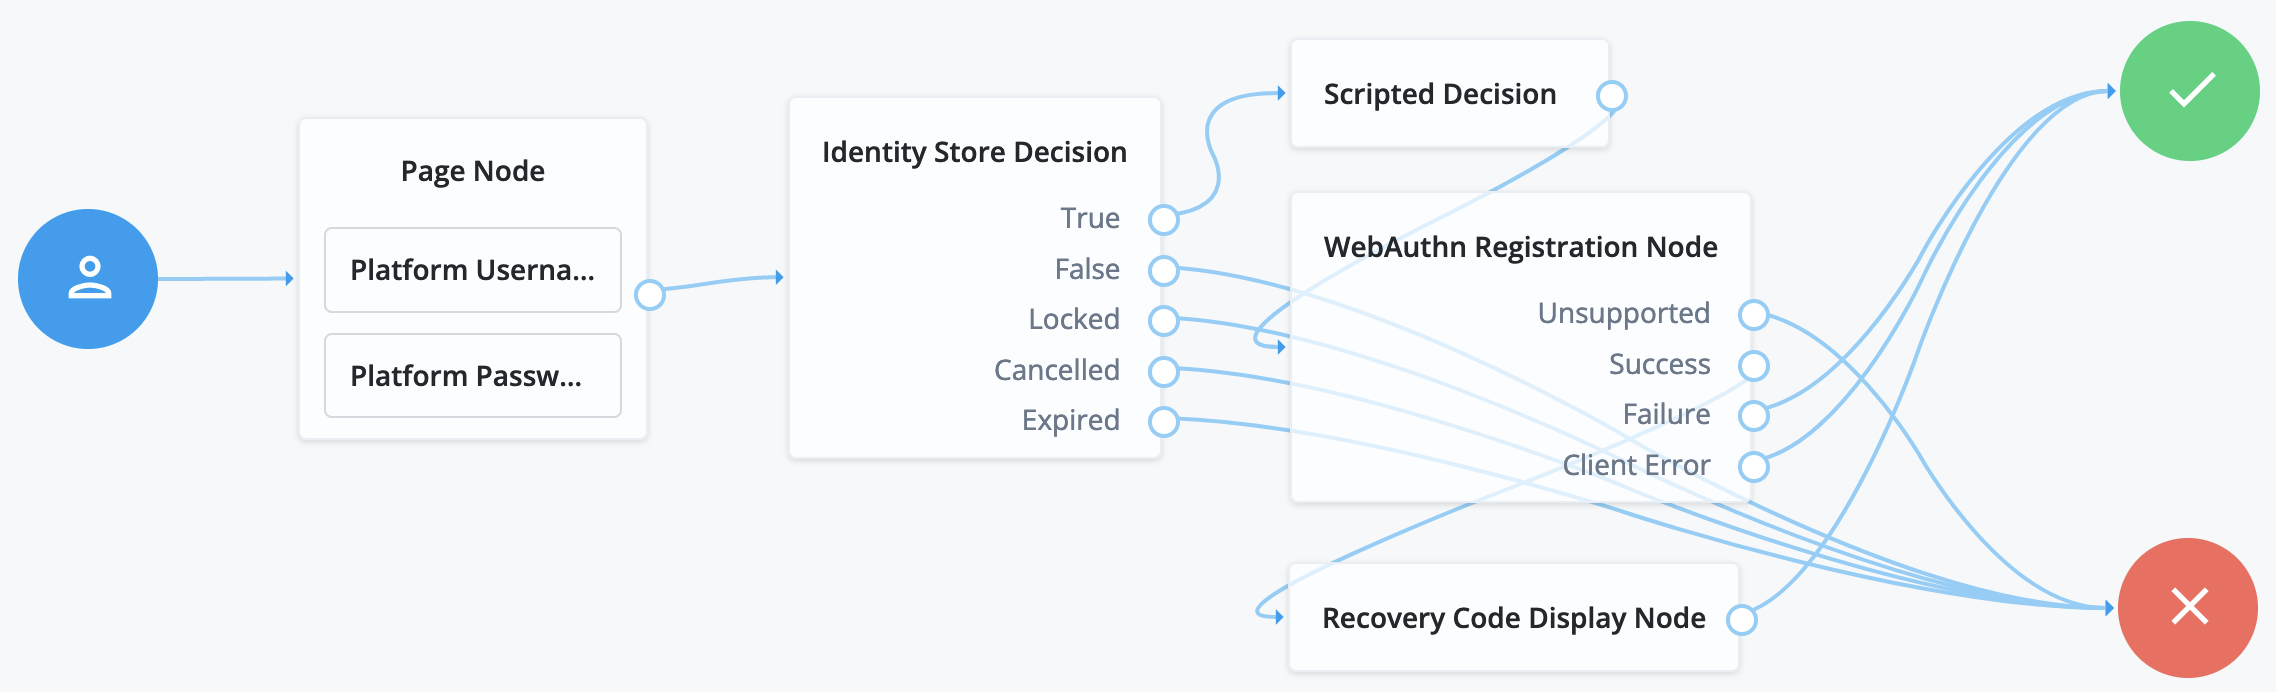
If you do not use the Scripted Decision node, connect the Identity Store Decision node
Trueoutput directly to the WebAuthn Registration node. -
On the Identity Store Decision node, select Username as Universal Identifier.
-
If you use the Scripted Decision node:
-
Select your script in the Script list.
-
Add the outcome of your script,
truein this example, in the Outcomes field.
-
-
On the WebAuthn Registration node:
-
Enable Username to device.
-
If you do not use the Scripted Decision node, add
userNamein the Shared state attribute for display name field. -
If you use the Scripted Decision node, add the shared state variable name, such as
displayName, in the Shared state attribute for display name field.
-
-
Save your changes.
Create a usernameless authentication journey
-
Configure the WebAuthn Profile Encryption settings for the realm if you haven’t already done so.
-
In the Advanced Identity Cloud admin console, create a custom journey for usernameless authentication.
Learn more in Custom journeys.
-
In the Advanced Identity Cloud admin console, add a WebAuthn Authentication node to your journey.
-
Connect the nodes as demonstrated in the following figure:
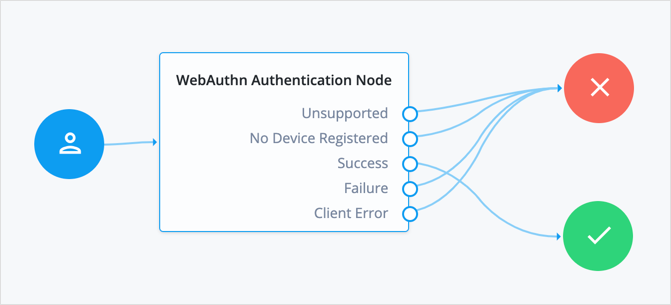
-
On the WebAuthn Authentication node, enable Username from device.
-
Save your changes.
Register for usernameless authentication
Follow these steps to register a device for usernameless authentication, and then authenticate with no username or password, only an authorization gesture.
-
Create a test user account if you don’t already have one.
-
Copy and paste the Preview URL for the usernameless registration journey into a browser in incognito mode.
A login screen prompts for your credentials.
-
Sign in with the username and password of the test user.
-
If you’re authenticating from a FIDO2-enabled device, it prompts you for the method to verify your identity.
For example, you might use a USB security key or a built-in biometric sensor.
Select the option to associate with the user.
-
Perform the authorization gesture of the chosen option when asked to do so.
For example, press the button on your USB security key or scan your fingerprint.
The UI displays the user profile page.
-
Browse to Edit Your Profile > 2-Step Verification > Change.
The UI displays a list of the registered devices that you can rename or delete.
The default name for the WebAuthn device is
New Security Key. -
(Optional) Click the ellipsis icon, , select Edit Name, and give a suitable name to the new WebAuthn device, such as
MacBook Touch ID.
Authenticate with usernameless authentication
After registering, authenticate the test user without a username or password as follows:
-
Sign out.
-
Copy and paste the Preview URL for the usernameless authentication journey into the same browser window.
-
Perform the authorization gesture of the chosen option when prompted.
A list of the accounts associated with the authentication device displays:
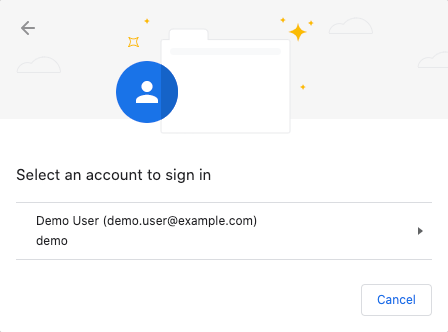
In this example, the user’s full name and email address appear. The Scripted Decision node gathered them during registration.
-
Select the account to sign in.
The UI displays the user profile page without you having to enter your username or password.
| Find information about designing simple user journeys that invoke biometric sensors on FIDO2-enabled devices to add biometrics to your authentication journeys in the Community blog Use case: Configure biometric authentication in PingOne Advanced Identity Cloud. |
Related origins for web authentication (ROR)
By default, a WebAuthn credential is bound to a single relying party identifier (RP ID), and browsers only offer the credential on origins that belong to that domain.
For example, if your users register a passkey on one domain (app.example.com) and sign in from a related domain (login.example.net), the browser doesn’t offer the passkey.
Related Origin Requests (ROR) is a WebAuthn Level 3 feature that lets users register a credential on one web origin and use it on another related origin.
For example, when using example.com as the shared RP ID, users can register on https://app.example.com and sign in from https://login.example.net.
| Advanced Identity Cloud supports ROR for browser-based WebAuthn flows. ROR doesn’t merge application domains or user profiles in Advanced Identity Cloud. The applications must use the same user and WebAuthn device data. |
Common use cases for related origins
-
Multi-region and country-code top-level domains: Allows multinational brands operating localized domains (for example,
example.com,example.co.uk,example.fr) to share a single passkey across all country sites.A user registers once and can sign on seamlessly on any regional site.
-
Cross-brand and ecosystem domains: Enables companies operating across multiple associated brands or portals (for example,
brand.comandbrandrewards.com) to share passkeys without forcing users into duplicate registrations. -
Internet and private network domains: Lets users register a passkey on an external, internet-facing domain (for example,
company.com) and authenticate with that same passkey on a private or corporate network domain (for example,company.net.au). -
Passkey autofill and frictionless user experience: Lets browser password managers and credential providers suggest and autofill the same passkey on any related domain in the allowlist, providing a consistent user experience.
Before you start
To configure ROR in Advanced Identity Cloud, you must have:
-
Control of the web tier serving the RP ID domain.
This means you must control the servers or content delivery network (CDN) that serve the RP ID domain, the primary domain used for passkeys.
-
HTTPS on all origins involved.
Browsers offer passkeys only in secure contexts.
Configure related origin requests
-
Host a ROR configuration file at the following URL, where rp-id is the relying party identifier:
https://rp-id/.well-known/webauthn-
The file must contain only an
originsarray listing all origins that can use the relying party identifier. For example:{ "origins": [ "https://app.example.com", "https://login.example.net" ] } -
The endpoint must be publicly reachable, unauthenticated, and served from the domain matching the configured RP ID.
-
Ensure no redirects are served for this path. Browsers request it directly and don’t follow redirects.
-
If the origin has a non-default port, include the port.
Origins match exactly, character for character. For example,
https://app.example.com:8443doesn’t matchhttps://app.example.com.Browsers fetch this file on the RP ID’s default HTTPS port ( 443) even when the application itself runs on another port. Serve the file on443regardless of the application port. -
The file must be served over HTTPS with the
application/jsoncontent type. -
If you’re using PingGateway, configure PingGateway or a static web server to serve this exact path. Don’t place it under an Advanced Identity Cloud journey or
/jsonendpoint.
-
Only add origins that your organization controls and requires for the WebAuthn flow.
-
Use exact HTTPS origins. Don’t use wildcards or broad domains.
-
Protect the DNS, TLS certificates, web server, and deployment process for the ROR file.
-
Review the file when you add or retire an application.
-
Most browser implementations enforce a limit of five unique origins in
/.well-known/webauthn. Lists exceeding five origins might have additional entries ignored by the browser.
-
-
Verify that the file is publicly reachable at the exact URL and that its response contains valid JSON. For example:
$ curl -i https://example.com/.well-known/webauthn
{
  "origins": [
    "https://app.example.com",
    "https://login.example.net"
  ]
}
If your applications use one RP ID, host one
/.well-known/webauthnfile for that identifier. If you configure different RP IDs, host a file for each identifier. -
In your WebAuthn journey, configure the following nodes:
-
-
Set Relying party identifier to the shared RP ID.
-
In the Origin domains property, add each complete origin that can start a registration or authentication ceremony. For example, add
https://app.example.comandhttps://login.example.net. -
Enable Username to device.
This setting enables discoverable credentials so the credential can be offered on other origins during authentication.
-
Optionally enable Generate recovery codes if your users need a fallback mechanism.
-
-
-
Set the Relying party identifier and Origin domains properties to the same values as the WebAuthn Registration node.
-
Don’t enable Username from device unless this is a usernameless journey or it supports passkey autofill.
When this setting is off, the node looks up the user’s registered credential by the journey’s username and scopes the browser ceremony to it. The browser applies related-origin rules to that request too.
-
Use the No Device Registered outcome to route new users to the WebAuthn Registration node.
-
When the user signs in from a second origin, collect the same username they registered with. The node uses this username to find the stored credential and to scope the ceremony. If you allow users to authenticate with a different username, the journey fails with the error No passkeys available. -
-
Test the configuration:
-
Open the application on the first origin (
https://app.example.com) and register a passkey. -
Sign out, then sign in from the second origin (
https://login.example.net) with the same username.The browser offers the passkey and names the RP ID. For example:
Use a saved passkey for example.com. -
Complete authentication.
The session is issued by the same Advanced Identity Cloud instance. No separate registration is needed on the second origin.
-
|
Learn more about ROR in the WebAuthn Level 3 specification.
Troubleshoot a ROR configuration
The following errors can occur if you’ve misconfigured ROR in Advanced Identity Cloud:
| Symptom | Likely cause | Fix |
|---|---|---|
|
The calling origin is missing from the related-origins file or does not match exactly, including scheme, host, or port. |
Add the calling origin to the file on the RP ID host, exactly as reported by the browser. |
Advanced Identity Cloud rejects registration or sign-on with a failure |
The origin is missing from the node’s Origin domains list. |
Add the origin (including its port, if applicable) to both WebAuthn nodes. |
The browser doesn’t offer the saved passkey on the second origin |
The browser doesn’t support related origin requests. |
Use a supported browser: Chrome 128+, Edge 128+, Safari 18+, or Firefox 152+. Older browsers support same-origin sign-on only. |