Getting started with PingOne Protect
Prevent account takeover, new account fraud, and multi-factor authentication (MFA) and password fatigue with PingOne Protect.
By evaluating multiple attack vectors, assigning risk scores, and providing insights, PingOne Protect triggers mitigation tools to block attacks and allow legitimate users to authenticate easily.
PingOne Protect allows enterprises to:
-
Stop account takeover and new account fraud.
-
Improve user experience by reducing MFA prompts and going passwordless.
-
Create intelligent policies that aggregate multiple predictors and assign a risk score.
You can use PingOne Protect in user access, authentication, authorization, registration, and transaction flows.
The two basic elements used in the risk analysis process are predictors and risk policies:
- Predictors
-
A predictor looks at a single factor, for example, whether or not a user is trying to authenticate from an anonymous network, and yields an estimated risk level. Learn more in Predictors.
- Risk policy
-
A risk policy combines a number of individual risk predictors, looks at the risk level estimated for each of the predictors, and then yields an overall risk level of Low, Medium, or High. Learn more in Risk policies.
PingOne creates risk evaluations when a user initiates a flow, and the risk policy determines how the aggregated risk score from the risk evaluation should be translated into a final risk level. Learn more in Risk evaluations.
Threat Protection Dashboard
To help you assess how risk evaluations are impacting user flows, PingOne includes the Threat Protection Dashboard. The dashboard displays top-level information and includes a number of charts that you can use to get detailed information on specific aspects of the data.
Learn more in Threat Protection Dashboard.
How PingOne Protect works
PingOne Protect dynamically evaluates risk data and calculates a risk level. You can create risk policies to control the response that the end user receives depending on the risk level.
The following diagram shows how PingOne Protect works.
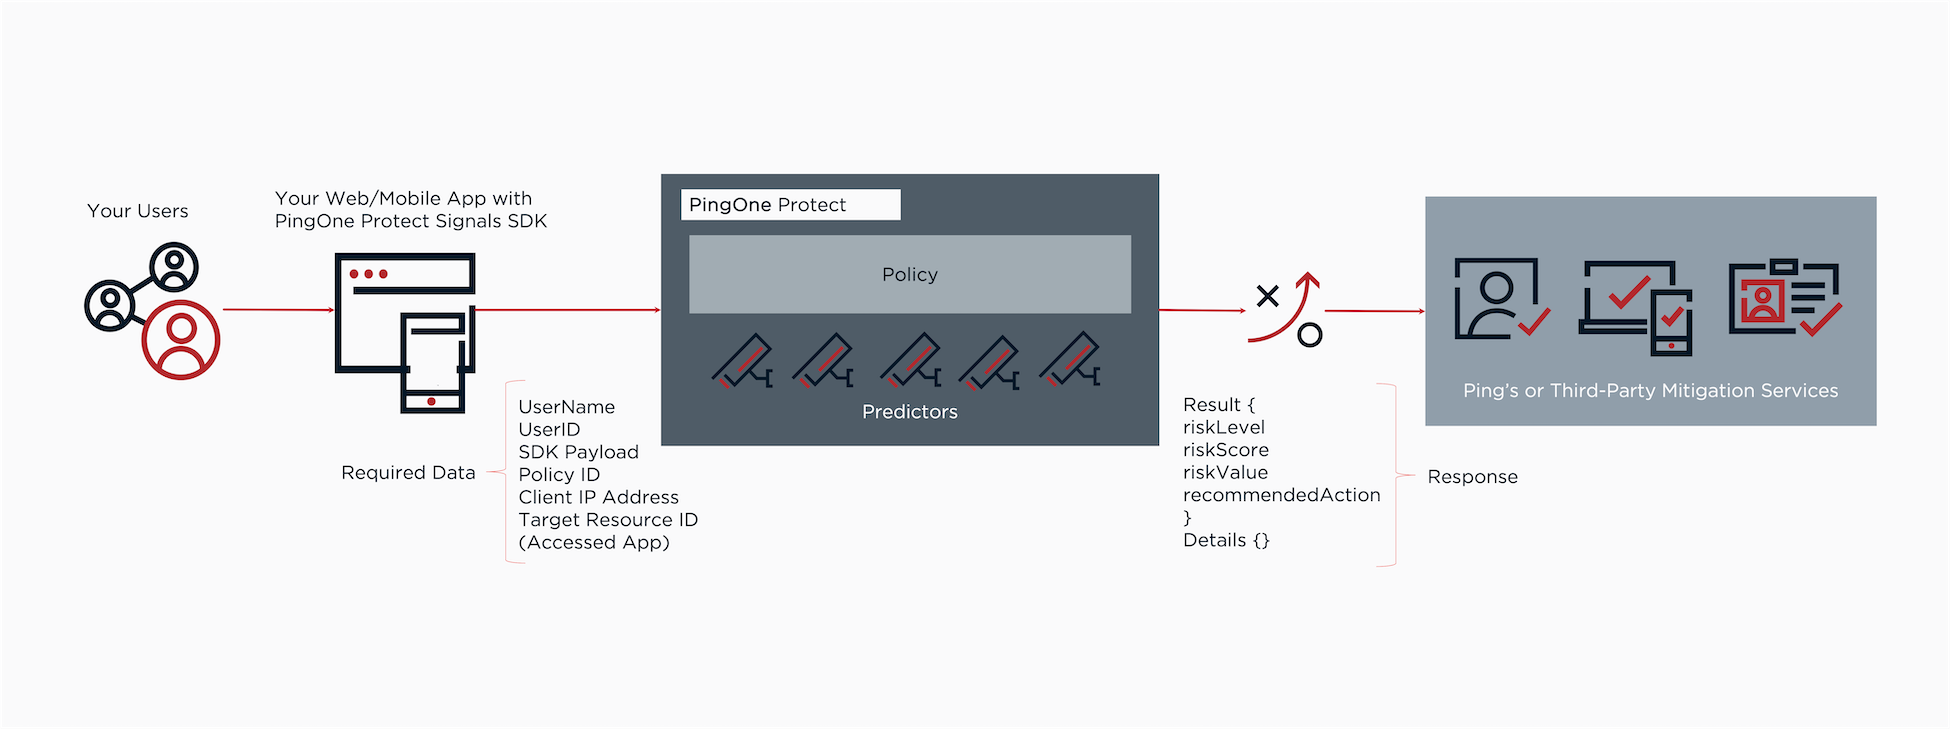
-
The user initiates the flow.
Possible types of user flows are access, authentication, authorization, registration, or transaction. You can also specify a flow subtype to provide additional detail about the context of the flow, such as if the user performed a password reset or signed on with their username and password. Learn more about flow types and subtypes in the PingOne Protect API documentation.
-
PingOne Protect evaluates risk levels based on various data points, such as network, location, device hardware and settings, behavioral biometrics, and more.
-
The PingOne Protect risk policy calculates the risk based on policy settings.
-
PingOne Protect returns a detailed response that includes data about the event, the user and their device, predictor results, and the risk policy result.
Learn more in Risk evaluations.
You can use the PingOne API to configure and retrieve risk policies and evaluations. Learn more in the PingOne Protect API documentation.
The policy result can include the following attributes:
result.level-
The response always returns this attribute. Values can be
LOW,MEDIUM, andHIGH. result.score-
The response always returns this attribute and includes the numeric score that the policy calculates. The score determines the risk level based on the policy threshold.
result.recommendedAction-
The response might return this attribute based on the attack vector. This attribute enhances the risk level attribute and provides information on how the user flow should continue. Possible values are:
-
ACCOUNT_RECOVERY: There are indications that the user’s account may have been compromised, so you should have them follow your account recovery procedure. -
AITM_MITIGATION: You should take steps to mitigate the damage from an Adversary-in-the-Middle (AitM) attack. For an AitM attack, the user’s credentials have been intercepted, so in addition to blocking the access request, you should lock the user’s account until the password is changed. -
BOT_MITIGATION: You should take steps to handle a scenario where a bot is involved. -
DENY: When a risk level ofHIGHis calculated for a traffic anomaly predictor, you should deny access because the repeated risk evaluations are likely a sign of a brute force attack. -
TEMP_EMAIL_MITIGATION: The user has specified a disposable email address, which is an indication of a fraud attempt.
-
result.mitigations-
This attribute is included in the result when a mitigation rule is configured in the risk policy to define custom recommended actions and the conditions of the rule are met.
result.value-
The response might return this attribute.
result.valueis free text that you can add to a policy override. Override rules are not necessary in most cases, but you can use them in scenarios that require blocking a user (for example, known IPs that you want to block).Learn more about policy overrides and mitigations in Risk policies.
You can find a full response example in PingOne Protect API documentation.
-
The risk policy makes a decision based on the response, and the user flow continues based on the decision.
Key concepts
To fully leverage the capabilities of PingOne Protect, familiarize yourself with the following key concepts:
Introduction to risk policies
The risk policy looks at the risk level estimated for each of the predictors and then yields an overall risk level of Low, Medium, or High. When you define a user journey with the tools provided by Ping Identity, you decide which of your defined risk policies you would like to associate with that flow. For some situations, you might need to use a stricter risk policy, while for others, you could use a more lenient risk policy.
The default risk policy
When you add the PingOne Protect service to a PingOne environment, it includes a default risk policy. This is the recommended policy for your initial testing of risk evaluations.
The default risk policy has the following characteristics:
-
It uses the Scores approach, which gives you a higher degree of control than the Weights approach.
Weights in risk policies have been deprecated for new PingOne environments but can still be used in existing environments.
-
It includes all of the out-of-the-box predictors.
-
It assigns a score of 50 for High risk for some of the predictors and a score of 75 for High risk for the remaining predictors. This is based on the premise that the IP-related predictors are less indicative of risky situations than the other predictors.
The risk level for each predictor type is calculated separately. Most predictor types require training and learn from successful events. You can also configure a fallback value for most predictor types to use if there is insufficient information to calculate a risk level.
Learn more in Predictors.
You can also create custom predictors that leverage external or processed data. Learn more in Adding custom predictors.
Staging policies
Staging policies allow you to fine tune and test risk policy changes before releasing changes to your production policy and does not affect your end users until you promote a staging policy to production.
Learn more in Creating and managing staging policies.
Custom risk policies
|
Customize risk policies only after you’ve accumulated sufficient authentication data and analyzed it. |
Use the Risk Policies page in PingOne to modify the default risk policy or create additional risk policies of your own. Learn more in Risk policies.
Introduction to predictors
Predictors are the basic building blocks that form risk policies. A predictor looks at a single factor, such as whether or not a user is trying to authenticate from an anonymous network. Each predictor yields an estimated risk level. For some predictors, the levels are Low and High. For other predictors, the levels are Low, Medium, and High.
PingOne Protect leverages the following risk predictors to learn user behavior and detect anomalies:
| Predictor | Description |
|---|---|
Adversary-in-the-Middle (AitM) |
Checks the domain name that the user is trying to access in order to identify AitM attacks. |
Anonymous network detection |
Analyzes IP address data from a user’s device to determine if the address is originating from any type of anonymous network, such as unknown VPNs, Tor, or proxies to mask the IP address. |
Bot detection |
Leverages advanced analysis of mouse, keyboard, touch, and mobile sensors, as well as device attributes, to detect non-human behavior, automated frameworks, recorders, and more. |
Email reputation |
Detects the use of disposable email addresses during registration. |
Geovelocity anomaly |
Analyzes location data to calculate if travel time between two session locations is physically possible. |
IP reputation |
Analyzes data from different intelligence sources to determine the probability an IP address is associated with malicious activity and to request stronger authentication to verify the user’s identity. |
IP velocity |
Tracks the number of distinct IPs used per user. |
New device |
Takes into account the risk associated with users trying to access applications from unknown devices or devices that have not been used for sign-on in the recent past. |
PingID device trust |
Establishes device trust by collecting device information through the PingID device trust agent installed on an organization’s workstations. |
Suspicious device |
Scrutinizes browser, operating system, and hardware attributes to identify suspicious settings or inconsistencies between these attributes collected from the device. |
Traffic anomaly |
Monitors users, devices, and sessions to detect traffic anomalies, such as a large number of risk evaluations requested for a single user within a short period of time or a large number of users per device during a given time period. |
User-based risk behavior |
Compares a transaction with the typical behavior of that specific user. |
User location anomaly |
Detects a user’s sign-on location and checks it against previously saved authentication locations. |
User velocity |
Tracks the number of distinct users per IP. |
Learn more about each predictor in Predictors.
|
The PingOne Risk license allows you to use the following predictors in your risk policies. The remaining predictors require a PingOne Protect license.
To upgrade your license to PingOne Protect and gain access to the additional predictors, contact your account team for more details. |
The risk level for each predictor type is calculated separately. Most predictor types require training and learn from successful events. You can configure a fallback value for most predictor types to use if there is insufficient information to calculate a risk level.
You can also create custom predictors that leverage external or processed data. Learn more in Customizing predictors.
Introduction to risk evaluations
Risk evaluations calculate the risk level and other risk-related details associated with an event. The PingOne Protect risk policy then calculates the risk based on policy settings and returns a detailed response that includes data about the event, the user and their device, predictor results, and the risk policy result. You can view the results from risk evaluations to see how your risk policy is performing.
Learn more about risk evaluations and how to use them in:
Introduction to using the PingOne API for risk evaluations
You can use the PingOne API to:
-
Create and manage risk predictors
-
Create and manage risk policies
-
Create risk evaluations
-
Update the completion status of risk evaluations to improve the accuracy of future risk evaluations
Learn more in the PingOne Protect section of the PingOne API documentation.
Trying PingOne Protect with a sample app
Before you begin
Sign up for a PingOne trial. Learn more in Starting a PingOne trial.
About this task
Signing up for a PingOne trial is a great way to experience the functionality of PingOne Protect with an automatically generated sample application. This sample app is a Ping-maintained application that allows you to design registration and sign-on experiences for your customers and test them in the app.
With your PingOne trial, you can try PingOne Protect and quickly and easily simulate risk events with the sample app to test how predictors work. The sample app allows you to test the capabilities of PingOne Protect in addition to other PingOne services, such as PingOne MFA and PingOne SSO, and can be tailored to your industry.
|
Learn more about trying PingOne Protect in your existing PingOne user journey instead of with a trial in Getting up and running. |
To try PingOne Protect with a sample app:
Steps
-
In the PingOne admin console, click Add Environment.
-
Select Customer solution, and click Next.
When you create a Customer solution, your new environment automatically includes the PingOne Protect service.
-
Click Next again to create the environment.
-
Enter the details for your environment, select the Include a solution designer to easily design and test experiences check box, and click Finish.
Result:
Your new PingOne environment is created and automatically opens.
-
Choose if you want to tailor your experience for your industry, or click Skip.
Result:
PingOne creates a sample app based on your selection. You can click Get Started to view the tour or close the tour pop-up window.
-
The PingOne Protect capabilities are available in the Authentication flow of the sample app.
Getting up and running
Follow these steps to start using PingOne Protect as part of your user journeys.
While PingOne Protect provides many ways to customize predictors and to combine them in a risk policy, it also provides out-of-the-box predictors and a default risk policy that combines these predictors.
When you first start with PingOne Protect, the best approach is to use the default risk policy that is provided. After you’ve seen how this default policy affects the flow experience for your users, you can go back and fine-tune it by customizing individual predictors or creating multiple risk policies.
Because you’ll use the default risk policy, your only task at the beginning is the integration of PingOne Protect with your user journey.
The main steps required to start using PingOne Protect are:
-
Integrate PingOne Protect into a user journey.
-
Configure the PingOne Signals (Protect) SDK.
-
Run and analyze your predictors:
-
Run PingOne Protect to train the predictor models.
-
Use the PingOne Protect dashboard to analyze the results.
-
Adjust the scores for the predictors in the risk policy.
-
-
Repeat step 3 as needed.
Adding the PingOne Protect service to your environment
To get started, add the PingOne Protect service to your PingOne environment.
Before you begin
-
If you don’t have a PingOne account yet, start a PingOne trial.
-
Make sure that you can sign on to the PingOne admin console.
-
Add an environment to organize your services.
-
Make sure that you have the Environment Admin and Identity Data Admin roles in your PingOne environment. Learn more in Managing user roles.
Steps
-
In the PingOne admin console, go to Overview.
-
Next to Services, click the icon.
-
Click Add to add the PingOne Protect service.
-
In the Add a Service window, click Finish.
Result
PingOne Protect is displayed in the sidebar.
Integrating PingOne Protect with user journeys
After you add PingOne Protect to your environment, integrate PingOne Protect into a user journey.
Before you begin
You’ll need a PingOne account with at least one environment that includes the PingOne Protect service. Learn more in Add an environment.
You can integrate your risk policy into a user journey in one of the following ways:
-
Using the integration with PingFederate
-
Building a custom flow with PingOne DaVinci
-
Using the PingOne API
-
Integrating with PingOne Advanced Identity Cloud or PingAM
Regardless of the integration approach you use, the high-level steps are the same. The steps below use an authentication flow as an example for integration, but you can also use other user journeys, such as registration and authorization:
Steps
-
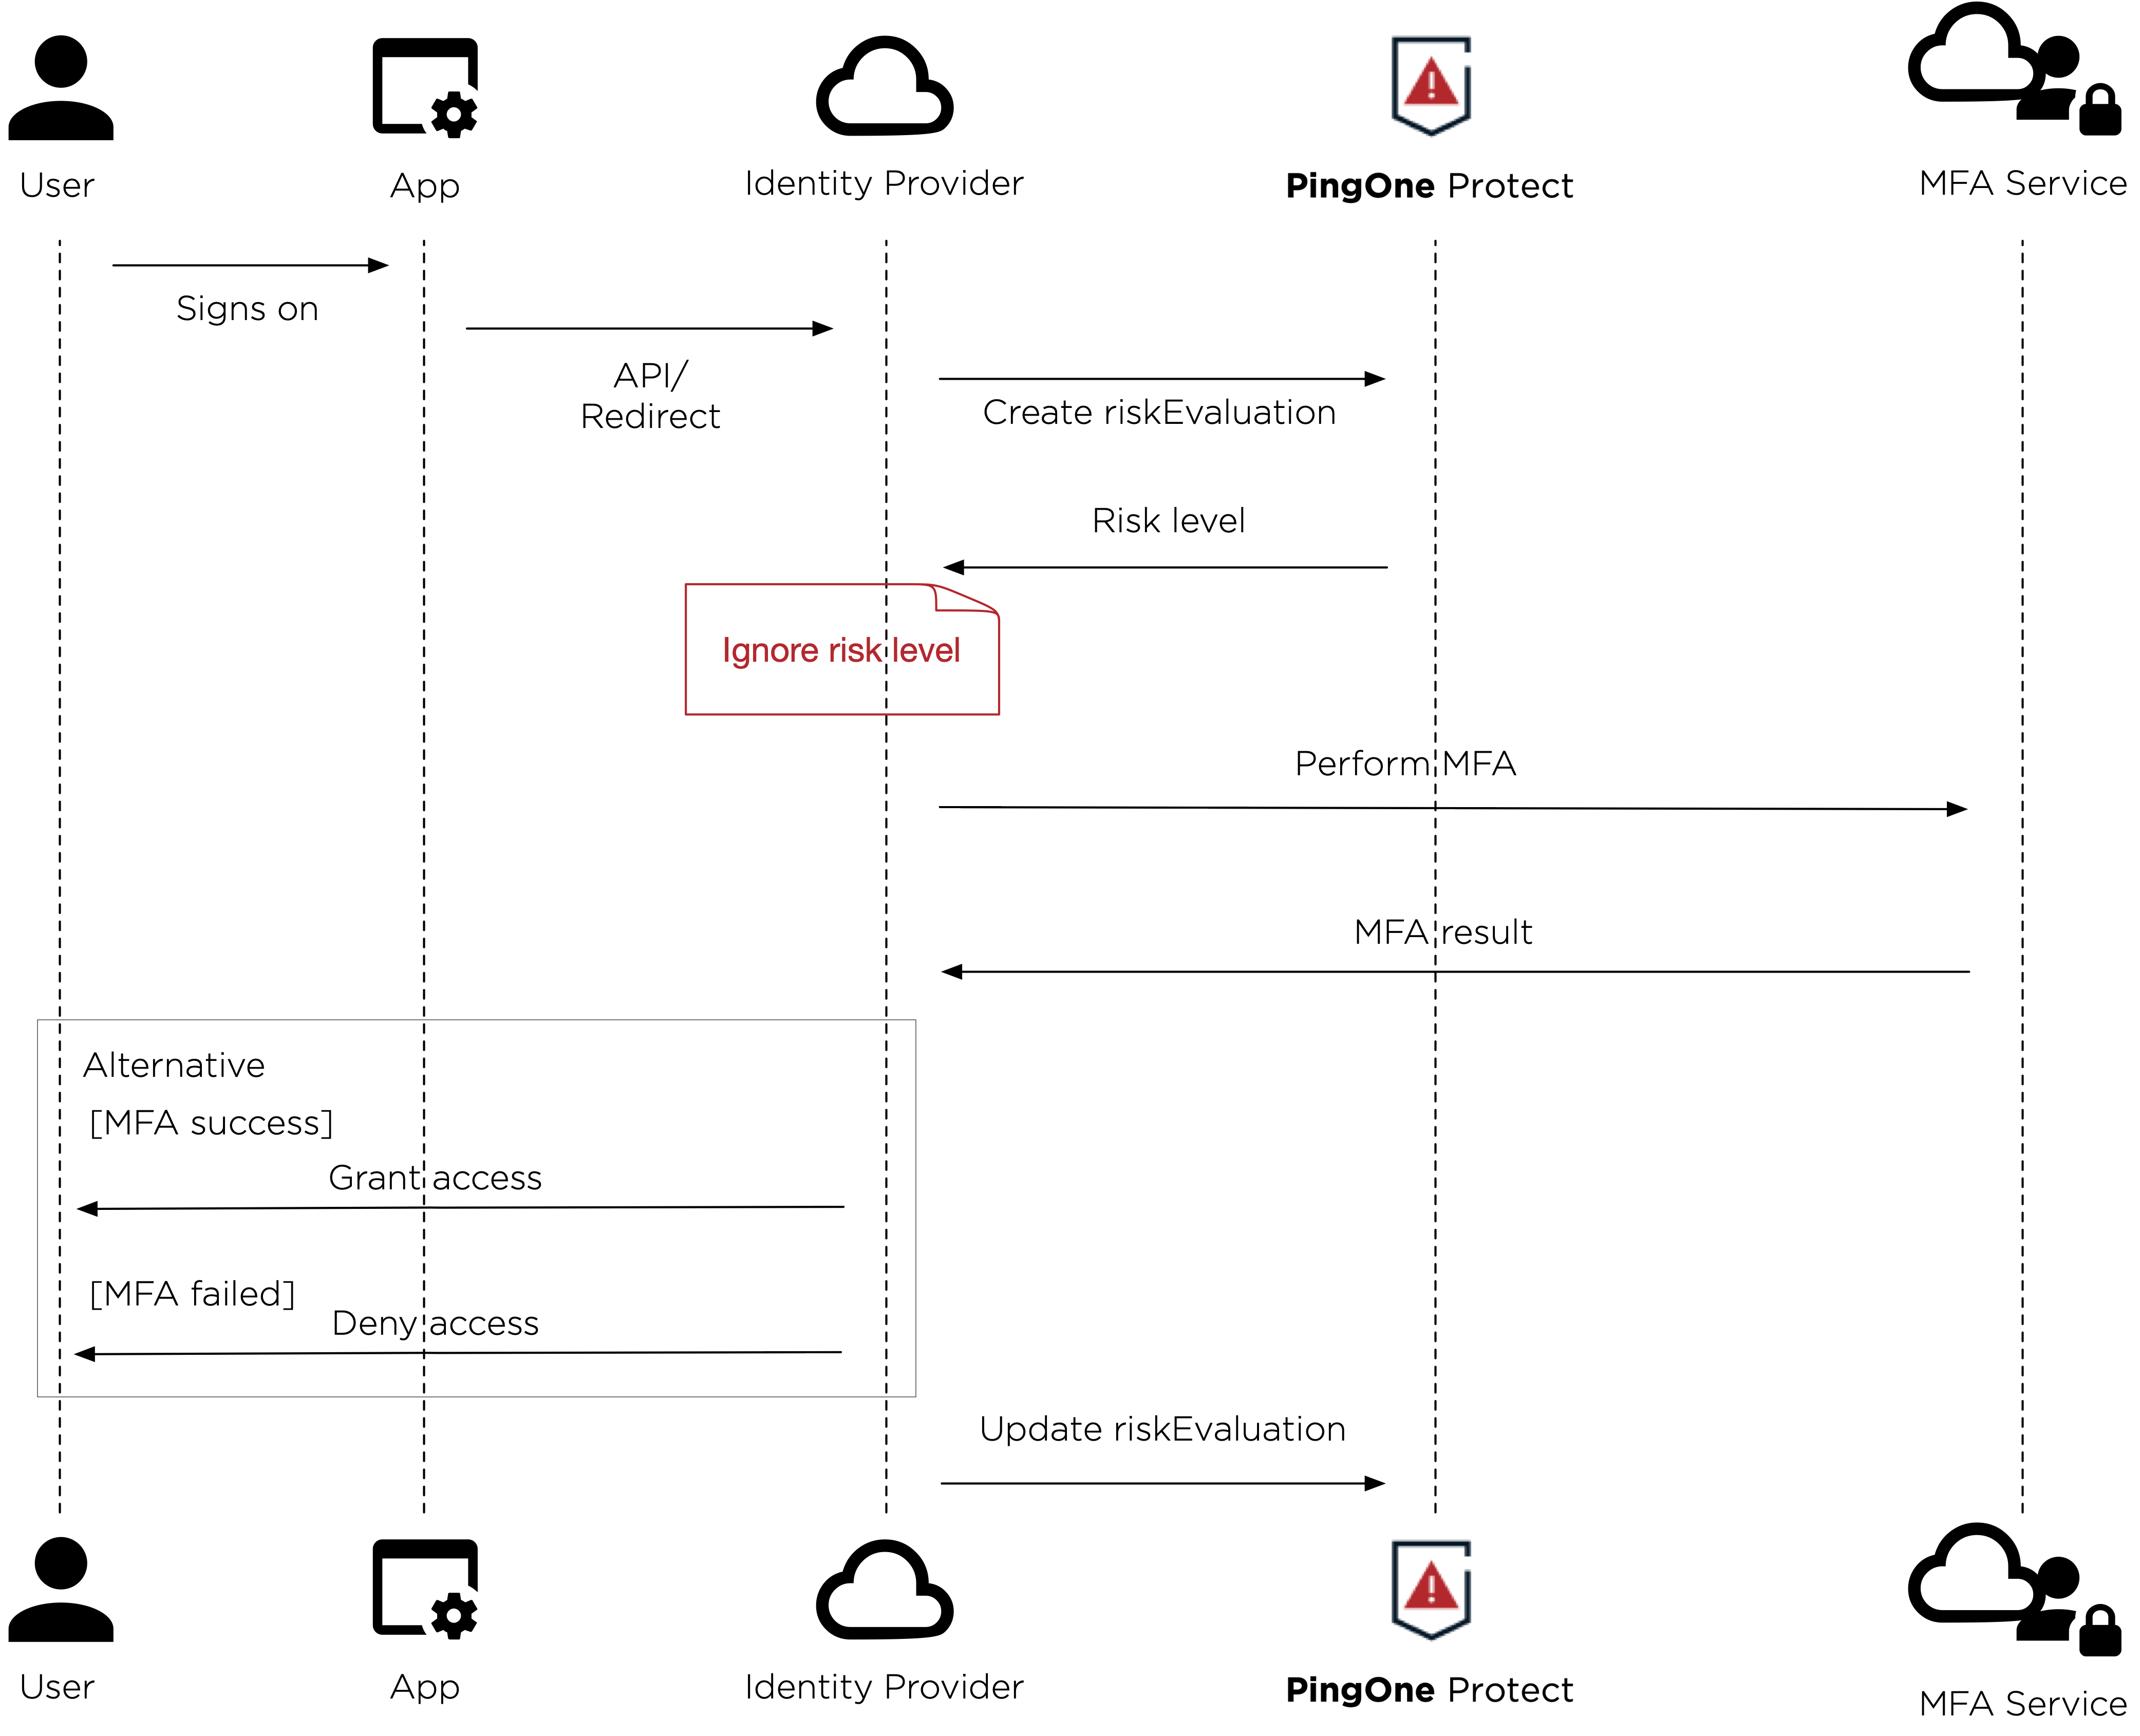
Integrate into an authentication flow.
The following diagram shows a high-level overview of PingOne Protect integrated in silent mode into an example authentication flow.
-
Send transaction feedback.
-
Configure a risk policy.
The simplest approach is to use the default risk policy. You can also edit the default risk policy.
-
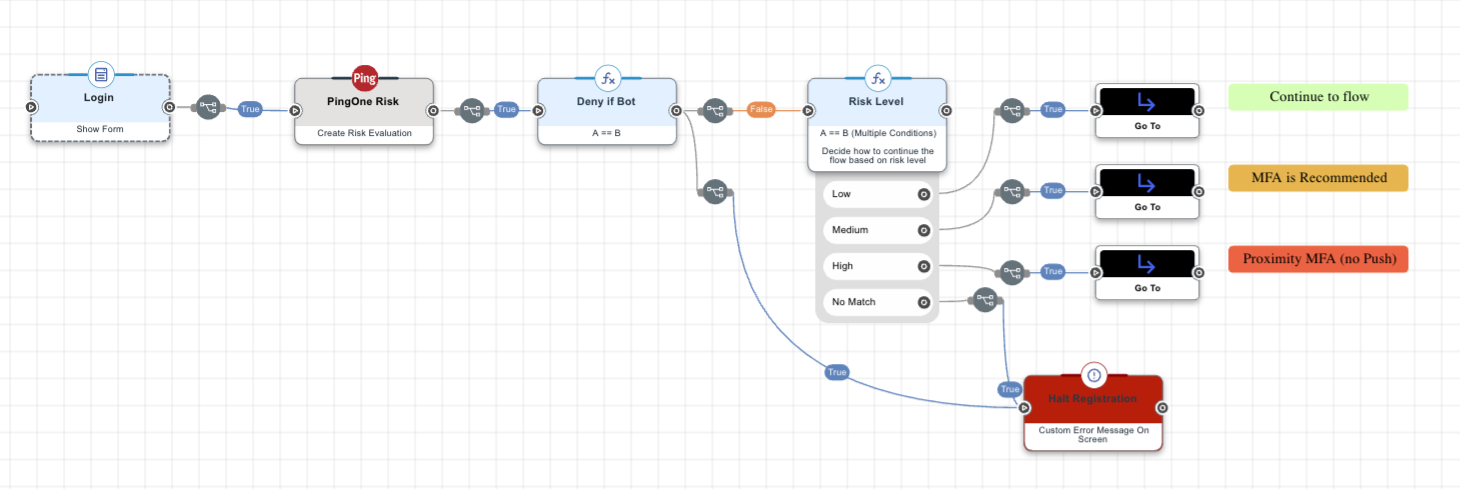
Add risk evaluation to your authentication flow.
The following diagram shows an example of PingOne Protect integrated into an authentication flow with risk levels affecting the flow.

-
PingFederate
-
DaVinci
-
API
-
PingOne Advanced Identity Cloud
Using the PingOne Protect Integration Kit with PingFederate
Before you begin
Before proceeding, make sure PingFederate is installed. Learn more in Installing PingFederate.
Steps
-
Deploy the files for the type of integration kit you’re using to your PingFederate directory:
Choose from:
-
The PingOne Protect Integration Kit 1.0 works with PingFederate 11.3 and later. The PingOne Risk Integration Kit will continue to support PingFederate versions 10.2 and later.
-
To allow PingFederate to communicate with PingOne, create a connection between PingOne and PingFederate.
-
To configure the integration kit, follow the steps in the documentation for the integration type that you selected in step 1.
Building a custom flow with PingOne DaVinci
Before you begin
Add PingOne DaVinci to your PingOne environment. Learn more in Adding an environment.
About this task
PingOne DaVinci is the graphic orchestration tool used for designing flows, such as user registration and authentication flows. Learn more about using PingOne DaVinci in the DaVinci documentation.
You can use the PingOne Protect connector to define different paths in an user journey flow, based on the result of a risk evaluation.
For example, you can use a risk evaluation connector before a MFA step, and then define different paths based on the risk score calculated:
-
Skip the MFA challenge if low risk.
-
Use a specific authentication method if user behavior data suggests medium or high risk.
-
Block access completely in a high-risk situation, such as when the recommended action is equal to bot mitigation.
For examples of using the PingOne Protect connector in different types of flows, see the following templates in the Flow Library:
-
PingOne - Sign On and Adaptive MFA
-
PingID - MFA flow + Protect
-
PingID - FIDO2 Passwordless + Protect
To use Protect connectors in a flow:
Steps
-
After you have added DaVinci to your PingOne environment, ensure any risk connectors you add to your flows already have been configured with the correct information for environment ID, client ID, and client secret.
If you import a flow from a different PingOne environment, you must go to the settings for the Protect connector and update this information to reflect the environment where you’re adding the flow.
-
Add two different Protect connectors to your flow by following the documentation for the PingOne Protect connector:
-
Add a Protect connector with the Create Risk Evaluation capability.
The response returns a final risk evaluation result -
High,Medium, orLow. The Protect connector with theCreate Risk Evaluationcapability should be added at a point in the flow where you would like to base the next action on the risk score assigned, for example, show an MFA prompt for Medium or High, but automatically grant access if the risk is deemed Low. -
Add risk evaluation feedback to the flow by adding a Protect connector with the Update Risk Evaluation capability.
This step is included after authentication has been completed, and it consists of sending an update with the final state of the transaction, such as
SUCCESSorFAIL. The Update Risk Evaluation capability represents the system’s ability to learn over time in order to improve results. You should always include an update connector in your flow because this step is essential for improving the accuracy of the machine learning models.Flows may take users on different paths. Make sure to include a Protect connector with the Update Risk Evaluation capability at the end of each possible path.
-
Troubleshooting
If you are having issues with the PingOne Protect Connector, try the following:
-
For each connector in the flow, make sure that all of the mandatory inputs have been provided.
-
If you are using the
skriskcomponent to include the data provided by the PingOne Signals (Protect) SDK, make sure that you have carried out the necessary steps. -
Use the Analytics feature to see where the flow stopped.
-
Select the Options icon, and turn on Show Node ID. This will make it easier to identify the source of inputs and outputs.
Using the PingOne API
About this task
To integrate using the PingOne API:
Steps
-
Create a worker application and get an access token.
Learn more in Adding an application and Getting an access token.
-
Add risk evaluation to your user flow.
Learn more in the Risk evaluation section in the PingOne Protect API documentation.
The response returns a final risk evaluation result of
High,Medium, orLow. -
Add risk evaluation feedback to the flow.
This step is included after authentication has been completed, and it consists of sending an update with the final state of the transaction, such as
SUCCESSorFAIL. This step is essential for improving the accuracy of the machine learning models. Learn more in PUT UPDATE Risk Evaluation in the PingOne Protect API documentation. -
Modify the default risk policy or create one of your own risk policy set with the API.
Integrating with PingOne Advanced Identity Cloud
Before you begin
Make sure you have:
-
A PingOne Advanced Identity Cloud administrator account
-
A PingOne account
Learn more in Starting a PingOne trial.
-
The client ID and client secret for a PingOne environment
-
A risk policy configured in PingOne (or use the default risk policy)
-
A worker application with the Identity Data Admin role assigned in PingOne
About this task
Advanced Identity Cloud is a comprehensive identity and access management (IAM) service that lets you deploy applications anywhere: on-premises, in your own private cloud, or in your choice of public cloud. With Advanced Identity Cloud, you can manage user journeys and take advantage of the PingOne Protect threat protection features by integrating the three PingOne Protect nodes into your journey.
Steps
-
Configure the PingOne Service in Advanced Identity Cloud.
-
Set up your user journey in Advanced Identity Cloud with the three PingOne Protect nodes in the journey:
-
The PingOne Protect Initialization node to initialize the PingOne Protect Web SDK on the client device.
-
The PingOne Protect Evaluation node to calculate the risk level and other risk-related details associated with an event.
-
The PingOne Protect Result node to update the risk evaluation configuration or modify the completion status of the resource when the risk evaluation is still in progress.
-
-
Validate that the PingOne Protect Evaluation node is working by checking the PingOne Audit log for Risk Evaluation Created events.
Getting input from the PingOne Signals (Protect) SDK
Certain risk predictors, such as the New Device predictor, rely on supplemental risk-related information that is supplied by the PingOne Signals (Protect) SDK.
About this task
The default risk policy includes predictors that are dependent upon this input. To get reliable risk evaluations right from the start, you must carry out the steps to include the required code in your applications and include the information from the Signals SDK in your user journeys.
Steps
-
Add the required Signals SDK code into your web applications, Android applications, and iOS applications.
Choose from:
-
Include the information from the Signals SDK in your flows using one of the following methods:
Choose from:
-
PingOne Protect Integration Kit for PingFederate: Integrate device profiling with one of following:
-
PingOne Protect API: Create risk evaluations.
-
PingOne DaVinci: Include the PingOne Protect connector as part of a user flow.
-
PingOne Advanced Identity Cloud: Include the PingOne Protect authentication nodes as part of journey.
-
Using third-party risk scores with PingOne Protect
The best threat protection often means leveraging multiple risk and fraud services. PingOne Protect allows administrators to send third-party data and other risk signal vendor scores, for example sending information from PingFederate whether a device is managed and not.
There are three steps to ingesting third-party risk data into PingOne Protect:
-
Send the third-party data to PingOne Protect by creating custom attributes to map the values to.
-
Validate that PingOne Protect received the third-party data.
-
Configure a custom predictor using the custom attributes.
Custom predictors allow you to plug in external data sources and reference custom attributes. You can use custom predictors to determine a risk score for unmanaged devices or map third-party risk scores to high, medium, or low. You can also add custom predictors to risk policies, apply overrides, and view analytics in the dashboards.
Sending third-party data to PingOne Protect
PingOne Protect cannot invoke a third-party API directly, so the external data must be sent into the evaluation call from another service, and the values need to be mapped into custom attributes.
Depending on your identity service providers, there are multiple ways to send third-party data to PingOne Protect:
- PingOne DaVinci
-
The most straightforward approach is using PingOne DaVinci to retrieve a third-party data feed and pass the response back into PingOne Protect. Use purpose-built PingOne DaVinci connectors to get risk evaluations from vendors such as Castle, LexisNexis, or Securonix. You can also configure a generic REST call to get risk information from other vendors.
Learn more in:
-
Example connectors:
-
PingOne DaVinci HTTP connector (generic API call)
- PingFederate
-
Use PingFederate integration kits to retrieve third-party data in combination with the PingOne Protect Integration Kit to configure custom attributes to map the data into PingOne Protect.
Learn more in:
-
Example integration kits:
-
Mobile device management (MDM) integration kits:
-
Workspace ONE UEM Integration Kit (formerly known as AirWatch)
- PingOne API
-
Use the PingOne API to retrieve risk evaluations from third-party risk providers. You can add custom attributes to
eventobjects by adding the attribute to theeventobject in the body of a risk evaluation request. Learn more in Risk evaluations in the PingOne Protect API documentation. - PingOne Authorize
-
Use PingOne Authorize to call PingOne Protect for risk evaluations as part of a PingOne authorization policy. Learn more in Connecting to PingOne Protect.
Validating received third-party data in PingOne Protect
After you send the third-party data to PingOne Protect, validate that the data was received either using the PingOne admin console or the API:
-
PingOne admin console: To view a risk evaluation, follow the steps in Reviewing risk evaluations.
-
PingOne API: Create a risk evaluation and review the response. Learn more in the PingOne Protect API documentation.
|
In a risk evaluation, the custom attributes appear in the |
Configuring custom predictors using custom attributes
After sending third-party data and validating that it was received in PingOne, configure custom predictors that use the custom attributes that you previously created:
-
PingOne admin console: Learn more in Adding custom predictors.
-
PingOne API: Learn more in Custom risk predictors in the PingOne Protect API documentation.
Running, analyzing, and adjusting your risk policy
To make informed decisions about how to fine-tune risk predictors and policies, you’ll have to accumulate a certain amount of data on authentication attempts and how the risk evaluation impacts them.
About this task
You should use the default risk policy for the initial period before you start customizing the policy or defining multiple risk policies.
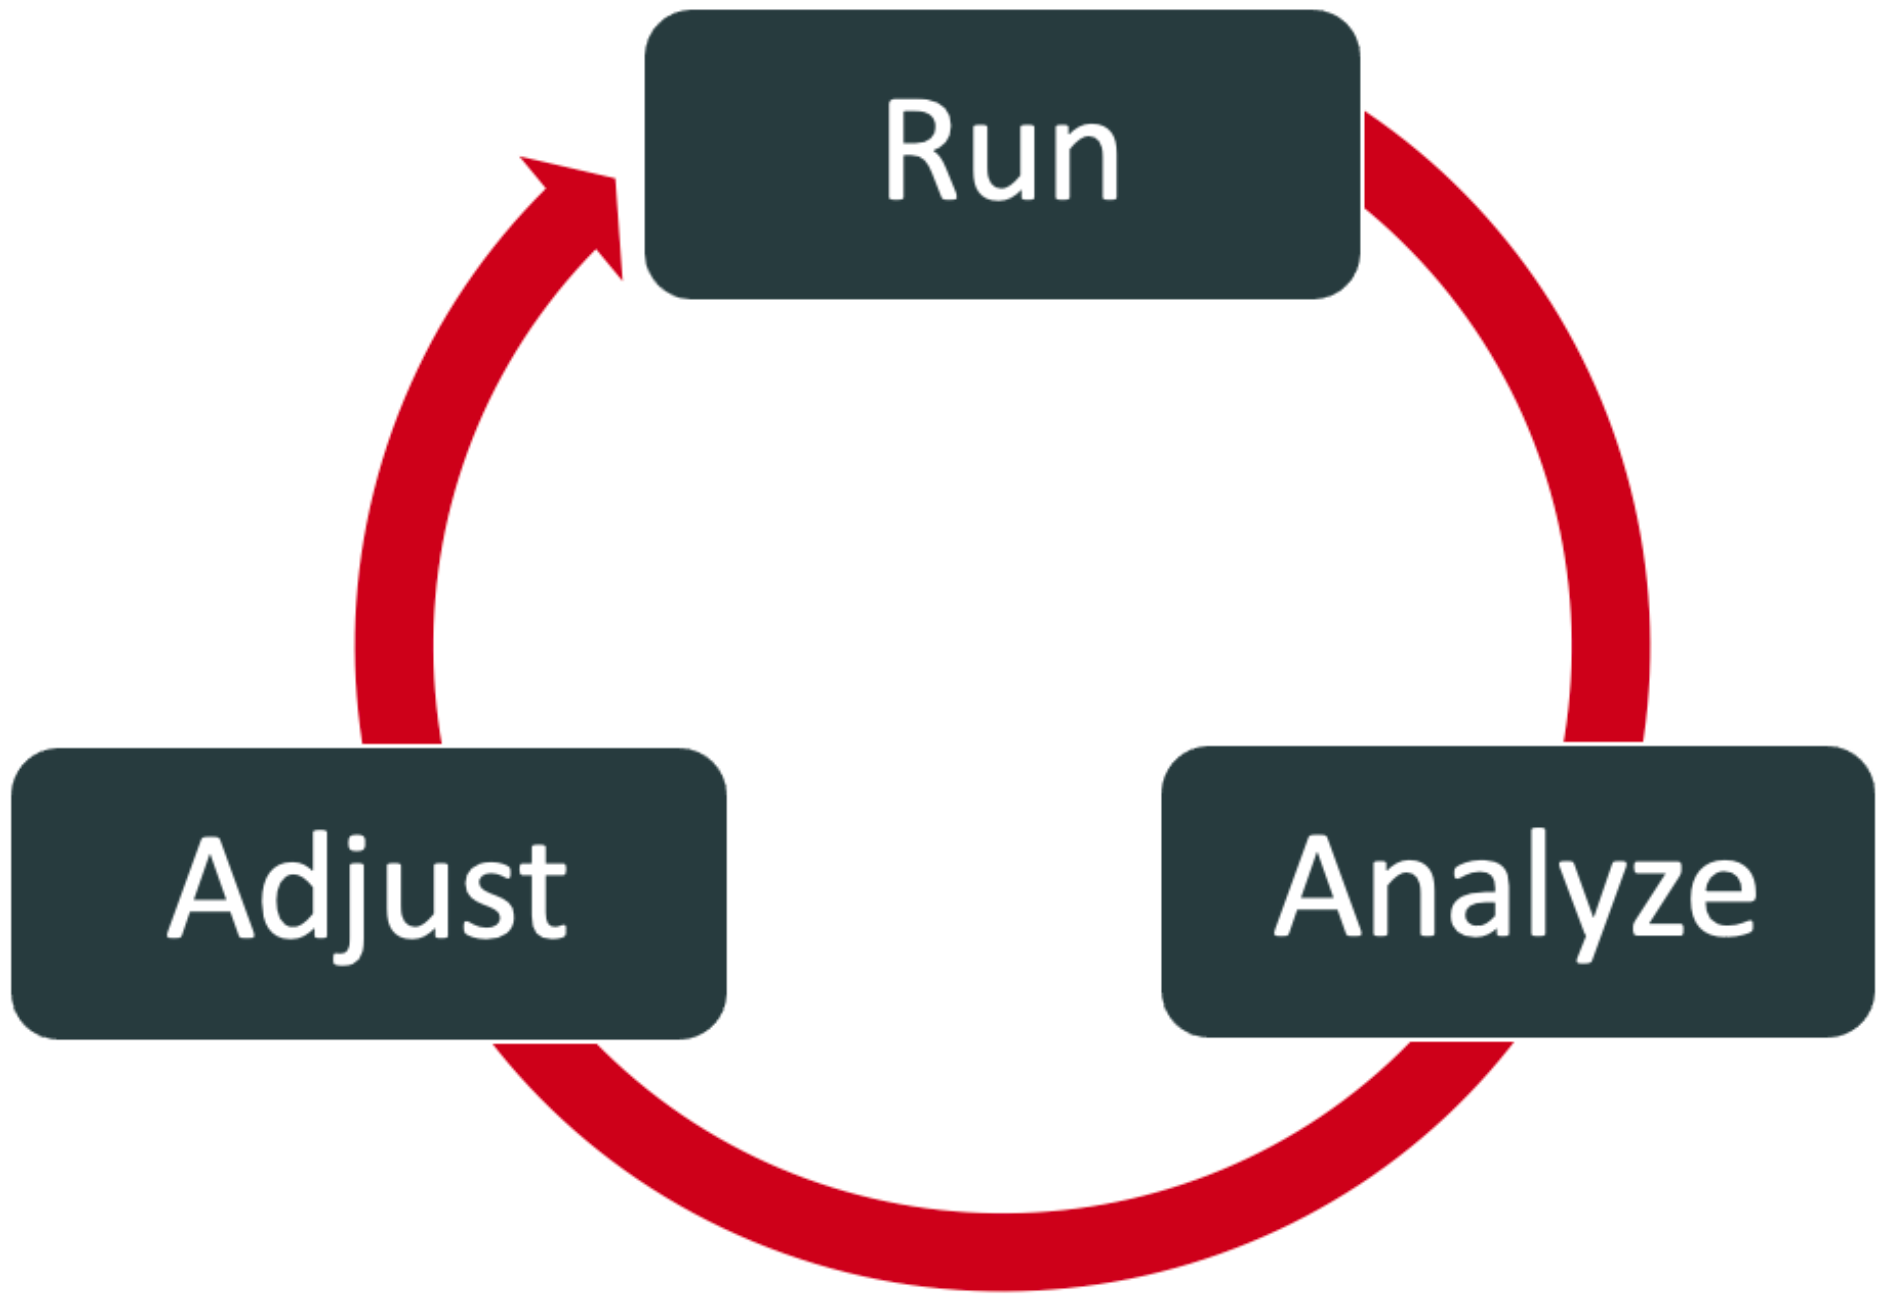
Fine-tuning your policy is an iterative process and should follow this approach:
Steps
-
Train the risk models with production data for 1 - 3 weeks for workforce usage or 2 - 4 weeks for customer usage. This should be done with the default risk policy.
-
Use the Threat Protection Dashboard to analyze the results. Identify false positive results, meaning situations that are identified as High risk even though they are legitimate users. Check what’s causing these false positives.
-
Adjust the scores for the different risk predictors in the risk policy to see if you can reduce the incidence of false positives.
Next steps
After you’ve familiarized yourself with how PingOne Protect works and have it running, refer to the following for next steps to deepen your understanding:
-
To learn more about how the predictors work, you can test predictors by simulating risk events in a sample application.
-
Learn more about customizing predictors that leverage external or processed data in Custom predictors and Adding custom predictors.
-
Learn more about building and customizing your own risk policies in Risk policies.
-
To test and fine-tune risk policy changes before promoting them into production, you can create a staging policy and view how your changes impact your users. Learn more in Evaluating staging policy risk data.