Register a WS-Federation or WS-Trust application
|
The topics in this section are for tenants created on or after January 12, 2023. Learn more in Application management migration FAQ. |
Applications that use the WS-Federation or WS-Trust protocols let end users access external systems using their Advanced Identity Cloud credentials. You can’t configure provisioning for SSO applications.
Microsoft 365
|
The Microsoft 365 application requires WS-Federation/WS-Trust, which is an add-on capability. Contact your Ping Identity representative to add this to your PingOne Advanced Identity Cloud subscription. |
The Microsoft 365 application lets you set up SSO for web-based access, rich client applications, and Microsoft Entra hybrid joined devices:
-
For web-based access, it uses the WS-Federation identity protocol and the Passive Requestor Profile (where the passive requestor is an end user’s browser). Advanced Identity Cloud acts as the Identity Provider (IdP) and Microsoft 365 acts as the Service Provider (SP). When an end user tries to access a protected resource, such as
office.com, the SP redirects them to the IdP to authenticate. The user signs on with their Advanced Identity Cloud credentials. After successful authentication, Advanced Identity Cloud generates a token and then redirects the user back to the SP with the token. The SP validates the token and grants the user access to the protected resource. -
For rich client applications, such as Microsoft Outlook or SharePoint, it uses the WS-Trust protocol to issue security tokens. Learn more in Configure WS-Trust.
-
For Microsoft Entra hybrid joined devices, it uses the WS-Trust protocol to support SSO. A hybrid joined device is joined to an on-premises Active Directory (AD) and Microsoft Entra ID. Advanced Identity Cloud acts as the federated IdP for Entra ID. When a user signs on to a hybrid joined device, Windows authenticates the user against the on-premises AD. For access to cloud resources, Entra ID redirects the authentication request to Advanced Identity Cloud. After successful authentication, Advanced Identity Cloud issues a security token that Entra ID uses to issue a Primary Refresh Token (PRT) to the device, which enables SSO to Entra ID applications. Learn more in Microsoft Entra hybrid join requirements.
Microsoft 365 requirements
-
Enable WS-Federation add-on capability.
-
To use provisioning with Microsoft 365, create an Advanced Identity Cloud Entra or Active Directory provisioning application with matching:
-
Email address style identifier. For example, mapping
userName>userPrincipalName(UPN). -
Unique ID. For example, mapping
_id>objectGUID.-
Apply a transformation script to Base64-encode the
objectGUID.Show example transformation script
/*
Convert objectGUID in string format to Base64 format.
1. Convert objectGUID to hex
2. Reverse the byte order of the first three components of objectGUID
3. Base64 encode
*/
var uuid = Packages.java.util.UUID.fromString(source);

var buffer = Packages.java.nio.ByteBuffer.allocate(16);
buffer.putLong(uuid.getMostSignificantBits());
buffer.putLong(uuid.getLeastSignificantBits());

var uuidBytes = buffer.array();
var guidBytes = Packages.java.util.Arrays.copyOf(uuidBytes, uuidBytes.length);

guidBytes[0] = uuidBytes[3];
guidBytes[1] = uuidBytes[2];
guidBytes[2] = uuidBytes[1];
guidBytes[3] = uuidBytes[0];
guidBytes[4] = uuidBytes[5];
guidBytes[5] = uuidBytes[4];
guidBytes[6] = uuidBytes[7];
guidBytes[7] = uuidBytes[6];

var encoder = Packages.java.util.Base64.getEncoder();
encoder.encodeToString(guidBytes);
-
-
-
Create a journey with authenticated user attributes required for WS-Fed response message. You can use a scripted decision node for this.
Show example journey
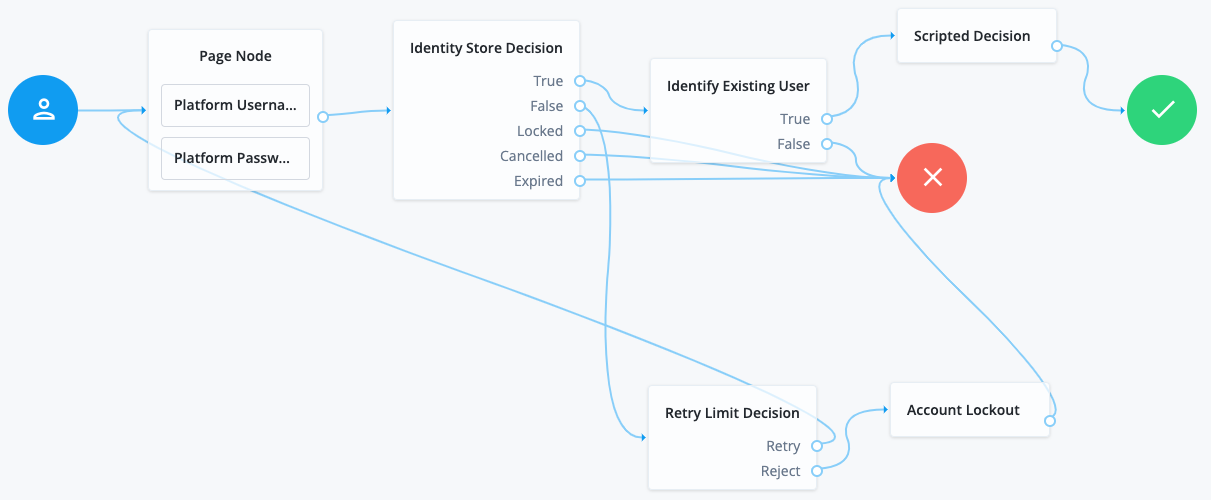
Show example
sessionScriptfor scripted decision node/* - Data made available by nodes that have already executed are available in the sharedState variable. - The script should set outcome to either "true" or "false". - Note: This script is not fault-tolerant. It is simply meant to give an idea how script nodes may be used in the context of the webinar. */ var fr = JavaImporter(org.forgerock.openam.auth.node.api.Action); // get the user id from the node state. var userId = nodeState.get("_id").asString(); // get the username from the user repository. var username = idRepository.getAttribute(userId, "uid").iterator().next(); // add user id and username to the session property. action = fr.Action.goTo("true") .putSessionProperty("am.protected.immutableID", userId) .putSessionProperty("am.protected.userPrincipalName", username) .build(); outcome = "true";For a list of AM attribute names you can use in the scripted decision node, learn more in the User identity attributes and properties reference. -
Add the required Allowlisted Session Property Names from the journey to the Session Property Whitelist Service (Under Native Consoles > Access Management, go to Realms > Realm Name > Services > Session Property Whitelist Service).
Configure the Microsoft 365 application
-
In the Advanced Identity Cloud admin console, go to Applications > Applications, and click Browse App Catalog.
-
In the Browse App Catalog modal, select Microsoft 365, and click Next.
-
Review the Application Integration information, and click Next.
-
In the Application Details window, specify the name, description, application owners, and logo for the application.
-
Click Create Application.
-
On the Sign On tab, click Set Up SSO.
-
In the Set Up Single Sign-on modal (field descriptions):
-
If you’ve set up multiple custom domains, select the applicable Sign on domain, and click Next; otherwise, continue to the next step.
You must set the Cookie domain for the selected custom domain. -
Enter the Microsoft Entra ID Domain Name.
-
Select a Journey.
-
Click Save.
The Sign On tab displays additional settings (field descriptions).
-
-
In the Next Steps section, click View PowerShell cmdlets.
-
In the PowerShell Cmdlets modal, copy the Set Up SSO PowerShell Cmdlet script.
-
Open Windows PowerShell, paste the copied command, and run it.
-
To test the SSO connection, at the bottom right of the page, click Try it out and follow the SSO flow.
Microsoft Entra hybrid join requirements
To set up SSO for Microsoft Entra hybrid joined devices, do the following after completing Microsoft 365 requirements:
-
Create a new managed object type for devices with the following requirements:
-
Don’t use underscores in the object
name. -
Add two required, searchable string properties:
computerNameandimmutableId.
-
-
Provision devices:
-
Create an Advanced Identity Cloud Active Directory authoritative application.
-
Set up application provisioning with the following important details:
-
Include
computerin the User Object Classes field. -
Include
computerin the Object Classes to synchronize field.Show provisioning application example
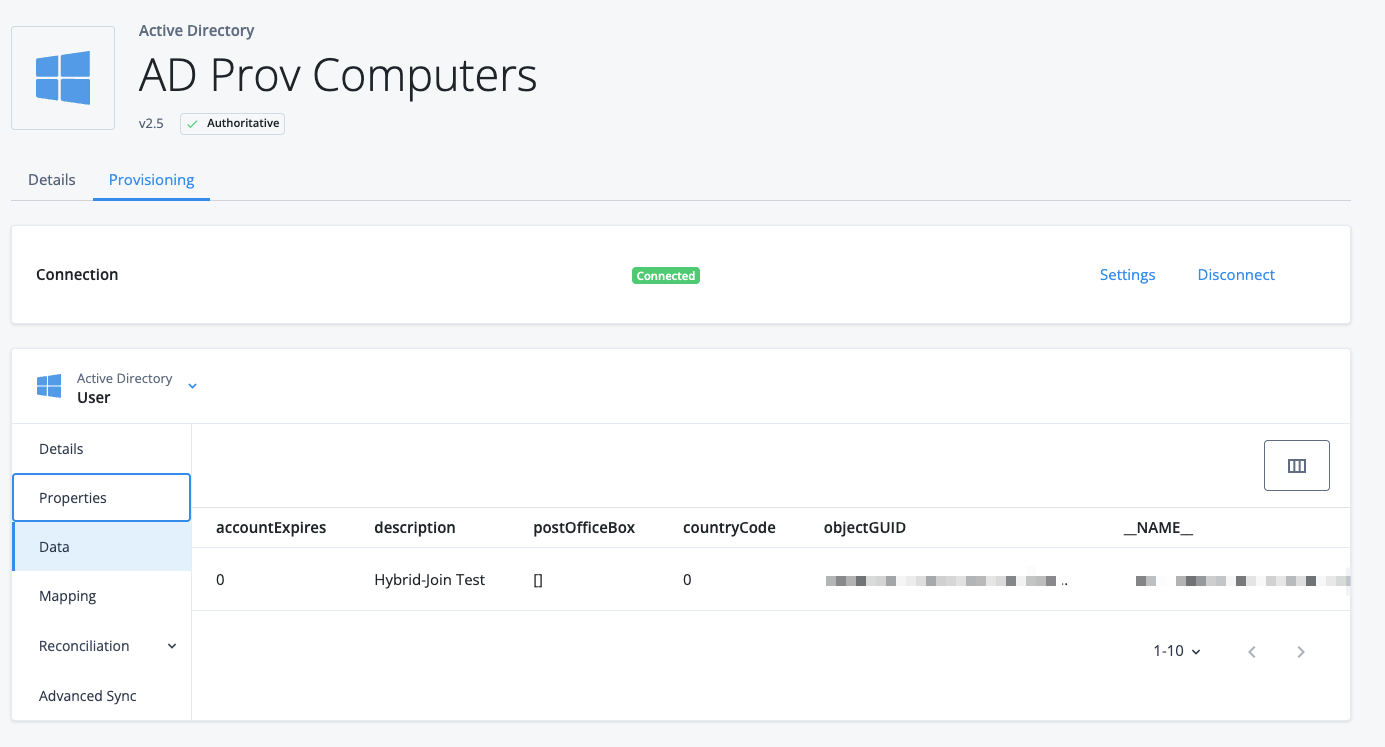
-
-
Use the Advanced Sync tab to map the following source attributes to the device managed object properties:
-
source.sAMAccountNametocomputerName. -
source.objectGUIDtoimmutableId.-
Apply a transformation script to Base64-encode the
objectGUID.Show example transformation script
/*
Convert objectGUID in string format to Base64 format.
1. Convert objectGUID to hex
2. Reverse the byte order of the first three components of objectGUID
3. Base64 encode
*/
var uuid = Packages.java.util.UUID.fromString(source);

var buffer = Packages.java.nio.ByteBuffer.allocate(16);
buffer.putLong(uuid.getMostSignificantBits());
buffer.putLong(uuid.getLeastSignificantBits());

var uuidBytes = buffer.array();
var guidBytes = Packages.java.util.Arrays.copyOf(uuidBytes, uuidBytes.length);

guidBytes[0] = uuidBytes[3];
guidBytes[1] = uuidBytes[2];
guidBytes[2] = uuidBytes[1];
guidBytes[3] = uuidBytes[0];
guidBytes[4] = uuidBytes[5];
guidBytes[5] = uuidBytes[4];
guidBytes[6] = uuidBytes[7];
guidBytes[7] = uuidBytes[6];

var encoder = Packages.java.util.Base64.getEncoder();
encoder.encodeToString(guidBytes);
Show application mapping example
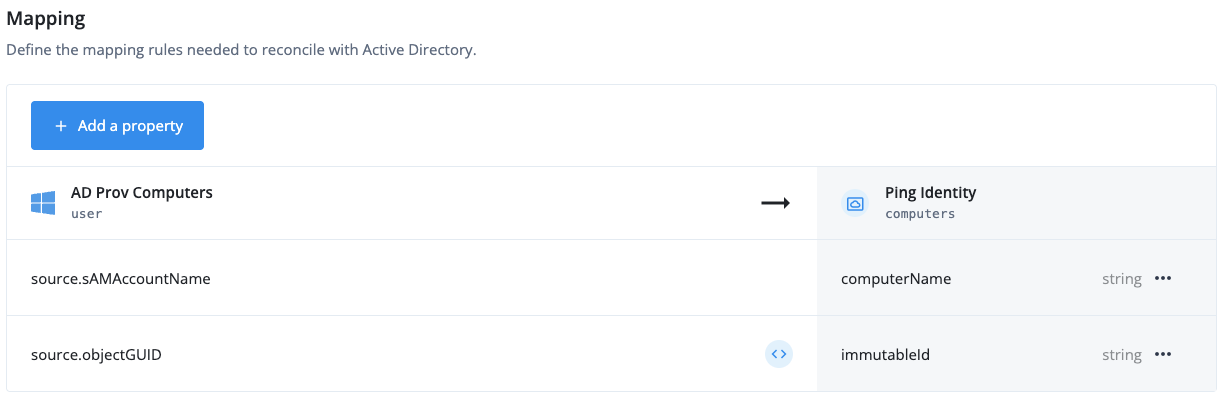
-
-
-
Define the following advanced sync situation rules (leave all others as
ASYNC):Situation Action Missing
CREATEConfirmed
UPDATEFound
UPDATEAbsent
CREATEShow situation rules example
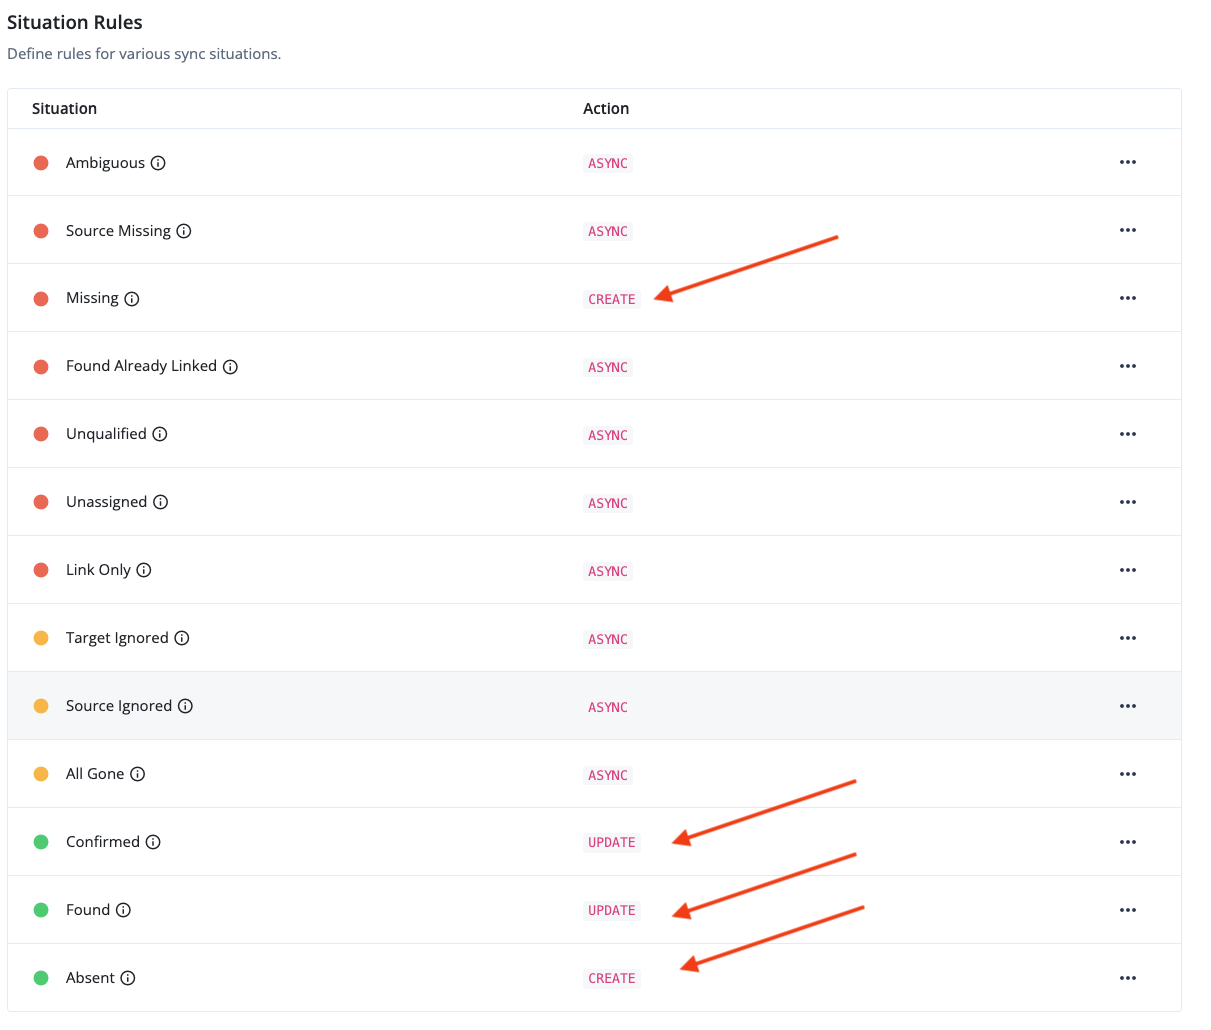
-
From the Reconciliation drop-down menu, select Reconcile and click Reconcile Now.
-
-
Configure a Service Principal Name (SPN) for Kerberos authentication in your on-premises AD:
-
On the Domain Controller, create or update an existing service account in AD for Kerberos.
-
In the serviceAccountName properties, select the following Account options:
-
This account supports Kerberos AES 128 bit encryption
-
This account supports Kerberos AES 256 bit encryption
-
-
Open Windows PowerShell, and run the following command to configure the SPN:
setspn -S HTTP/<AIC_sigon_on_domain> <sAMAccountName>Show example
setspn -S HTTP/openam-hgale-uidev-may4.forgeblocks.com aicKerberos

Checking domain DC=hgaledomain,DC=lab

Registering ServicePrincipalNames for CN=aicKerberos,CN=Managed Service Accounts,DC=hgaledomain,DC=lab
        HTTP/openam-hgale-uidev-may4.forgeblocks.com
Updated object
-
-
You must enable Kerberos Authentication in the WS-Trust Authentication Methods section.
-
Register devices for hybrid join:
-
On the member server machine, open Windows PowerShell, and run the following command:
dsregcmd /status +----------------------------------------------------------------------+ | Device State | +----------------------------------------------------------------------+ AzureAdJoined : YES/NO EnterpriseJoined : NO DomainJoined : YES DomainName : hgaledomain -
If
AzureAdJoinedisNO, continue to the next step; otherwise, run the command:dsregcmd /leave -
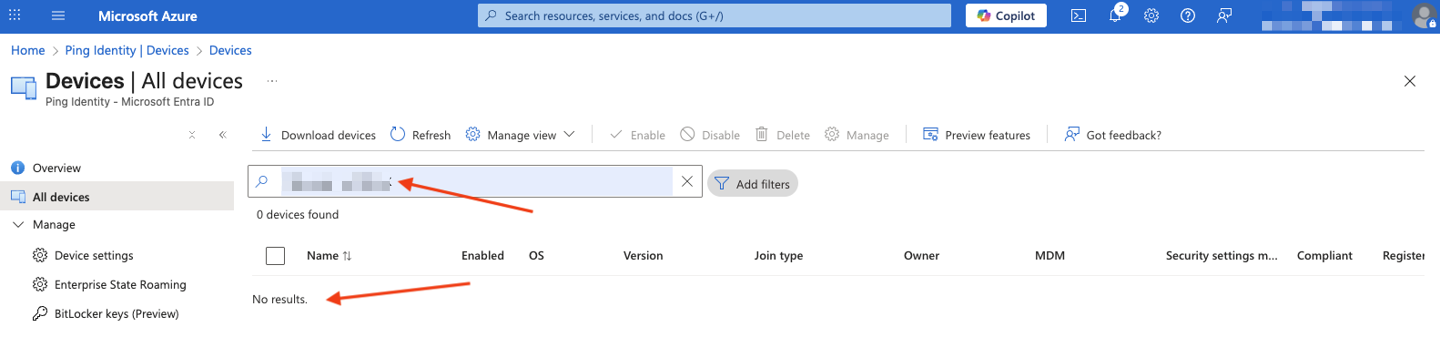
Sign on to the Azure portal, navigate to Microsoft Entra ID > Manage > Devices > All devices, and verify your device isn’t listed.
Show example
-
On the member server machine, open Windows PowerShell, and run the following command to join the device:
dsregcmd /join /debugShow example output
dsregcmd::wmain logging initialized. dsregcmd::wmain logging initialized. DsrCmdAccountMgr::IsDomainControllerAvailable: DsGetDcName success { domain:hgaledomain.lab forest:hgaledomain.lab domainController:\\XXXXXXX-XXXXXXX.hgaledomain.lab isDcAvailable:true } PreJoinChecks Complete. preCheckResult: Join isPrivateKeyFound: undefined isJoined: undefined isDcAvailable: YES isSystem: YES keyProvider: undefined keyContainer: undefined dsrInstance: undefined elapsedSeconds: 0 resultCode: 0x0 Automatic device join pre-check tasks completed. TenantInfo::Discover: Join Info { TenantType = Federated; AutoJoinEnabled = 1; TenandID = 07e...90; TenantName = hgale.ping-eng.com } GetComputerTokenForADRS: Get token for ADRS GetComputerTokenForADRS: Auth code URL: "https://login.microsoftonline.com/07e...90/oauth2/authorize" GetComputerTokenForADRS: Token request authority: "https://login.microsoftonline.com/common" AdalLog: Token is not available in the cache ; HRESULT: 0x0 AdalLog: Authority validation is enabled ; HRESULT: 0x0 AdalLog: Authority validation is completed ; HRESULT: 0x0 AdalLog: AggregatedTokenRequest::AcquireToken get refresh token info ; HRESULT: 0x0 AdalLog: AggregatedTokenRequest::AcquireToken- refresh token is not available ; HRESULT: 0x0 AdalLog: AggregatedTokenRequest::AcquireToken- returns false ; HRESULT: 0x0 AdalLog: AggregatedTokenRequest::UseWindowsIntegratedAuth w Tenant ; HRESULT: 0x0 AdalLog: HRESULT: 0x4aa90010 AdalLog: AggregatedTokenRequest::UseWindowsIntegratedAuth- received realm info ; HRESULT: 0x0 AdalLog: AggregatedTokenRequest::GetAppliesTo: using resource ID "urn:federation:MicrosoftOnline" for authority "https://login.microsoftonline.com/common". ; HRESULT: 0x0 AdalLog: HRESULT: 0x4aa90010 AdalLog: Webrequest opening connection ; HRESULT: 0x0 AdalLog: HRESULT: 0x4aa90010 AdalLog: Webrequest has valid state ; HRESULT: 0x0 AdalLog: WebRequest Status:200 ; HRESULT: 0x0 AdalLog: Webrequest returns success for oauth response ; HRESULT: 0x0 AdalLog: HRESULT: 0x4aa9000f AdalLog: HRESULT: 0x4aa9000d Join request ID: c0...8c Join response time: Mon, 04 Aug 2025 15:16:23 GMT Join HTTP status: 200 DsrCmdJoinHelper::Join: AutoEnrollAsComputer completed successfully DSREGCMD_END_STATUS AzureAdJoined : YES EnterpriseJoined : NO DeviceId : 42...5d Thumbprint : 47...6D DeviceCertificateValidity : [ 2025-08-04 15:16:23.000 UTC — 2035-08-04 15:16:23.000 UTC ] KeyContainerId : 42...77 KeyProvider : Microsoft Software Key Storage Provider TpmProtected : NO TenantName : TenantId : 07...90 Idp : login.windows.net AuthCodeUrl : https://login.microsoftonline.com/07...90/oauth2/authorize AccessTokenUrl : https://login.microsoftonline.com/07...90/oauth2/token MdmUrl : MdmTouUrl : MdmComplianceUrl : SettingsUrl : JoinSrvVersion : 1.0 JoinSrvUrl : https://enterpriseregistration.windows.net/EnrollmentServer/device/ JoinSrvId : urn:ms-drs:enterpriseregistration.windows.net KeySrvVersion : 1.0 KeySrvUrl : https://enterpriseregistration.windows.net/EnrollmentServer/key/ KeySrvId : urn:ms-drs:enterpriseregistration.windows.net WebAuthNSrvVersion : 1.0 WebAuthNSrvUrl : https://enterpriseregistration.windows.net/webauthn/07...90/ WebAuthNSrvId : urn:ms-drs:enterpriseregistration.windows.net DeviceManagementSrvVer : 1.0 DeviceManagementSrvUrl : https://enterpriseregistration.windows.net/manage/07...90/ DeviceManagementSrvId : urn:ms-drs:enterpriseregistration.windows.net DeleteFileW returned 0x00000001. -
Confirm your device is hybrid joined:
-
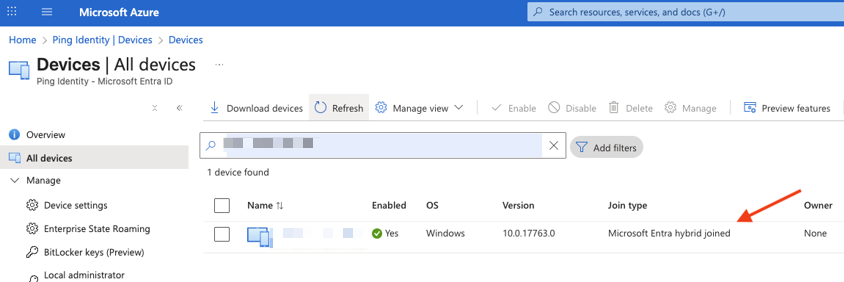
Sign on to the Azure portal, navigate to Microsoft Entra ID > Manage > Devices > All devices, and verify your device is listed.
Show example
-
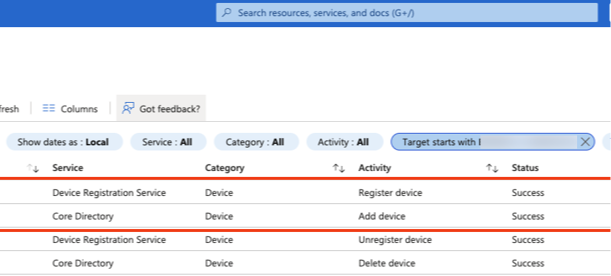
Navigate to Microsoft Entra ID > Manage > Devices > Activity > Audit logs, and verify audit events for your device.
Show example
-
On the member server machine, open Windows PowerShell, and run the following command to confirm
AzureAdJointedisYES:dsregcmd /statusShow example output
+----------------------------------------------------------------------+
| Device State                                                         |
+----------------------------------------------------------------------+

             AzureAdJoined : YES
          EnterpriseJoined : NO
              DomainJoined : YES
                DomainName : HGALEDOMAIN
...
+----------------------------------------------------------------------+
| SSO State                                                            |
+----------------------------------------------------------------------+

                AzureAdPrt : NO
       AzureAdPrtAuthority :
             EnterprisePrt : NO
    EnterprisePrtAuthority :
-
-
Retrieve the
AzureAdPrt:-
Sign out of the member server machine.
-
Sign on to the member server machine, open Windows PowerShell, and run the following command:
dsregcmd /statusShow example output
+----------------------------------------------------------------------+
| SSO State                                                            |
+----------------------------------------------------------------------+

                AzureAdPrt : YES
      AzureAdPrtUpdateTime : 2025-08-04 15:56:23.000 UTC
      AzureAdPrtExpiryTime : 2025-08-18 15:56:22.000 UTC
       AzureAdPrtAuthority : https://login.microsoftonline.com/07...90
             EnterprisePrt : NO
    EnterprisePrtAuthority :
-
-
Configure WS-Trust
You can configure WS-Trust for your Microsoft 365 application only after the initial application setup. If you need to set up SSO for Microsoft Entra hybrid joined devices, complete Microsoft Entra hybrid join requirements first.
-
On the Sign On tab, select Enable WS-Trust.
-
In the WS-Trust Authentication Methods section, select one or more of the following options:
-
Username/Password Authentication: Allows users to authenticate with their username and password using WS-Trust.
-
Select the ImmutableID Attribute Name. This list contains all string properties for the managed user object.
-
Select the UPN Attribute Name. This is the managed user property that maps to the Microsoft 365 User Principal Name (UPN). Advanced Identity Cloud uses this attribute to authenticate the user during WS-Trust Username/Password Authentication. If you don’t select a value, it defaults to
Username.For existing Microsoft 365 applications, re-save the application for this change to take effect.
-
-
Kerberos Authentication: Activate Kerberos authentication with your organization’s realm.
-
Select the Kerberos Realm.
You can add, edit, or delete Kerberos realms from this list.
-
Add
-
Edit
-
Delete
To add a new Kerberos realm:
-
Click Add.
-
In the Add Kerberos Realm modal, enter the:
-
Unique AD Domain/Realm Name.
-
Domain/Realm Username.
-
Password.
-
-
Click Save.
To edit a Kerberos realm:
-
Adjacent to an existing realm name, click .
-
In the Add Kerberos Realm modal, make changes and click Save.
To delete a Kerberos realm:
-
Adjacent to the existing realm name, click .
-
In the Add Kerberos Realm modal, click Delete Realm.
-
In the Delete Kerberos Realm confirmation modal, click Delete.
-
-
Select a Managed Object Name for the location where the device information is locally stored. This list contains all custom managed objects.
-
-
x.509 Authentication: Use certificate-based authentication for WS-Trust sign-on.
-
Select the ImmutableID Attribute Name. This list contains all string properties for the managed user object.
-
Select the UPN Attribute Name. The attribute that maps to the User Principal Name (UPN) in Microsoft 365. Defaults to
Usernameif not selected. This list contains all string properties for the managed user object. -
Enter the Allowed Issuer DNs. The system only accepts tokens that match a certificate issuer DN from this list.
Make sure to add a trusted certificate for this authentication method. -
-
-
Click Save.
-
When you enable, disable, or edit the WS-Trust settings and save the configuration, the PowerShell cmdlet adds or removes the
ActiveSignInURIandMetadataExchangeUrilines. Run the updated cmdlet:-
Scroll back to the top of the page, and in the Next Steps section, click View PowerShell cmdlets.
-
In the PowerShell Cmdlets modal, copy the Update SSO Settings PowerShell Cmdlet script.
-
Open Windows PowerShell, paste the copied command, and run it.
-
Microsoft 365 update SSO settings
To update the SSO settings for your Microsoft 365 Advanced Identity Cloud application:
-
In the Advanced Identity Cloud admin console, go to Applications > Applications, and click the existing Microsoft 365 application.
-
Select the Sign On tab, and from the Next Steps section, click View PowerShell cmdlets.
-
In the PowerShell Cmdlets modal, copy the Update SSO Settings PowerShell Cmdlet script.
-
Open Windows PowerShell, paste the copied command, and run it.
Microsoft 365 Sign On settings
The following table displays all Microsoft 365 Sign On field descriptions:
| Field | Description | ||
|---|---|---|---|
Sign on domain |
The Advanced Identity Cloud sign on domain to use for SSO.
|
||
Microsoft Entra ID Domain Name |
The custom domain value from your Entra ID account. You can find your custom domain in the Entra ID Admin Center by navigating to Domain Names. Use the format |
||
Name ID Format |
Specifies the format of the Subject Name Identifier attribute in the WS-Fed security token. |
||
Journey |
The SSO journey. |
||
WS-Trust |
Select this option to activate support for token-based authentication using the WS-Trust protocol, typically for use with legacy SOAP-based applications such as older versions of Microsoft Outlook or SharePoint. |
||
WS-Trust Authentication Methods
|
|||
Username/Password Authentication |
Allows users to authenticate with their username and password using WS-Trust.
|
||
Kerberos Authentication |
Activate Kerberos authentication with your organization’s realm using WS-Trust.
|
||
x.509 Authentication |
Use certificate-based authentication for WS-Trust sign-on.
|
||
Advanced settings
|
|||
Logout Mode |
Choose how Advanced Identity Cloud handles logout for the Microsoft 365 application.
Selecting |
||
Always authenticate user |
Select this option to always prompt the user for credentials when signing on to Microsoft 365. |
||
ImmutableID |
The path in the authenticated session that maps to the attribute that uniquely identifies a user in Microsoft 365. Default value |
||
Subject |
The path in the authenticated session that maps to the Subject in Microsoft 365. Default value |
||
UPN |
The path in the authenticated session that maps to the User Principal Name (UPN) in Microsoft 365. Default value |
||
Manage Microsoft 365 application signing certificates
When you configure SSO for Microsoft 365, the application generates a signing certificate to secure communication with Microsoft. It’s best practice to rotate this certificate periodically. You might need to do this for several reasons:
-
The existing certificate is within three months of its expiration date.
-
To comply with regulatory security requirements.
-
To adhere to internal company policies.
The signing certificate is shared across all your Microsoft 365 applications.
To manage signing certificates:
-
In the Advanced Identity Cloud admin console, go to Applications > Applications, and select one of your Microsoft 365 applications.
-
On the Sign On tab, scroll down to the Signing Certificate section. You can view, download, and rotate your certificates.
If an active certificate’s expiration date is within three months, its status shows as Expiring.
|
View and download the signing certificate
You can review the certificate’s details, including its issuer and subject, serial number, and expiration date. Downloading a copy is also useful for:
-
Troubleshooting by comparing it with your Microsoft 365 configuration.
-
Retaining a copy for audit purposes.
To view and download the certificate:
-
Click the certificate to display its details.
-
In the Certificate Details modal, review the certificate details.
-
To save a local copy, click Download Certificate.
-
Click Done.
Rotate the signing certificate
The rotation process replaces the currently active certificate with a new one. It involves three stages: generating a new inactive certificate in Advanced Identity Cloud, updating Microsoft 365 applications to trust it, and then activating the new certificate in Advanced Identity Cloud.
| You can have only one inactive certificate at a time. If an inactive certificate already exists and you need to create a new one, you must delete the old one first. To do this, click the ellipsis () icon next to the inactive certificate and select Delete. |
To rotate the signing certificate:
-
Click Generate New Certificate.
The new certificate appears in the list with an
Inactivestatus. -
Update Microsoft 365 applications to trust the new certificate:
-
In the Next Steps section, click View PowerShell Cmdlets.
-
In the PowerShell Cmdlets modal, copy the Update SSO Settings PowerShell Cmdlet script.
-
Open Windows PowerShell, paste the copied command, and run it.
-
Repeat steps b and c for each of the applications listed in the PowerShell Cmdlets modal.
-
Return to the PowerShell Cmdlets modal and click Done.
-
-
Activate the new certificate:
Don’t proceed unless you’ve successfully run the PowerShell cmdlets for all Microsoft 365 applications in the previous step. Activating the new certificate permanently deletes the old one. All users of all Microsoft 365 applications will be locked out unless the apps have been updated to trust the new certificate.
-
Click the ellipsis () icon next to the inactive certificate and select Activate.
-
Click Activate Certificate.
The old certificate is removed and the new certificate’s status changes to
Active. -
Manage Microsoft 365 application trusted certificates
When you configure x.509 authentication for WS-Trust, Advanced Identity Cloud uses trusted certificates to validate the identity of clients. These certificates are shared across all your Microsoft 365 applications.
To manage trusted certificates:
-
In the Advanced Identity Cloud admin console, go to Applications > Applications, and select one of your Microsoft 365 applications.
-
On the Sign On tab, scroll down to the Trusted Certificates section. You can view, import, and delete your certificates.
View trusted certificate details
You can review a certificate’s details, including its issuer, subject, and expiration date.
To view the certificate details:
-
Click the certificate to display its details.
-
In the Certificate Details modal, review the certificate details.
-
Click Done.
Add a trusted certificate
You can add a trusted certificate in PEM, CRT, and CER formats.
To add a trusted certificate:
-
Click Add Certificate.
-
In the Add x.509 Certificate modal, click Browse, select the certificate, and then click Upload.
-
In the Certificate Details modal, review the certificate details, and click Done.
The new certificate displays in the Trusted Certificates section.
Custom WS-Fed
|
Custom WS-Fed applications require WS-Federation, which is an add-on capability. Contact your Ping Identity representative to add WS-Federation to your PingOne Advanced Identity Cloud subscription. |
Custom WS-Fed applications let you set up SSO using the WS-Federation identity protocol and the Passive Requestor Profile (where the passive requestor is an end user’s browser). Advanced Identity Cloud serves as the identity provider (IdP) and the connected partner acts as the service provider (SP) that’s identified by a unique partner realm.
When an end user tries to access a protected resource, the SP redirects them to the IdP to authenticate. The user signs on with their Advanced Identity Cloud credentials. After successful authentication, Advanced Identity Cloud generates a token and then redirects the user back to the SP with the token. The SP validates the token and grants the user access to the protected resource.
Custom WS-Fed requirements
-
Enable the WS-Fed add-on capability.
-
Configure the SP for WS-Fed.
-
Create a journey with authenticated user attributes required for the WS-Fed response message. You can use a scripted decision node for this.
Show example journey
Show example
sessionScriptfor scripted decision node/* - Data made available by nodes that have already executed are available in the sharedState variable. - The script should set outcome to either "true" or "false". - Note: This script isn't fault-tolerant. It's meant to give an idea about how script nodes might be used in the context of the webinar. */ var fr = JavaImporter(org.forgerock.openam.auth.node.api.Action); // get the user id from the node state. var userId = nodeState.get("_id").asString(); // get the username from the user repository. var username = idRepository.getAttribute(userId, "uid").iterator().next(); // add username to the session property. action = fr.Action.goTo("true") .putSessionProperty("am.protected.username", username) .build(); outcome = "true";For a list of AM attribute names you can use in the scripted decision node, learn more in the User identity attributes and properties reference. -
Add the required Allowlisted Session Property Names from the journey to the Session Property Allowlist Service located in Native Consoles > Access Management, go to Realms > Realm Name > Services > Session Property Whitelist Service.
Configure the custom WS-Fed application
| You can create only one custom WS-Fed SSO application per partner realm. Additionally, you can’t use the Microsoft Online partner realm to configure a custom WS-Fed application. Instead, use the Microsoft 365 application to configure your use case. |
-
In the Advanced Identity Cloud admin console, go to Applications > Applications and click Custom Application.
-
In the Add a Custom Application modal, select WS-Fed and click Next.
-
In the Application Details window, specify the name, description, application owners, and logo for the application.
-
Click Save.
Advanced Identity Cloud creates the application.
-
On the Sign On tab, click Set Up SSO.
-
In the Set Up Single Sign-on modal (field descriptions):
-
If you’ve set up multiple custom domains, select the applicable Sign on domain and click Next. Otherwise, continue to the next step.
You must set the Cookie domain for the selected custom domain. -
Enter the Partner’s Realm.
-
Select a Journey created as a part of the Custom WS-Fed requirements.
-
Select a Name ID Format.
-
Enter the Subject Path.
-
Enter the Username Path.
-
Enter the Service Endpoint.
-
(Optional) Click Show advanced settings to set advanced options:
-
Logout Mode
-
Always authenticate user
-
Sign-in URL
-
Redirect URLs area:
-
Valid Domain
-
Allow any query parameter and/or fragment
-
Valid Path
-
-
Service Provider Attributes area:
-
Name
-
Name Format
-
Attribute Path
-
Multi-valued
-
-
-
Click Save.
-
-
In the Next Steps section, click Download certificate.
The SP uses this certificate to validate incoming tokens from Advanced Identity Cloud.
-
To test the SSO connection, at the bottom right of the Settings section, click Try it out and follow the SSO flow.
Custom WS-Fed Sign On settings
The following table displays all custom WS-Fed Sign On field descriptions:
| Field | Description | ||
|---|---|---|---|
Partner’s Realm |
The unique identifier of your SP partner. |
||
Journey |
The SSO journey. |
||
Name ID Format |
The format of the Subject Name Identifier attribute in the WS-Fed security token. |
||
Subject Path |
The JSON pointer to the subject attribute in the authenticated session. Default value: |
||
Username Path |
The JSON pointer to the location of the username in the authenticated session. This is validated against the incoming user identifier, if any, collected during authentication to determine if the user has an existing session. Default value: |
||
Service Endpoint |
The SP URL to send security tokens to after authentication. |
||
Advanced settings |
|||
Logout Mode |
Choose how Advanced Identity Cloud handles logout for the custom WS-Fed application.
Selecting |
||
Always authenticate user |
Select this option to always prompt the user for credentials when signing on to the custom WS-Fed application. |
||
Sign-in URL (optional) |
The URL to redirect users to for authentication. If left empty, the value of the Service Endpoint field is used. |
||
Redirect URLs (optional) |
Specify additional valid URLs for redirection. |
||
Valid Domain |
A leading wildcard (*) is allowed to match subdomains. For example, |
||
Allow any query parameter and/or fragment |
If this is selected, the Valid Path field can’t contain any query or fragment. |
||
Valid Path (optional) |
Must start with a forward slash and not contain wildcards. Leave blank to allow any path. |
||
Service Provider Attributes (optional) |
Define additional attributes to be included in the token issued to the SP. |
||
Name |
The name of the attribute. |
||
Name Format |
The format of this attribute in the WS-Fed security token. |
||
Attribute Path |
The JSON pointer to the location of this claim’s value in the authenticated session. For example,
|
||
Multi-valued |
Enable if the claim’s attribute path resolves to more than one value in the authenticated session. When selected, the claim is included as a multi-valued claim in the WS-Fed assertion. |
||
Manage the custom WS-Fed application signing certificate
When you configure SSO for WS-Fed, the application generates a signing certificate to secure communication with the SP. It’s best practice to rotate this certificate periodically. You might need to do this for several reasons:
-
The existing certificate is within three months of its expiration date.
-
To comply with regulatory security requirements.
-
To adhere to internal company policies.
The signing certificate is unique to your custom WS-Fed application.
To manage signing certificates:
-
In the Advanced Identity Cloud admin console, go to Applications > Applications and select the custom WS-Fed application.
-
On the Sign On tab, scroll down to the Signing Certificate section. From here, you can view, download, and rotate your certificates.
If an active certificate’s expiration date is within three months, its status shows as Expiring.
|
View and download the signing certificate
You can review the certificate’s details, including its issuer and subject, serial number, and expiration date. You must download a copy and update the SP to trust this certificate. Retaining a local copy is also useful for audit purposes.
To view and download the certificate:
-
Click the certificate to display its details.
-
In the Certificate Details modal, review the certificate details.
-
To save a local copy, click Download Certificate.
-
Click Done.
Rotate the signing certificate
The rotation process replaces the currently active certificate with a new one. It involves three stages:
-
Generating a new inactive certificate in Advanced Identity Cloud.
-
Updating the SP with the new certificate.
-
Activating the new certificate in Advanced Identity Cloud.
| You can have only one inactive certificate at a time. If an inactive certificate already exists and you need to create a new one, you must delete the old one first. To do this, click the ellipsis () icon next to the inactive certificate and select Delete. |
To rotate the signing certificate:
-
Click Generate New Certificate.
The new certificate appears in the list with an
Inactivestatus. -
Update the SP configuration to use the new certificate for token validation.
-
Activate the new certificate:
Activating the new certificate permanently deletes the old one. To prevent authentication failures, ensure you update the SP to trust this certificate.
-
Click the ellipsis () icon next to the inactive certificate and select Activate.
-
Click Activate Certificate.
The old certificate is removed and the new certificate’s status changes to
Active. -