Configure basic social registration journeys
Social registration journeys let end users register and sign on to your applications using their existing accounts from providers such as Google or Facebook. This offers a convenient experience for end users, as they don’t need to create and remember a new password.
This page shows you how to build a basic social registration journey, configure account claiming for end users who might already have a local account, and let end users link their social accounts from their profile page.
| The Ping Identity Marketplace includes a prebuilt Login with self-service journey. This sample journey lets end users sign on using a social identity provider or the username and password of an account in the Advanced Identity Cloud datastore. |
Social identity provider nodes
There are two nodes associated with social identity providers:
- Select Identity Provider node
-
The Select Identity Provider node prompts the end user to select a social identity provider for registration or sign on or (optionally) to continue with local registration or sign on.
When the end user selects a provider, the journey continues to the Social Provider Handler node.
- Social Provider Handler node
-
The Social Provider Handler node communicates with the selected provider and collects the information provided after the end user has authorized the service. It runs the provider’s configured normalization script to map the information into a format that Advanced Identity Cloud can consume.
Next, the node uses a transformation script provided by Advanced Identity Cloud called
Normalized Profile to Managed Userto transform the profile information into a managed object.The node then queries the identity store available for the realm to check whether the end user already exists. If the end user exists, they are signed on. If the end user doesn’t exist, the end user must be created.
Configure a social registration journey
In a basic social registration journey, the end user can register with a social identity provider and create a local account in Advanced Identity Cloud.
To create a social registration journey:
-
In the Advanced Identity Cloud admin console, go to Journeys > Journeys.
You can create a new journey, modify an existing journey, or duplicate an existing journey.
-
Add the nodes shown in the following journey and configure them as described.
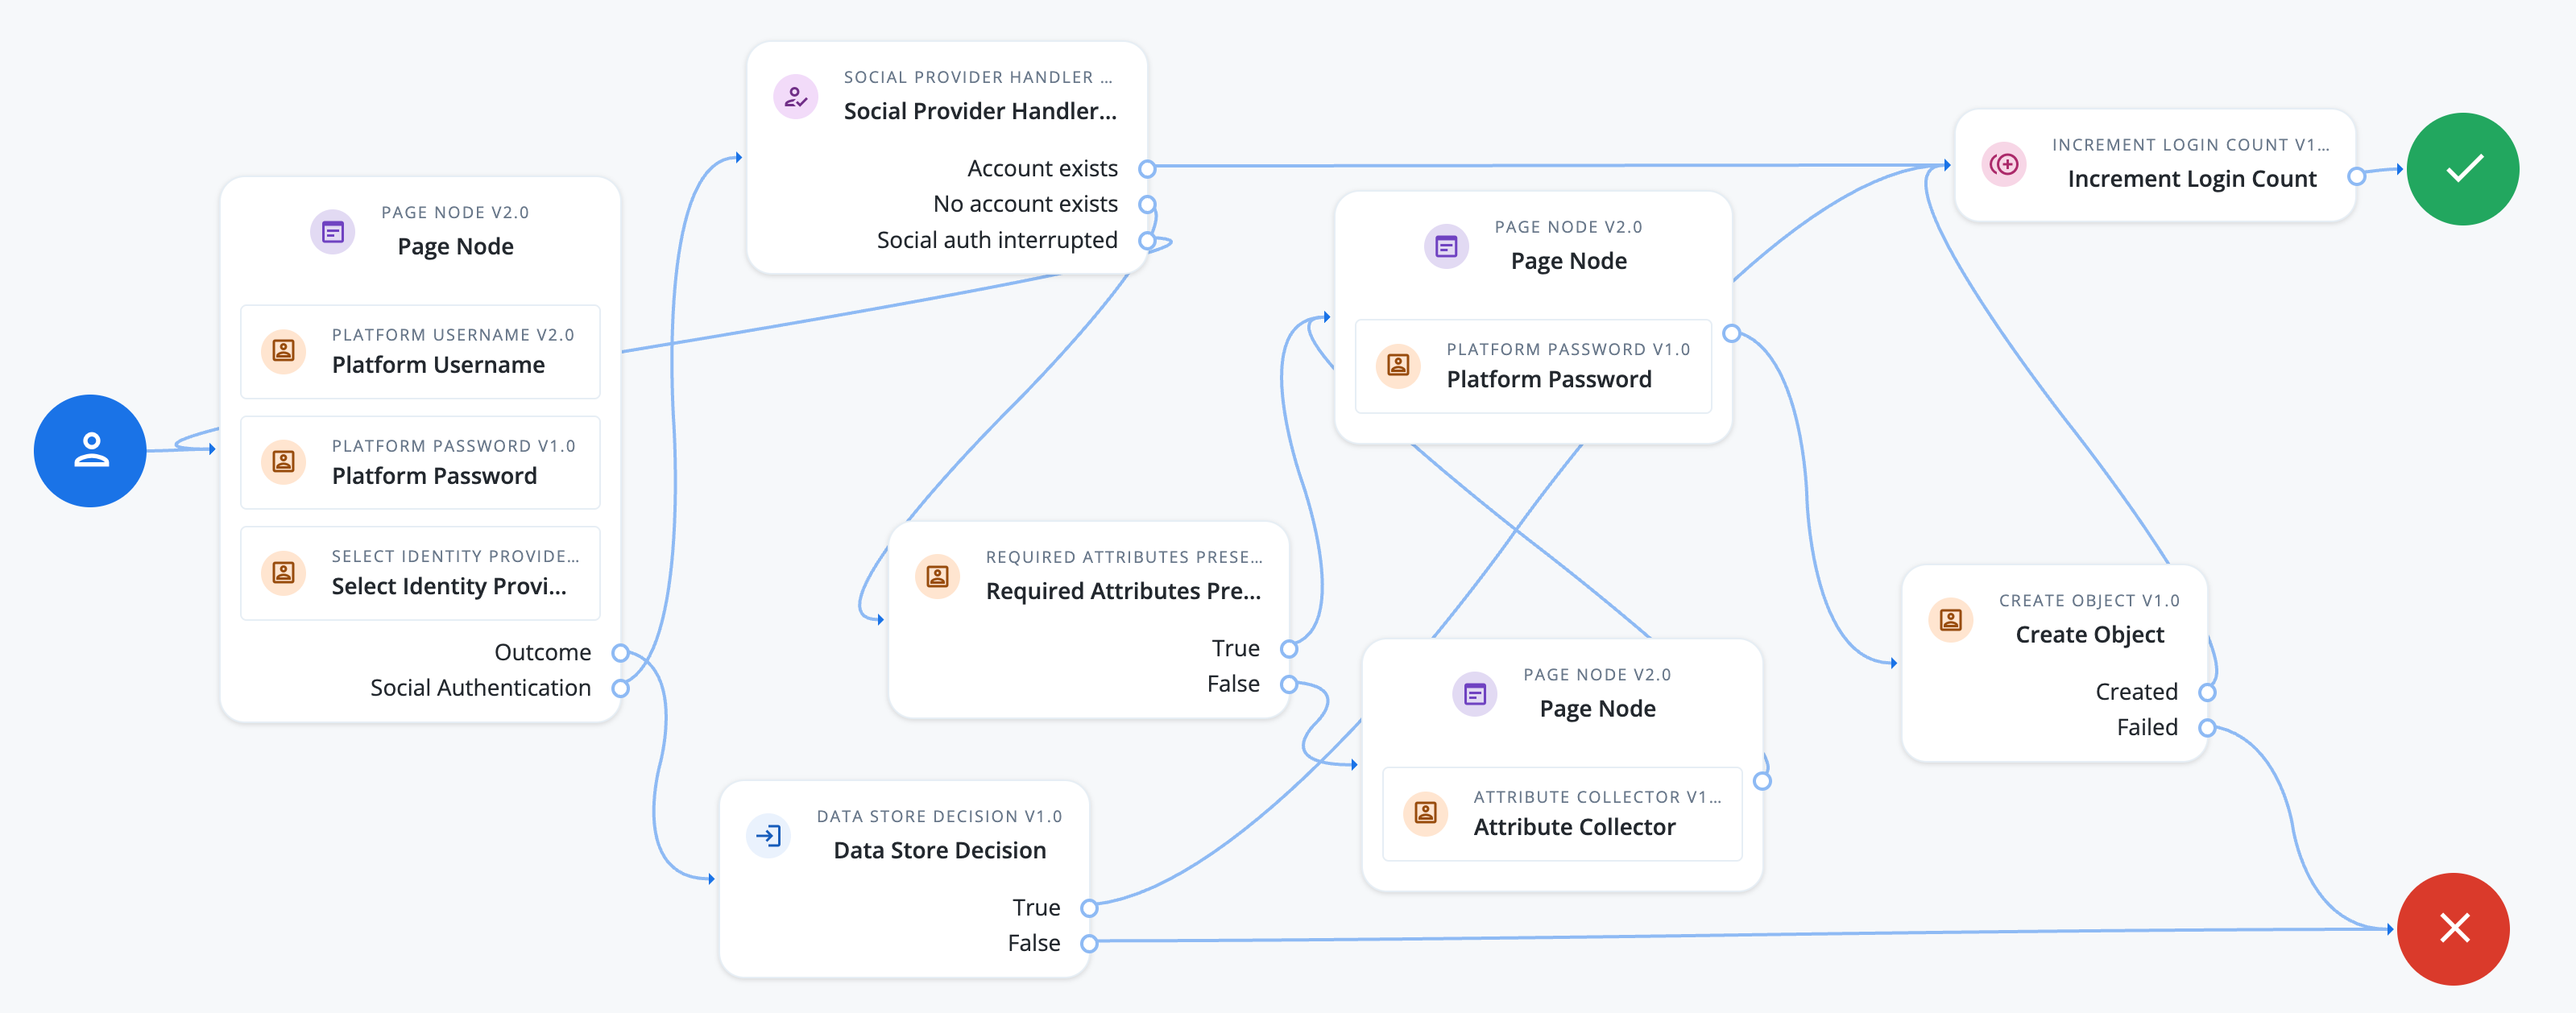
Page node (initial)
Learn more in Page node.
-
Location:
-
Add a Page node at the start of the journey and add the following nodes: Platform Username node, Platform Password node, and Select Identity Provider node.
-
-
Connections:
-
Connect the Start node to this Page node.
-
Connect the Social Authentication outcome to the Social Provider Handler node.
-
Connect Outcome to the Data Store Decision node.
-
-
Configuration:
-
By default, the Select Identity Provider node supports both local and social authentication on the same page.
-
To require social authentication only, deselect Include local authentication. Learn more in Enforce social registration.
-
Social Provider Handler node
Learn more in Social Provider Handler node.
-
Connections:
-
Connect the Account exists outcome to the Increment Login Count node.
-
Connect the No account exists outcome to the Required Attributes Present node.
-
Connect the Social auth interrupted outcome to the initial Page node.
-
-
Configuration:
-
In the Transformation Script field, select
Normalized Profile to Managed User. This script transforms the normalized identity provider profile into a format that Advanced Identity Cloud can use.Find information on the script and the available bindings in normalized-profile-to-managed-user.js.
Social authentication uses two transformation steps:
-
First, the identity provider configuration runs its normalization script. This script receives the raw claims returned by the provider and converts them into a normalized profile format.
-
Next, the Social Provider Handler node runs the transformation script selected in the node. This script maps the normalized profile to the managed user fields used to create or update the identity object in Advanced Identity Cloud.
-
-
In the Client Type field, select
BROWSERwhen using the Ping Identity-provided user interfaces or Ping SDKs for JavaScript, orNATIVEwhen using the Ping SDKs for Android or iOS.
-
Data Store Decision node
Learn more in Data Store Decision node.
-
Connections:
-
Connect the True outcome to the Increment Login Count node.
-
Connect the False outcome to the Failure node.
-
Increment Login Count node
Learn more in Increment Login Count node.
-
Connections:
-
Connect to the Success node.
-
Required Attributes Present node
Learn more in Required Attributes Present node.
-
Connections:
-
Connect the True outcome to the second Page node (containing the Platform Password node).
-
Connect the False outcome to the third Page node (containing the Attribute Collector node).
-
-
Configuration:
-
In the Identity Resource field, enter the relevant managed identity resource type, such as
managed/alpha_user.To check for the available managed identity resource types, go to Identities > Configure and review the current list.
-
At minimum, make sure your social registration flow can supply values for these managed user attributes:
userName,givenName,sn, andmail.Typical OIDC mappings:
-
userName:preferred_username, falling back toemail, thensub -
givenName:given_name -
sn:family_name -
mail:email
-
-
Page node (second, containing a Platform Password node)
-
Connections:
-
Connect to the Create Object node.
-
Page node (third, containing an Attribute Collector node)
-
Connections:
-
Connect to the second Page node (containing the Platform Password node).
-
-
Configuration:
-
Configure the Attribute Collector node to collect any required attributes that the provider doesn’t return. In a typical social registration journey, these include
mail,givenName, andsnattributes. Ensure the journey also resolves a suitable value foruserName.
-
Create Object node
Learn more in Create Object node.
-
Connections:
-
Connect the Created outcome to the Increment Login Count node.
-
Connect the Failed outcome to the Failure node.
-
-
Configuration:
-
In the Identity Resource field, configure the relevant managed identity resource type, such as
managed/alpha_user.
-
-
-
Click Save to save the journey.
Enforce social registration
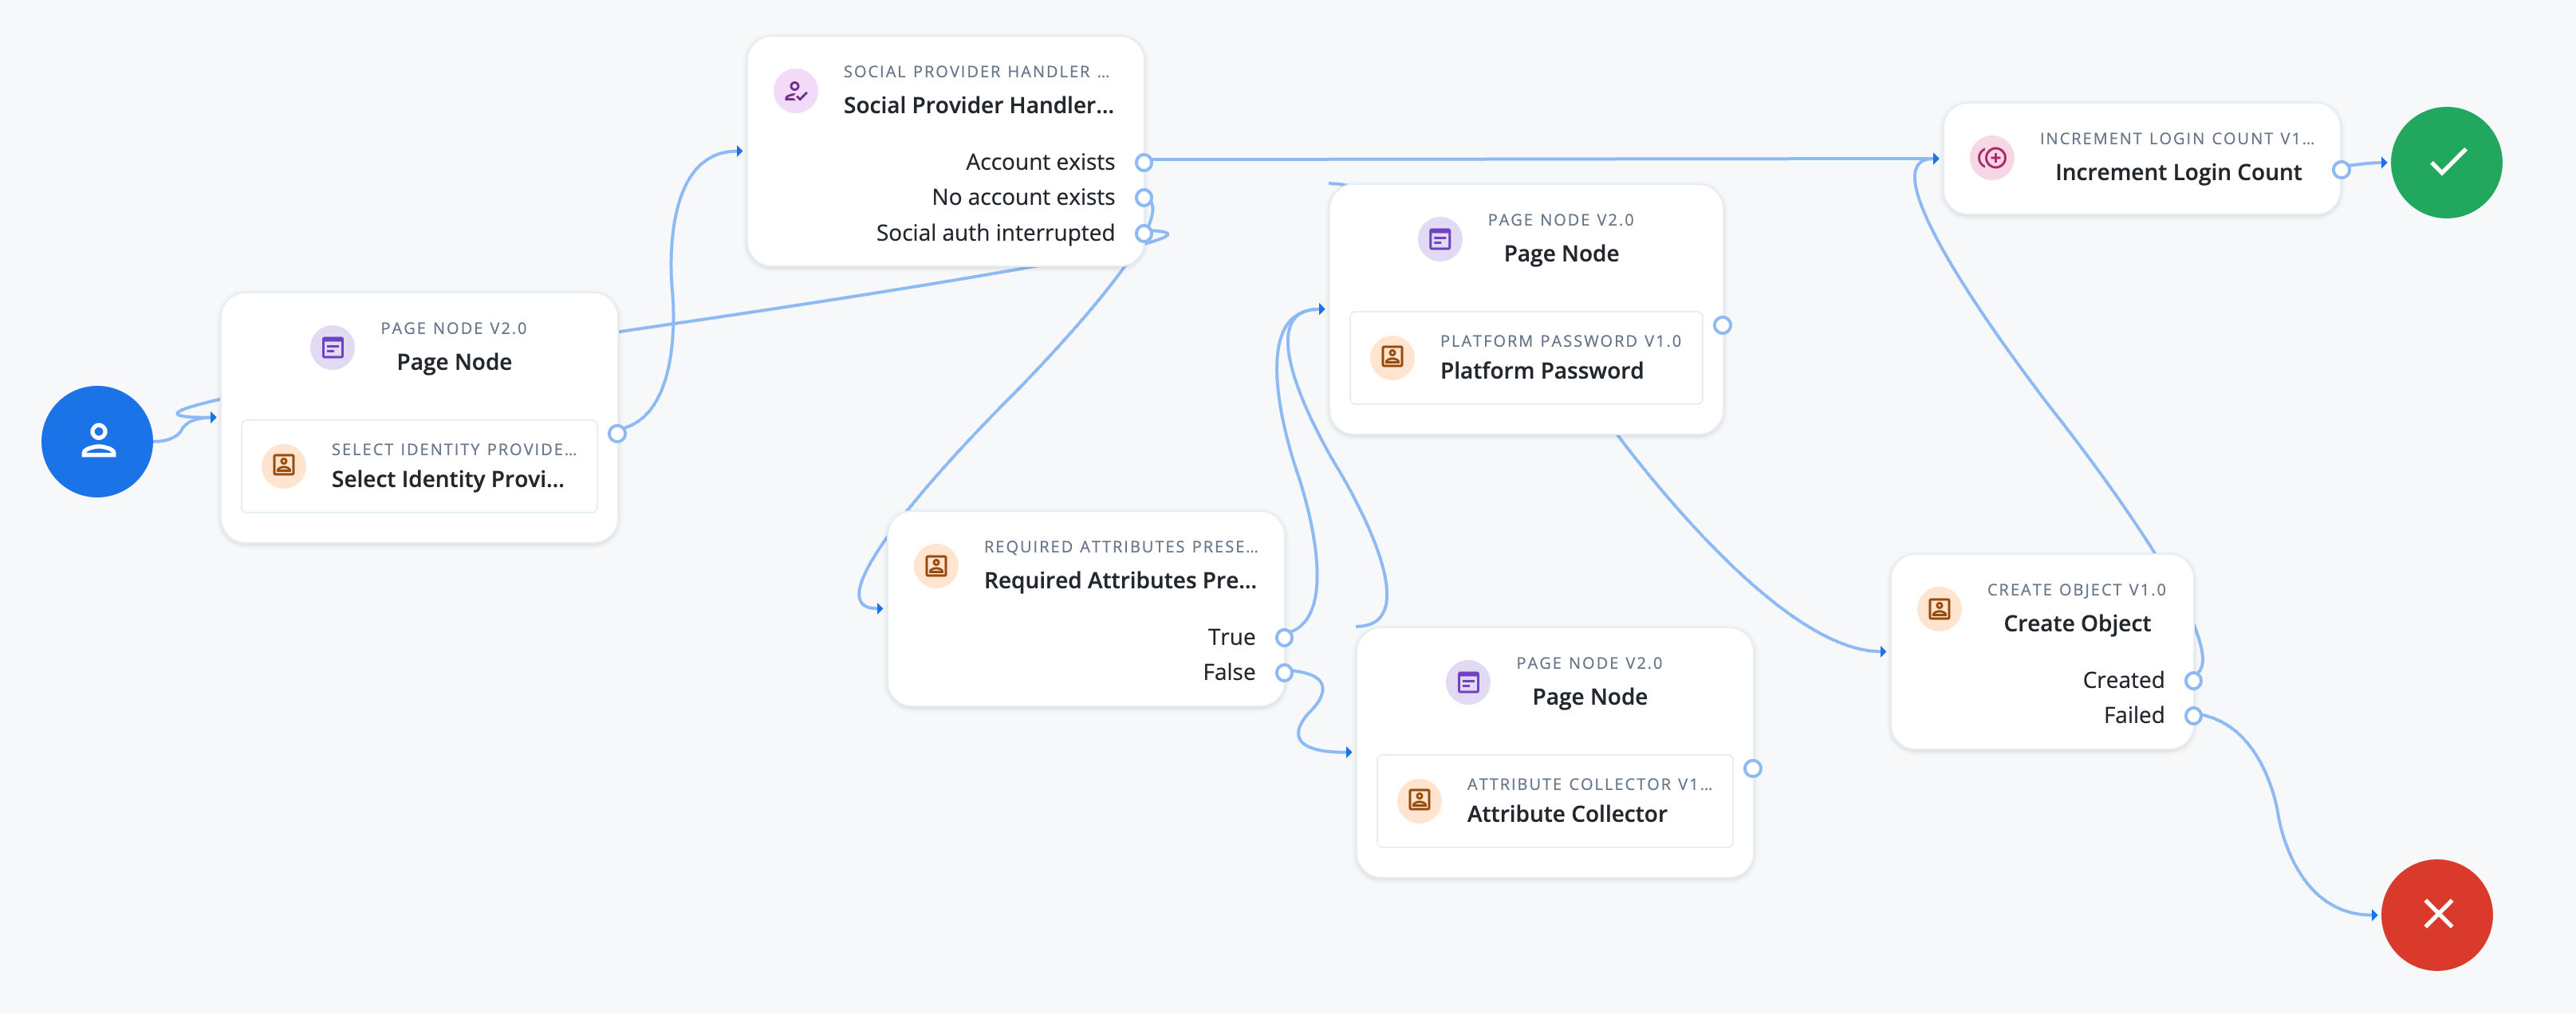
To modify the journey to enforce social registration, make the following changes:
-
In the Select Identity Provider node, deselect Include local authentication.
-
Remove the Platform Username and Platform Password nodes from the initial Page node.
-
Remove the Data Store Decision node.
The resulting journey looks similar to this:
Configure social registration with account claiming
If your end users have one or more social identity provider accounts, they can link them to the same Advanced Identity Cloud account.
The following example builds on the basic social registration journey shown in Configure a social registration journey:
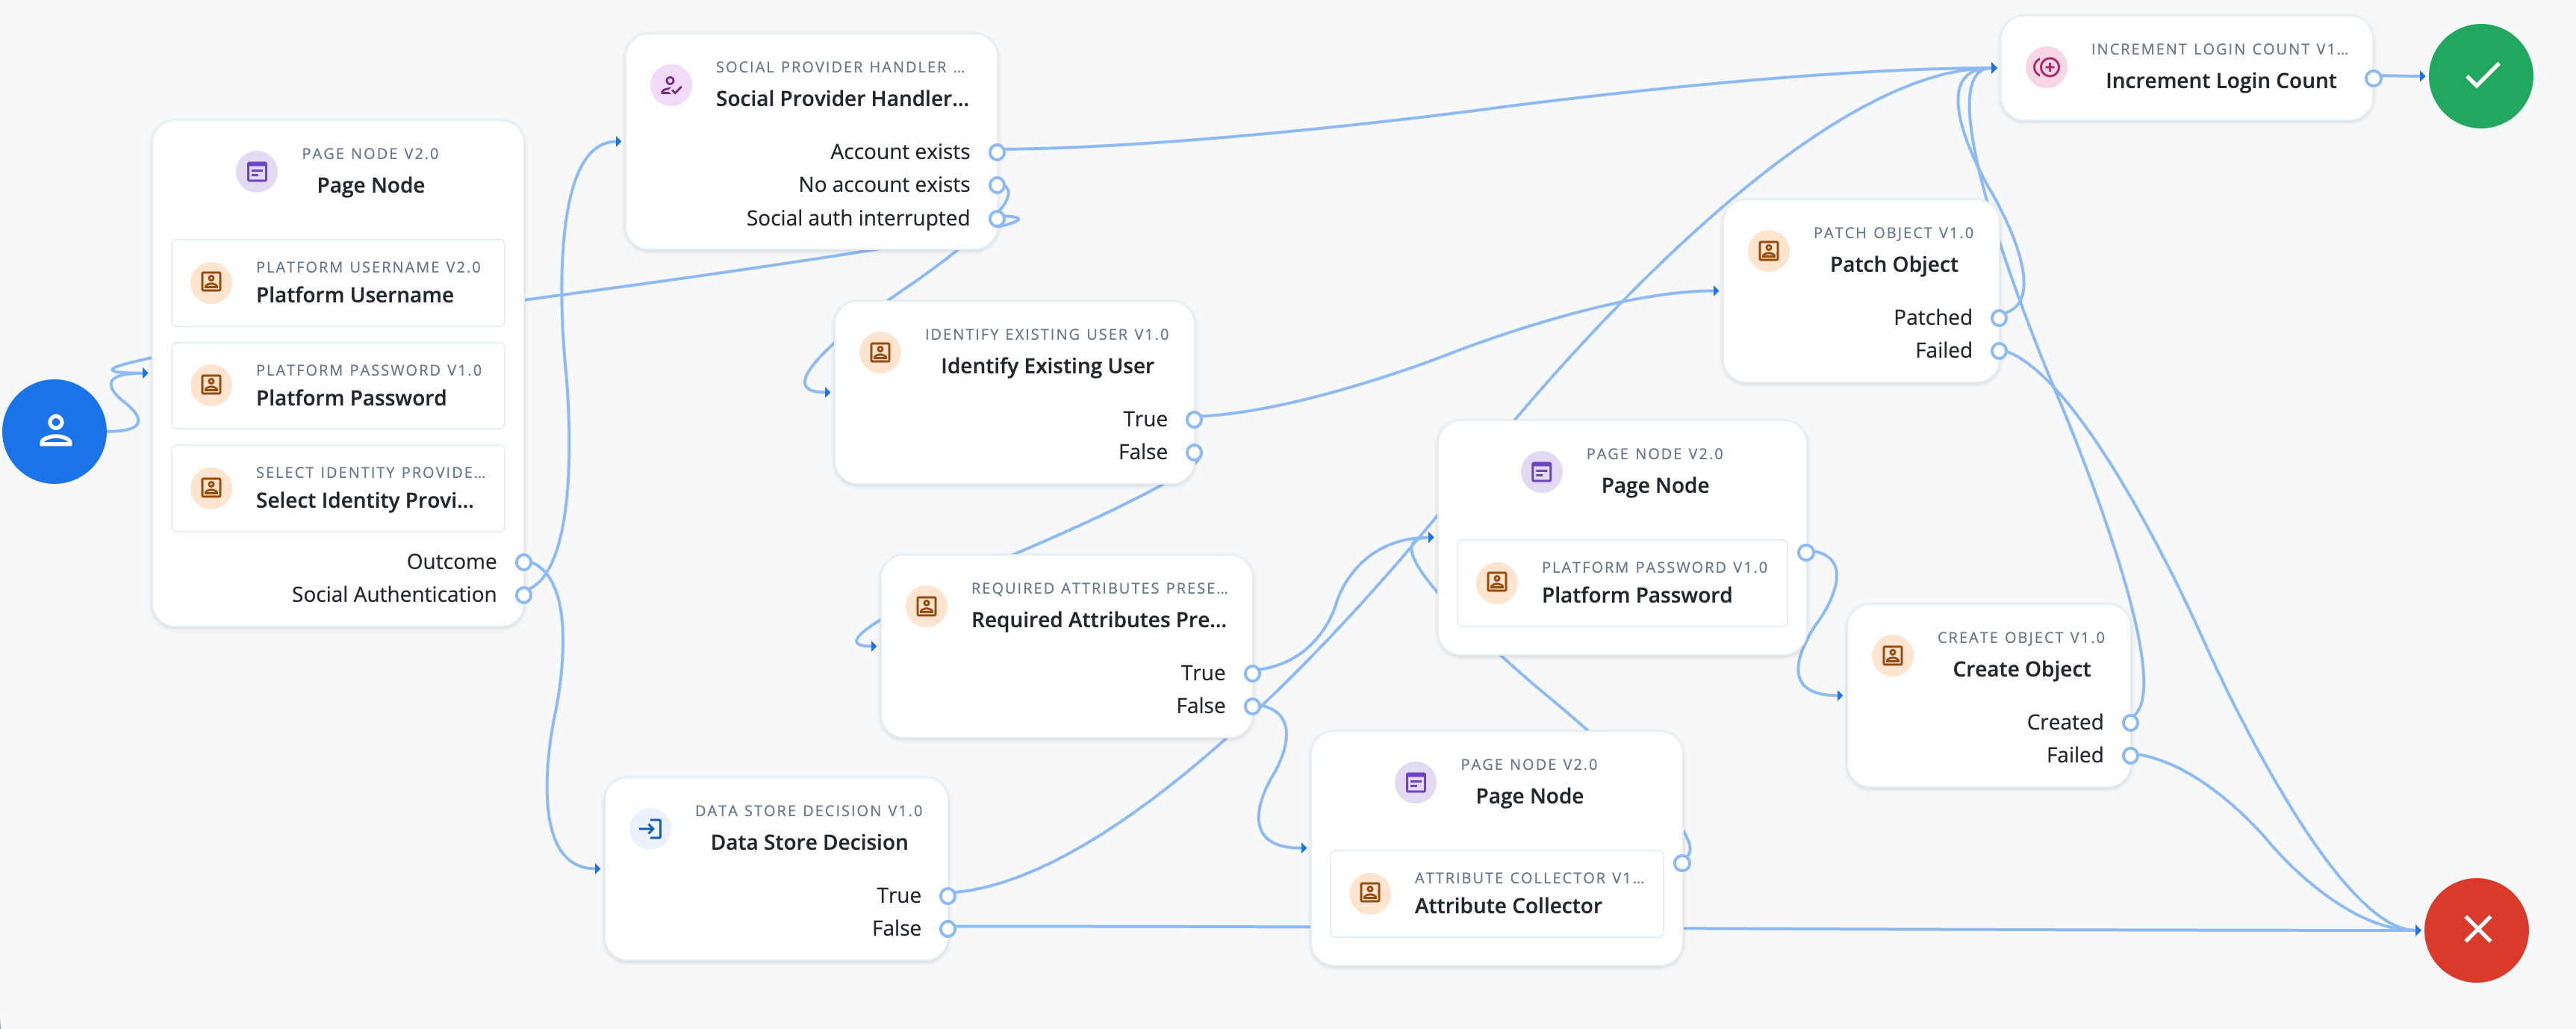
The journey uses the Identify Existing User node to determine if the end user is already registered in Advanced Identity Cloud. By default, the node checks that the email address associated with the account is already registered in Advanced Identity Cloud.
Ensure that you configure the Transformation Script in the Social Provider Handler node, and the Identity Resource field in the Patch Object node.
Learn more in Configure a social registration journey.
Let end users connect through their profile page
To let end users connect to social identity providers through the hosted account pages profile page, add a mapping for your social registration journey:
-
In the Advanced Identity Cloud admin console, go to Authentication > Self Service Journeys.
-
If the Status is inactive, click Activate to enable it.
-
In the Key field, enter
connectSocial. -
In the corresponding Journey list, select the social registration journey to assign to it.
-
Click Save.