Standalone provisioners
Advanced Identity Cloud lets you create provisioners in two main ways:
-
Applications: As part of an application in the application catalog. This is the recommended approach for most tenants and is done through the Advanced Identity Cloud admin console. Learn more in Provision an application.
-
Standalone: As a standalone provisioner that isn’t associated with an application. Standalone provisioners can be created in these ways:
-
REST API: This is the recommended approach to create a standalone provisioner for most tenants. Learn more in Configure connectors using REST.
-
Advanced Identity Cloud admin console: This approach is only available for tenants that use legacy application management. Learn more in Create a standalone provisioner (legacy application management only).
-
IDM native admin console (deprecated): This approach isn’t recommended, as the IDM native admin console is deprecated and will be removed in a future release.
Use the Provisioners page to manage standalone provisioners.
The Provisioners page is unavailable for tenants that have Identity Governance[1]. -
View or edit a standalone provisioner
To view the details or configure settings for a standalone provisioner:
-
In the Advanced Identity Cloud admin console, go to Integrations > Provisioners.
-
In the list of provisioners, click the one you want to manage.
-
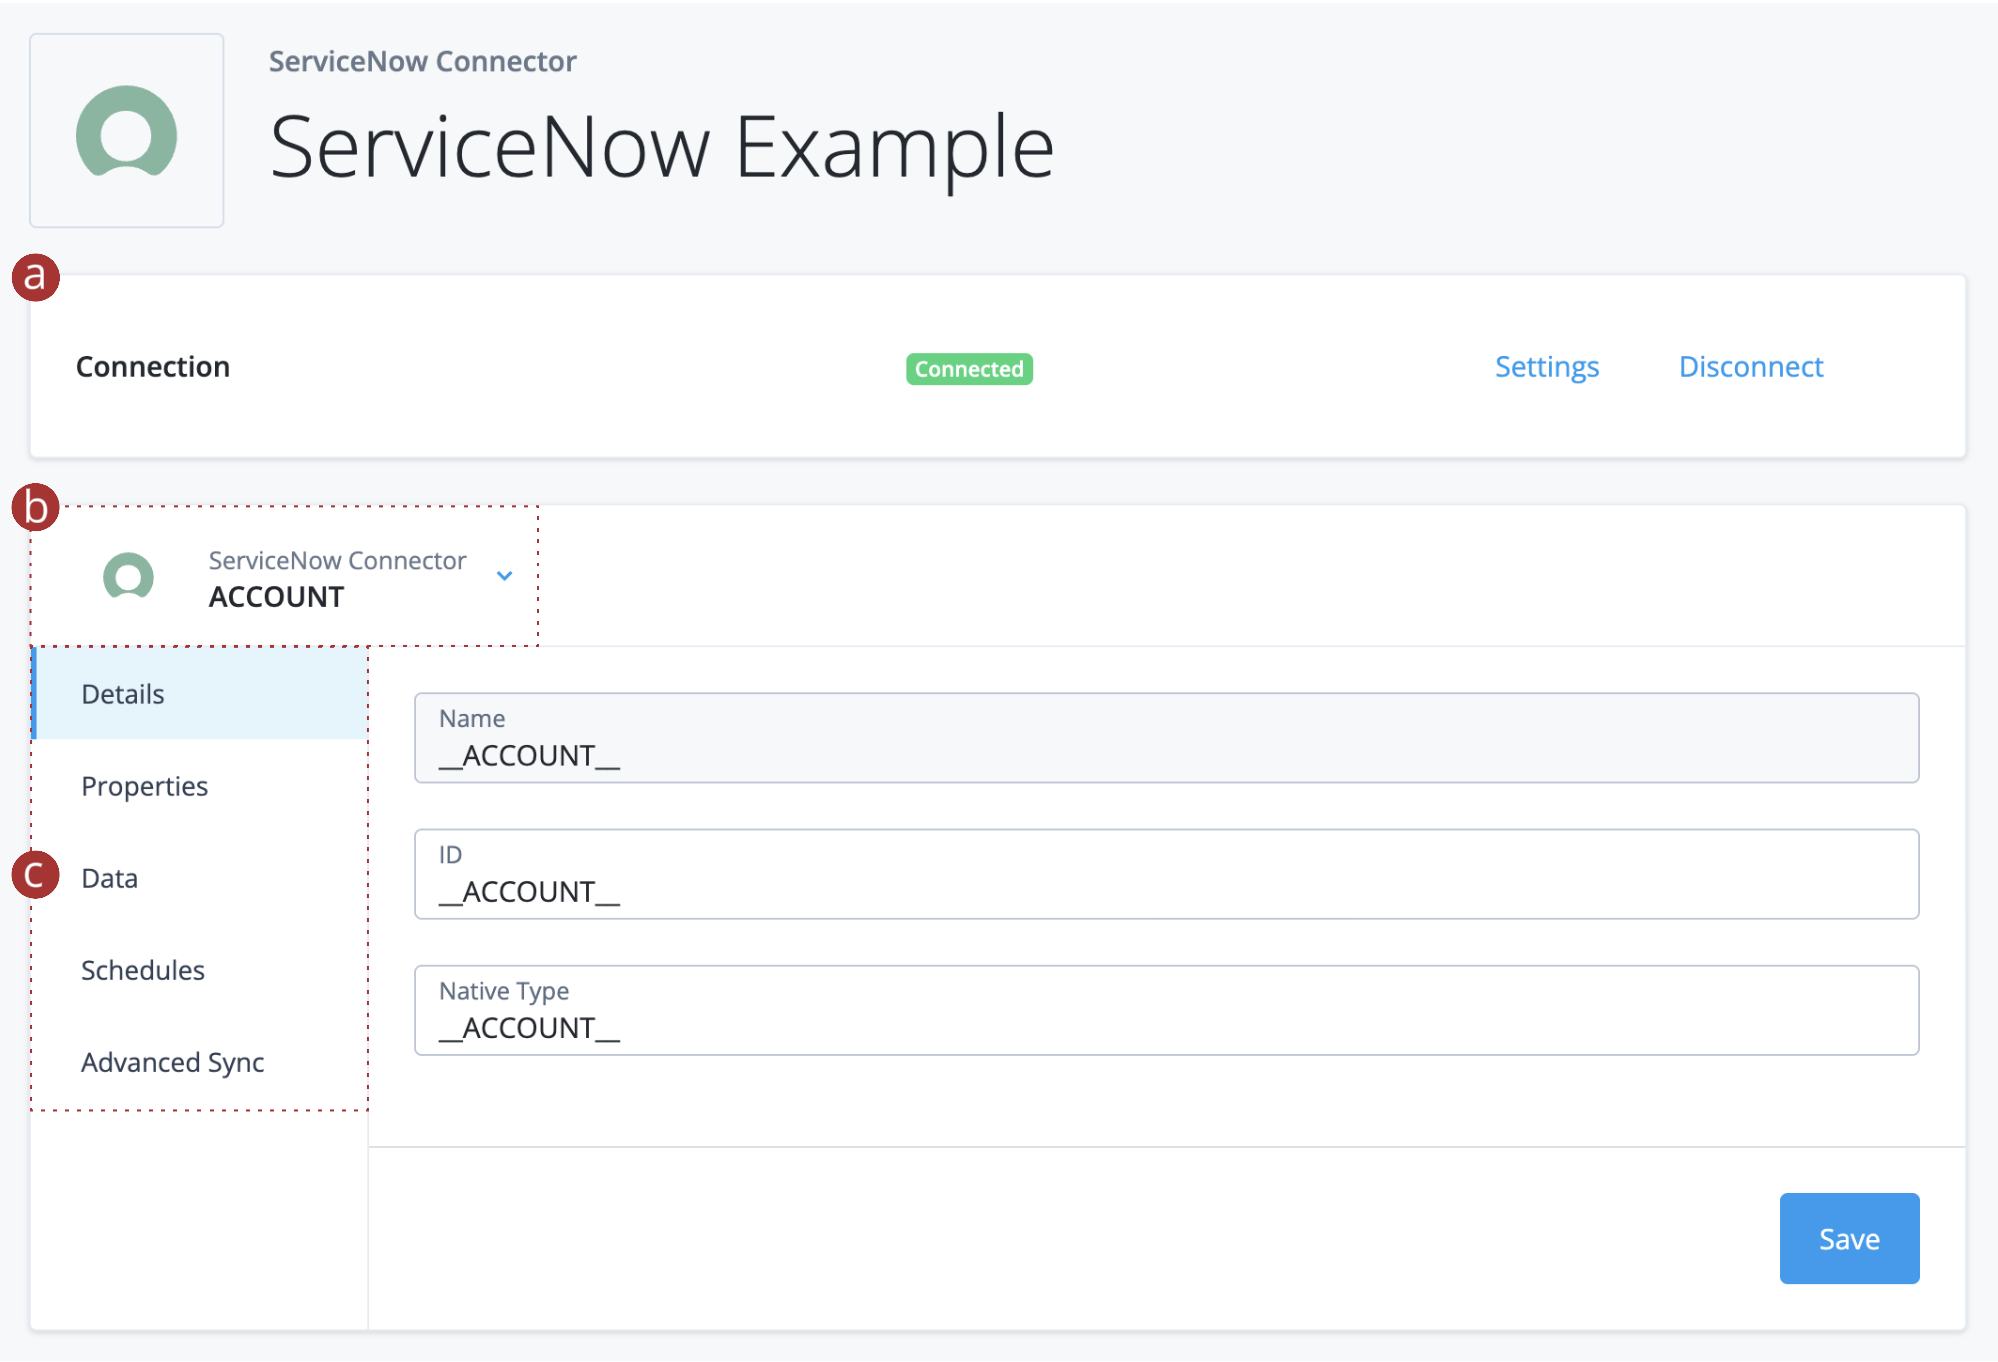
Review the provisioner details page:
-
a Connector status and settings for the provisioner. Learn more in View and update connector settings and Disconnect a provisioner.
-
b Object type list. Contains the object types that can be synchronized using this provisioner. In the screenshot, ACCOUNT is the currently selected object type.
-
c Configuration tabs for the currently selected object type:
-
Details: Review the basic configuration for the selected object type, including name, ID, and native type. In most deployments you don’t need to change these values.
-
Properties: Define or extend the schema for the selected object type. These properties represent attributes that exist on the connected system and can be used in advanced sync mappings. Learn more in Manage provisioner properties.
-
Data: View the raw data for a selected object type, such as
AccountorGroup, directly from the connected system. This is useful for confirming connectivity. Learn more in View connector data. -
Schedules: Configure incremental reconciliation (liveSync) jobs for the selected provisioner object type. A liveSync job detects changes in the external system and brings them into Advanced Identity Cloud in near real time. The schedule applies to every mapping that uses that object type as the source. Learn more in Manage provisioner schedules.
-
Advanced Sync: View, create, or edit advanced sync mappings that use the selected object type. Learn more in Configure advanced sync.
-
-
View and update connector settings
Click Settings to open the connector configuration for the provisioner. From here, you can view and update connector details such as endpoints, credentials (or ESV placeholders), and other connector-specific options.
These settings are the underlying connector configuration, and they apply to all object types and advanced sync mappings that use the provisioner. Change connector settings only when you need to realign with the external system.
Learn more about settings in:
-
Provision settings for an application for application template guidance.
-
Connectors for an overview of built-in and remote connectors and where they’re configured.
Disconnect a provisioner
You can disconnect a provisioner to temporarily break the connection between Advanced Identity Cloud and the external system without deleting the provisioner. This is useful when you want to pause synchronization for a specific connector without losing the configuration details. For example, when you’re rotating credentials, performing maintenance on the external system, or troubleshooting connection issues.
-
Click Disconnect to temporarily break the connection between Advanced Identity Cloud and the external system.
Existing advanced sync mappings and schedules remain defined, but liveSync and reconciliation for the provisioner will fail until you restore the connection.
-
Click Connect to restore the connection.
View connector data
When the provisioner configuration is complete and Advanced Identity Cloud can successfully connect to the remote resource, the Data tab displays the objects in that resource for the selected object type (for example, Account or Group).
This is a read-only view.
You can view the external data, but you can’t modify it from this tab.
The Data tab is useful for:
-
Confirming that the provisioner can reach the external system.
-
Checking that object types and properties are returned as expected.
To view connector data:
-
In the Advanced Identity Cloud admin console, go to Integrations > Provisioners and open the provisioner.
-
In the object type list in the upper-left corner, select the object type you want to view. For example, ACCOUNT.
-
Click the Data tab.
The table shows objects returned by the connector for the selected object type.
You can use the column filters to customize the table columns.
Manage advanced sync
Advanced sync lets you view and manage all synchronization mappings associated with the selected provisioner. This gives you direct control over how data flows between Advanced Identity Cloud and the external system for that provisioner.
This approach is particularly useful for provisioner-only integrations that aren’t represented as managed applications on the Applications page.
To manage advanced sync:
-
In the Advanced Identity Cloud admin console, go to Integrations > Provisioners and open the provisioner.
-
In the object type list in the upper-left corner, select the object type you want to use as the source or target for the synchronization. For example, ACCOUNT.
-
Click the Advanced sync tab to display all mappings where the selected object type is either the source or the target.
-
To manage advanced sync mappings, do one of the following:
-
To create an advanced sync mapping, click add Sync Data.
-
To update an advanced sync mapping, click the mapping you want to edit.
-
To delete an advanced sync mapping, click the Ellipsis icon () for the mapping and select Delete.
-
Learn about creating and managing mappings in advanced sync.
Create a standalone provisioner (legacy application management only)
| You can create provisioners on the Provisioners page only for tenants that use legacy application management. Learn more in Application management migration FAQ. |
To create a new standalone provisioner:
-
In the Advanced Identity Cloud admin console, go to Integrations > Provisioners.
-
Click New Provisioner.
-
In the New Provisioner modal, enter the provisioner name and select the type.
-
Update the JSON configuration for the provisioner. You can find configuration details for each connector type in the connector reference.
-
Click Save.
The new provisioner is added to the list of provisioners on the Provisioners page.