Manage AI agent identities using the admin console
You can find background information on AI agent identities in PingOne Advanced Identity Cloud in Secure your AI-driven solutions using AI agent identities.
Create an AI agent identity
To create a new AI agent identity:
-
In the Advanced Identity Cloud admin console, go to AI Agents.
-
Click Add AI Agent.
-
In the Add new AI Agent modal:
-
Enter a descriptive Name for the identity. For example,
Retail ChatbotorWorkforce Assistant. -
Enter a Client ID for the identity using only alphanumeric characters, dashes, or underscores. For example,
retail-chatbotorworkforce-assistant.Once you enter a client ID and save the identity, the client ID can’t be changed. -
(Optional) Enter a Client Secret:
-
If you don’t enter a value for the client secret, you can enter it later using the Access tab.
-
If you do enter a value, make a note of it, as you won’t be able to view it again after creating the identity.
-
-
(Optional) Click Use Secret Store for secrets, then enter a Secret Label Identifier.
-
If you don’t enter a value, you can enter it later using the Access tab.
-
If you do enter a value, after saving the identity you must also create an ESV secret and map it to a secret label with the format
am.applications.oauth2.client.<identifier>.secret. For example, if you enterretail-chatbot-secretas the secret label identifier, you must create an ESV secret and map it to the secret labelam.applications.oauth2.client.retail-chatbot-secret.secret. Learn more in Secret labels with identifiers.
-
-
Click Save.
-
-
Complete the new identity’s configuration using the instructions in Update an AI agent identity.
Update an AI agent identity
To update an AI agent identity, use the following instructions:
-
Manage application policies:
Update basic settings or custom attributes
To view or edit an AI agent identity’s basic settings or custom attributes:
-
In the Advanced Identity Cloud admin console, go to AI Agents.
-
Review the AI Agents page to find the identity you want to edit, then click it.
-
Click the Overview tab:
-
(Optional) Edit the identity’s Name. The name should be a descriptive label for the identity, such as
Retail ChatbotorWorkforce Assistant. -
(Optional) Enter a Description for the identity. The description should provide additional context about the identity’s purpose or functionality, such as
A chatbot that helps retail customers navigate products and answer questionsorA workforce assistant that helps employees access enterprise tools and resources. -
(Optional) Select one or more Agent Owners for the identity. Agent owners are symbolic owners that can be used for visibility within your organization, but don’t have any functional permissions or privileges related to the AI agent identity.
-
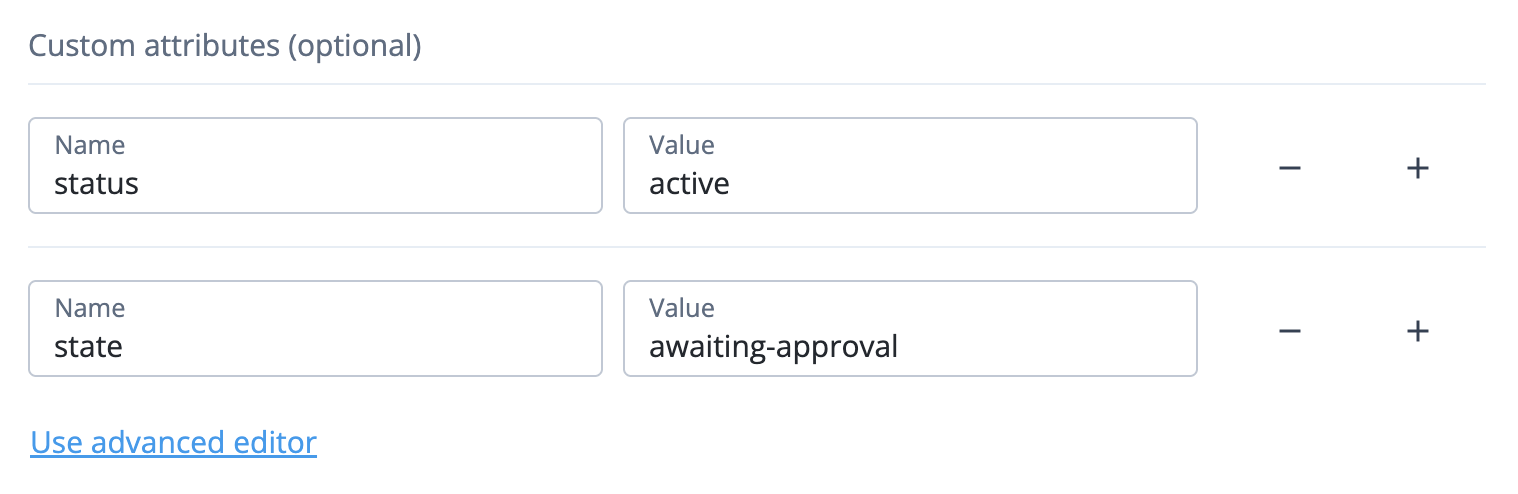
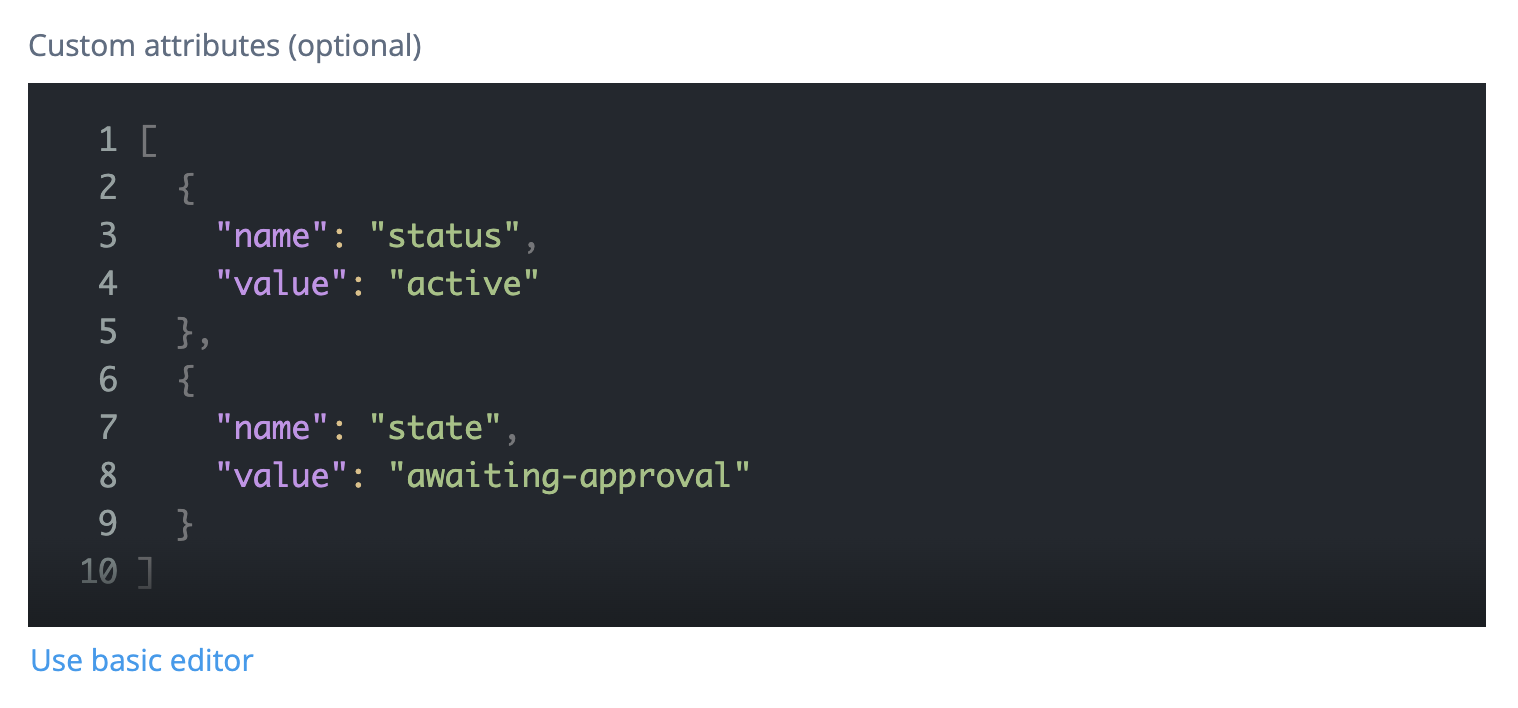
(Optional) Click Show advanced settings, then enter one or more Custom attributes. Custom attributes are key-value pairs that let you add additional metadata to the identity. For example, you could add
statusandstateattributes to track the identity’s lifecycle.You can enter custom attributes in two ways:
-
Basic editor: Use Name and Value fields to enter custom attributes one at a time. You can click the add button () to add additional custom attributes as needed and click the remove button () to remove any custom attributes you no longer need.
-
Advanced editor: Use a JSON editor to directly manage the underlying JSON object that stores the custom attributes. To switch to the JSON editor, click Use advanced editor. You can switch back to the basic editor at any time by clicking Use basic editor.
-
-
-
Click Save.
Update access settings
To view or edit an AI agent identity’s OAuth 2.0 settings:
-
In the Advanced Identity Cloud admin console, go to AI Agents.
-
Review the AI Agents page to find the identity you want to edit, then click it.
-
Click the Access tab.
-
Review the identity’s Client ID and Client Secret fields:
-
The Client ID is a read-only field and can’t be modified.
-
The Client Secret is a read-only, masked field.
-
-
(Optional) To add, update, or reset the Client Secret:
-
Click the Reset button to the right of the Client Secret field.
-
In the Reset Client Secret modal, enter a password in the New Client Secret field. Make a note of the new secret, as you won’t be able to view it again after clicking Save.
-
Click Save.
-
-
(Optional) Click Use Secret Store for secrets, then enter a Secret Label Identifier. If you enter a value, after saving the identity you must also create an ESV secret and map it to a secret label with the format
am.applications.oauth2.client.<identifier>.secret. For example, if you enterretail-chatbot-secretas the secret label identifier, you must create an ESV secret and map it to the secret labelam.applications.oauth2.client.retail-chatbot-secret.secret. Learn more in Secret labels with identifiers. -
(Optional) Click Show advanced settings and update the OAuth 2.0 client profile settings as needed. The settings are listed in step 4 of Create a client profile.
-
Click Save.
Create application privileges
You can create application privileges for an AI agent identity to specify which applications the identity can access, which end users or groups of end users the identity can act on behalf of when accessing those applications, and which OAuth 2.0 scopes the identity can use when accessing those applications.
-
In the Advanced Identity Cloud admin console, go to AI Agents.
-
Review the AI Agents page to find the identity you want to edit, then click it.
-
Click the Applications tab.
-
For each application privilege needed, do the following:
-
Click Add Application to open the Add new Application modal.
-
In the Resources list, select an application. Learn how to create an application to select here in Application management.
-
(Optional) Enter a Description for the application privilege. The description should provide additional context about the application privilege. For example:
-
Allows the retail chatbot to access the product catalog on behalf of customers to help them find products and answer questions -
Allows the workforce assistant to access Salesforce on behalf of employees.
-
-
(Optional) In the Acting On Behalf Of section, use one or both of the Subjects and Subject Groups drop-down lists to select which individual users (subjects) or groups of users (subject groups) the identity can act on behalf of when accessing the application. For example:
-
For a retail chatbot, you could specify a
Privilege Membercustomer group to allow the identity to act on behalf of any user in that group. -
For a workforce assistant, you could specify
Sales SupportandCustomer Serviceemployee groups to allow the identity to act on behalf of any user in that group.
To create users or groups to select here, refer to Manage identities.
-
-
(Optional) In the Permissions section, use the Permissions field to select or enter scopes:
-
You can select specific scopes in the list. The scopes in this list come from the application you select in the Resources field.
Guidance on selecting scopes for AI agent identities
When selecting scopes, you should choose only the scopes that are necessary for the identity to perform its intended functions when accessing the application, following the principle of least privilege. In particular, you should avoid selecting any high-risk or sensitive scopes that would allow the identity to perform actions that could be destructive or have significant consequences if misused, such as deleting data or managing user accounts.
For example:
-
For a retail chatbot accessing a product catalog application, you might only select read-only scopes that allow the identity to view product information on behalf of customers, but not any write scopes that would allow the identity to modify or delete product information. Additionally, you might want to select scopes that allow the identity to add a product to a customer’s shopping cart on their behalf, but avoid any scopes that would allow the identity to complete a purchase on the customer’s behalf without their explicit approval.
-
For a workforce assistant accessing Salesforce, you might select a mix of read and write scopes that allow the identity to view and update customer information on behalf of employees, but avoid any high-risk scopes that would allow the identity to delete customer information or manage user accounts.
To create scopes to select here, in the Advanced Identity Cloud admin console, go to Applications, select the application you want to create scopes for, click the Sign On tab, then enter scope values in the Scopes field.
-
-
You can also enter custom scope values that aren’t in the list by typing them into the field.
-
-
Click Save.
-
Update application privileges
To update application privileges for an AI agent identity:
-
In the Advanced Identity Cloud admin console, go to AI Agents.
-
Review the AI Agents page to find the identity you want to edit, then click it.
-
Click the Applications tab.
-
Review the application privileges to find the privilege you want to update.
-
To update an application privilege:
-
Click the application privilege.
-
In the Edit Application modal, follow the instructions in step 6 of Create application privileges.
-
-
To revoke an application privilege:
Revoking an application privilege immediately removes the identity’s access to the associated application, which could cause disruptions if the identity is actively performing tasks on behalf of end users when you revoke the privilege. Before revoking an application privilege, review the identity’s activity and audit logs to understand its recent actions and ensure that revoking the privilege won’t cause unintended consequences for your end users or your organization’s AI-driven solutions. -
Click the application privileges' ellipsis icon () to open its actions menu, then click Revoke.
-
Delete an AI agent identity
Before deleting an AI agent identity, review the identity’s activity and audit logs to understand its recent actions and ensure that it’s not still in use by any of your organization’s AI-driven solutions.
-
In the Advanced Identity Cloud admin console, go to AI Agents.
-
Choose one of the following actions:
-
To delete an identity from the AI Agents page:
-
Click the identity’s ellipsis icon () to open its actions menu, then click Delete.
-
In the Delete AI Agent? modal, click Delete.
-
-
To delete an identity from the identity’s own page:
-
Click the AI agent.
-
Click Delete Agent.
-
In the Delete Agent? modal, click Delete.
-
-