Configure provisioning
About this task
To configure a connection for outbound provisioning to Box, follow the instructions in this section.
Outbound provisioning details are managed within a service provider (SP) connection. You can configure outbound provisioning with or without Browser SSO, WS-Trust STS, or both when you create a new SP connection. You can also add outbound provisioning to an existing SP connection.
Steps
-
In the PingFederate administrator console, configure the data store that PingFederate will use as the source of user data. Learn more in Datastores in the PingFederate documentation.
-
When targeting users and groups for provisioning, exclude the user account that you will use to administer users in your connection to Box. This prevents the PingFederate provisioning engine from interfering with the account that provisions users and groups.
-
-
Create a new SP connection or select an existing SP connection from the SP Configuration menu.
-
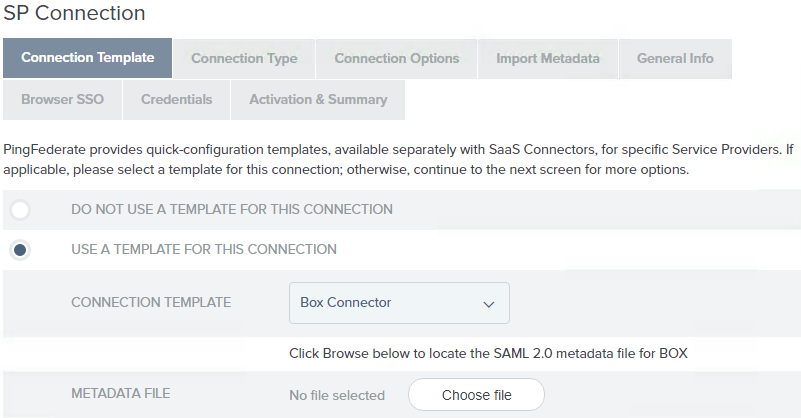
On the Connection Template screen, select the Use a template for this connection option and choose Box Connector from the Connection Template drop-down list. You will be asked to provide the
boxmetadata.xmlfile you obtained earlier in Download Box SAML 2.0 metadata file.
If this selection is not available, verify the connector installation and restart PingFederate.
-
On the Connection Type screen, ensure the Outbound Provisioning check box is selected, and the Browser SSO Profiles check box is cleared (if appropriate).
-
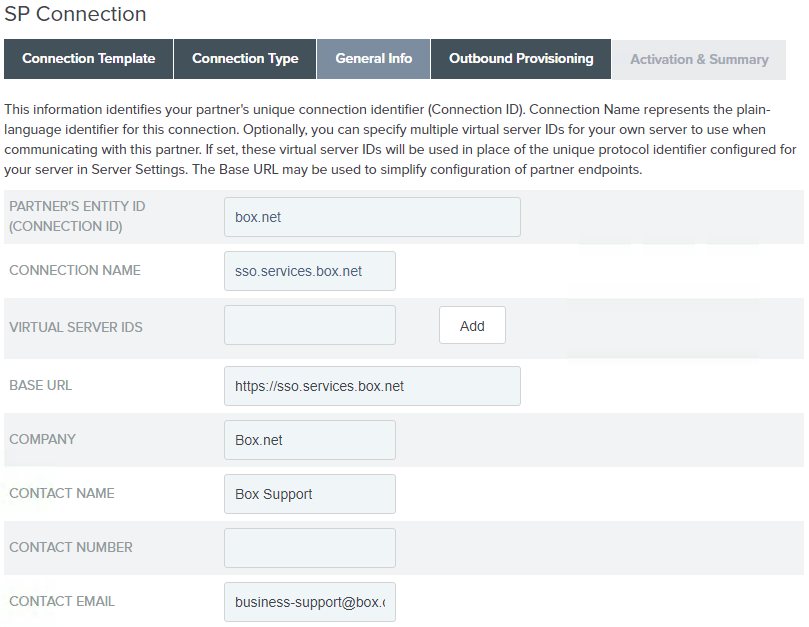
On the General Info screen, the default values are taken from the metadata file you selected in step 2. We recommend using the metadata default values.

-
Follow the connection wizard to configure the connection.
-
On the Outbound Provisioning screen, click Configure Provisioning.
-
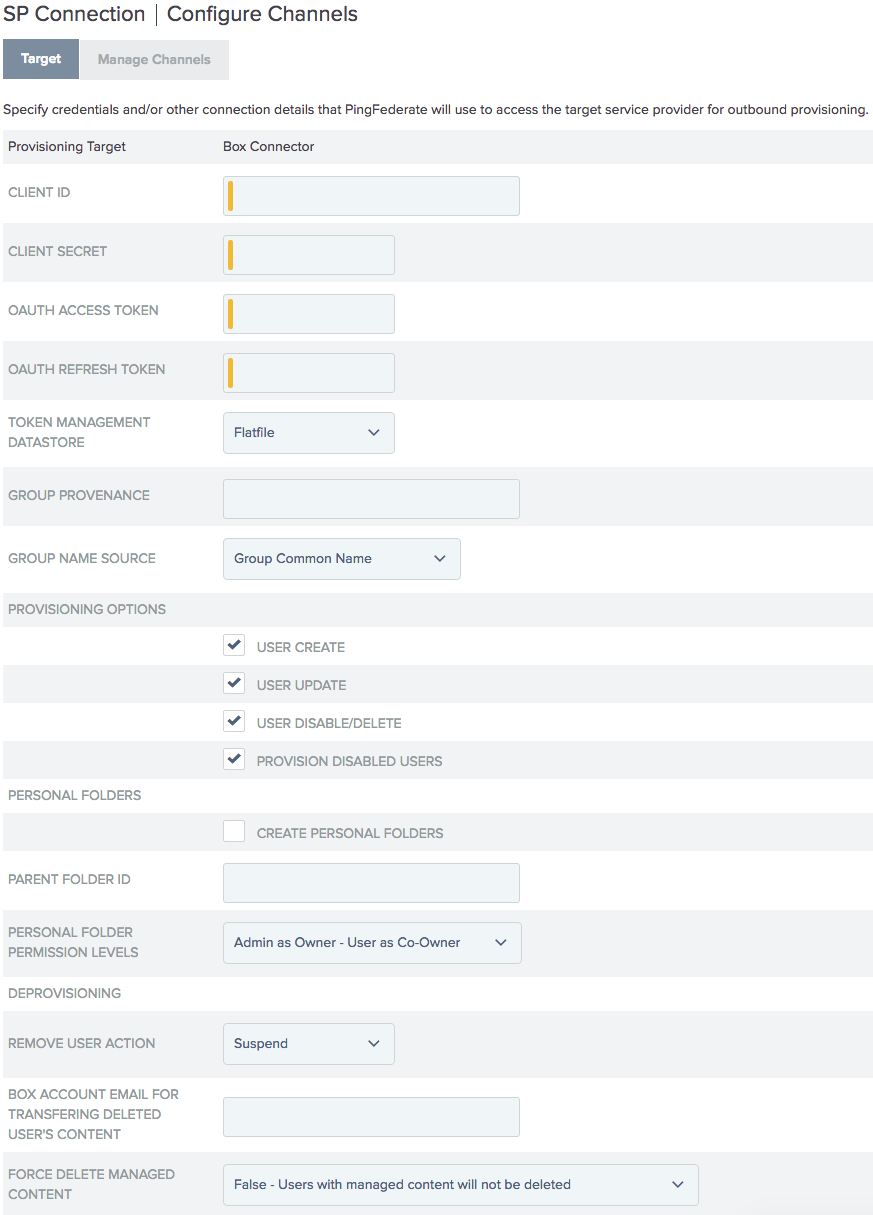
On the Target screen, enter the values for each field as required by the Box Connector.

Field Name Description Client ID
The client ID for the application created in Box.
Learn more about obtaining a client ID in Obtain client ID and secret from Box.
Client Secret
The client secret generated during application creation for Box.
Learn more about obtaining a client secret in Obtain client ID and secret from Box.
OAuth Access Token
The OAuth access token generated by the OAuth Configuration Service.
Learn more about obtaining authorized OAuth tokens in Generate OAuth access and refresh tokens.
OAuth Refresh Token
The OAuth refresh token generated by the OAuth Configuration Service.
Learn more about obtaining authorized OAuth tokens in Generate OAuth access and refresh tokens.
Token Management Datastore
Select where tokens will be stored:
- Flatfile (default)
-
Tokens will be stored in a flatfile named
boxoauthtoken.conflocated at<pf_install>/server/default/data/adapter-config.The flatfile option is only available when running in Standalone mode, since the flatfile cannot be accessed by multiple nodes. The flatfile option cannot be used in a clustered environment even if only one node is used for provisioning.
- Database
-
Tokens can also be stored in a database. If you have set up databases in PingFederate, they will appear in the list as options. If you have a multinode PingFederate configuration for clustered or failover use cases, tokens must be stored in a database.
The
saas_connection_fieldstable must be first created in the database using the appropriate supplied script. The same database used for PingFederate provisioning can be used to create thesaas_connection_fieldstable. This must be completed before configuring the Box Connector. During configuration, choose the database that contains thesaas_connection_fieldstable.
Group Provenance (Optional)
Optional and for group provisioning only. This allows you to keep track of which external source this group is coming from (for example, "Active Directory", "Google Groups", "Facebook Groups"). This field should be a human-readable identifier up to 255 characters long. Setting this will also prevent Box users from editing this group directly through Box. This is desirable for one-way syncing of groups.
Group Name Source
Possible values:
- Group Common Name (default)
-
When selected, groups will be provisioned in Box with the name equal to the common name of the group in Active Directory.
- Group Distinguished Name
-
When selected, groups will be provisioned in Box with the name equal to the distinguished name of the group in Active Directory.
Provisioning Options
User Create
- True (default)
-
Users will be created in Box.
- False
-
Users will not be created in Box.
The
provisioner.logwill display a warning within the create user workflow that the user was not created in Box.
User Update
- True (default)
-
Users will be updated in Box.
- False
-
Users will not be updated in Box.
The
provisioner.logwill display a warning within the update user workflow that the user was not updated in Box.
User Disable/Delete
- True (default)
-
Users will be disabled or deleted in Box.
A disabled user can only be re-enabled if User Update is true.
- False
-
Users will not be disabled or deleted in Box.
The
provisioner.logwill display a warning indicating that the user was not disabled or deleted in Box.
Provision Disabled Users
This option is only relevant if User Create is true.
- True (default)
-
If a disabled user in the user store is targeted for provisioning, it will be created in a disabled state in Box.
- False
-
Box users will not be created in a disabled state. This is desirable for scenarios where there are disabled users in the data store, not intended for creation in Box during initial synchronization.
The
provisioner.logwill display a warning within the create user workflow indicating that the user was not created in Box.
Personal Folders
Create Personal Folders
- False (default)
-
Personal folders will not be created.
- True
-
On the creation of a new user, a personal Box folder will be created for the user. The new folder will be created in a parent folder you must specify on this page (see Parent Folder ID), and its name will be the value of the user’s Personal Folder Name attribute. You can find details in Supported attributes reference.
If an issue occurs during the creation of the personal folder, the
server.logwill display a warning indicating that the user’s personal folder was not created in Box. If you have applied Additional logging changes, this will be shown in theprovisioner.log.
Parent Folder ID
This option is required if Create Personal Folders is true.
The ID of the parent folder in which new personal folders will be created. The administrator account used when obtaining the client ID and client secret must be the owner of this folder.
You can easily find the ID of a folder by navigating to the desired parent folder in the Box web portal and copying the string of numbers at the end of the url. For example, the ID of the folder located at:
-
https://myconnector.app.box.com/folder/12345678910
would be
12345678910.Personal Folder Permission Levels
This option is only relevant if Create Personal Folders is true.
- Admin as Owner - User as Co-Owner (default)
-
When a new personal folder is created, the admin will be the owner of the folder, and the user will be a co-owner.
- Admin as Owner - User as Editor
-
When a new personal folder is created, the admin will be the owner of the folder, and the user will be an editor.
- User as Owner
-
When a new personal folder is created, the user will be the owner, and the admin will have no permissions on or visibility into that folder.
Deprovisioning
Remove User Action
Select a deprovision method (Suspend or Delete). Deprovisioning is triggered when previously provisioned users no longer meet the condition set in the Source Location screen, or when a user has been suspended or deleted from the data store. This option is only applicable if User Disable/Delete is set to true.
- Suspend (default)
-
When selected, if you delete a user from Active Directory, the user will be suspended in Box (also known as a soft delete).
- Delete
-
When selected, if you delete a user from Active Directory, the user will be deleted in Box (also known as a hard delete).
Box Account Email For Transferring Deleted User’s Content
Optional and only relevant when User Disable/Delete is true and Remove User Action is Delete.
The email associated with a valid and active Box account. When this is specified, if a user is deleted, their content (for example, files) would be transferred to the specified Box account instead of being deleted with the user.
Force Delete Managed Content
This option is only relevant if User Disable/Delete is true, Remove User Action is Delete, and the Box Account Email For Transferring Deleted User’s Content is valid.
- False - Users with managed content will not be deleted (default)
-
Attempts to delete users who own files will fail unless the files can be transferred to another account. If a value has been provided for Box Account Email For Transferring Deleted User’s Content field then the user will be deleted after the data is transferred. The
provisioner.logwill show an error and retry on the next provisioning cycle. - True - CAUTION: Users and their managed content will be deleted
-
Attempts to delete users will proceed regardless of whether they own files. Any content owned by the user, including folders and files, will be permanently deleted from Box. If a value has been provided for the Box Account Email For Transferring Deleted User’s Content field, then the transfer of files will be attempted prior to the user and content being deleted. Only select this option if revoking user access to content is of a higher priority than preserving the content.
Once PingFederate is restarted, these and subsequent authorized OAuth tokens are stored in either the flatfile or the database, depending on the Token Management Datastore choice.
If these values in your SP connection require updating at any time in the future, follow the steps in Updating Box OAuth tokens.
-
Click Next to continue the provisioning configuration. Learn more in the following sections under Outbound provisioning for IdPs in the PingFederate documentation:
-
Credentials will be verified when the channel and SP connection is set to Active and provisioning is initiated.
If you are not ready to complete the provisioning configuration, you can click Save and return to the configuration page later. To return to the configuration page, select the connection from Identity Provider > SP Connections > Manage All.