Adding PingOne MFA to your authentication policy
By modifying your PingFederate authentication policy to include the PingOne MFA IdP Adapter, you can challenge users to complete a multi-factor authentication (MFA) step.
About this task
These steps are designed to help you add to an existing authentication policy. You can find more information about configuring authentication policies in Authentication policies in the PingFederate documentation.
Steps
-
In the PingFederate administrative console, go to Authentication > Policies > Policies.
-
Select the IdP Authentication Policies checkbox.
-
Open an existing authentication policy, or click Add Policy.
Learn more in Defining authentication policies in the PingFederate documentation.
-
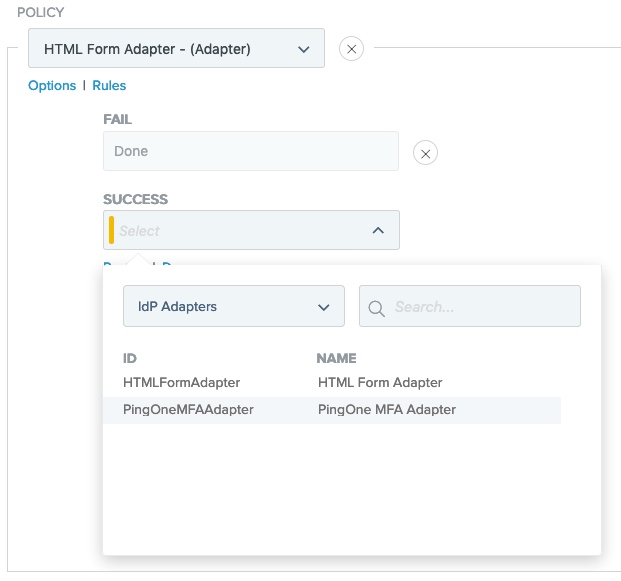
In the Policy area, in the Select list, select a PingOne MFA IdP Adapter instance.
-
Map the PingOne user ID or username into the PingOne MFA IdP Adapter instance.

-
Under the PingOne MFA IdP Adapter instance, click Options.
-
In the Options modal, in the Source list, select a previous authentication source that collects the PingOne user ID or username.
If you left the Username Attribute field blank in your PingOne MFA IdP Adapter configuration, the adapter also uses this value as the username when provisioning new users to PingOne.
-
In the Attribute list, select the user ID. Click Done.
-
(Optional) Select the User ID Authenticated checkbox.
The User ID Authenticated checkbox indicates whether the mapped user ID has been authenticated by the authentication source and therefore can be trusted by the current adapter. Device management options are limited if the user isn’t authenticated.
-
-
(Optional) Define policy paths based on the
pingone.mfa.statusorpingone.mfa.status.reasonattributes.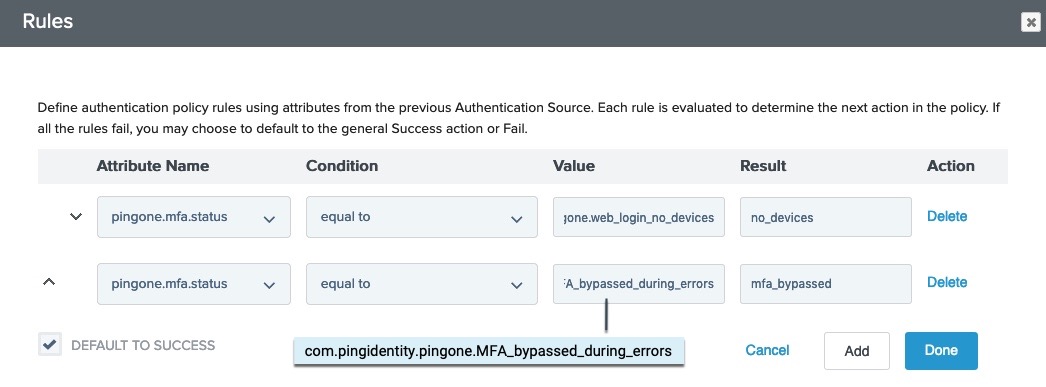
-
Under the PingOne MFA IdP Adapter instance, click Rules.
-
In the Rules modal, in the Attribute Name list, select pingone.mfa.status or pingone.mfa.status.reason.
-
In the Condition list, select equal to.
-
In the Value field, enter a value from PingOne MFA status attributes reference.
-
In the Result field, enter a name. This appears as a new policy path that branches from the authentication source.
-
If you want to add more authentication paths, click Add and repeat steps a-e.
-
Click Done.
-
-
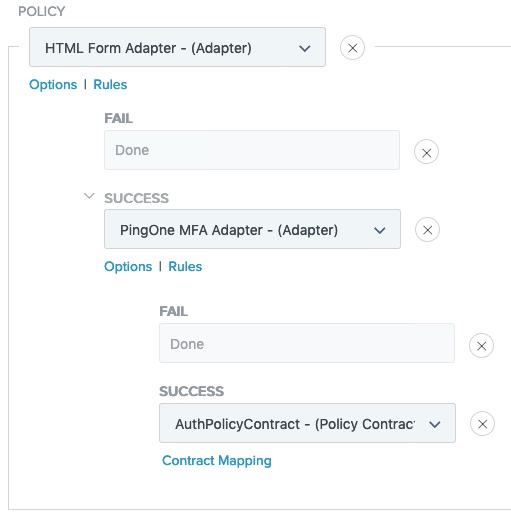
Configure each of the authentication paths.
-
Click Done.
-
Configure tracked HTTP parameters:
-
On the Tracked HTTP Parameters tab, in the Parameter Name field, enter the name of the parameter that you want to track.
For example:
-
To enable automatic device pairing, enter
mobilePayoad. -
To configure the PingOne MFA IdP Adapter to support the prompt parameter, enter
prompt.
-
-
Click Add.
-
Click Save.
-
Repeat the previous steps for any other parameters that you want to add.
-