Preparing Active Directory for federation
When you configure federation, your local Active Directory (AD) users should be provisioned to Azure AD. You can do this by using synchronization tools like Azure AD Connect.
|
The following installation steps are provided for a configuration where the |
Before configuring synchronization, you might need to prepare your local AD, including:
-
Configuring UPN suffix for non-routable domain names
-
Cleaning up AD objects
-
Planning filters for AD users
-
Planning for multiple forests
|
To simplify your configuration, Microsoft provides Azure AD Connect, which will automate many of the required steps. You can download Azure AD Connect at Microsoft Azure Active Directory Connect. Azure AD Connect automatically configures your Azure AD domain and exports a configuration file that provides the settings needed to complete the federated single sign-on connection from PingFederate. If you’re using Azure AD Connect and have the configuration file, proceed to install and configure PingFederate to complete your setup. |
Configuring a federated domain
Add a new federated domain for your account.
About this task
After signing up for Office 365, the only domain associated with your account is the onmicrosoft.com subdomain chosen during registration, such as contoso.onmicrosoft.com. To enable single sign-on (SSO) to Azure AD and Office 365, you should have another domain added to the environment.
If you’ve already added and verified such a domain, skip to Step 2.
|
Running the Azure AD Connect tool and following its prompts makes these required configuration changes automatically. The steps outlined here can be run manually if required. |
Steps
-
Add a federated domain to your account: Authenticate to Office 365 using the
Connect-MsolServicePowerShellcmdletand enter the same credentials used when authenticating to the Microsoft Online Services portal.Choose from:
-
Add a new domain using Azure AD or Office 365 Admin Portals. Learn more in the following sections of the Microsoft documentation:
-
Add a new domain manually with PowerShell.
You can load this and the other
cmdletsdescribed here by launching PowerShell from the Microsoft Azure Active Directory Module for Windows PowerShell desktop and Start menu shortcuts.-
To add a new domain, run the
New-MsolDomain -Name <name> -Authentication Managedcommand. -
To get DNS verification records for the new domain, run the
Get-MsolDomainVerificationDns -DomainName <name>command. -
To prove that you control the domain, use the output of the
Get-MsolDomainVerificationDNScommand to create a.txtrecord on the DNS server of the domain used in the previous step.This server must be accessible over the Internet so that Microsoft servers can resolve and access them.
The DNS record name should match the Domain Name and the DNS record value should be
MS=<ms portion of the Label>.The following is an example from the
Get-MsolDomainVerificationDNScommand.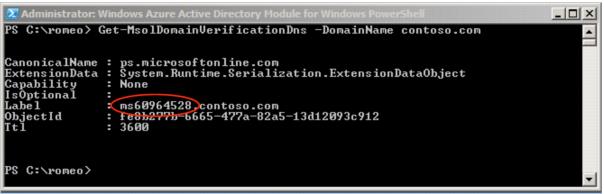
Creating a DNS record value can vary between different DNS host providers. Learn more about how to Add a domain to Microsoft 365 in the Microsoft documentation.
Example Values for Creating a Text Record Record Type Alias or hostname Destination or Points to Address TTL .txt@ or jkdoctest.comMS=ms600163961 HourMX@ or jkdoctest.comMs60016396.msv1.invalid.outlook.com1 Hour -
To prove your control of the domain, run the
Confirm-MsolDomain -DomainName <name>command.
-
-
-
Complete the steps in Enabling federated authentication.
-
Complete the steps in Configuring multiple domains.
-
To verify that the domain settings are up to date and in effect, run the
Get-MsolDomainFederationSettings -DomainName <name>command. -
To change domain settings after the domain is created and verified, run the
Set-MsolDomainFederationSettings -DomainNamecommand with extra arguments for the settings that you want to change.
Enabling federated authentication
The default authentication type in the Azure AD or Office 365 domain is managed, which means that access is provided only for Azure AD cloud user identities. To allow usage of the on-prem user accounts, change the authentication type to federated.
About this task
|
Running the Azure AD Connect tool and following its prompts makes these required configuration changes automatically. The steps outlined here can be run manually if required. |
You can complete the configuration manually using the Set-MsolDomainAuthentication PowerShell cmdlet. When you run it, you must provide the URLs for PingFederate, the public portion of its signing certificate, and some other inputs.
|
The |
Steps
-
Export the signing certificate from PingFederate:
-
Go to Server Configuration > Signing & Decryption Keys & Certificates.
-
Export the applicable signing certificate to the local file system, such as
C:\temp\pf-signing.crt. -
When prompted, select Certificate Only.
-
-
Use PowerShell to remove unnecessary lines from the certificate file and configure federation for your Azure AD domain.
Example:
$certFile = "C:\temp\pf-signing.crt"
$cert = [IO.File]::ReadAllText($certFile)
$cert = $cert.replace("-----BEGIN CERTIFICATE-----","")
$cert = $cert.replace("-----END CERTIFICATE-----","")
$cert = $cert.replace("`r","")
$cert = $cert.replace("`n","")
$domainName = "<Federated Domain Name>"
$hostName = "<Hostname>.$domainName"
$port = 9031
${pingfed} = "https://${hostName}:$port"
$brandName = "<Federated Domain Alias>"
$issuer = "<WS-Federation Realm or Virtual Server ID>"
$spId = "urn:federation:MicrosoftOnline"
$activeLogOn = "$pingfederate/idp/sts.wst"
$logOff = "$pingfederate/idp/prp.wsf"
$metaData = "$pingfederate/pf/sts_mex.ping?PartnerSpId=$spId"
$passiveLogOnPF="$pingfederate/idp/prp.wsf"
Set-MsolDomainAuthentication -Authentication Federated -DomainName
"$domainName" -ActiveLogOnUri  "$activeLogOn" -FederationBrandName
"$brandName" -IssuerUri "$issuer"  -LogOffUri "$logOff" -MetadataExchangeUri
"$metaData" -PassiveLogOnUri  "$passiveLogOnPF" -SigningCertificate "$cert"
Learn more about the
Set-MsolDomainAuthenticationcommand in Set-MsolDomainAuthentication in the Microsoft documentation. -
To verify that the domain settings are up-to-date and in effect, run the
Get-MsolDomainFederationSettings -DomainName <name>command.If you have multiple subdomain accounts in Office 365, you can connect to them in one service provider (SP) connection using multiple virtual server IDs in PingFederate 7.2 or later.
Configuring multiple domains
About this task
A single PingFederate server connection can support multiple Azure AD and Office 365 domains. This functionality relies on using Virtual Server ID (VSID) feature.
The VSID value overrides the WS-Federation Realm value configured in the server settings. It should be created for each domain you’re going to federate with and added to the connection configuration.
The same VSID value should be used for the IssuerURI parameter while configuring federation settings on the Azure AD side. The encoded VSID value should be added to all endpoint URIs, so the incoming requests can be processed correctly by the PingFederate server.
|
If you use the Azure AD Connect wizard to federate with PingFederate server, it generates the VSID value for each specified domain. This parameter is listed in the configuration file, which should be exported from the wizard to obtain required PingFederate server settings. The Azure AD Connect wizard adds the encoded VSID value to all corresponding URIs while completing the Azure AD side configuration. |
In a situation where you decide to use manual configuration, if both the engineering and marketing departments of contoso.com have their own departmental subdomains, engineering.contoso.com and marketing.contoso.com, they are both registered in Azure AD or Office 365 under the parent domain, contoso.com. As an example, their IssuerUri values are Engineering and Marketing, respectively.
|
When you run the |
Steps
-
Construct a JSON object containing a key-value pair of the virtual server ID in the format of
{"vsid":"<VirtualServerIdValue>"}.Example:
{"vsid":"Engineering"} -
Base64url-encode the JSON object.
Example:
eyJ2c2lkIjoiRW5naW5lZXJpbmcifQ -
Insert the base64url-encoded value between
/idpor/pfand the rest of the respective endpoint forActiveLogOnUri,LogoffUri,PassiveLogOnUri, andMetadataExchangeUri.Example:
$activeLogOn = “$pingfederate/idp/eyJ2c2lkIjoiRW5naW5lZXJpbmcifQ/sts.wst” $logOff = “$pingfederate/idp/eyJ2c2lkIjoiRW5naW5lZXJpbmcifQ/prp.wsf” $metaData = "$pingfederate/pf/eyJ2c2lkIjoiRW5naW5lZXJpbmcifQ/sts_mex.ping?PartnerSpId=$spId" $passiveLogOnPF = “$pingfederate/idp/eyJ2c2lkIjoiRW5naW5lZXJpbmcifQ/prp.wsf” -
Repeat step 1-3 for each subdomain.
Learn more about base64url in RFC 4648 on the Internet Engineering Task Force (IETF) website.