Configure Lucidchart for SSO
Before you begin
To configure Lucidchart for SSO you will require metadata from your PingFederate Identity Provider (IdP) setup. For more information, see Exporting selected SAML metadata in the PingFederate documentation.
To export your IdP metadata:
-
Go to Server Configuration > Metadata Export.
-
On the Metadata Mode screen, choose Select information to include in metadata manually and click Next.
-
On the Protocol screen, click Next.
-
On the Attribute Contract screen, click Next.
-
On the Signing Key screen, select the PingFederate signing certificate for use and click Next.
-
Follow the rest of the workflow to export a metadata XML file, including selecting the certificate to sign the metadata XML file in the Metadata Signing screen (as needed).
To configure Lucidchart for SSO:
|
For more information on how to set up SSO for Lucidchart, see SAML and SCIM: An Overview in the LucidChart documentation. |
Steps
-
Log into your Lucidchart account as an administrative user for your organization.
-
Go to Team > App Integration > SAML.
-
Select the checkbox for Enable SAML Integration.
-
Enter your Lucidchart account domain in the Domain field under the section Lucidchart Sign in URL.
Enter the domain only, not a full URL. The SAML integration will use your domain to generate a Lucidchart sign-in URL that will be provided to PingFederate. For example, if you enter acme.com as your domain, the URL will be https://www.lucidchart/saml/sso/acme.com. A user may go directly to this URL to initiate SAML single sign on.
-
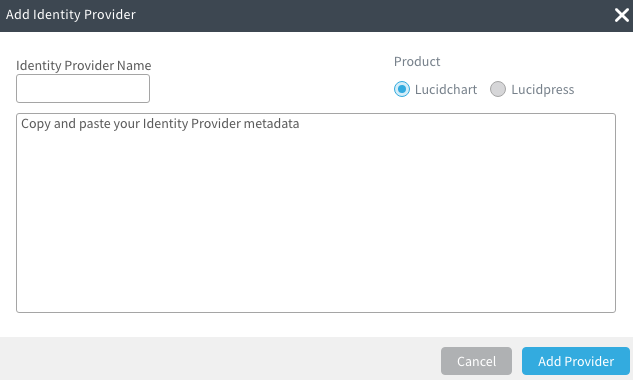
Under the Identity Providers section, select Add Identity Provider.
-
Open your IdP metadata
.xmlfile using a text editor. Copy the text from the.xmlfile and paste it into the text box under Identity Provider Metadata. -
Provide a description for Identity Provider Name, select the product Lucidchart and click Add Provider.

-
Under Download Service Provider Metadata, select Download Metadata and Save changes.
