Editing an application - OIDC
Use the Applications page to edit existing OpenID Connect (OIDC) applications.
Steps
-
In the PingOne admin console, go to Applications > Applications and browse or search for the application that you want to edit.
-
Click the application entry to open the details panel.
-
On the Overview tab, click the Pencil icon () and enter or edit the following:
Field Description Application Name
A unique identifier for the application. The maximum name length is 256 characters.
Description (optional)
A brief description of the application.
Icon (optional)
An image that represents the application.
Use a file up to 1 MB in JPG, JPEG, GIF, or PNG format.
Home Page URL
The default home page for the application.
Signon URL
The URL to which the application redirects the end user for sign-on.
To avoid issues with third-party cookies in some browsers, we recommend that you use a custom domain to give your PingOne environment the same parent domain as your authentication application. Learn more in Domains.
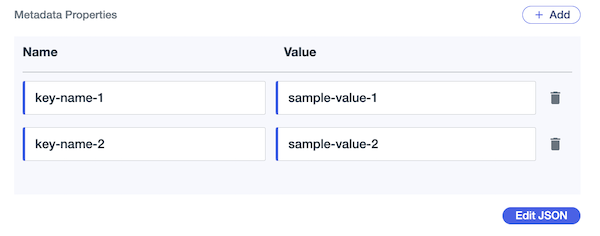
Metadata Properties (optional)
Add metadata for administrative purposes only, such as contact information or other properties for internal tracking.
To add properties, click Add and do either of the following:
-
Enter a Name and Value in the corresponding fields.
-
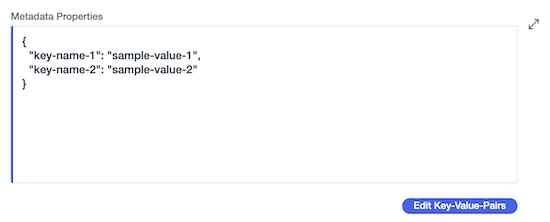
To add complex properties that include JSON object values or to directly write properties as JSON, click Edit JSON and add the key-value data in the editor.
-
To switch back to the field view, click Edit Key-Value-Pairs.
-
You can’t add metadata properties to the built-in system applications in PingOne, such as the PingOne Admin Console, PingOne Application Portal, and PingOne Self-Service - MyAccount applications.
-
To define more than 10 custom properties, you must use the JSON editor.
-
If you define fewer than 10 properties in the JSON editor, the Overview tab displays them in the Name and Value columns. Otherwise, they’re displayed as JSON.
-
If you include a JSON object for any property value in the JSON editor, the Overview tab displays the properties as JSON.
-
-
-
Click Save.
-
On the Configuration tab:
-
View or copy the following:
Field Description Environment ID
The identifier for the environment that contains the application.
Client ID
The unique identifier for the application.
Client Secret
The shared secret for the application. Ensure that you protect the client secret and store it in a secure location.
Generate New Secret
Update the client secret and select how long to retain the previous secret in the confirmation modal.
To revoke the previous client secret, click Revoke Previous Client Secret. Learn more in Rotating the client secret for an application.
Get Access Token
View or copy the access token for the application. Learn more in Getting an access token.
The application must be enabled to get the access token.
-
Click and enter or edit the following:
Field Description Response Type
Select Code, Token, or ID Token for the response type.
Learn more in Response types.
Grant Type
Select Authorization Code, Implicit, Client Credentials, CIBA, Refresh Token, or Token Exchange for the grant type.
Learn more in Grant types.
PKCE Enforcement
Select a value for PKCE code challenge enforcement. This value determines how the application creates the code challenge from the code verifier.
Learn more in PKCE enforcement.
PKCE enforcement is only available for the authorization code grant type.
Refresh Token configuration
Select this option to enable the Refresh Token grant type. You can specify the following:
- Refresh Token Format
-
The type of refresh token PingOne issues for the application in exchange for an expired access token:
-
Opaque Token: Contains a unique, unreadable string and doesn’t require a digital signature. This will be the only refresh token type issued after March 1, 2027.
-
JSON Web Token: Contains claims and information about the user’s authentication status, and requires a digital signature. This option is only available until March 1, 2027, after which it will be deprecated.
Learn more about the timeline for JWT deprecation in Refresh tokens.
-
- Refresh Token Duration
-
The lifetime of the refresh tokens. The default value is 30 days. Valid values are between 60 seconds and 1826 days (for Opaque Token).
- Refresh Token Rolling Duration
-
How long the application can use the refresh token grant type to obtain a new access token and a new refresh token after the most recent user authentication event. The default value is 180 days. Valid values are between 60 seconds and 1826 days (for Opaque Token).
Refresh Token Rolling Duration must be longer than or equal to the Refresh Token Duration.
- Refresh Token Rolling Grace Period
-
The amount of time that a rolled refresh token remains valid if the client failed to receive an updated one during a roll. Valid values are between 0 and 86,400 seconds (24 hours). A value of
0means that a refresh token becomes invalid after it’s rolled.
Redirect URIs
The address to which PingOne forwards the OIDC response after authentication.
The Redirect URI can’t contain a fragment component, such as
#somedata. Learn more in Redirection endpoint in the IETF documentation.Allow Redirect URI Patterns
Use a wildcard for flexibility in managing redirect URIs. Learn more in Redirect URIs.
Token Endpoint Authentication Method
Select one of the following:
-
None
-
Client Secret Basic
-
Client Secret Post
-
Client Secret JWT
-
Private Key JWT
Learn more in Token endpoint authentication methods.
JSON Web Key Set Method
Select JWKS URL or JWKS. Provide either the URL where PingOne can retrieve the JSON Web Key Set (JWKS) or the web key set itself. You can paste the JSON in one line or multiple lines.
JWKS Method is required for an application to send asymmetrically signed request objects. To use Private Key JWT for Token Endpoint Authentication Method, PingOne reuses the same JWKS URL or JWKS to process the private key JSON Web Token (JWT).
-
If Token Endpoint Authentication Method is set to Private Key JWT, you must provide the JWKS Method.
-
If Token Endpoint Authentication Method is set to None, Client Secret Basic, Client Secret Post, or Client Secret JWT, if the JWKS Method is not provided and the application sends an RS256/384/512-signed request object to PingOne, PingOne returns an error.
Require Pushed Authorization Request
Require the application to send its authorization requests directly to PingOne, without going through the browser, which can safeguard sensitive information from end-user devices. If Require Pushed Authorization Request isn’t selected, the application can send plain authorization requests or pushed authorization requests. Learn more in Pushed authorization requests.
Pushed Authorization Request Reference Timeout
Specify how long the pushed authorization request should be valid. The default value is 60 seconds.
Initiate Login URI
The application’s login initiation endpoint for third parties to begin the sign-on process for the application.
If provided, PingOne redirects users to this URI to initiate SSO to PingOne. The application is responsible for implementing the relevant OIDC flow when the Initiate Login URI is requested.
Learn more in Initiating Login from a Third Party in the OIDC specification. This URI is required if you want the application to show in the PingOne Application Portal. Learn more in Application portal.
Target Link URI
The URI for the application. If provided, PingOne redirects application users to this URI after the user is authenticated.
Signoff URLs
The URLs to which the browser can be redirected after user signs off from the application.
If you include a
post_logout_redirect_uriquery parameter in the/signoffrequest, with the same value that was set in the application, the browser will redirect the user to the matching URL.Request Parameter Signature Requirement
Specify how the application sends the optional
requestparameter in its authorization requests.Click Compare Options for a description of the different settings.
-
Default: Allow the application to send authorization requests with or without the
requestparameter. If using the request parameter, the application must include a digital signature. -
Require signed request parameters: Requires the application to use the
requestparameter and include a digital signature of it in its authorization requests. -
Allow unsigned request parameters: Allows the application to send authorization requests with or without the
requestparameter. If using therequestparameter, including a digital signature is optional for the application.
Learn more in Request Parameter Signature Requirement.
Additional Refresh Token Replay Protection
Outside of the optional rolling grace period, refresh tokens are intended for one-time use. For increased security, enable this option so that PingOne can invalidate both access and refresh tokens when a refresh token is reused. Learn more in Refresh token rotation.
Token Header Options
-
Select Include the x5t parameter in the header of access tokens, ID tokens, and JWT-based refresh tokens if the application, custom resource, or both require the
x5tparameter in the digital signature verification process. Thex5tparameter acts as a fingerprint for the X.509 certificate and provides increased security by identifying the specific key used to sign the token. -
Select Include the typ parameter in the header of access tokens for PingOne to include the
typheader parameter with a value ofat+jwtwhen minting access tokens for theUserInfoendpoint, PingOne APIs, and custom resources.The
typparameter identifies the type of token and ensures the application handles the token correctly, and theat+jwtvalue indicates the purpose of the JWT as an OAuth 2.0 access token, providing increased security and preventing misuse.Beginning March 2, 2027, the Include the x5t parameter in the header of access tokens, ID tokens, and JWT-based refresh tokens setting will be discontinued, and PingOne will always include the parameter with the
at+jwtvalue when minting access tokens for theUserInfoendpoint, PingOne APIs, and custom resources. To avoid service disruptions, you must validate and update your applications and custom resources before this date to handle this parameter always being included in access tokens.
OpenID Connect Session Management
Facilitate OIDC session management by allowing applications in the same browsing mode, such as private or normal browsing mode, to monitor the PingOne user session. Only applications running in the same browsing mode can monitor the PingOne user session.
To use this option, your PingOne environment must be configured with a custom domain, such as
sso.example.com, and the applications must be accessible under that domain. For example,apps.example.com/app1andapps.example.com/app2orapp1.example.comandapp2.example.com. Learn more in Setting up a custom domain.When enabled, the
session_stateparameter is included in the PingOne authorization response with the session status, such asunchanged,changed, orerror. Learn more in OIDC session management in the PingOne API documentation and Best practices: Session management.-
The default idle timeout is 30 days. To set an idle timeout of fewer than 30 days:
-
Build a PingOne DaVinci flow that includes the Return Success Response (Redirect Flows) node from the PingOne Authentication connector.
-
In the Return Success Response (Redirect Flows) node, set the Idle Timeout value to the desired amount of time, such as 5 minutes.
-
Assign the flow to the applicable applications.
-
-
If a user session is deleted because of a PingOne session API request or is purged by the system, it doesn’t trigger a
changedresponse.
Request scopes to access multiple resources
Enable this option to allow the application to request scopes from multiple custom resources in a single request.
To use this option, any custom resources that the application requests access to must have the following configurations across all requested custom resources:
-
Overview tab: Access token time to live must be set to the same value.
-
Attributes tab: The mapping configuration of the
subattribute must be the same. -
Attributes tab: Any other attribute using the same name in multiple custom resources must have the same mapping configurations.
-
Scopes tab: The scope names must be unique so that PingOne can determine which custom resource and associated scope that the application is attempting to access.
-
Permissions tab: For environments with PingOne Authorize, permissions names must be unique if Include user permissions in access tokens is enabled.
If any of these configurations aren’t consistent across the requested custom resources, the request results in an error.
Terminate User Session by ID Token
Enable this option to allow the application to send requests for PingOne to terminate end-user sessions at the
/idpSignoffendpoint using only the ID token.The audience claim value in the ID token must match the client ID of the application so that PingOne can identify the session to be terminated. The application is not required to have access to the session token cookie.
Learn more in the PingOne API documentation.
CORS Settings
Specifies the cross-origin resource sharing (CORS) options for the application. Learn more in CORS.
-
Allow any CORS-safe origin (default): Allows the application to receive requests from any domain for safe calls, while disallowing all domains for unsafe calls.
-
Safe calls are CORS requests to API endpoints that are either public (for example,
/as/jwks) or private and require an explicit credential (for example,/as/token). -
Unsafe calls are CORS requests to API endpoints that require an implicit browser credential, such as cookies, and return sensitive information, such as access tokens (for example,
/as/authorize). By default, PingOne blocks all CORS requests to unsafe endpoints to prevent cross-site request forgery (CSRF) attacks.
-
-
Allow specific origins: Allows the application to receive both safe and unsafe calls from a specific trusted origin.
-
Allowed origins: Specifies the allowed origin domains for CORS. You can specify a domain pattern or a valid IPv4 address. If you use a domain pattern, you can specify one wildcard to match incoming requests.
You can’t use the wildcard on the domain name.
For example, the following search patterns are valid:
-
https://*.test.com -
https://www.app*.test.com
The following patterns are not valid:
-
https://test*.com -
https://www.app.test*.com
-
-
-
Disallow all origins: Don’t allow the application to receive requests from a cross-origin domain.
After you make changes to the CORS Settings, it can take several minutes for the new settings to take effect because of time-to-live configuration on the resource.
-
-
Click Save.
-
On the Resources tab, click and select the checkboxes to add appropriate OAuth scopes for the application. Click the Selected scopes tab to see the scopes that are currently selected for the application.
The OAuth scopes determine the resources that the application can access. If you add OIDC scopes here, the application inherits the attributes associated with that scope.
If the application uses the refresh token grant type, add the
offline_accessscope to enable the application to request a refresh token from PingOne on a per-request basis. For example, when the application needs a refresh token, it includes theoffline_accessscope in its request, and PingOne includes a refresh token in its token response. However, when the application doesn’t need a refresh token, it doesn’t include the scope in the request, and PingOne therefore doesn’t include a refresh token in its token response. If theoffline_accessscope is not added to an application that uses the refresh token grant type, PingOne always includes a refresh token in its token response, whether the application needs a refresh token or not.To customize the lifetime of access tokens for applications, you must configure a custom resource, set the desired access token lifetime, and then add those scopes to the application. Learn more in Customizing access token lifetime.
-
Click Save.
-
On the Policies tab, click and select the authentication policies for the application.
If you have a DaVinci license, you can select PingOne policies or DaVinci flow policies, but not both. If you don’t have a DaVinci license, you’ll see PingOne policies only.
To add one or more PingOne authentication policies, click the PingOne Policies tab. If the application was previously configured with one or more DaVinci flow policies, click Deselect all other Policies to remove them from the application and select the PingOne authentication policies you want to apply to the application. PingOne authentication policies are applied in the order in which they appear in the list. Click the Selected PingOne Policies tab, reorder the policies as needed, then click Save.
To add one or more DaVinci flow policies, click the DaVinci Policies tab. If the application was previously configured with one or more PingOne authentication policies, click Deselect all other Policies to remove them from the application and select the DaVinci flow policies you want to apply to the application. PingOne applies the first DaVinci flow policy in the list. Click the Selected DaVinci Policies tab, reorder the policies as needed, then click Save.
For OAuth-based applications, you can specify another policy in the
acr_valuesparameter in the authorization request. Theacr_valuesparameter specifies the sign-on policies that PingOne should use for authentication. You can include any policies assigned to the application. Specify either a single DaVinci policy by flow policy ID or one or more PingOne policies by name, separated by spaces or the encoded space character%20. For example,acr_values=d1210a6b0b2665dbaa5b652221badba2oracr_values=Single_Factor%20Multi_Factor.Learn more in Authentication policies for applications.
-
Click Save.
-
On the Attribute Mappings tab, click , select a PingOne user attribute, and map it to an attribute in the application that you’re adding.
Learn more in Customizing OIDC attributes for an application.
-
Enter an application attribute and then select the corresponding PingOne attribute in the list.
-
Click the Gear icon () to use the expression builder to build an attribute mapping.
Learn more in Using the expression builder.
-
-
Click Save.
-
On the Access tab, click and enter or edit the following:
Field Description Application Portal Display
Determines whether an application icon appears in the application portal, even if the user would see the application in the application portal based on the group membership policy. Learn more in Application access control.
Admin Only Access
Specifies that a user with an administrator role is required to access the application. The user must have one of the following roles:
-
Organization Admin -
Environment Admin -
Identity Data Admin -
Client Application Developer
Group Membership Policy
Select the group membership policy for the application. Learn more in Groups.
-
-
Click Save.
-
(Optional) For Workforce MFA use cases, to connect the OIDC application to your PingFederate instance, download the OIDC application properties file and upload it to the relevant PingID adapter instance in PingFederate.
Learn more in Configuring a PingID adapter instance.
-
To enable the application, click the toggle at the top of the details panel to the right (blue).
You can disable the application by clicking the toggle to the left (gray).
If you selected Response Type = Code and Grant Type = Authorization Code, there is also an Integrate tab that you can use to test your configuration. Generate code snippets from this tab and copy them into a web application so that you can ensure that the authorization and authentication configuration is working as intended.