PingOne

Version history

Version History provides a linear history of changes made to policies and Trust Framework definitions and enables you to publish versions to decision endpoints.

Versions are sorted to display the most recent changes first.
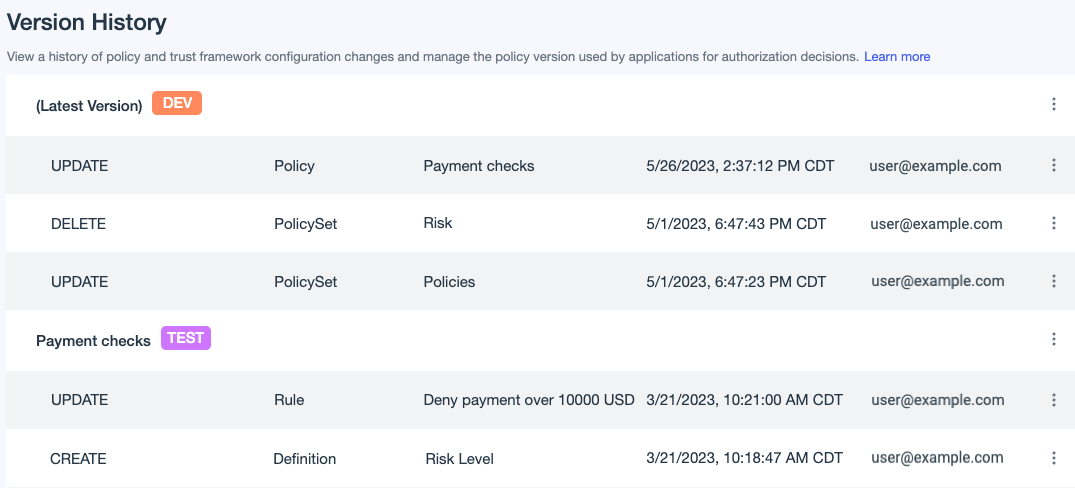
Screen capture of Version History showing the type of change, entity type, entity name, timestamp, and the user’s email address for each version.

The following information is shown for each version:

Column Description

Action

The type of change made.

Object

The type of object that changed. This can be a policy, policy set, rule, statement, or definition. Definition includes changes to attributes, services, conditions, and processors.

Name

The name of the object that changed.

Timestamp

The date and time the change was made.

Use

The email address of the user who made the change.

To help you track changes, you can name any version. When you reach policy development milestones, you can publish notable points in the version history to decision endpoints. When a named version is no longer published to any endpoints, you can remove the name from the version.

Each environment can have up to 100 named versions and 500 unnamed versions. The maximum data size for each version is 7 MB.

Changes to decision endpoints that have corresponding API services are listed under version names that begin with API Access Management.

Screen capture showing the API Access Management Policies version for the Meme Game.

Do not rename these versions. Instead of publishing these versions, deploy the API service.

Publishing a version

You can publish notable points in Version History in order to deploy policies and Trust Framework definitions to decision endpoints.

About this task

Publishing a version is like saving a snapshot of your policies and Trust Framework definitions. The published version reflects the state of these objects at a specific point in time.

By default, PingOne Authorize provides three decision endpoints for every environment: Dev, Test, and Prod. You can publish a version to multiple decision endpoints, but each decision endpoint can have only one version published to it at a time. The version is replaced each time you publish to an endpoint. If an endpoint is set to use the latest version, updated versions are published to it automatically.

Ensure that your policies and Trust Framework definitions are thoroughly tested before you publish them to the Prod endpoint and use them in production.

Steps

  1. Go to Authorization → Version History.

  2. Click the More Options (⋮) icon next to the version that you want to publish and select Publish Version.

    Screen capture showing the Publish Version option in the More Options menu.

    Do not publish versions with names that begin with API Access Management. Instead, deploy the API service to publish these changes.

  3. In the Publish to list, select an endpoint.

  4. For version Name, enter a name that makes the version easy to identify.

    If there’s already a name, you can keep it or update it. The name is used as a tag in audit events.

  5. Click Publish.

    Result:

    The version name and the endpoints that the version is published to are displayed in Version History.

Naming a version

Track notable updates to policies and Trust Framework definitions by giving them a version name.

About this task

You can name a version whether you decide to publish the version or not. You can also change the name of a version. Version naming is optional.

Do not name or rename versions that begin with API Access Management. Instead, manage these versions by deploying the corresponding API service.

When a named version is no longer published to any endpoints, you can remove the name from the version. For example, you might remove the name from an older version after you deploy a new version that corrects errors in the older version.

Steps

  1. To name a version:

    1. Go to Authorization → Version History.

    2. Click the More Options (⋮) icon next to the version that you want to name and select Name.

      Screen capture of Version History with the Name option selected from the More Options menu.
    3. In the Name Version window, enter a version name, and then click Name.

  2. To rename a version:

    1. Click the More Options (⋮) icon next to the version that you want to rename and select Rename.

      Screen capture of Version History with the Rename option selected from the More Options menu.
    2. In the Rename Version window, change the version name, and then click Rename.

  3. To remove a version name:

    1. Click the More Options (⋮) icon next to the version with the name that you want to remove and select Remove Name.

    2. In the Remove Name window, click Remove Name.