Creating a Workday connection
Use the Provisioning page to create a connection between a Workday identity store and PingOne.
Before you begin
Make sure you have:
-
An existing Workday tenant.
-
The hostname for the Workday tenant. Learn more in Identifying your Workday hostname.
-
An Integration System User account in Workday. Learn more in Creating a Workday Integration System User.
-
A write-back provisioning in your configuration, learn more in Configuring write-back provisioning.
-
Reviewed the limitations of the Workday provisioner. Learn more in Workday provisioner known limitations.
-
An Integration System created in Workday to enter your Integration System IDs. Learn more in Creating a Workday Integration System with a Field Override Service.
Steps
-
In the PingOne admin console, go to Integrations > Provisioning.
-
Click and then click New Connection.
-
On the Identity Store line, click Select.
-
On the Workday tile, click Select. Click Next.
-
Enter a name and description for this provisioning connection.
Result:
The connection name appears in the provisioning list after you save the connection.
-
Click Next.
-
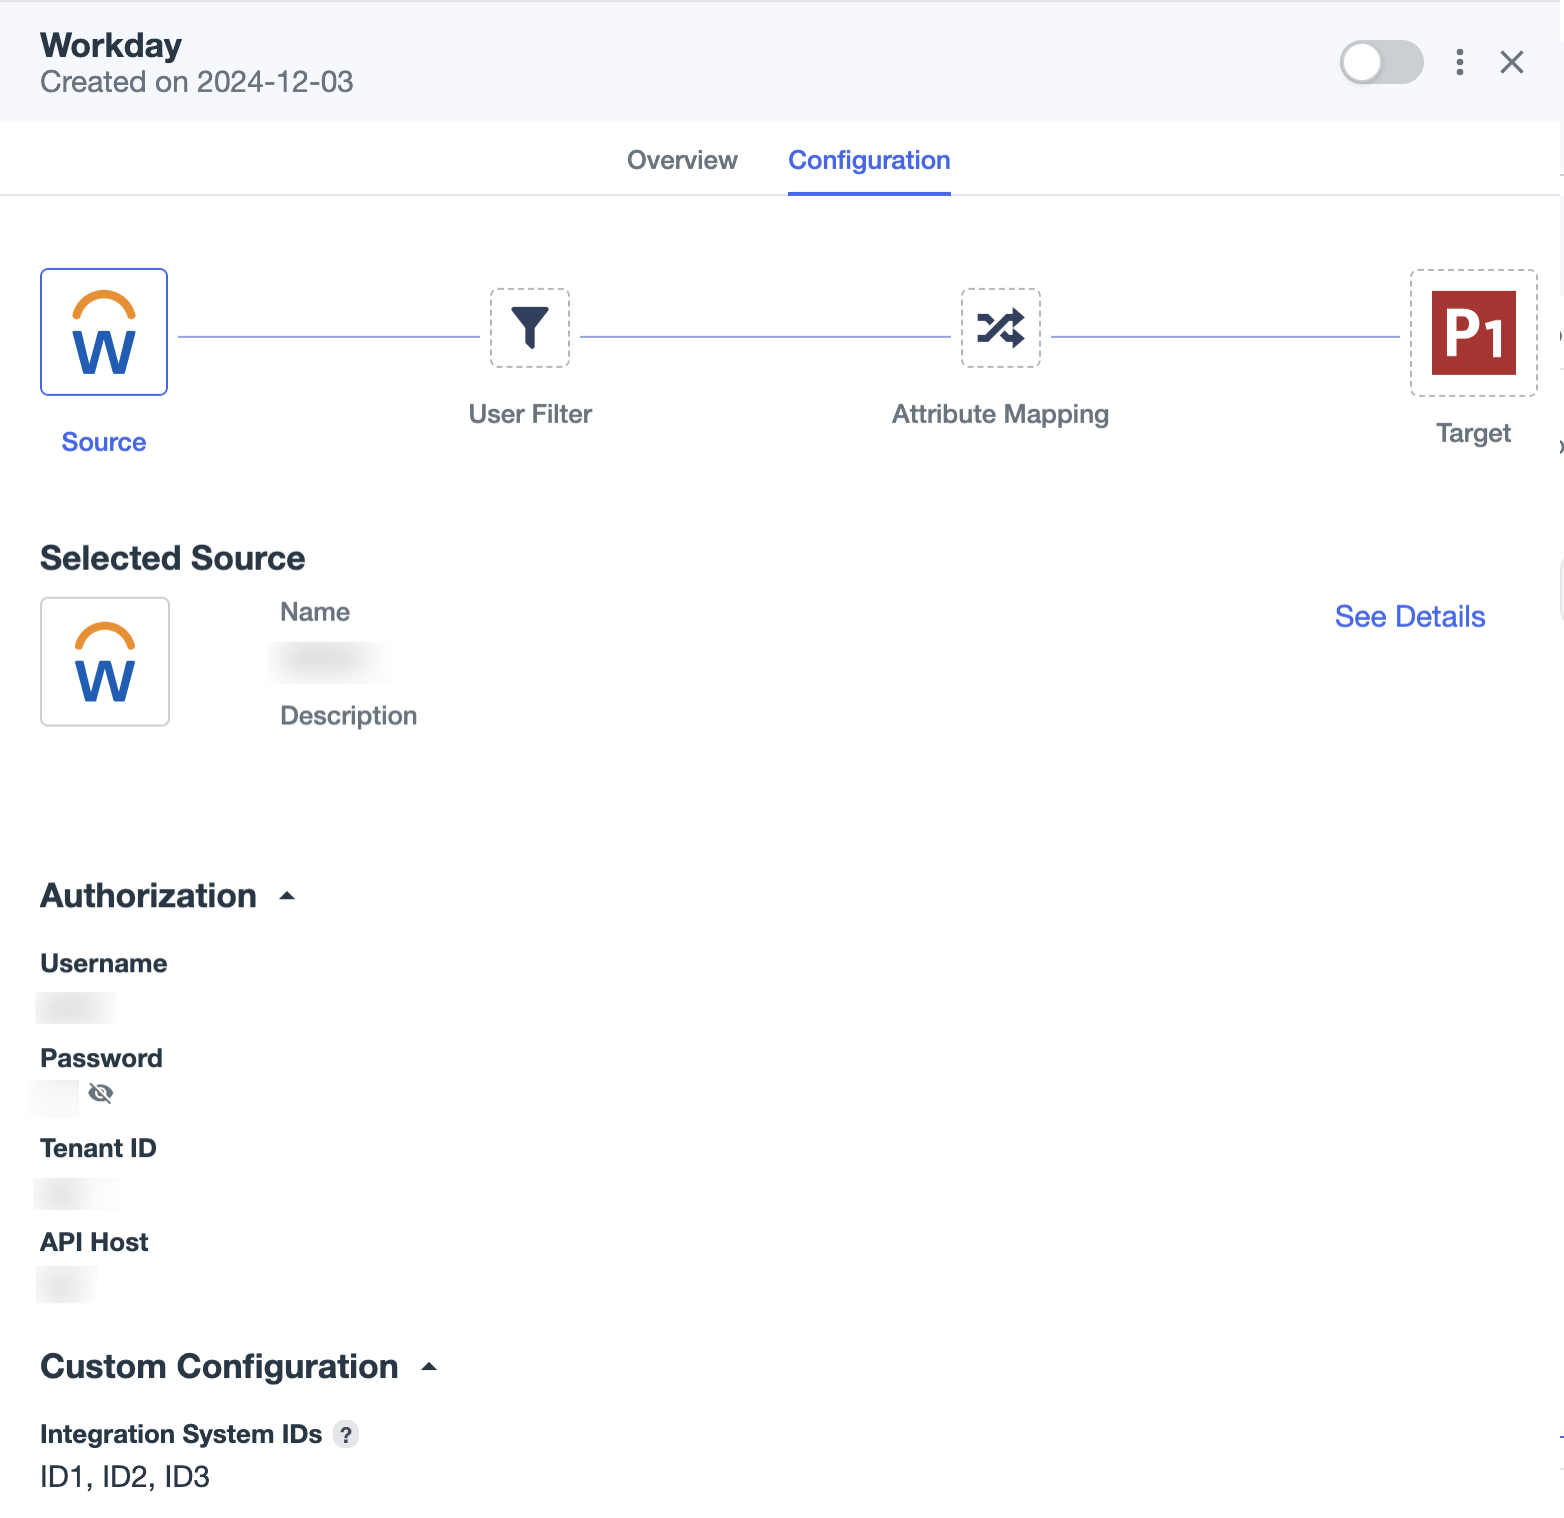
In the Configure Authentication section, enter the values for the following fields:
Field Value User Name
The Workday Integration System User account. Learn more in Creating a Workday Integration System User.
Password
The password for the Workday Integration System User account.
Tenant ID
The name of your Workday tenant. To find the tenant name, start Workday and go to Edit Tenant Setup - Security. The tenant name is shown in the list.
API host
The hostname, including subdomain, for your Workday tenant. For example,
<your_subdomain>.workday.com. Learn more about finding the hostname in Identifying your Workday hostname. -
Click Test Connection to verify that PingOne can establish a connection to Workday.
Result:
If there are any issues with the connection, a Test Connection Failed modal opens. Click Continue to resume the setup with an invalid connection.
You can’t use the connection for provisioning until you’ve established a valid connection to Workday. To retry, click Cancel in the Test Connection Failed modal and repeat step 7.
Troubleshooting:
Learn more about troubleshooting your connection in Troubleshooting Test Connections Failure.
-
Click Next.
-
In the Configure Preferences section, enter the Integration System IDs to sync custom attributes from your Workday Integration Systems. To find the Integration System IDs, view your Integration System in Workday and click the list next to System ID.
You can add mulitple Integration System IDs, separated by commas.
-
Click Save.
-
To enable the connection, click the toggle at the top of the details panel to the right (blue).
You can disable the connection by clicking the toggle to the left (gray).
Result
The Workday provisioning connection is added to the list of connections on the Provisioning page.
Next steps
Define which users are provisioned and how attributes are mapped between PingOne and an external identity store. Learn more in Creating an inbound rule.
Learn more about adding custom attributes from Workday in Adding Workday Integration System IDs to PingOne.
Add custom attributes in Workday and sync them into PingOne. Learn more in Creating a Workday Integration System with a Field Override Service and Syncing custom attributes from Workday into PingOne.
Configuring write-back provisioning
You can configure write-back provisioning from PingOne to the Workday user directory. Use write-back provisioning to update certain user attributes in the Workday user directory. You enable write-back provisioning by setting attribute mappings to bi-directional.
Before you begin
-
To enable write-back provisioning, you must first configure a Workday provisioning connection. See Creating a Workday connection.
-
Configure permissions for the security group you created when you configured the Workday provisioning connection. See Configuring Business Process Security Policy permissions for write-back.
About this task
With bi-directional sync, if an attribute is changed in either directory, the other directory will be updated as well. Changes made in the Workday directory are updated on the next scheduled inbound sync, but changes made in the PingOne directory are updated immediately.
Only native source attributes can be used for write-back provisioning. You cannot use expressions and literal values for write-back provisioning. When you enable bi-directional mapping for an attribute, PingOne automatically adds the required WID (Worker ID) attribute to uniquely identify users within the Workday directory. WID is typically mapped to External ID in PingOne.
|
Some attributes are dependent on other attributes for write-back provisioning. For example, to write back a |

Steps
-
Go to Integrations → Provisioning.
-
Click the Rules tab.
-
Locate the existing Workday inbound provisioning rule, and click the entry to open the details panel.
-
Click the Configuration tab.
-
Click the Attribute mapping button, and then click the pencil icon.
-
Review the default mapped attributes and add any additional attributes.
-
Identify any attributes for write-back provisioning, and then click the directional arrow to toggle between inbound and bi-directional. The arrow changes to a double blue arrow to indicate bi-directional (write-back) provisioning.

-
Ensure that you have enabled write-back for all attributes in the same attribute grouping. For more information, see Workday attribute mapping.
-
Not all attributes support write-back. For attributes that do not support write-back, you will see the message
This
attribute does not support write-back
.
-
-
Click Save.
Next steps
Identifying your Workday hostname
You’ll need the Workday hostname to configure the Workday provisioning connection. You can find it in the WSDL file in your Workday tenant.
Steps
-
Start the Workday application.
-
In the Search bar, enter
Public Web Servicesand click the report. -
In the resulting screen, click the … button, point to Web Service and click View WSDL in the message.
-
In the WSDL file, locate
soapbind:address. -
Copy the hostname from the location element and paste it to a secure location.
When setting up the provisioning connection, you’ll use the hostname, including subdomain, for your Workday tenant. For example,
<your_subdomain>.workday.com.
Creating a Workday Integration System User
For Workday provisioning, PingOne requires an Integration System User in Workday with a minimally scoped set of permissions. PingOne uses this user account to consume data from Workday through the Workday APIs.
Before you begin
You might already have a suitable Integration System User. If not, use the following procedure to add one.
About this task
The Integration System User must be part of an Unconstrained Integration System Security Group with a series of Get Only Domain Security Policies granted to it to access the appropriate worker data. These domains relate to worker data about their employment status, home and work contact information, and organizations to which they belong.
Steps
-
Go to your Workday tenant and enter
create integration system userin the search field. -
Under Tasks & Reports, click Create Integration System User.
-
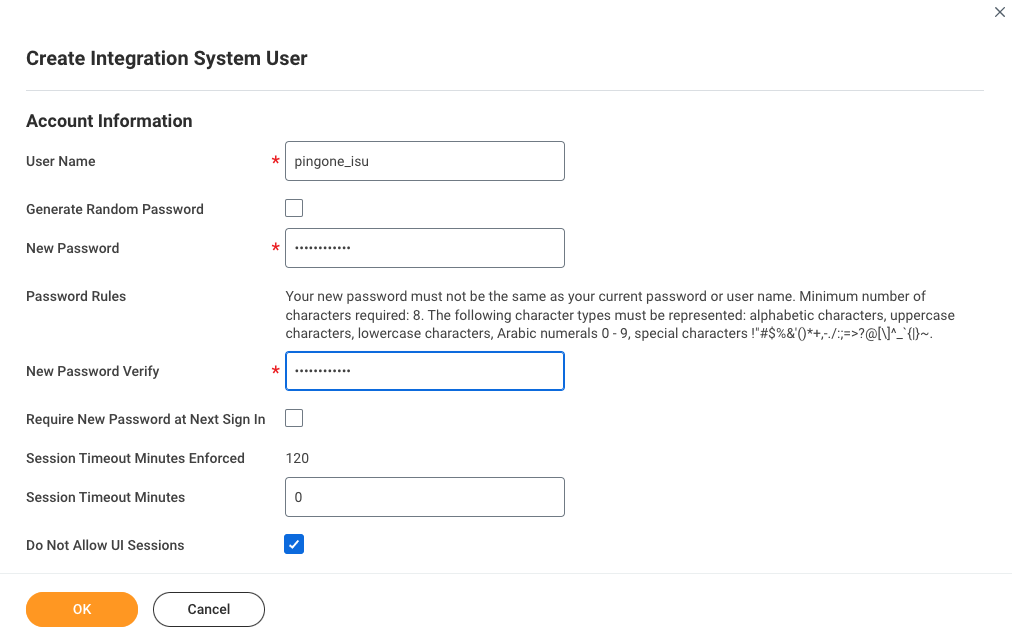
Enter a username and password for the new user.
-
Leave the Require New Password at Next Sign In option clear.
-
For Session Timeout Minutes, enter
0. This option helps avoid any issues with PingOne related to timeouts. -
Select Do Not Allow UI Sessions to prevent this user from signing into Workday.
-
Click OK.
Next steps
Adding the Integration System User to a Security Group
To ensure that the Integration System User can access the appropriate worker data, add it to an Unconstrained Integration System Security Group.
Before you begin
You might already have a suitable Security Group. If not, use the following procedure to add one.
Steps
-
Go to your Workday tenant and enter
create security groupin the search field. -
Under Tasks & Reports, click Create Security Group.
-
For Type of Tenanted Security Group, select Integration System Security Group (Unconstrained).
-
Enter a name for the security group.
-
Click OK.
-
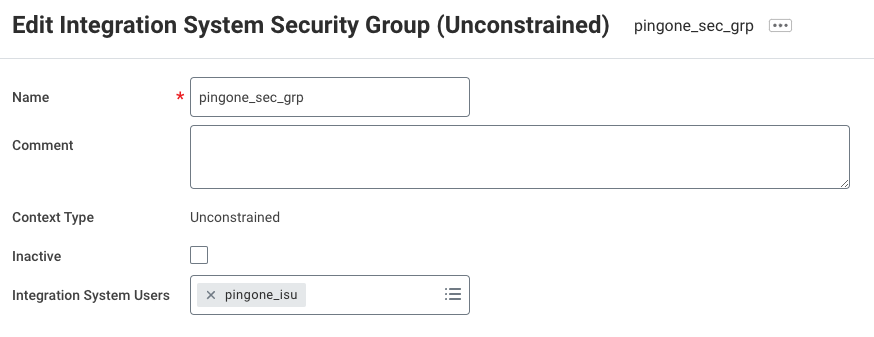
On the Edit Integration Security Group (Unconstrained) screen, add the appropriate user to the group under Integration System Users. You can search or browse for the appropriate user.
-
Click OK.
Next steps
Configuring the Domain Security Policy Permissions for the Security Group
Edit the security group to ensure that it has the appropriate permissions.
Steps
-
Go to your Workday tenant and enter
maintain permissions for the security groupin the search field. -
Under Tasks & Reports, click Maintain Permissions for Security Group.
-
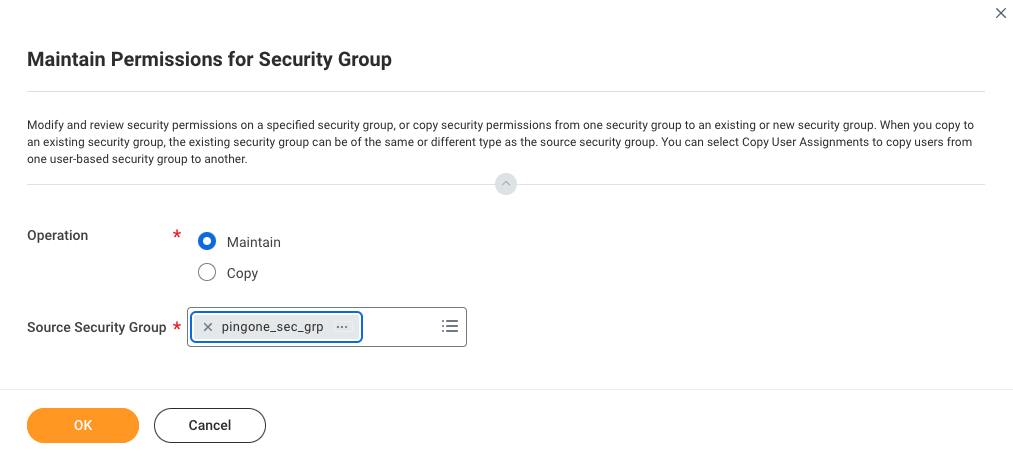
For Operation, click Maintain.
-
For Source Security Group, enter the name of the security group you created earlier.
-
Click OK.
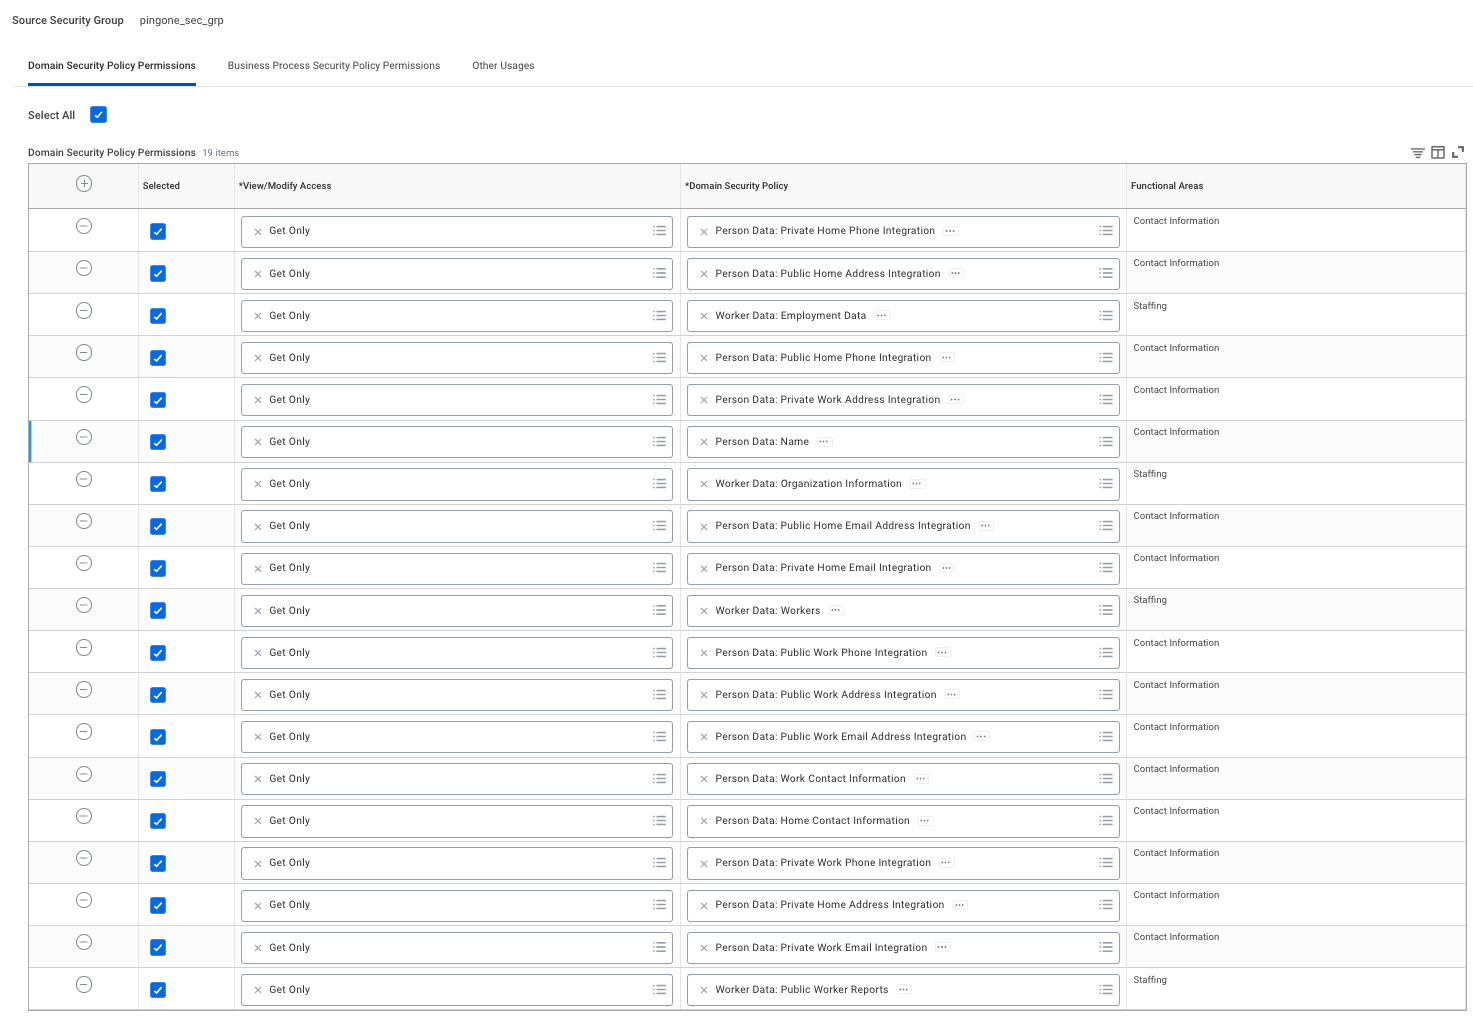
-
On the next screen, under Domain Security Policy Permissions, add a separate row for each required Domain Security Policy. To add a new row click the icon, enter the correct access level (
Get Onlyin all cases) and the Domain Security Policy. Add the Domain Security Policy according to the following table.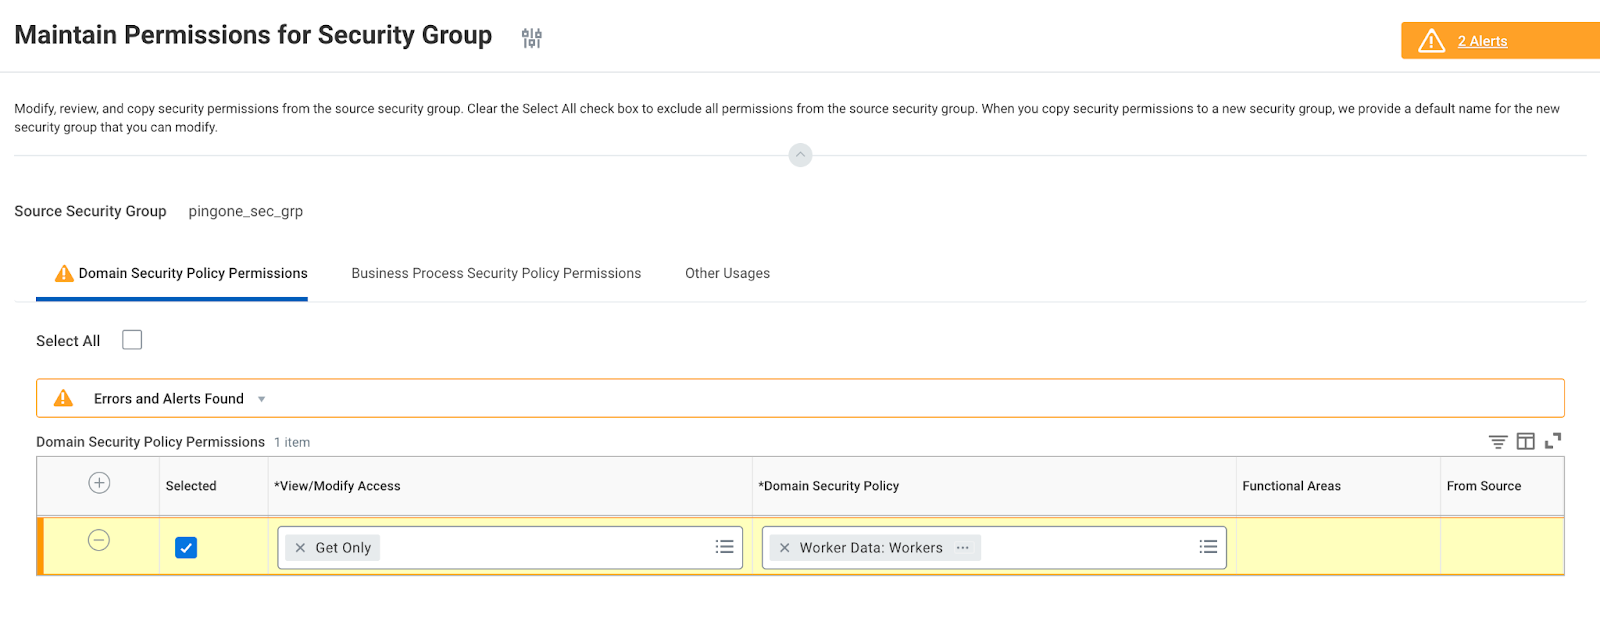
Domain Domain Security Policy Get Only
Worker Data: Employment Data
Get Only
Person Data: Public Home Email Address Integration
Get Only
Person Data: Public Work Address Integration
Get Only
Worker Data: Organization Information
Get Only
Person Data: Public Work Email Address Integration
Get Only
Person Data: Private Work Address Integration
Get Only
Worker Data: Workers
Get Only
Person Data: Private Work Phone Integration
Get Only
Person Data: Private Home Address Integration
Get Only
Person Data: Public Home Address Integration
Get Only
Person Data: Name
Get Only
Person Data: Work Contact Information
Get Only
Person Data: Public Home Phone Integration
Get Only
Person Data: Public Work Phone Integration
Get Only
Person Data: Home Contact Information
Get Only
Person Data: Private Work Email Integration
Get Only
Person Data: Private Home Phone Integration
Get Only
Person Data: Private Home Email Integration
Get Only
Worker Data: Public Worker Reports
-
Click OK.
-
Review that the permissions for the security group contain all the necessary Domain Security Policy options.
-
Click Done.
Next steps
Configuring Business Process Security Policy permissions for write-back
For write-back, you must edit the security group to ensure that it has the appropriate permissions.
Steps
-
Go to your Workday tenant and enter
edit business process security policyin the search field. -
Under Contact information, click Change legal name.
-
Locate the Web service section and add the security group you created earlier.
-
Repeat this process for:
-
Change Home Contact Information
-
Change Work Contact Information
-
-
Click OK.
Next steps
Activating the Security Policy Changes
After you have reviewed the permissions for the group, activate the security policy changes. If you don’t activate the security policy changes, the Integration System User will not have the necessary permissions and PingOne will not be able to sync users from Workday.
Steps
-
Go to your Workday tenant and enter
activate pending security policy changesin the search field. -
Under Tasks & Reports, click Activate Pending Security Policy Changes.
-
Add a comment to describe the security changes and then click OK.
-
Review the pending security policy changes, then select the Confirm checkbox.
-
Click OK.
Next steps
After you have created the Integration System User, added the Integration System User to a security group, configured the Domain Security Policy Permissions for the group, and activated the Security Policy changes, you can create the Workday provisioning connection. See Creating a Workday connection.
Workday attribute mapping
The following table lists the default Workday attributes that can be mapped to PingOne user attributes for user provisioning.
| Attribute | Description |
|---|---|
|
The user’s email address. |
|
The user’s username and Workday sign-on. |
|
The status of the user account in Workday. |
|
The user’s first (given) name. |
|
The user’s middle name. |
|
The user’s last (family) name. |
For inbound provisioning from Workday, LDAP gateway, and SCIM identity stores, you can specify some additional options for onboarding new users. Learn more in Creating an inbound rule and Creating an inbound rule for a connection through an LDAP gateway
The following is an example of how to get user details by SOAP call:
Endpoint:
https://{{workday_host}}/ccx/service/{{tenant}}/Human_Resources/v36.0
XML Request Body:
<?xml version="1.0" encoding="UTF-8"?>
<soapenv:Envelope xmlns:soapenv="http://schemas.xmlsoap.org/soap/envelope/"
                  xmlns:bsvc="urn:com.workday/bsvc"
                  xmlns:wsse="http://docs.oasis-open.org/wss/2004/01/oasis-200401-wss-wssecurity-secext-1.0.xsd">

<soapenv:Header>
  <wsse:Security soapenv:mustUnderstand="1">
   <wsse:UsernameToken>
     <wsse:Username>{{username}}@{{tenant}}</wsse:Username>
      <wsse:Password Type="http://docs.oasis-open.org/wss/2004/01/oasis-200401-wss-username-token-profile-1.0#PasswordText">
         {{password}}
       </wsse:Password>
     </wsse:UsernameToken>
  </wsse:Security>
 </soapenv:Header>
 <soapenv:Body>
   <bsvc:Get_Workers_Request>
     <bsvc:Request_References bsvc:Skip_Non_Existing_Instances="true">
       <bsvc:Worker_Reference>
         <bsvc:ID bsvc:type="WID">{{worker_id}}</bsvc:ID>
       </bsvc:Worker_Reference>
     </bsvc:Request_References>
     <bsvc:Response_Group>
       <bsvc:Include_Personal_Information>true</bsvc:Include_Personal_Information>
       <bsvc:Include_Employment_Information>true</bsvc:Include_Employment_Information>
       <bsvc:Include_Organizations>true</bsvc:Include_Organizations>
       <bsvc:Include_Management_Chain_Data>true</bsvc:Include_Management_Chain_Data>
       <bsvc:Include_Employee_Contract_Data>true</bsvc:Include_Employee_Contract_Data>
       <bsvc:Include_User_Account>true</bsvc:Include_User_Account>
     </bsvc:Response_Group>
   </bsvc:Get_Workers_Request>
  </soapenv:Body>
</soapenv:Envelope>
Replace the variables with the following values:
-
{{username}}: Integration System User
-
{{workday_host}}: Workday host
-
{{tenant}}: Workday tenant (for example, ping_pt1)
-
{{password}}: Your Workday user’s password
-
{{worker_id}}: Workday Worker ID (WID) or Employee ID
Attribute dependencies
When mapping attributes for write-back, some attributes are dependent on other attributes. For example, to configure a Name attribute, you must also map First Name, Middle Name, Last Name, and Name Locale.
The following table shows the dependent attribute groupings.
|
If you map one attribute in a group for write-back, you must map them all. |
| Groups | Dependents |
|---|---|
|
|
|
|
|
|
|
|
|
|
You can map the following attributes independently of one another:
-
WID -
Work Email -
Home Email
Creating a Workday Integration System with a Field Override Service
You can use Workday’s Field Override Service to create and sync Workday custom attributes into PingOne. The Field Override Service simplifies and improves performance over custom reports.
To create a Field Override Integration System in Workday and add custom attributes to sync into PingOne as part of user onboarding:
Steps
-
Sign on to your Workday account.
-
In the search bar, enter
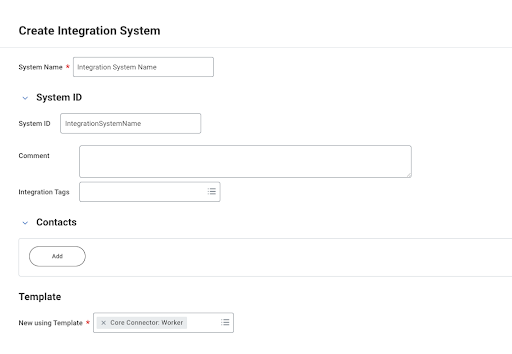
Integration System, and click Create Integration System. -
Enter the following:
-
System Name: A name for your Integration System.
-
Comment (Optional): Add a comment.
-
Template: In the New using template list, select Core Connector: Worker.
-
-
Click OK.
-
On the Configure Integration Services page, in the Custom Integration Services section, click +.
-
Click Create.
-
In the list of services, select Create Integration Field Override Service.
-
Enter a name for the Field Override Service.
-
Select Worker as the Business Object.
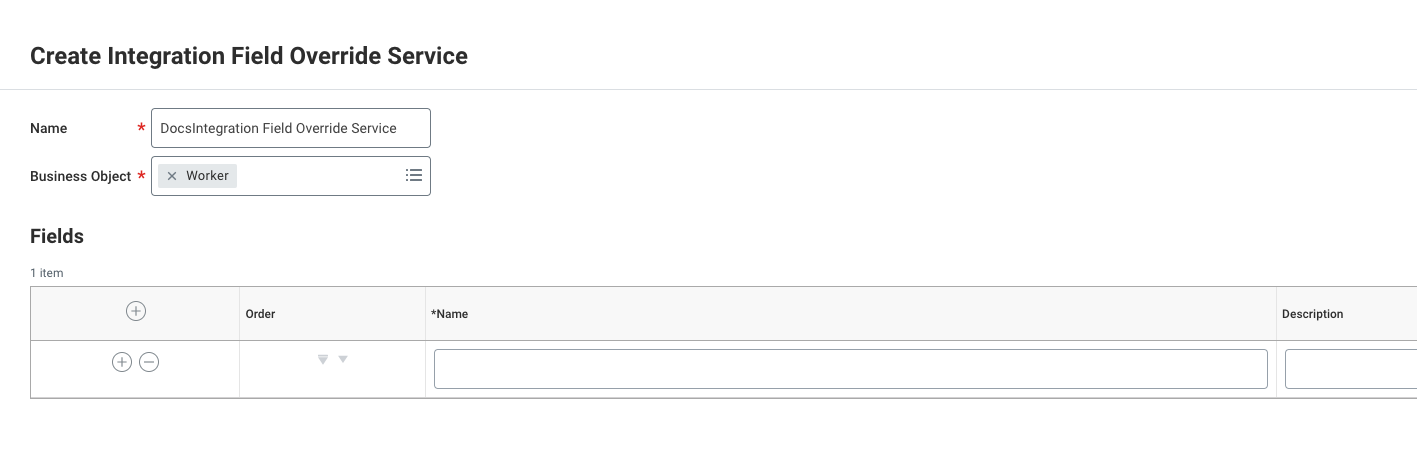
-
To add fields:
-
Enter a Name.
-
(Optional) Enter a Description.
-
To add more fields, click +.
-
-
Click OK.
Result:
Your integration system is created.
-
Click OK to return to the View Integration System page.
-
To configure the field mappings for your system:
-
Click the … icon.
-
Go to Actions > Integration System > Configure Integration Field Overrides.
-
In the Integration Service list, select your system, and then click it to open the field mappings.
-
Configure the mappings for your fields.
-
Click OK.
-
-
Click Done.
All custom properties are treated as strings.
Next steps
Add the integration System IDs from Worday to PingOne. Learn more in Adding Integration System IDs from Workday into PingOne.
Sync custom attributes from Workday to PingOne. Learn more in Syncing custom attributes from Workday into PingOne.
Adding Workday Integration System IDs to PingOne
To set up and update your provisioning settings and be able to sync custom attributes into PingOne, you need the Integration System IDs from Workday.
Before you begin
-
Make sure you have an Integration System created in Workday with a Field Override Service to populate and map custom Workday attributes. Learn more in Creating a Workday Integration System with a Field Override Service.
-
Make sure you have an Integration System user with permission to make the GET call on the custom attributes from Workday. Learn more in Adding the Integration System User to a Security Group and Configuring the Domain Security Policy Permissions for the Security Group.
Steps
-
Sign on to your Workday account.
-
In the search bar, enter
View your Integration System. -
In the list, select your Integration System.
-
Click OK.
-
Expand System IDs.
-
Copy the system IDs that you want to add to PingOne.
-
In PingOne, go to Integrations > Provisioning.
-
Click your applicable connection.
-
On the Configurations tab, click the Pencil icon.
-
In the Configure Preferences section, enter the Integration System IDs needed for syncing custom attributes from your Workday Integration System.
The Integration System IDs field supports multiple system IDs, separated by commas.
-
Click Save.
Next steps
Sync your custom Workday attributes into PingOne. Learn more in Sync custom workday attributes.
Syncing custom attributes from Workday into PingOne
Sync custom attributes from Workday into PingOne.
Before you begin
-
Make sure you have an Integration System created in Workday with a Field Override Service to populate and map custom Workday attributes. Learn more in Creating a Workday Integration System with a Field Override Service.
-
Make sure you added the Integration System IDs to your connection. Learn more in Add Workday System IDs into PingOne.
-
Make sure you have an Integration System user with permission to make the GET call on the custom attributes from Workday. Learn more in Adding the Integration System User to a Security Group and Configuring the Domain Security Policy Permissions for the Security Group.
-
Make sure you copy the custom attribute from Workday.
Steps
-
In the PingOne admin console, go to Integrations > Provisioning.
-
On the Rules tab, click the appropriate rule.
Result:
The details panel opens.
-
Click the Configuration tab.
You should see the Integration System IDs you added when creating or editing a connection.
-
Click Attribute Mapping.
-
Click the Pencil icon to edit the attribute mapping.
-
Click + Add.
-
Paste the custom attribute you copied from Workday.
If the custom attribute has a value populated, the value appears with "ADD:" in front of the custom attribute name.
-
Map the added custom attribute you added to the target attribute.
-
Click Save.
Workday provisioner known limitations
The following are known limitations with Workday user provisioning.
The PingOne Workday provisioner does not support the following Workday integration options:
-
Contingent workers. Contingent or temporary worker user types are not supported by the PingOne provisioning Workday integration at this time. Only full time employee user types can be imported.
-
Dynamic attributes. The PingOne provisioning Workday integration does not support dynamic attributes at this time.
Workday write-back provisioning has the following limitations:
-
For write-back, you cannot create or delete users, you can update existing users only.
-
Phone number country codes use an internal Workday format, so any modifications to the country code field require codes in that format.
-
If there is a pending business process associated with any of the attributes configured for write-back, then write-back will fail. For example, if an admin updates a name attribute, Workday starts a business process in which another admin must approve that name change. If a write-back occurs while the name change is pending, then the write-back will fail.
-
The
Countryattribute for addresses must be mapped to a custom attribute because Workday uses a different data format than PingOne. Use the three-letter country code (ISO 3166-1), followed by an underscore, and then the country calling code (international subscriber dialing code) for that country. The following example shows the Workday country code format for Canada.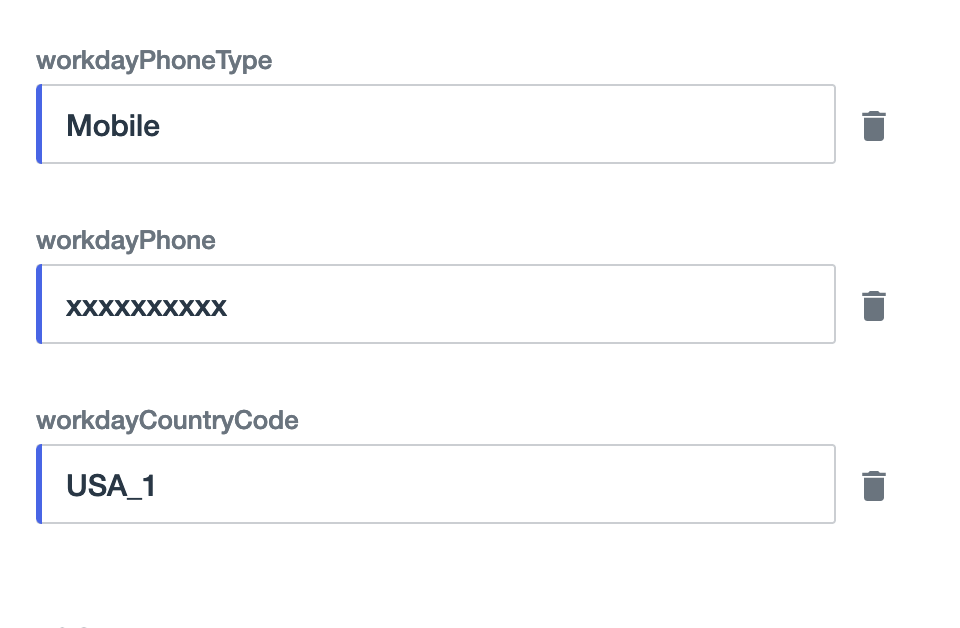
-
For custom attributes, you must have an Integration System user with permission to make the GET call on the custom attributes from Workday. For example, the attribute names
Hire_DateandOriginal_Hire_Daterequire the permissionWorker Data: Current Staffing Information. Learn more in Adding the Integration System User to a Security Group and Configuring the Domain Security Policy Permissions for the Security Group.