Reviewing risk evaluations
Depending on your organization’s goals and use cases, you should review and analyze risk evaluations to fine-tune your risk policy. The risk evaluation details in the audit log can help you understand the factors that led to the resulting risk level.
Steps
-
View a risk evaluation.
Choose from:
-
Using the API: You can find information about creating a risk evaluation in the PingOne Protect API documentation.
-
Using the PingOne admin console:
-
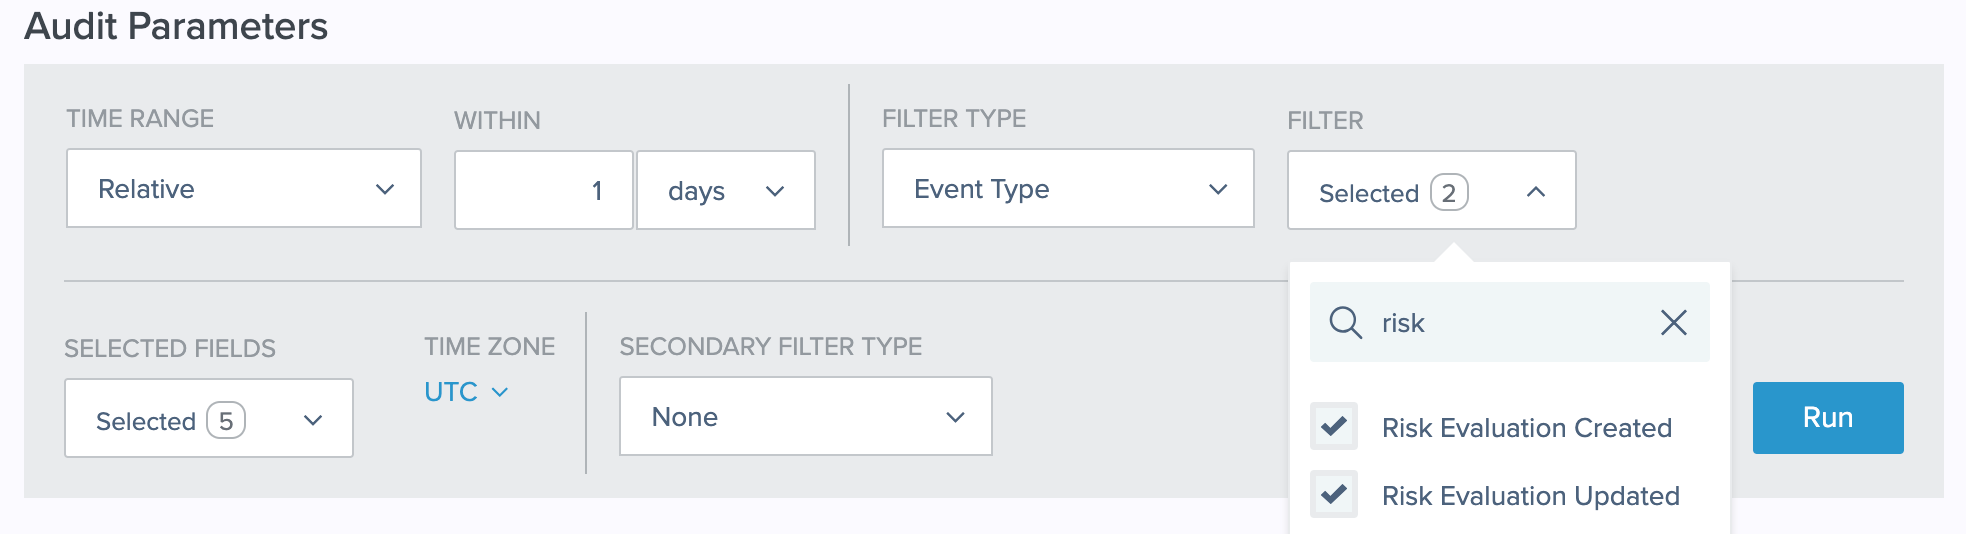
In the PingOne admin console, go to Monitoring > Audit.
-
Edit the Time Range and Within fields as needed.
-
For Filter Type, select Event Type.
-
For Filter, select Risk Evaluation Created and Risk Evaluation Updated.
You can enter
riskin the Search Filter Type field to view only risk-related event types.You can find a complete list of events logged in PingOne in Audit Reporting Events in the PingOne API documentation.
-
Click Run.
-
To view the specific data and scores from an event, click View in the Details column in the report summary.
Example:
The following is an example response result from a risk evaluation:
"result": {
	"level": "HIGH",
	"score": 80.0,
	"source": "AGGREGATED_SCORES",
	"recommendedAction": "BOT_MITIGATION",
	"type": "VALUE"
}
-
-
-
In the response result section, review the following attributes in this order:
-
result.recommendedActionPossible values are:
-
ACCOUNT_RECOVERY: There are indications that the user’s account may have been compromised, so you should have them follow your account recovery procedure. -
AITM_MITIGATION: You should take steps to mitigate the damage from an Adversary-in-the-Middle (AitM) attack. For an AitM attack, the user’s credentials have been intercepted, so in addition to blocking the access request, you should lock the user’s account until the password is changed. -
BOT_MITIGATION: If this attribute is included in the result, a bot was detected, and your policy’s risk level returnedHIGH. In this case, you should halt the user flow or route the user to an additional bot mitigation tool.Make sure to set the bot detection predictor score higher than the overall High risk threshold in the risk policy. If the bot detection predictor score is not set higher than the High risk threshold, the risk policy result will not include the
recommendedAction: BOT_MITIGATIONattribute. Using this attribute allows you to test your risk policy or control the response from the risk policy instead of modifying the flow or code at the app level. -
DENY: When a risk level ofHIGHis calculated for a traffic anomaly predictor, you should deny access because the repeated risk evaluations are likely a sign of a brute force attack. -
TEMP_EMAIL_MITIGATION: The user has specified a disposable email address, which is an indication of a fraud attempt.
-
-
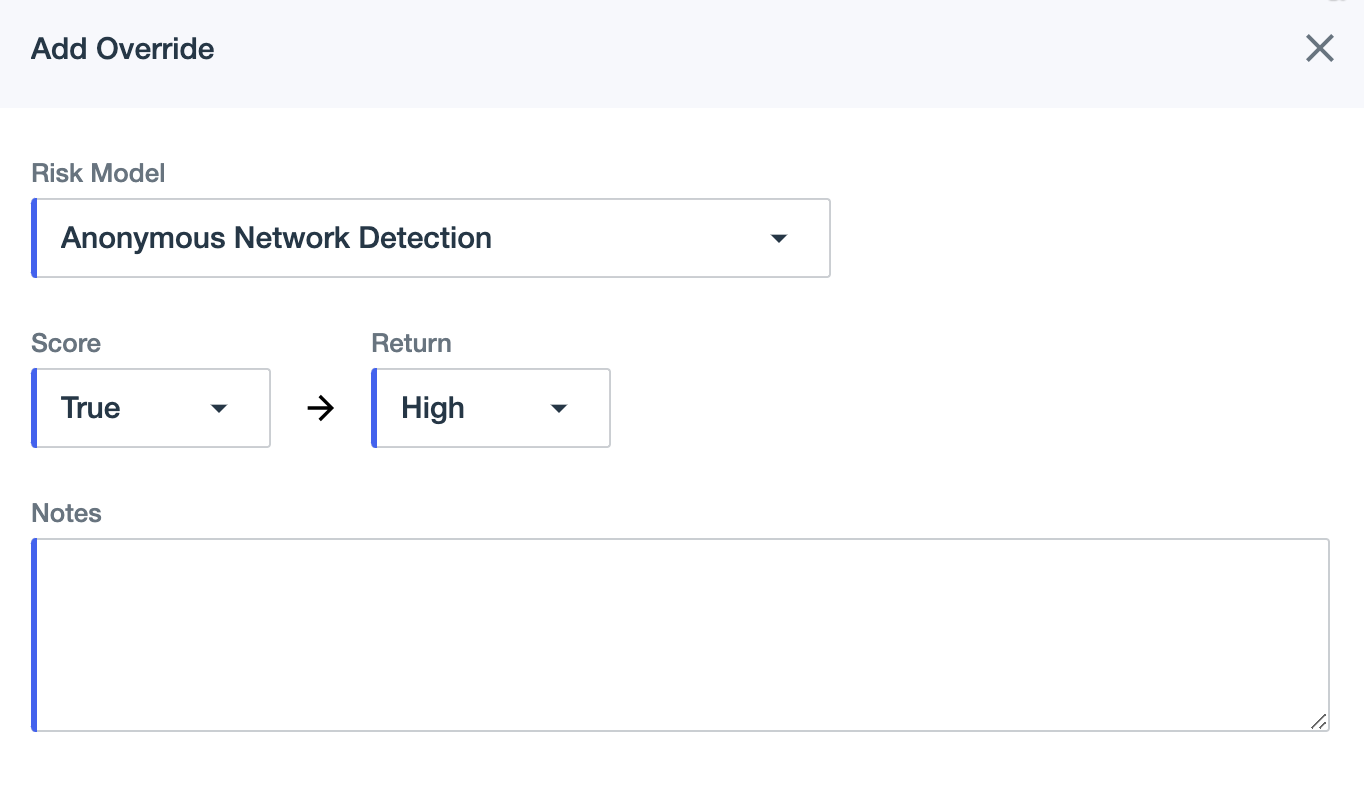
result.mitigationsThis attribute is included in the result when a mitigation rule is configured in the risk policy to define custom recommended actions and the conditions of the rule are met. For example, you can configure a mitigation rule to recommend denying access if the email reputation predictor returns high risk. The recommended action that you configured in the rule is returned in the risk evaluation response as the value for
result.mitigations[].action. Any text entered in the Notes field is also included in the risk evaluation response. You must then translate the recommended action, such as deny and suspend in the following example, into an action in your user flow.The following is an example response result from a risk evaluation:
"result" : { "mitigations" : [ { "action" : "DENY_AND_SUSPEND" } ], "type" : "MITIGATION" } -
result.valueThis attribute is included in the result when a risk policy has an override configured, and the Notes field of the override rule has free text entered.
Check the value returned in the result against the Notes text entered in the override rule. If you don’t use overrides for blocking events, you do not need to check this attribute.
-
result.levelThis attribute is always included in the response as one of three levels and affects the user flow as follows:
-
LOW: Continue the user flow without additional friction. -
MEDIUM: Challenge the user with multi-factor authentication (MFA).You can decide to continue the user flow without challenging the user, depending on your use case, the user flow type, and how your risk policy is configured.
-
HIGH: Challenge the user with restrictive MFA.The specific method you employ to challenge the user in a high-risk event depends on your use case and the type of MFA available to your users. It is not recommended to use the standard push MFA mechanism or block the user in this case.
-
-
result.scoreThis numeric attribute is tied to
result.leveland can be used instead of or in conjunction withresult.levelfor additional granularity.Example:
You could decide to block based on the risk score, such as if
result.scoreis greater than 250. Before making such a decision, review the Threat Protection Dashboard production data to see how your risk policy is currently performing.If you want to block based on risk scores, check
result.scorebeforeresult.level.The following is an example user flow using
result.scorein conjunction withresult.level:-
If
result.scoreis greater than 300, then block. -
If
result.levelisHIGH, then restrictive challenge with MFA, such as with one-time passcode (OTP) or Fast IDentity Online (FIDO). -
If
result.levelisMEDIUM, then challenge with MFA. -
If
result.levelisLOW, then allow.
-
-
-
Analyze the response results to determine if the desired outcome occurs for various events and risk levels.
Next steps
After reviewing risk evaluations, you might need to fine-tune your risk policy, including how the various predictors are configured, the scores assigned to the predictors, any override rules, and how the thresholds for the final risk level are set.
You can also create a staging policy to test changes to your risk policy before putting them into production. Learn more in Creating and managing staging policies.