Best practices for configuring Active Directory for LDAP gateways
This guide provides an overview of the recommended configuration for integrating AD with PingOne Lightweight Directory Access Protocol (LDAP) gateways, including setting up the service account with the required permissions and granting the permissions for user password changes and resets.
|
These configurations in AD require LDAP Gateway client application 3.1.2 or later. |
In this guide, the example gateway is used to manage users in the Employees organizational unit (OU):
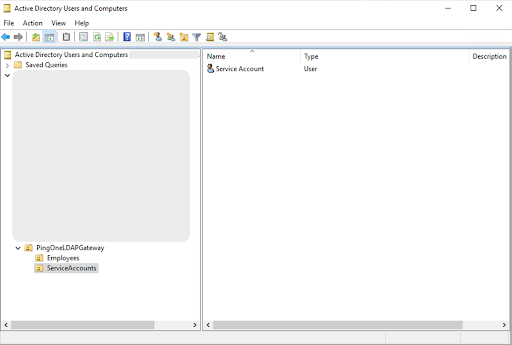
Bind DN: CN=Service Account,OU=ServiceAccounts,OU=PingOneLDAPGateway
Search Base DN: OU=Employees,OU=PingOneLDAPGateway
Setting up the service account
About this task
Set up the service account to manage permissions for the client:
Steps
-
Set the service account as the bind DN in the LDAP gateway.
Service Account should be in a separate OU from the target users (Employees in this example).
-
Grant Read permissions for each Search Base DN in the gateway’s user types.
-
For inbound provisioning through the LDAP gateway, ensure that the service account can read deleted entries (
cn=Deleted Objects) to keep PingOne in sync when objects are deleted in AD:Choose from:
-
Make the service account an administrator.
-
Allow non-administrators to view the AD deleted objects container.
Learn more in Let non-administrators view deleted objects container in the Microsoft documentation.
-
Granting user password permissions
About this task
Manage user password changes and resets by enabling users to change their own passwords and administrators to reset user passwords.
Instead of making changes to each user, AD also allows admins to apply permissions to whole hierarchies of users, such as an entire OU.
Steps
-
To allow users to change their own passwords:
-
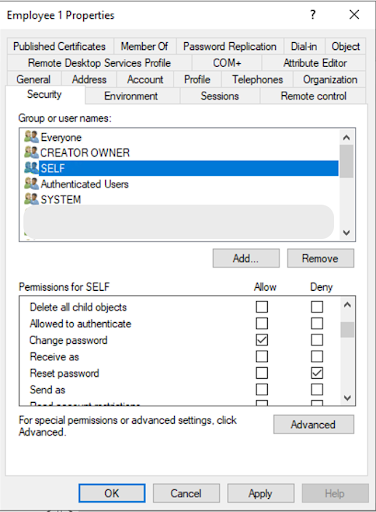
Right-click on the user group or name to which you want to grant password permissions and click Properties.
-
On the Security tab, select the SELF group of users, and select the Allow checkbox for Change password and the Deny checkbox for Reset password.
-
Click Apply and then OK.
To disable users from changing their own passwords, select the Deny checkbox for Change password.
-
-
To allow admins to reset user passwords:
-
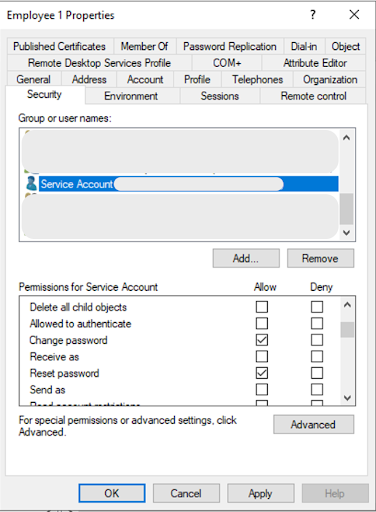
Right-click the Employee user object, click Properties, and then click the Security tab.
-
In the list of groups, select the Service Account and select the Allow checkbox for Change password and Reset password.
-
Click Apply and then OK.
-
-
To add permissions to an entire OU:
-
Open Active Directory Users and Computers.
-
Right-click on the OU of the target users (for example, Employees), and then click Properties.
-
To create customizable permissions, click the Security tab, click Advanced, and then click Add.
-
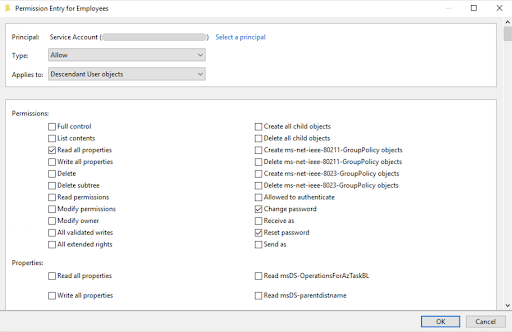
In the Permission Entry window, click Select a principal.
-
Enter
Service Accountfor object name and click OK. -
Clear the default permissions and then select the desired permissions.
For example, the recommended permissions for a service account are:
-
Read all properties
-
Change password
-
Reset password
-
-
Click OK.
-
-
In the Advanced Security Settings window, click Add.
-
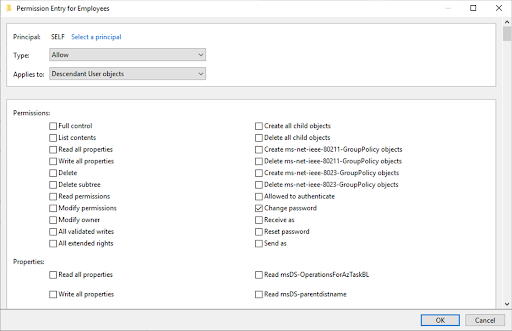
In the Permission Entry window, click Select a principal.
-
Enter
SELFfor object name and click OK. -
Clear the default permissions and then select the desired permissions.
For example, the recommended permission for SELF is Change password.
-
Click OK.
-
-
In the Advanced Security Settings window, click Apply and OK.
-
In the Security tab, click Apply and OK.
-