Setting up SSO to PingOne Advanced Identity Cloud
To set up single sign-on (SSO) access for administrators from the PingOne admin console to PingOne Advanced Identity Cloud, configure PingOne with each Advanced Identity Cloud tenant environment and test the sign-on experience.
Before you begin
Ensure that you have:
-
A PingOne account
-
A separate environment added to your PingOne account for each Advanced Identity Cloud tenant environment for which you want to set up SSO access from PingOne
Learn more in Creating an environment.
-
The following admin roles assigned in each PingOne environment and corresponding Advanced Identity Cloud tenant environment:
-
PingOne: Identity Data Admin, Environment Admin, and PingOne Advanced Identity Cloud Super Admin
Learn more in Administrator Roles and Managing user roles.
-
Advanced Identity Cloud: Super Admin
Learn more about assigning admin roles in Tenant administrator settings.
-
|
Because Advanced Identity Cloud is made up of several individual tenant environments, you must complete the configuration steps for each Advanced Identity Cloud tenant environment. |
Adding PingOne Advanced Identity Cloud to an environment
About this task
Add Advanced Identity Cloud to your existing environment.
Steps
-
In the PingOne admin console sidebar, click the Ping Identity logo to open the Environments page and browse or search for the applicable environment.
-
On the Environments page, click the environment to open the details panel.
-
Click Manage Environment to go to the Overview page for the environment.
-
In the Services section, click .
-
Click Add next to PingOne Advanced Identity Cloud and any other products or services that you want to add to the environment.
-
Click Finish.
Configuring SSO to PingOne Advanced Identity Cloud
About this task
After adding Advanced Identity Cloud to your environment, configure SSO from the PingOne admin console.
Steps
-
In the PingOne admin console, in the Environments list, click the environment with Advanced Identity Cloud and click Manage Environment.
-
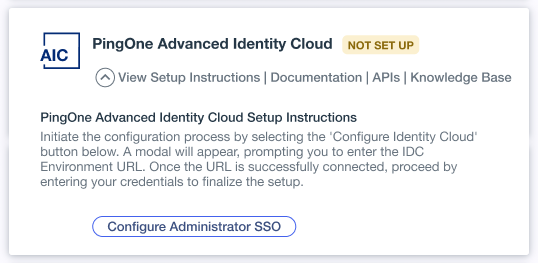
On the Overview page, locate the PingOne Advanced Identity Cloud tile and click Configure Administrator SSO.
-
In the Configure PingOne Advanced Identity Cloud window, enter the URL for the Advanced Identity Cloud administrative tenant.
The URL must end with .forgerock.io or .forgeblocks.com. Learn more in Tenant administrator sign-on in the Advanced Identity Cloud documentation.
-
In the Direct Sign-On Environment list, select the environment that administrators must be associated with when authenticating directly from Advanced Identity Cloud using the Sign in with PingOne option.
Any administrator with an appropriate Advanced Identity Cloud role from any environment in PingOne can use SSO into Advanced Identity Cloud from PingOne.
-
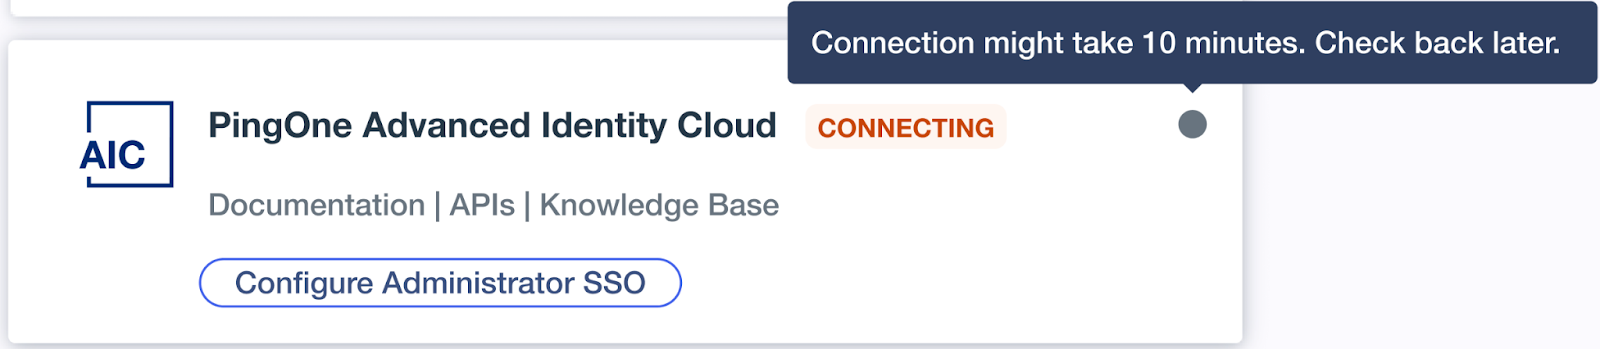
Click Connect.
Result:
PingOne opens a new browser tab with the Advanced Identity Cloud sign-on screen.
-
Go to the new browser tab and enter your Advanced Identity Cloud credentials to complete setup.
Result:
PingOne creates a connection to Advanced Identity Cloud. It can take up to 10 minutes to complete the connection.
Testing SSO to PingOne Advanced Identity Cloud
About this task
After configuring PingOne and Advanced Identity Cloud, test the SSO experience.
Steps
-
In the PingOne admin console sidebar, click the Ping Identity logo to open the Environments page and browse or search for the applicable environment.
-
On the Environments page, click the environment to open the details panel.
-
In the Connected Services section, click PingOne Advanced Identity Cloud.
Result
The Advanced Identity Cloud admin UI opens.
Inviting additional PingOne Advanced Identity Cloud administrators
About this task
After verifying the connection and gaining SSO access to the Advanced Identity Cloud tenant, the PingOne Advanced Identity Cloud Super Admin can invite additional Advanced Identity Cloud Super Admins and Tenant Admins to access the Advanced Identity Cloud tenant.
Steps
-
In the PingOne admin console, add admins with SSO access to the tenant.
These users can be assigned either the Advanced Identity Cloud Super Admin or Advanced Identity Cloud Tenant Admin role for the Advanced Identity Cloud tenant.