Setting up PingOne SSO, DaVinci, and PingID as the external MFA provider for Microsoft Entra ID
Microsoft Entra ID allows customers to use an external authentication provider for multi-factor authentication (MFA) through Entra ID external MFA, formerly known as external authentication methods (EAMs). In this use case, you’ll learn how to set up Entra ID, PingOne SSO, DaVinci, and PingID to support external MFA in Entra ID.
Set up external MFA in Entra ID if:
-
Entra ID is the identity provider (IdP).
-
The users reside in a managed domain in Entra ID.
Learn more in Create and configure a managed domain in the Entra ID documentation.
-
PingOne is the external authentication provider.
|
If you added a Microsoft 365 application to PingOne using the application catalog and completed the PowerShell cmdlets to set up PingOne as the federated IdP for the domain in Entra ID, external MFA isn’t required for MFA. Instead, you can add an MFA claim in the Microsoft 365 application to communicate to Entra ID that PingOne will handle MFA. Learn more in Using WS-Fed or SAML 1.1 federated IdP in the Entra ID documentation. |
The high-level process of signing on with external MFA works as follows, with PingOne and PingID acting as the external authentication provider:
-
A user opens an application protected by Entra ID and is prompted to complete first-factor MFA in Entra ID.
-
Entra ID determines that another factor needs to be satisfied, such as if a conditional access policy requires MFA.
-
The user chooses the applicable external MFA as second-factor MFA.
-
Entra ID sends an OpenID Connect (OIDC) authentication request to PingOne (the external authentication provider in this use case).
-
PingOne initiates MFA for the user.
-
The user completes the MFA requirement using the PingID app.
-
PingOne returns an ID token to Entra ID in the authentication response.
-
Entra ID validates the ID token and signs the users on to the application.
Learn more about external MFA in Use Microsoft Entra MFA with an external MFA provider in the Entra ID documentation.
Goals
After completing this use case, you’ll know how to:
-
Configure Entra ID to support external MFA.
-
Add Entra ID as an external IdP in PingOne.
-
Set up PingID as the MFA solution for Entra ID users.
What you’ll do
In Entra ID, you’ll configure three components:
-
Add and configure an application.
-
Create external MFA.
-
Add a conditional access policy.
In PingOne, you’ll configure the following:
-
Create a population for Entra ID users.
-
Create a Microsoft IdP connection.
In PingOne DaVinci, you’ll configure two flows:
-
Add a flow to handle external authentication requests from Entra ID.
-
Add a second DaVinci flow to redirect users to Entra ID for OIDC authentication.
The last step is configuring PingID as the external MFA for Entra ID.
Before you begin
To set up this use case, you’ll need:
-
A PingOne organization. Learn more in Starting a PingOne trial.
-
A PingOne environment with the PingOne SSO, DaVinci, and PingID services added.
Create a new environment as follows, depending on whether you’re already using PingID:
-
If you aren’t using PingID already or if you want to create a new PingID account, create a new PingID environment in PingOne.
-
If you’re using PingID currently and want to use your existing PingID account, integrate a PingID account with a new PingOne account. You should also follow these steps if you’ve previously integrated PingID with Entra ID using custom controls. Learn more about integrating PingID with Entra ID in the PingID documentation.
-
-
An Entra account with an active subscription and an Entra tenant.
Tasks
New PingID accounts: Creating a population for Entra ID users
If you created a new PingID environment in PingOne, your new environment includes a population named Default. Learn more in Setting up an environment for strong authentication (MFA).
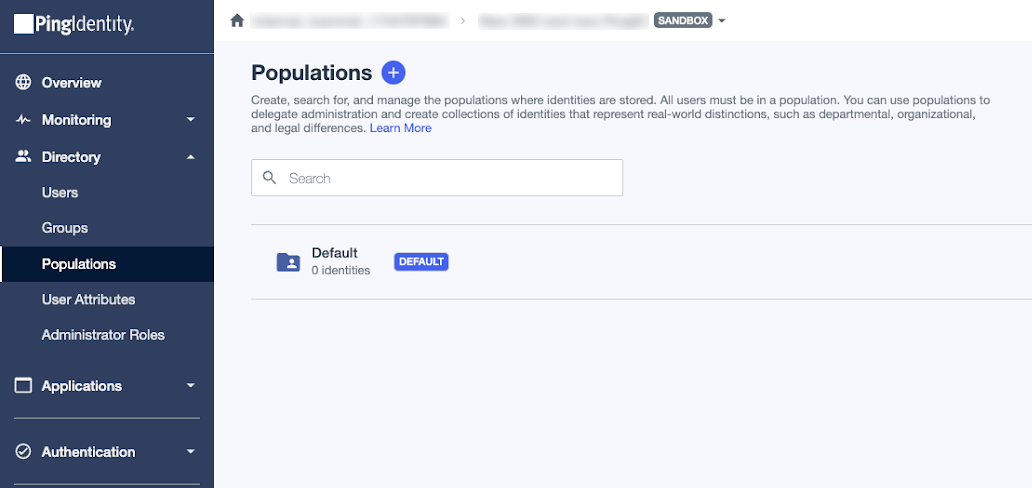
When you configure external MFA for Entra ID, you’ll need to create a new population in PingOne for users coming from Entra ID.
Steps
-
In the PingOne admin console, go to Directory > Populations.
-
Click the icon to add a new population.
-
Enter the following:
-
Population Name: A unique label for the population, such as
Entra ID users. -
Description (optional): A brief description of the population.
-
Default Population (optional): Don’t select this checkbox in this scenario unless you want to specify this population as the new default population.
-
-
Click Save.
Existing PingID accounts: Creating a population for Entra ID users and changing the default population
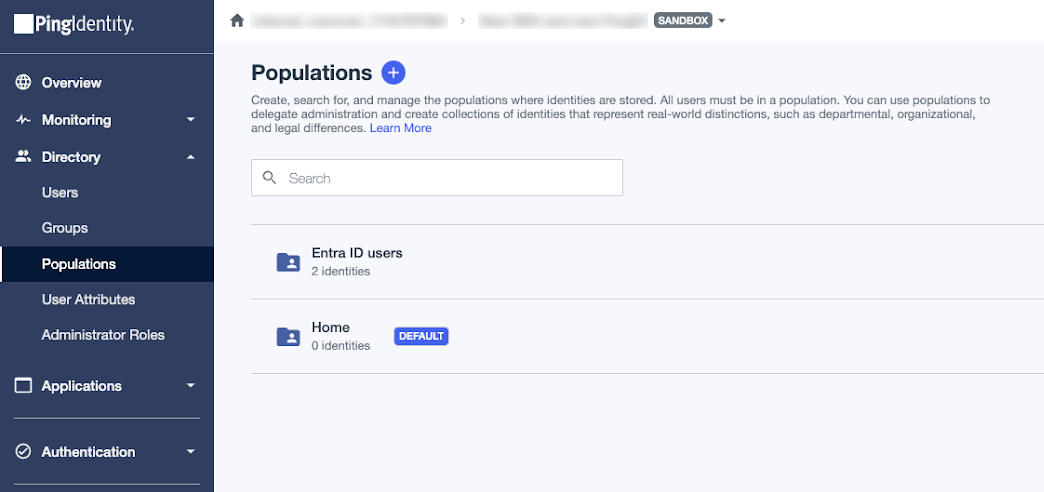
If you integrated your PingID account with a new PingOne account, your new environment includes a population named Default with users from PingID assigned to this population. The following image shows the Default population with two users from PingID.
|
If you created a new PingID environment in PingOne, follow the steps in New PingID accounts: Creating a population for Entra ID users. |

By default, the Identity Provider for this population is set to PingOne. You’ll update this setting as part of this process.
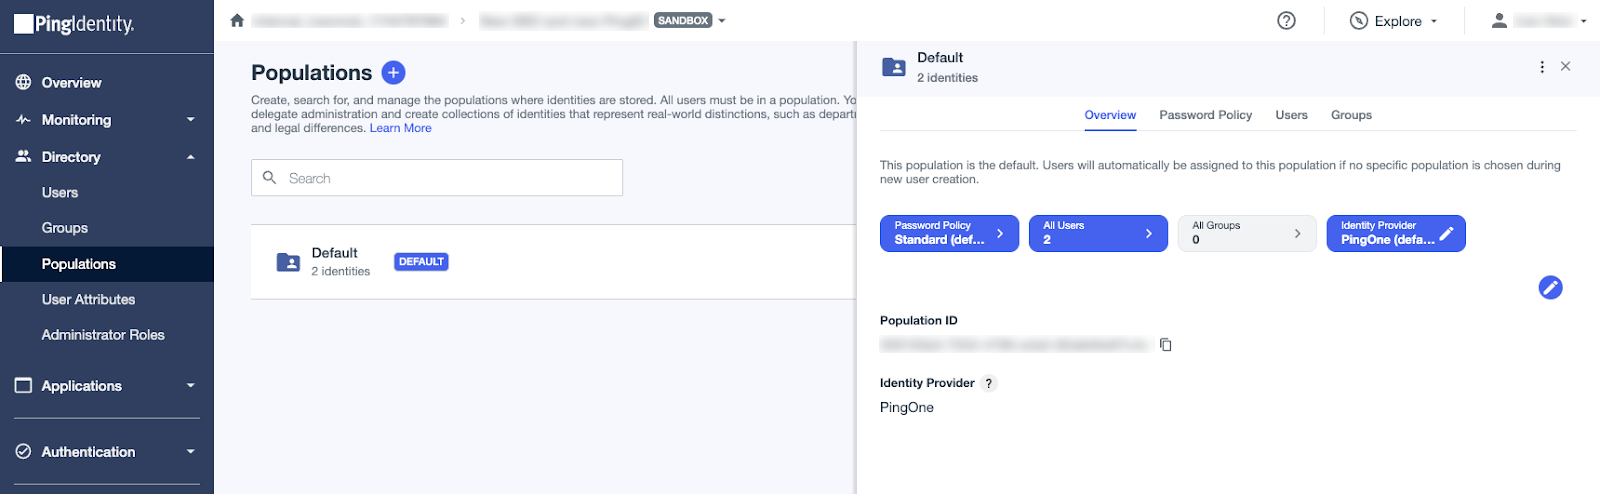
Because you could have a future scenario where users in this environment aren’t coming from Entra ID, you should rename the Default population, create a new population for users coming from Entra ID, and set the new population as the default population.
Steps
-
In the PingOne admin console, go to Directory > Populations.
-
Click the Default population, and then click the Pencil icon () to edit the population.
-
Change Population Name from Default to a new name, such as
Entra ID users.
-
Click Save.
-
To create a new population, click the icon.
-
Enter the following:
-
Population Name: A unique label for the population, such as
Home. -
Description (optional): A brief description of the population.
-
Default Population: Select the Enable checkbox to set this population as the new default population.
-
In the confirmation modal, click Confirm to make this population the new default population.

-
-
Click Save.
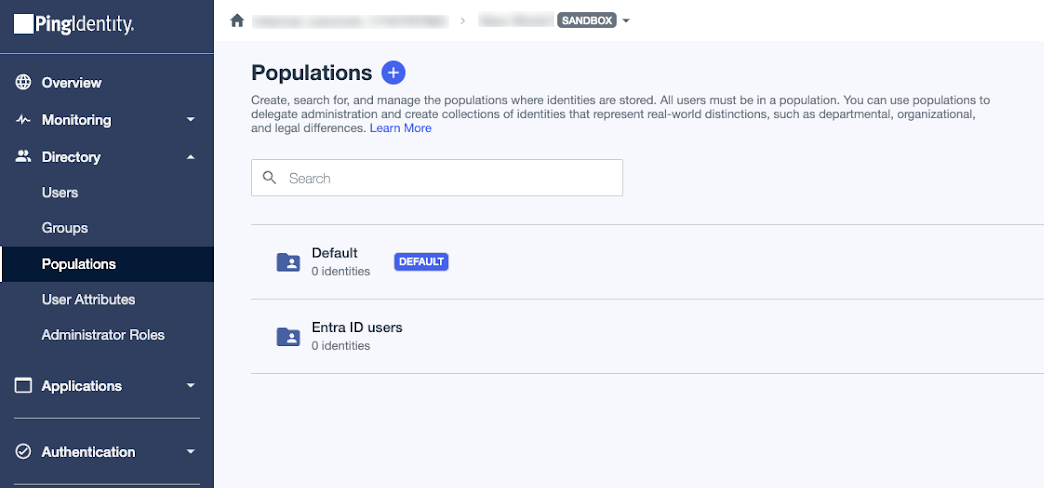
Result
You now have two populations in your environment:
-
Entra ID users: Users from PingID are assigned to this population. This is also the population where future Entra ID users will be assigned when Entra ID redirects users to PingOne for MFA. Previously, this population was named Default and was set as the default population.
-
Home: This population is the new default population and was created for future scenarios where users aren’t coming from Entra ID.
Registering your application with Microsoft
To configure external MFA, register an application in Microsoft Entra. Learn more in Quickstart to registering an app in the Microsoft Entra documentation.
Before you begin
Ensure that you have:
-
A Microsoft Entra account with an active subscription
-
An Entra tenant
Steps
-
Go to the Microsoft Entra admin center and sign on to your account.
If you don’t have a Microsoft Entra account, you can create one now.
-
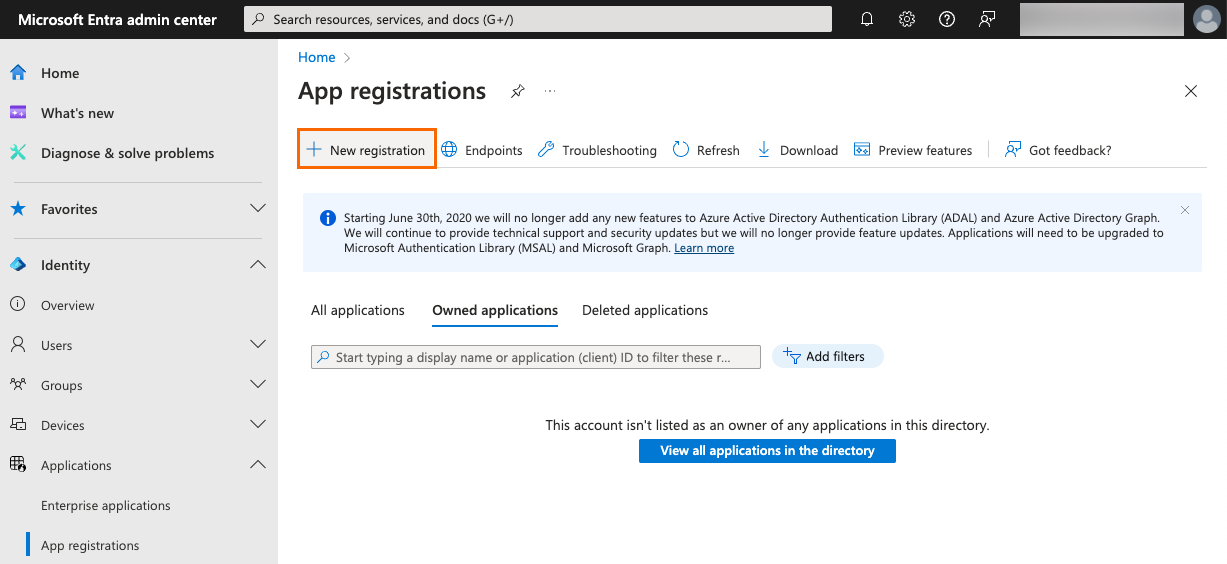
In the sidebar, go to Identity > Applications > App registrations.
-
Click New registration.
-
Enter and configure the following:
-
Name: Enter a user-facing display name for the application.
-
Supported account types: Select either of the following, depending on the needs of your organization:
-
Accounts in this organizational directory only (<Your Entra tenant name> only - Single tenant): Select this option if you’re working with only identities from your environment.
-
Accounts in any organizational directory and personal Microsoft accounts
-
-
Redirect URI: Select Web as the platform and enter the authorization URL of your PingOne environment.
You can find this URL on the Overview tab of any OIDC application in the PingOne admin console in the Connection Details section.
The format is
<issuer>/authorize.Example 1:
https://auth.pingone.<region>/<envID>/as/authorizeExample 2:
https://<customDomain>/as/authorizeif you set up a custom domain. Learn more in Setting up a custom domain.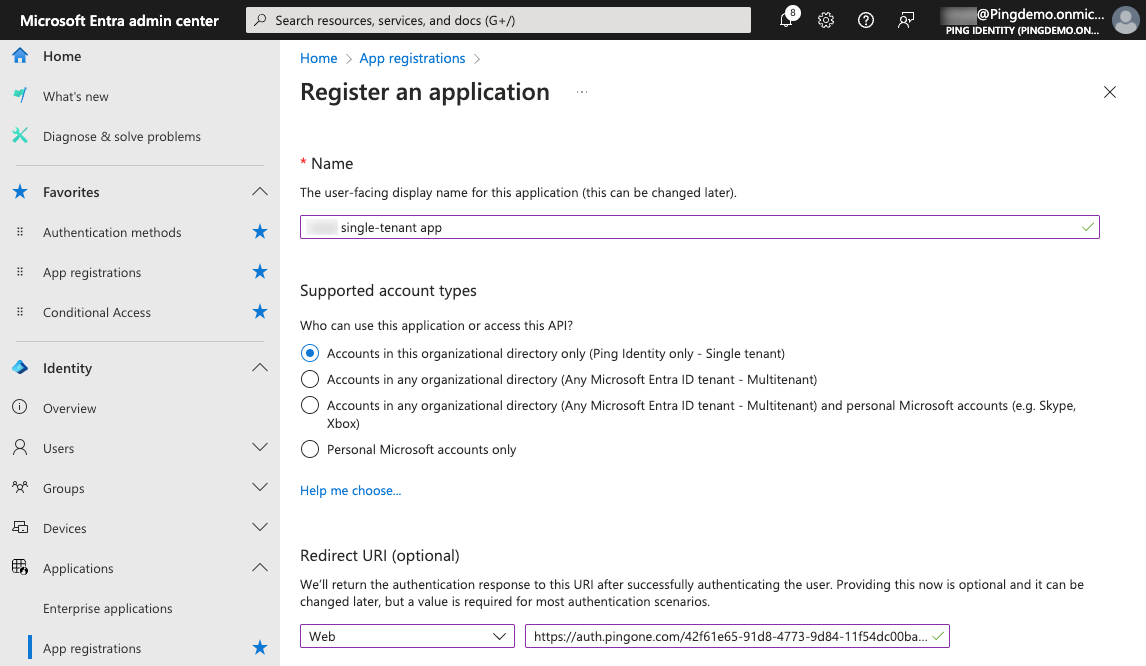
-
-
Click Register.
Enabling the implicit grant
After registering the application in Entra, enable the implicit grant type for your application to support external MFA.
Steps
-
Go to the Microsoft Entra admin center.
-
In the sidebar, go to Identity > Applications > App registrations and click your application.
-
On the App registrations page, in the Manage section, click Authentication.
-
In the Implicit grant and hybrid flows section, select the ID tokens checkbox for the token type to be issued by the authorization endpoint.
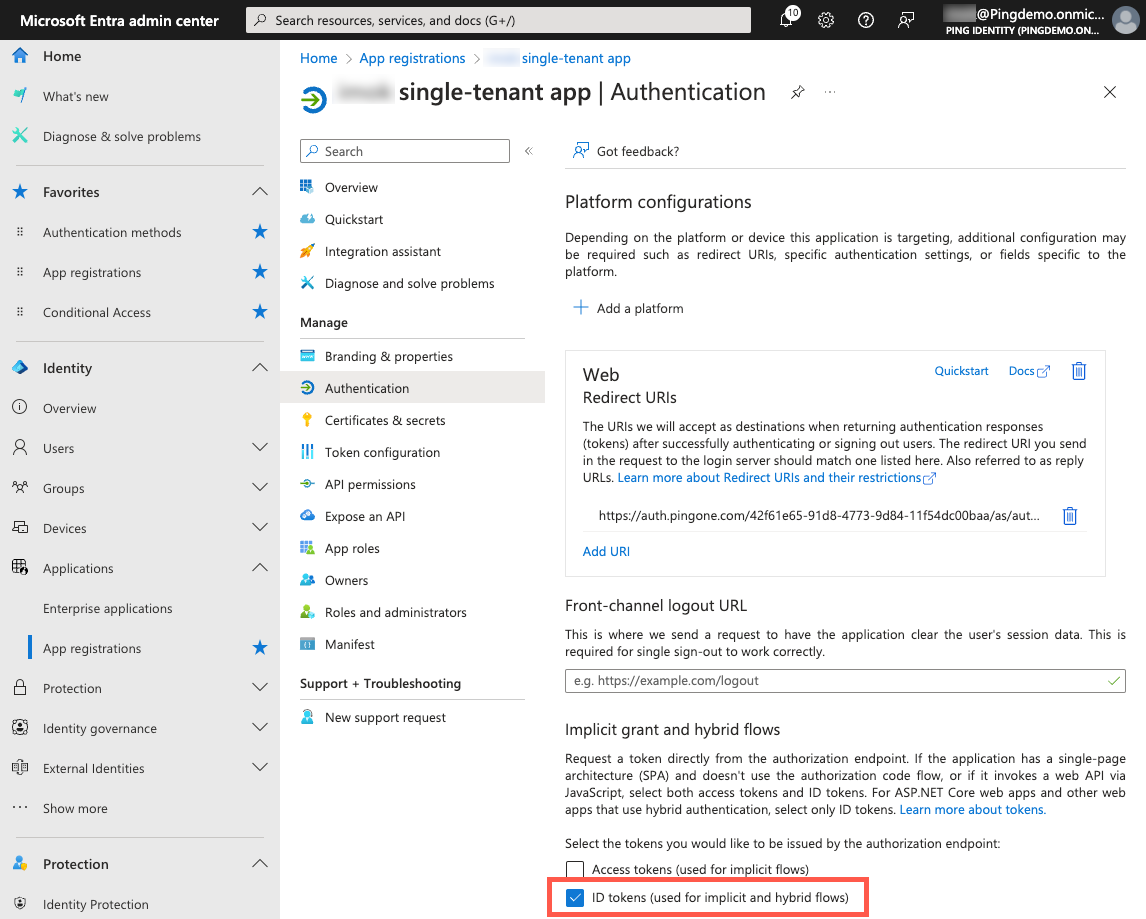
-
Click Save.
Getting the client ID and client secret for your application and the tenant ID of your Entra tenant
When you register your application with Microsoft, Microsoft generates an application (client) ID and application secret for the application.
Microsoft also generates a directory (tenant) ID for each Entra tenant. You’ll copy these values and enter them into PingOne.
Steps
-
Go to the Microsoft Entra admin center.
-
In the sidebar, go to Identity > Applications > App registrations and click your application.
-
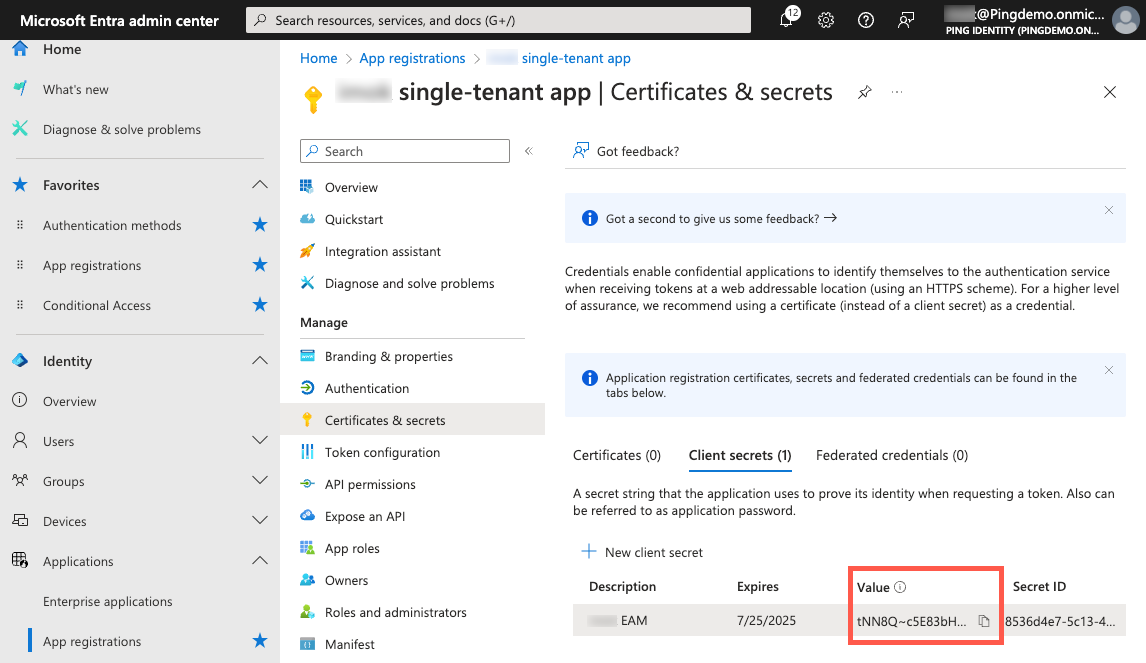
On the App registrations page, in the Manage section, click Certificates & secrets.
-
On the Client secrets tab, click New client secret.
-
Enter the following:
-
Description: A brief description of the client secret.
-
Expires: Select the duration of the certificate based on the needs of your organization.
-
-
Click Add.
-
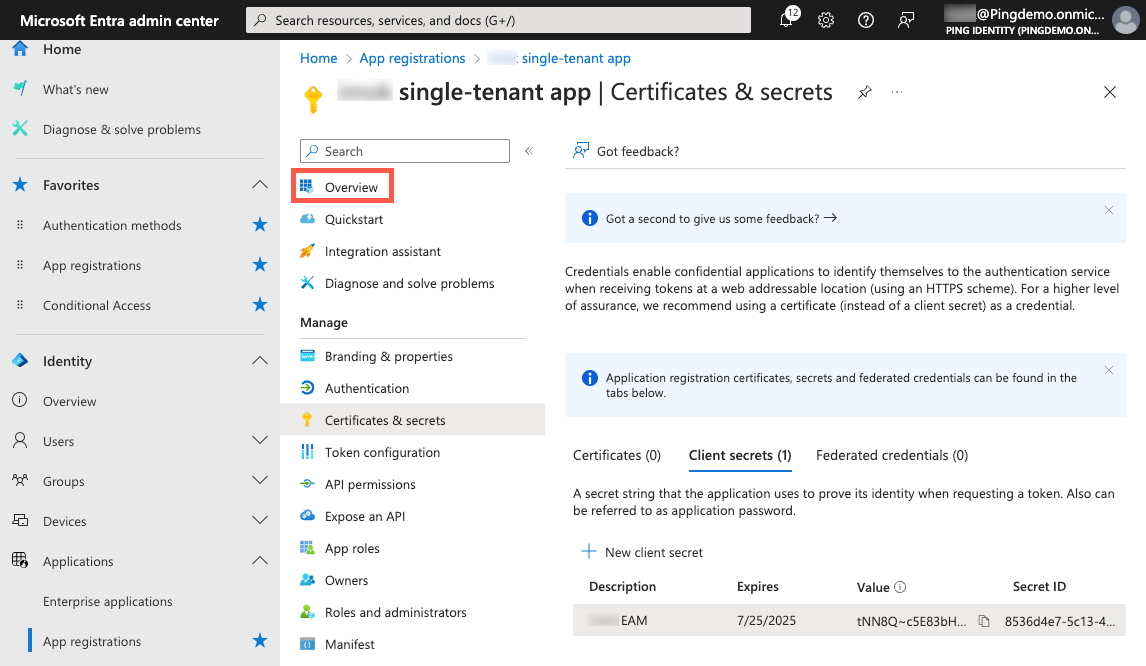
On the Client secrets tab, click the Copy icon () for the Value and paste it in a secure location.
-
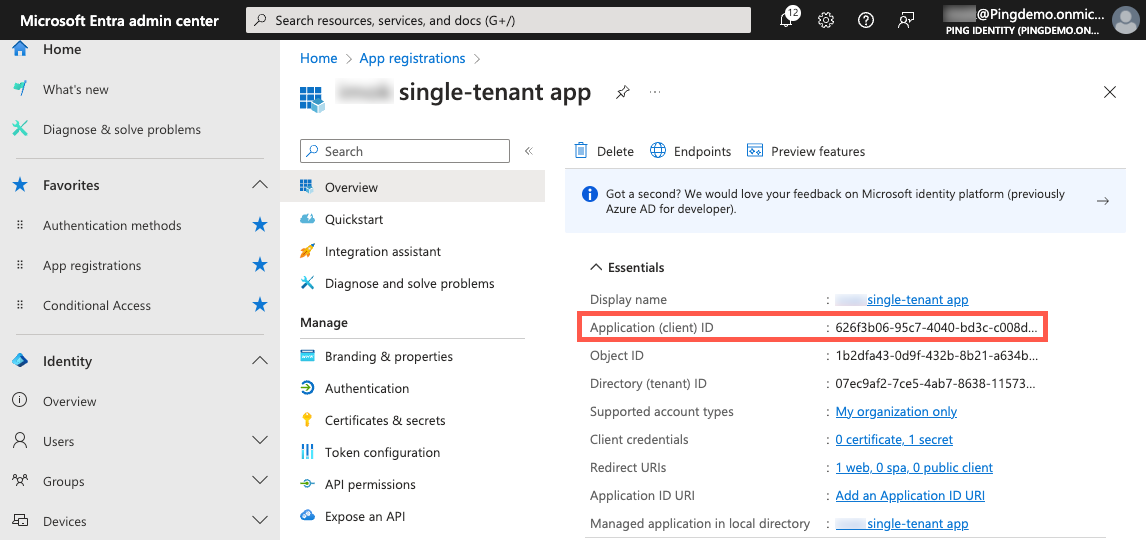
In the App registrations sidebar, click Overview.
-
Copy the Application (client) ID and paste it in a secure location.
-
Locate the Directory (tenant) ID and copy it to a secure location.
Setting up API permissions
Using external MFA with Microsoft Entra requires certain API permissions that you’ll need to enable in your application.
Steps
-
Go to the Microsoft Entra admin center.
-
In the sidebar, go to Identity > Applications > App registrations and click your application.
-
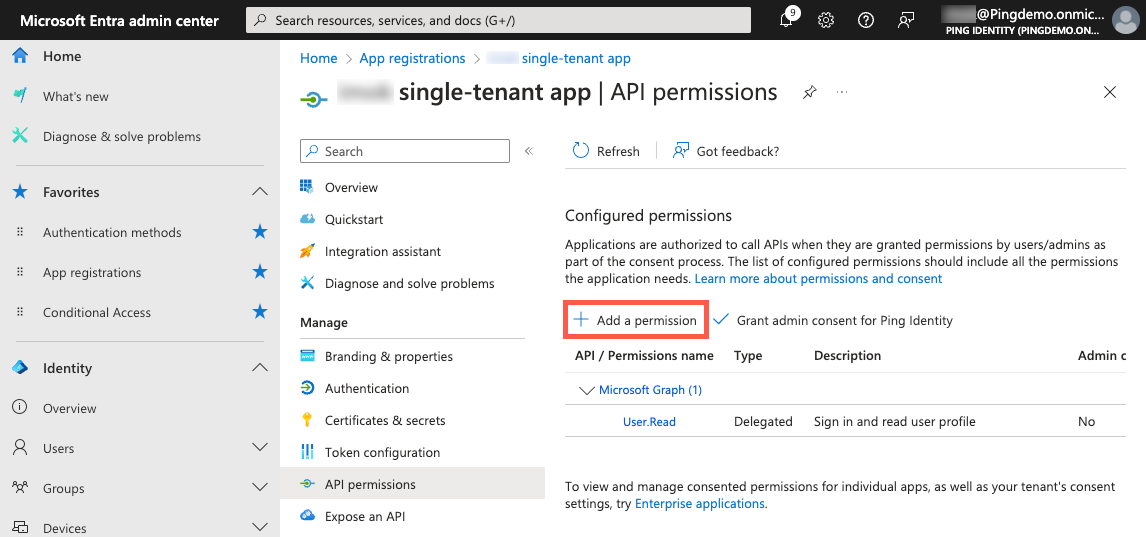
On the App registrations page, in the Manage section, click API permissions.
-
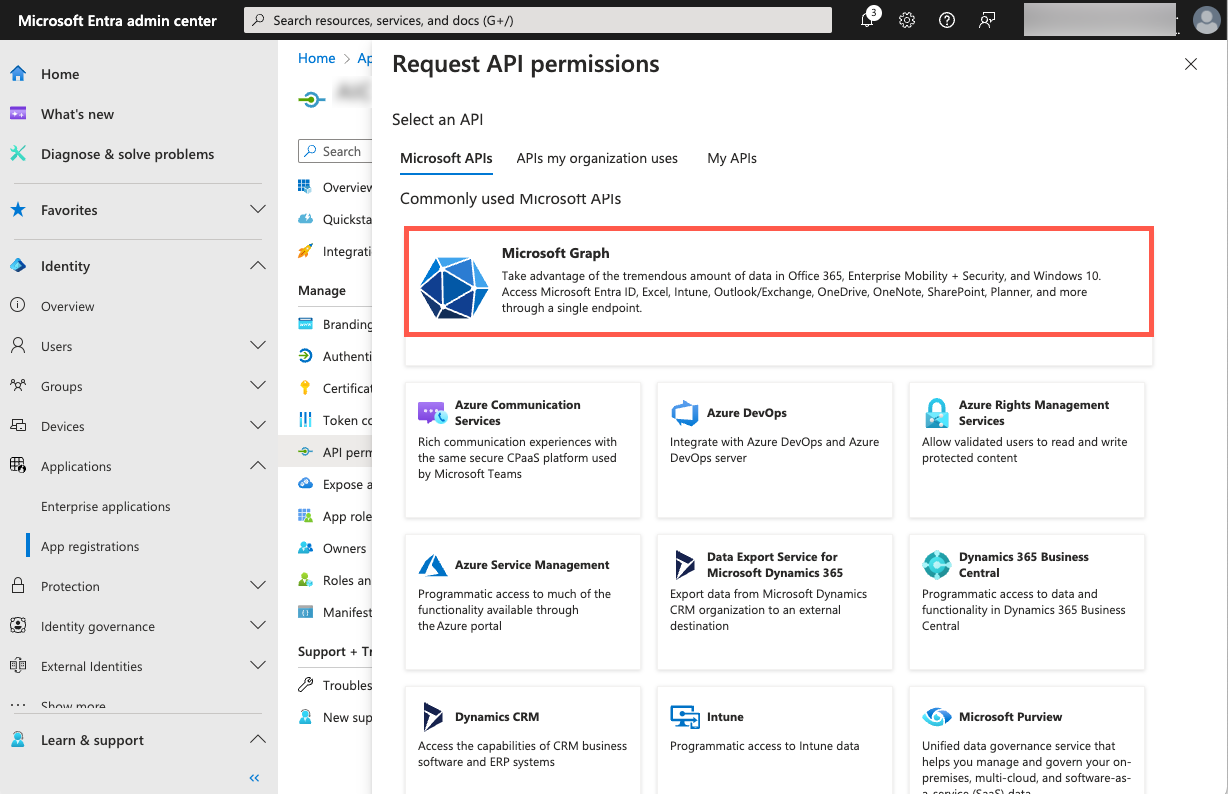
Click Add a permission.
-
On the Request API permissions panel, click Microsoft Graph.
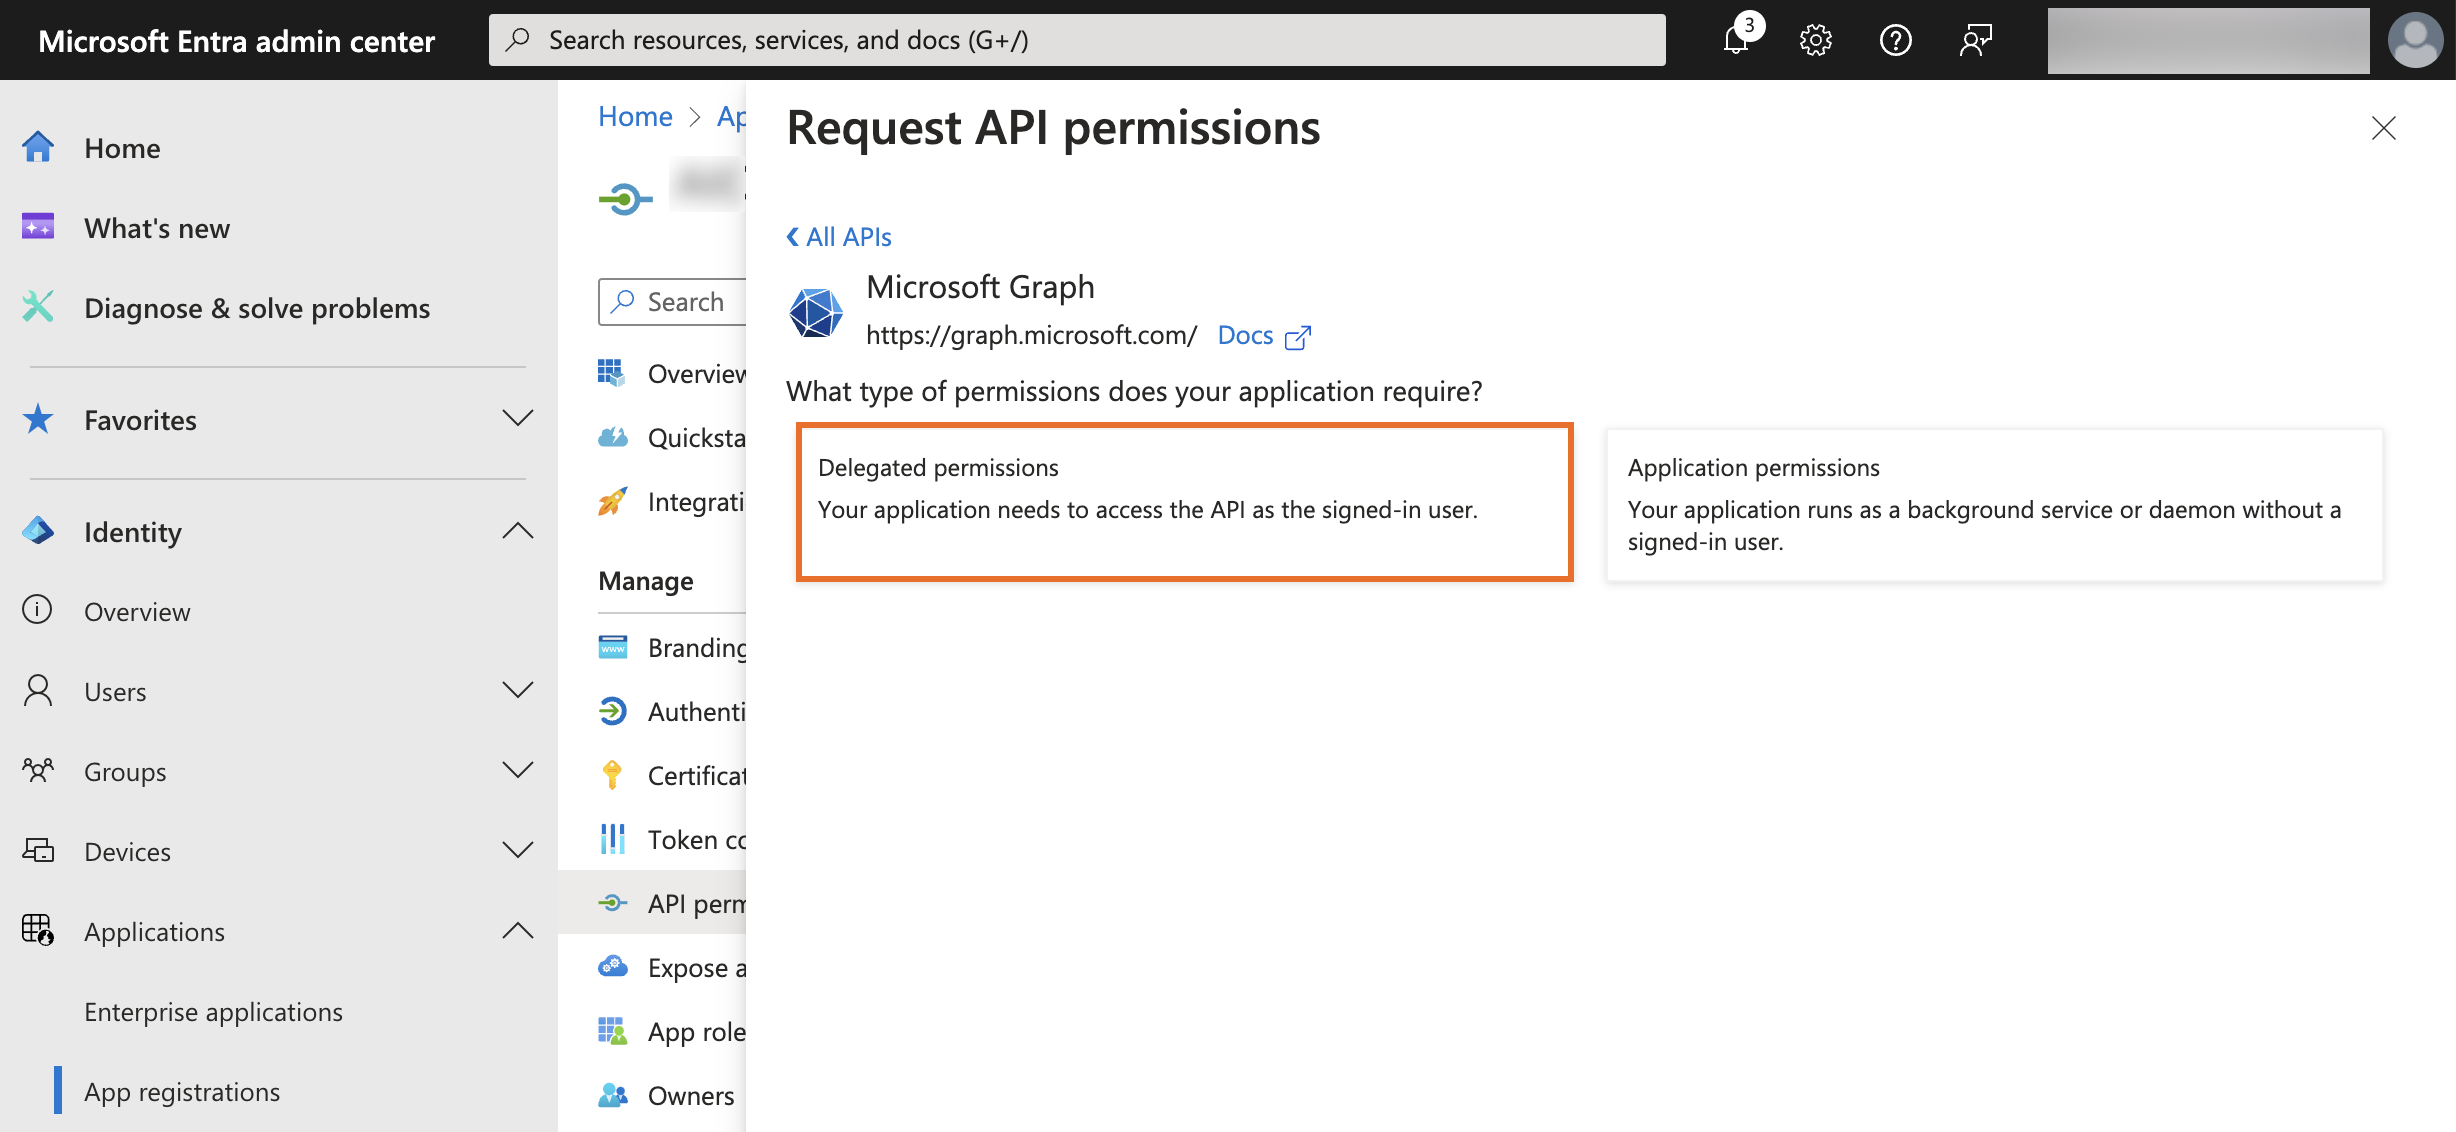
-
Click Delegated permissions for the type of permissions to allow for your application.
-
Expand Openid permissions.
-
Select the
openidandprofilepermissions.User.Readis included by default and should remain selected. -
Click Application permissions, expand User, and select the
User.Read.Allpermission.If you don’t intend to retrieve many attributes from Entra ID and populate them into PingOne, you can select the
User.ReadBasic.Allpermission instead of theUser.Read.Allpermission.Both of these permissions require admin consent.
-
To grant admin consent, click Add permissions.
-
Click Grant admin consent for <your Entra tenant>.
Adding Microsoft as an identity provider in PingOne
Configure the IdP connection in PingOne.
Steps
-
In the PingOne admin console, go to Integrations > External IdPs and click the icon.
-
Click Microsoft as the Identity Provider Type.
-
Click Next.
-
In the Create Profile step, enter the following information:
-
Name: A unique identifier for the IdP.
-
Description (optional): A brief description of the IdP.
-
Population: Select a population that overrides the authentication policy’s registration population and enables just-in-time (JIT) registration from the IdP.
You can’t change the Icon and Sign-on button, in accordance with the provider’s brand standards.
-
-
Click Next.
-
In the Connection Details step, enter the following information:
-
Client ID: The application ID from the Microsoft Entra admin center that you copied earlier. You can find this information on the Microsoft Entra admin center.
-
Client secret: The application secret from the Microsoft Entra admin center that you copied earlier. You can find this information on the Microsoft Entra admin center.
-
Tenant ID: The tenant ID of your Entra tenant from the Microsoft Entra admin center that you copied earlier. You can find this information on the Microsoft Entra admin center.
-
Callback URL: Copy the Callback URL and paste it in a secure location. You’ll add this value in the Microsoft Entra admin center later.
-
-
Click Next.
-
Define how the PingOne user attributes are mapped to IdP attributes. Learn more in Mapping attributes.
-
Leave the default PingOne user profile attributes and the external IdP attributes:
-
Preferred Username (from Microsoft) as the source of the PingOne Username
-
Email (from Microsoft) as the source of the PingOne Email Address
-
-
To add an attribute, click Add.
-
To use the advanced expression builder, click the Gear icon (). Learn more in Using the expression builder and Using expressions to retrieve Microsoft Entra attributes.
-
Select the update condition, which determines how PingOne updates its user directory with the values from the IdP. The options are:
-
Empty only: Update the PingOne attribute only if the existing attribute is empty.
-
Always: Always update the PingOne directory attribute.
-
-
-
Click Save.
-
Click the connection in the External IdPs list to expand the connection details.
-
On the Profile tab, click .
-
For Population, select the population that you previously created for Entra ID users.
-
If you created a new PingID environment in PingOne, use the population that you created in New PingID accounts: Creating a population for Entra ID users.
-
If you integrated your PingID account with a new PingOne account, use the population that you created in Existing PingID accounts: Creating a population for Entra ID users and changing the default population.
-
-
Click Save.
-
To enable the IdP, click the toggle at the top of the details panel to the right (blue).
You can disable the IdP by clicking the toggle to the left (gray).

Updating the population
After creating your connection to Microsoft, update the Identity Provider setting for the population that you created for users coming from Entra ID.
The Identity Provider setting is used as the runtime fallback IdP for users in the population who don’t have an authoritative IdP configured in their user profile. Updating the population is especially important if you integrated your PingID account with a new PingOne account because those user profiles are created in PingOne without an authoritative IdP set. If the user is removed from the population, the IdP set in the population no longer applies to them.
Steps
-
In the PingOne admin console, go to Directory > Populations.
-
Click the population that you previously created for Entra ID users and click .
-
In the Identity Provider list, select the IdP that you previously created in Adding Microsoft as an identity provider in PingOne.
-
Click Confirm in the modal, and then click Save.
Adding a DaVinci flow and flow policy for Entra ID external authentication
Download and configure the DaVinci Entra ID external MFA sample flow to handle external authentication requests from Entra ID.
Steps
-
Download the Entra ID External MFA & OIDC Authentication Reference Flow from the Ping Identity Marketplace and extract the contents of the
.ziparchive to a folder on your computer. -
In DaVinci, on the Flows tab, click Add Flow and select Import Flow.
-
Upload the
entra-id-external-multifactor-authentication-reference-flow.jsonfile from the sample flow.zipfile and click Import. -
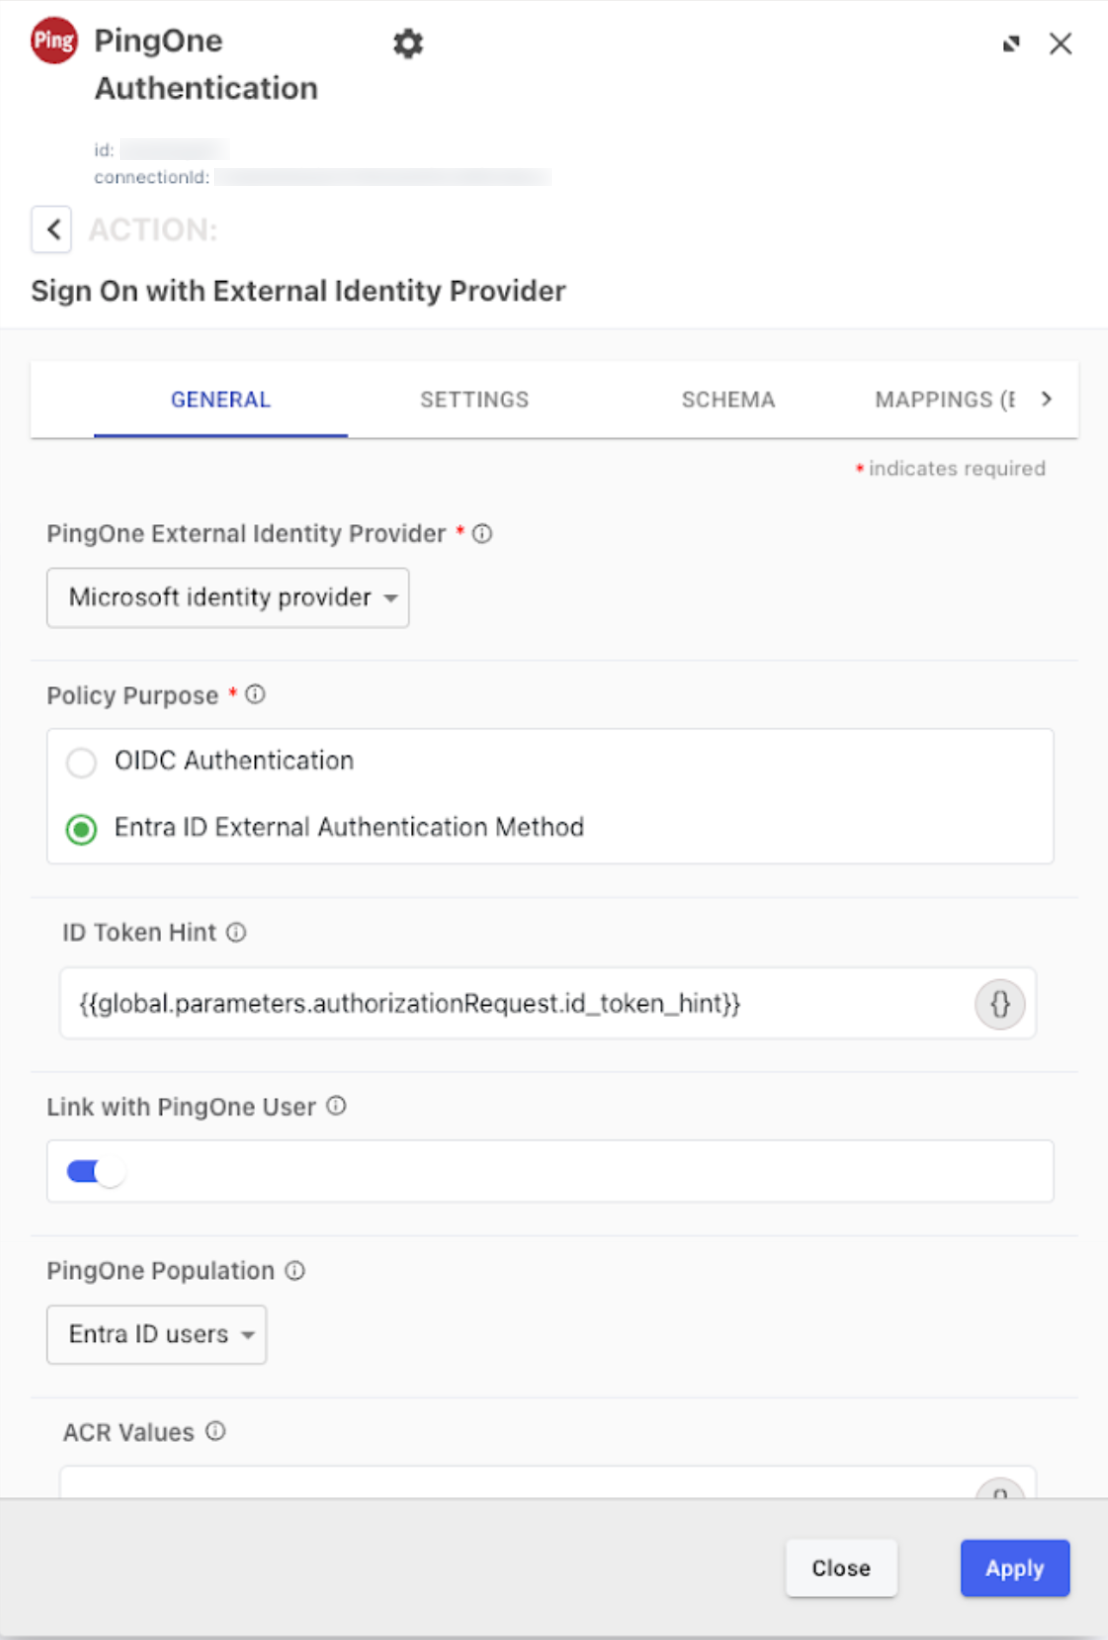
Configure the Entra ID external MFA - Sign On with External Identity Provider node:
-
Click the node to open the configuration settings.
-
On the General tab, in the PingOne External Identity Provider list, select the Microsoft IdP you created in Adding Microsoft as an identity provider in PingOne.
-
Make sure the following default configurations are set:
-
Policy Purpose is set to Entra ID External Authentication Method.
-
ID Token Hint is set to
{{global.parameters.authorizationRequest.id_token_hint}}. -
The Link with PingOne User toggle is enabled (blue).
-
-
In the PingOne Population list, select the applicable population.
-
For new PingID accounts, learn more in New PingID accounts: Creating a population for Entra ID users.
-
For existing PingID accounts, learn more in Existing PingID accounts: Creating a population for Entra ID users and changing the default population.
-
-
Click Apply.
-
-
Review the default configuration settings for the Mint Tokens - Return Success Response node:
-
Click the node to open the settings.
-
On the General tab, make sure User ID is mapped to
idfrom the Entra ID External MFA - Sign On with External Identity Provider node. -
Make sure Custom Authentication Methods is mapped to
entraIdAmrfrom the Map PingID AMR Value - Custom Function node. -
Click Apply.
-
-
Add a DaVinci flow policy for the sample flow:
-
Go to the Applications tab and click Add Application.
-
In the Name field, enter a name for the application and click Create.
-
To edit the application, select the application in the Applications list.
-
On the Flow Policy tab, click Add Flow Policy.
-
In the Policy Name field, enter a name for the flow policy.
-
Select PingOne Flow Policy to enable flows in the policy to be launched directly through PingOne.
This option can’t be changed after the flow policy is created. PingOne flow policies can only include flows and flow versions that have the PingOne Flow setting enabled. Learn more in Configuring a flow policy in the DaVinci documentation.
-
Click Next.
-
In the flow list, click Entra ID External MFA Sample Flow and select one or more versions of the flow to use.
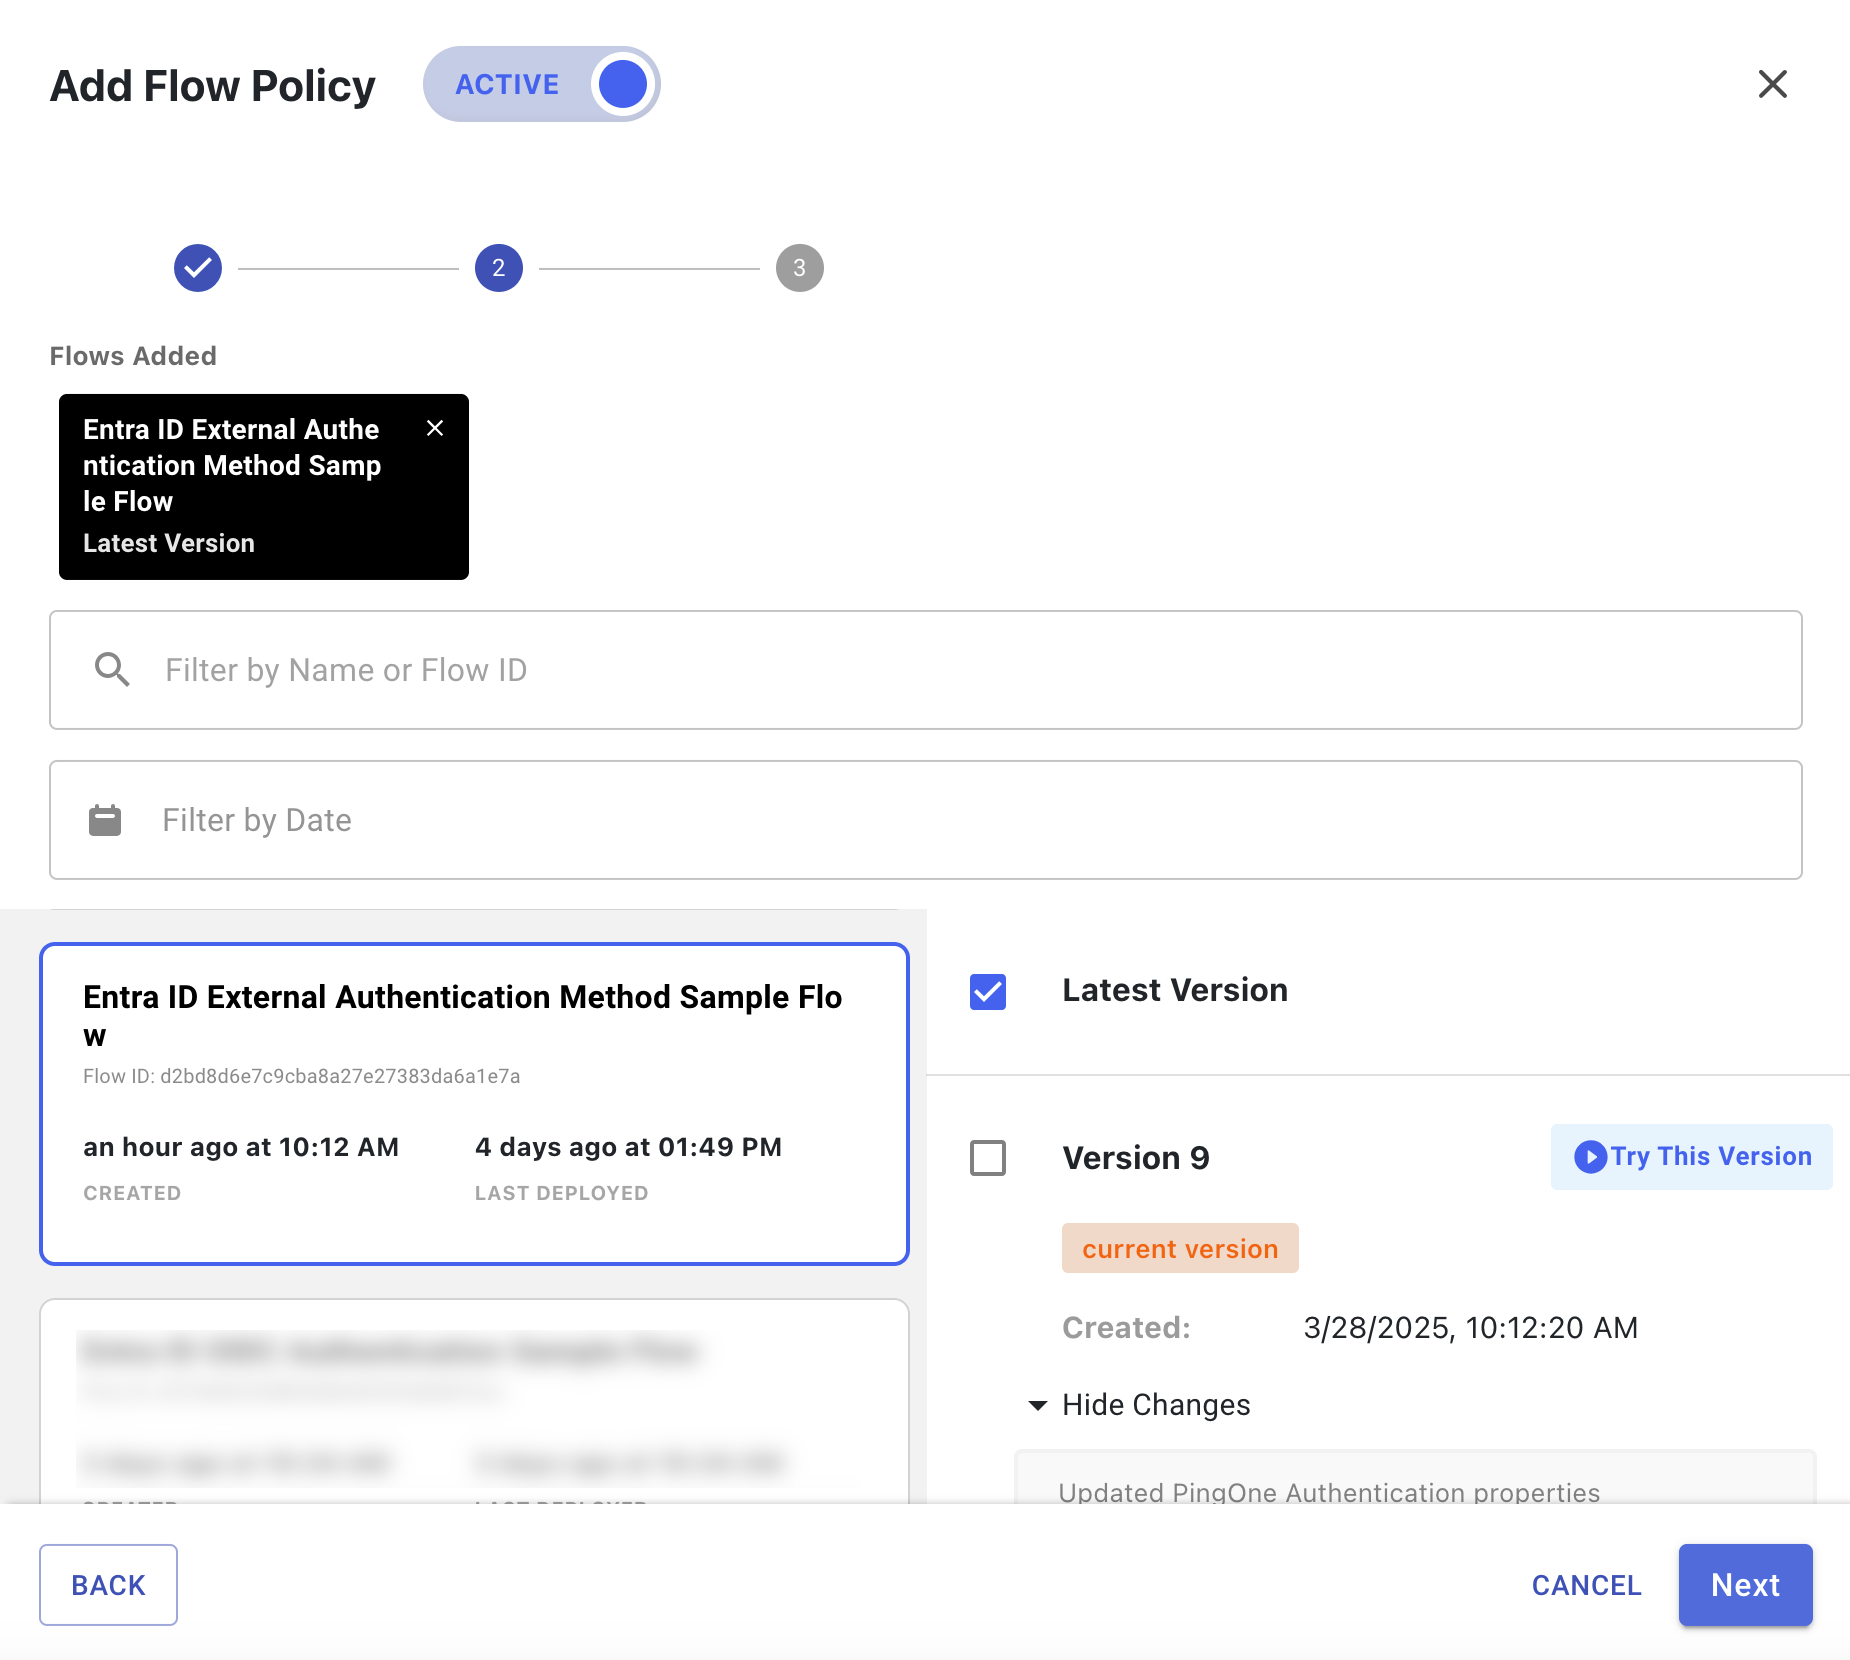
-
Click Next.
-
(Optional) Add weight distribution and analytics information for each flow and flow version. Learn more in Configuring a flow policy in the DaVinci documentation.
-
Click Create Flow Policy.
-
Configuring the OIDC application
Configure an OIDC application to handle authentication requests from Microsoft Entra ID.
Steps
-
In the PingOne admin console, go to Applications > Applications.
-
Click the icon to add an application.
-
On the Add Application panel, enter and choose the following:
-
Application Name: A unique identifier for the application.
-
Description (optional): A brief description of the application.
-
Icon (optional): A graphic representation of the application. Use a file up to 1 MB in JPG, JPEG, GIF, or PNG format.
-
Application Type: Choose OIDC Web App.
-
Click Save.
-
-
On the Configuration tab, click and enter or edit the following:
-
Response Type: Clear the default Code checkbox and select ID Token.
-
Grant Type: Clear the default Authorization Code checkbox and select Implicit checkbox.
-
Redirect URIs: Enter
https://login.microsoftonline.com/common/federation/externalauthprovider. -
Click Save.
-
-
On the Policies tab, click Add Policies.
-
On the DaVinci Policies tab, select the DaVinci flow policy that you created to handle external authentication requests from Entra ID.
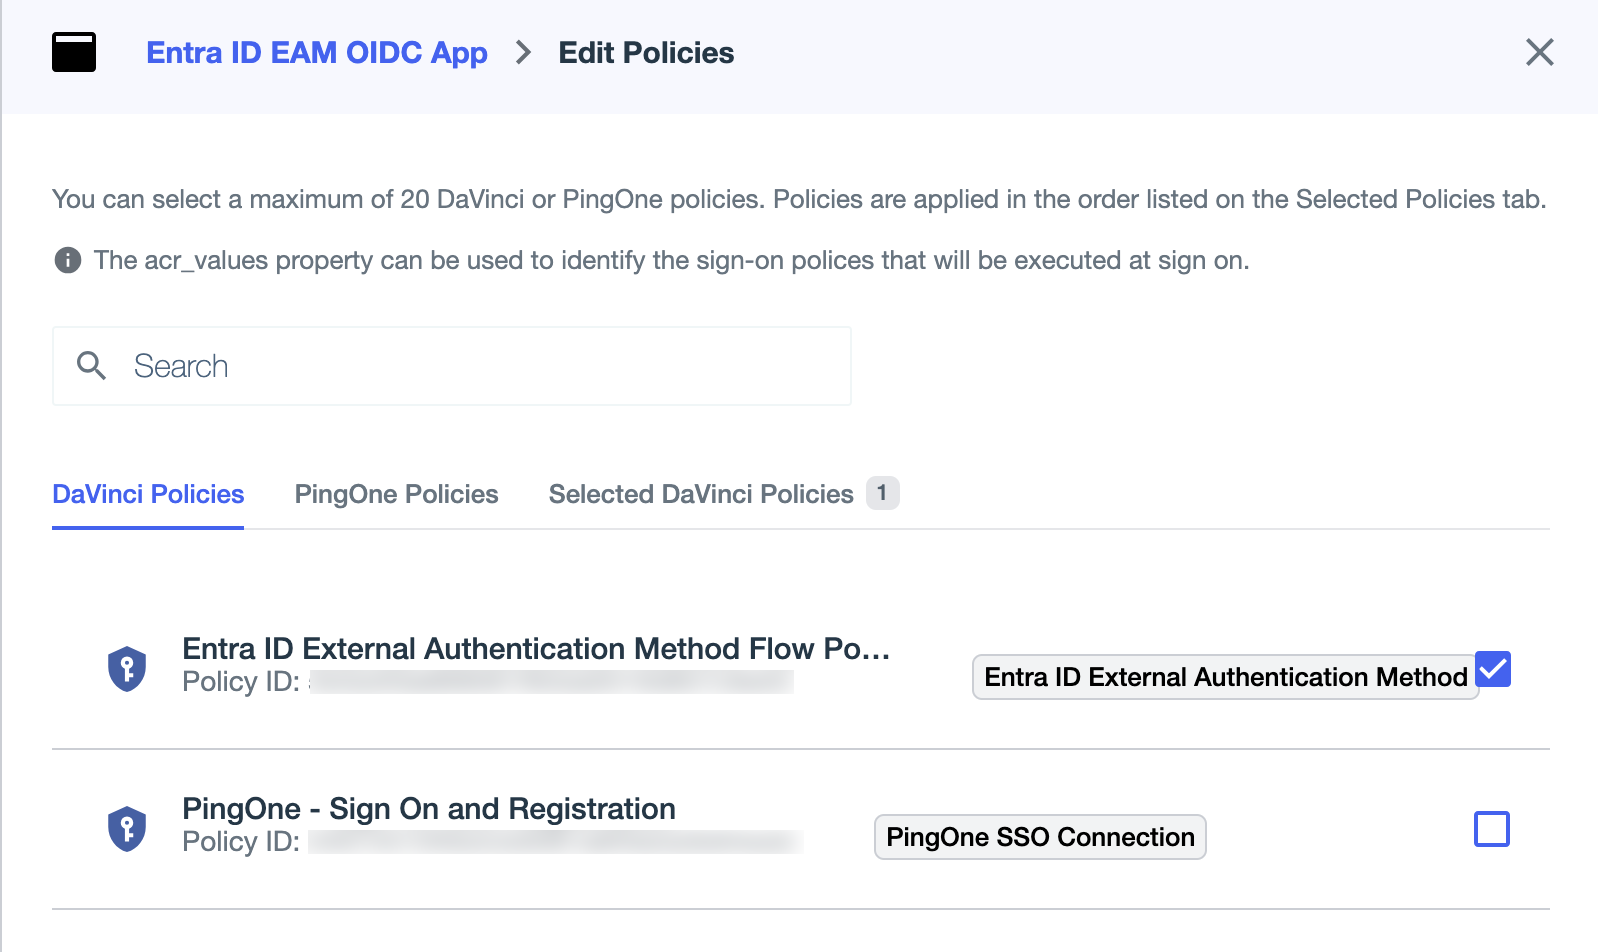
-
Click Save.
-
To enable the application, click the toggle at the top of the details panel to the right (blue).
You can disable the application by clicking the toggle to the left (gray).
-
Click the application entry to open the details panel.
-
On the Overview tab, copy the following PingOne application details to add in the Microsoft Entra admin center:
-
In the General section, copy the Client ID and paste it in a secure location.
-
In the Connection Details section, copy the OIDC Discovery Endpoint and paste it in a secure location.
-
Creating external MFA in Microsoft Entra
After creating the OIDC application in PingOne and copying the application ID, OIDC discovery endpoint, and client ID, create external MFA in Microsoft Entra.
Steps
-
Go to the Microsoft Entra admin center.
-
In the sidebar, go to Protection > Authentication methods > Policies.
-
Click Add External MFA.
-
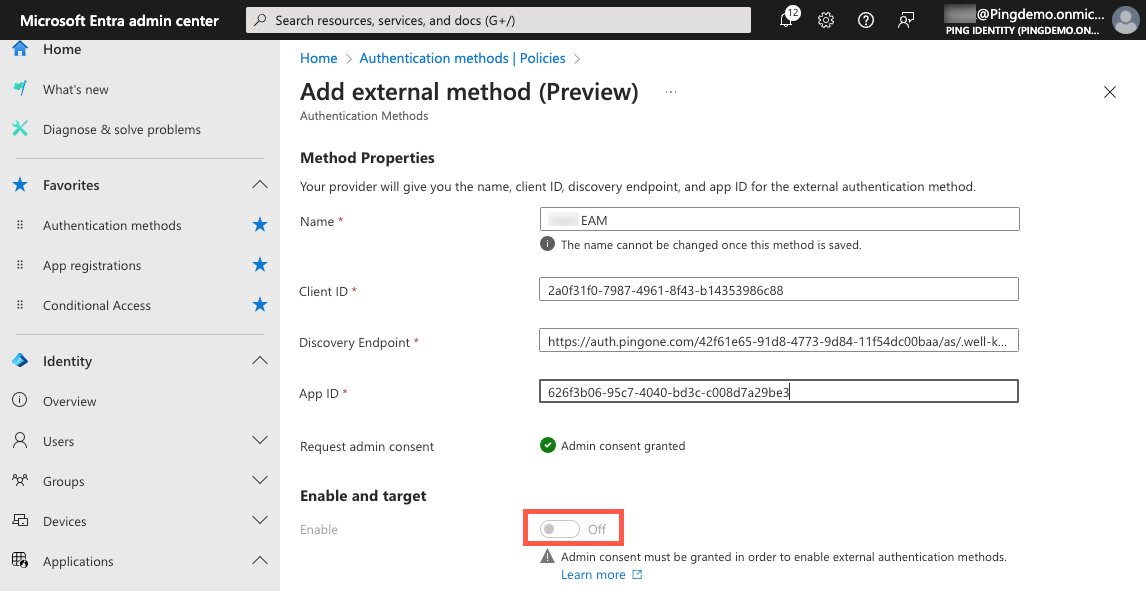
Enter the following:
-
Name: Enter a name for the external MFA.
-
Client ID: Enter your PingOne application’s client ID that you copied earlier.
-
Discovery Endpoint: Enter the OIDC Discovery Endpoint that you copied earlier from PingOne. The format is
<issuer>/.well-known/openid-configuration. -
App ID: Enter the Microsoft Entra application ID that you copied previously. You can find the application ID in the Microsoft Entra admin center.
-
-
Click Request permission.

Result:
The browser opens a new window for you to sign on with your Microsoft Entra admin credentials.
-
Review the requested permissions and click Accept if you agree.
-
In the Enable and target section, configure whether you want to include a subset of your users or all users.
-
Click the Enable toggle to enable the external MFA.
Creating a conditional access policy in Microsoft Entra
Configure a conditional access policy in Microsoft Entra to define authentication requirements for users accessing applications.
|
If your Microsoft Entra tenant contains other conditional access policies that use custom controls to initiate MFA, ensure those policies don’t apply to the same users, groups, and applications that you select in this conditional access policy. Otherwise, your users could be prompted multiple times for MFA. |
Steps
-
Go to the Microsoft Entra admin center.
-
In the sidebar, go to Protection > Conditional Access > Policies.
-
Click Create new policy or update an existing policy.
-
Configure the following:
-
Name: Enter a name for the policy.
-
Users: Select the same users and groups that you selected in your external MFA.
-
Target resources: Select the applications to which you want to apply this conditional access policy.
-
Grant:
-
Click Grant access.
-
Select the Require multifactor authentication checkbox.
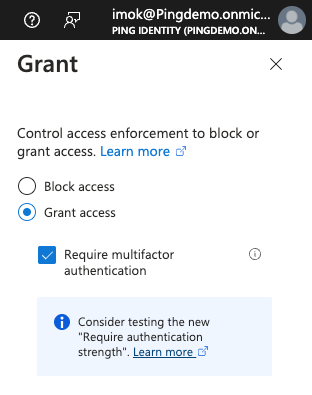
-
Click Select.
-
-
Enable policy: Select On to turn on the policy.
-
-
Click Save.
Configuring PingID as the external MFA
Configure a PingID policy to process user MFA requests coming from the PingOne application that you created to handle Microsoft Entra requests.
Steps
-
In the PingID admin portal, go to Setup > PingID and click the Configuration tab.
If you selected Enable for Enforce Policy, you might need to create an additional PingID policy. Learn more in the next step.
-
Click the Policy tab, and on the Web tab, expand and review each policy.
Microsoft Entra ID doesn’t allow MFA bypasses from external MFA and requires always prompting the user to complete MFA. If you have a policy that can apply to all applications and that has a rule with an action of Approve, you must create a new policy for the PingOne application. Examples of such policies include Recent Authentication or Accessing from Company Network.
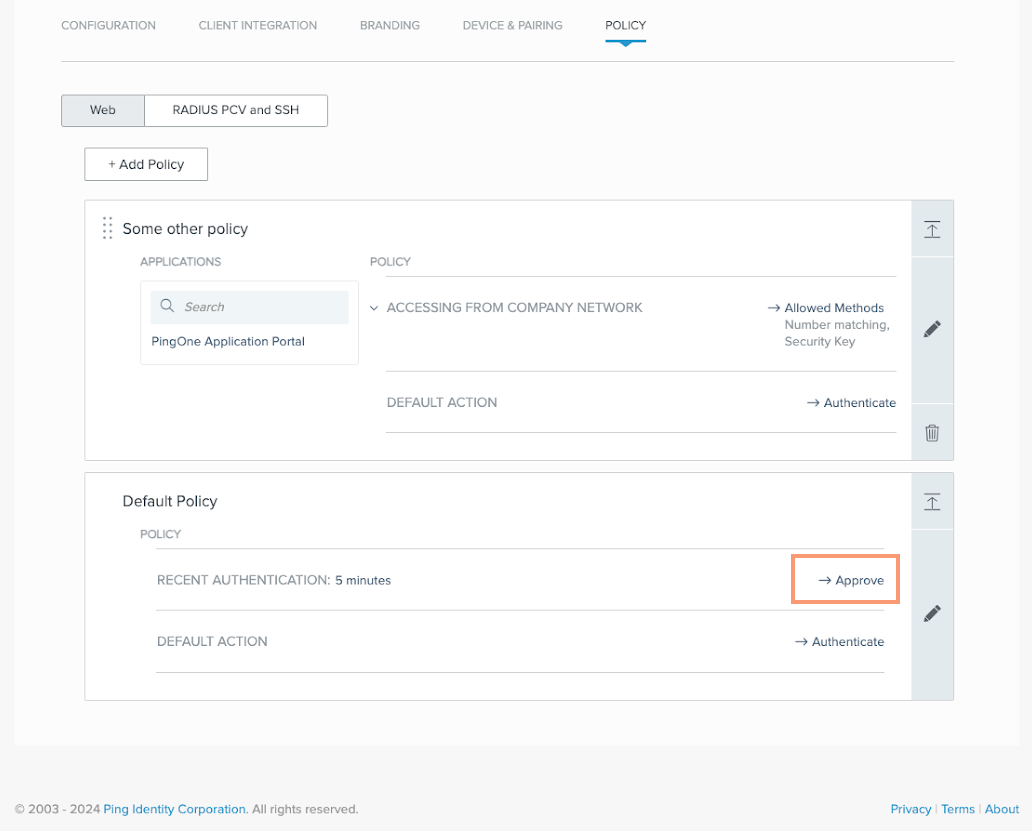
-
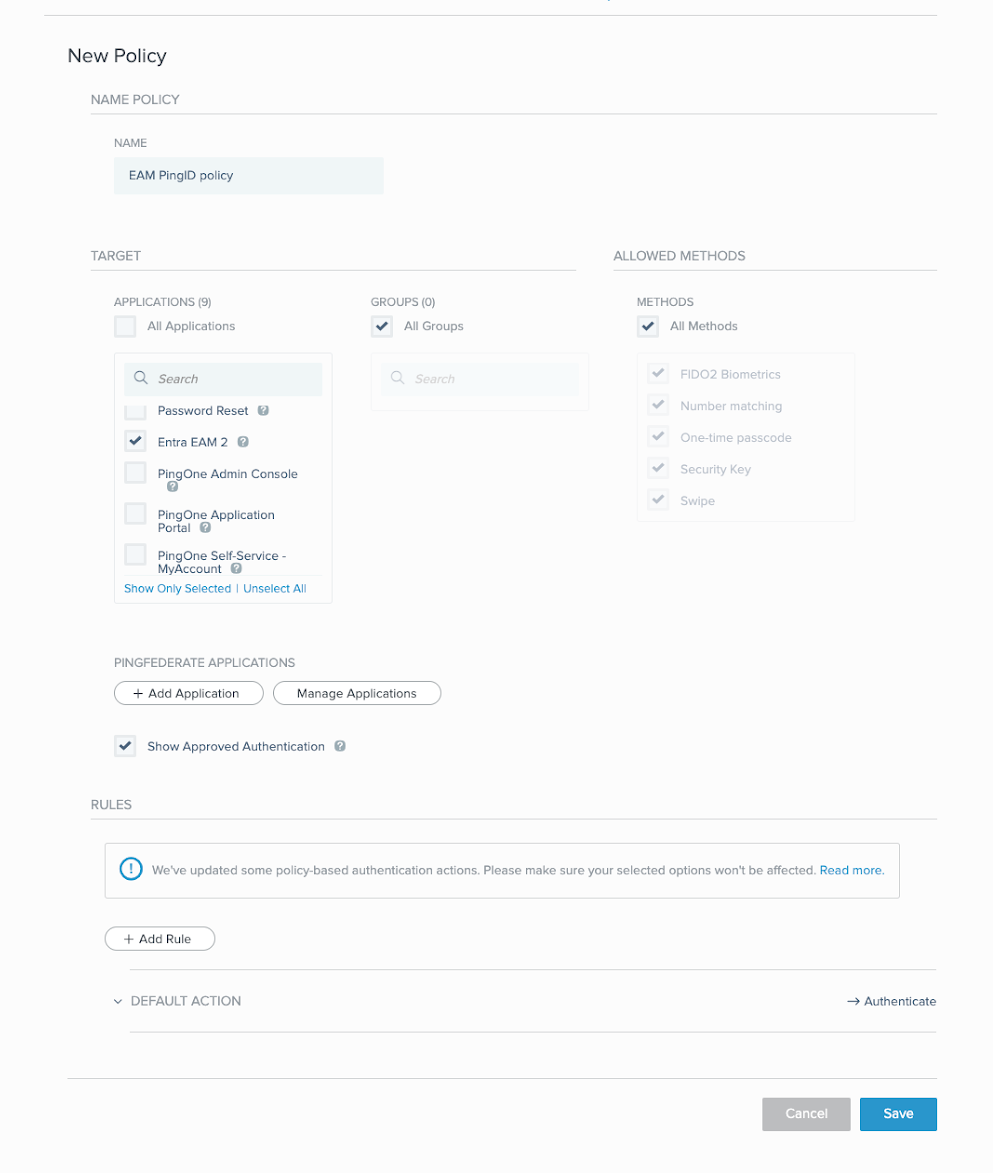
To add a new policy, click Add Policy.
-
Enter a name for the policy, such as
External MFA PingID policy. -
In the Target section, in the Applications list, select the PingOne application that you previously created.
-
For Groups, select all applicable groups.
-
(Optional) In the Allowed Methods section, select the authentication methods you want to allow.
-
Click Save.
Result:
The new policy becomes the first PingID policy, which works as Microsoft Entra ID external MFA. PingID will use this new policy when processing MFA requests coming from the PingOne application that you created to handle Microsoft Entra ID requests.
-
-
In a scenario where a user forgot or lost their mobile phone and can’t use the PingID app for MFA, you can allow a user to bypass MFA with PingID for a specificed period of time, such as 8 hours.
-
In the PingOne admin console, go to Directory > Users.
-
Browse or search for the applicable user and click the user entry to open the details panel.
-
In the list for the Services tab, select Authentication.
-
Scroll down to the Integrations section, click the More Options icon, and select Bypass.
-
In the Bypass window, select the desired amount of time from the Allow bypass of PingID authentication on SSO for list and click Bypass.
Because Microsoft Entra ID requires the third-party MFA provider to specify the MFA method used and doesn’t accept MFA bypasses as an acceptable MFA method, you must also configure bypass in the Microsoft Entra admin center. Learn more about configuring conditional access in the Microsoft Entra documentation.
-
Adding a DaVinci flow and flow policy for OIDC authentication
If you want to allow users to sign on to the PingOne Self-Service - MyAccount application to manage their MFA methods or to other applications you’ve added to PingOne, you must create a DaVinci flow and flow policy for OIDC authentication using the same Microsoft IdP connection.
Before you begin
Make sure you’ve downloaded the Entra ID External MFA & OIDC Authentication Reference Flow from the Ping Library and extracted the contents of the .zip archive to a folder on your computer. Learn more in Adding a DaVinci flow and flow policy for Entra ID external authentication.
Steps
-
In DaVinci, on the Flows tab, click Add Flow and select Import Flow.
-
Upload the
entra-id-external-mfa-oidc-authentication-reference-flow.jsonfile from the sample flow.ziparchive and click Import. -
Configure the Entra ID OIDC authentication - Sign On with External Identity Provider node:
-
Click the node to open the configuration settings.
-
In the PingOne External Identity Provider list, select the same Microsoft IdP you used in the Entra ID External MFA Sample Flow.
-
Make sure Policy Purpose is set to OIDC Authentication.
-
Make sure the Link with PingOne User toggle is enabled (blue).
-
In the PingOne Population list, select the same population you used in the Entra ID External MFA Sample Flow.
-
Click Apply.
-
-
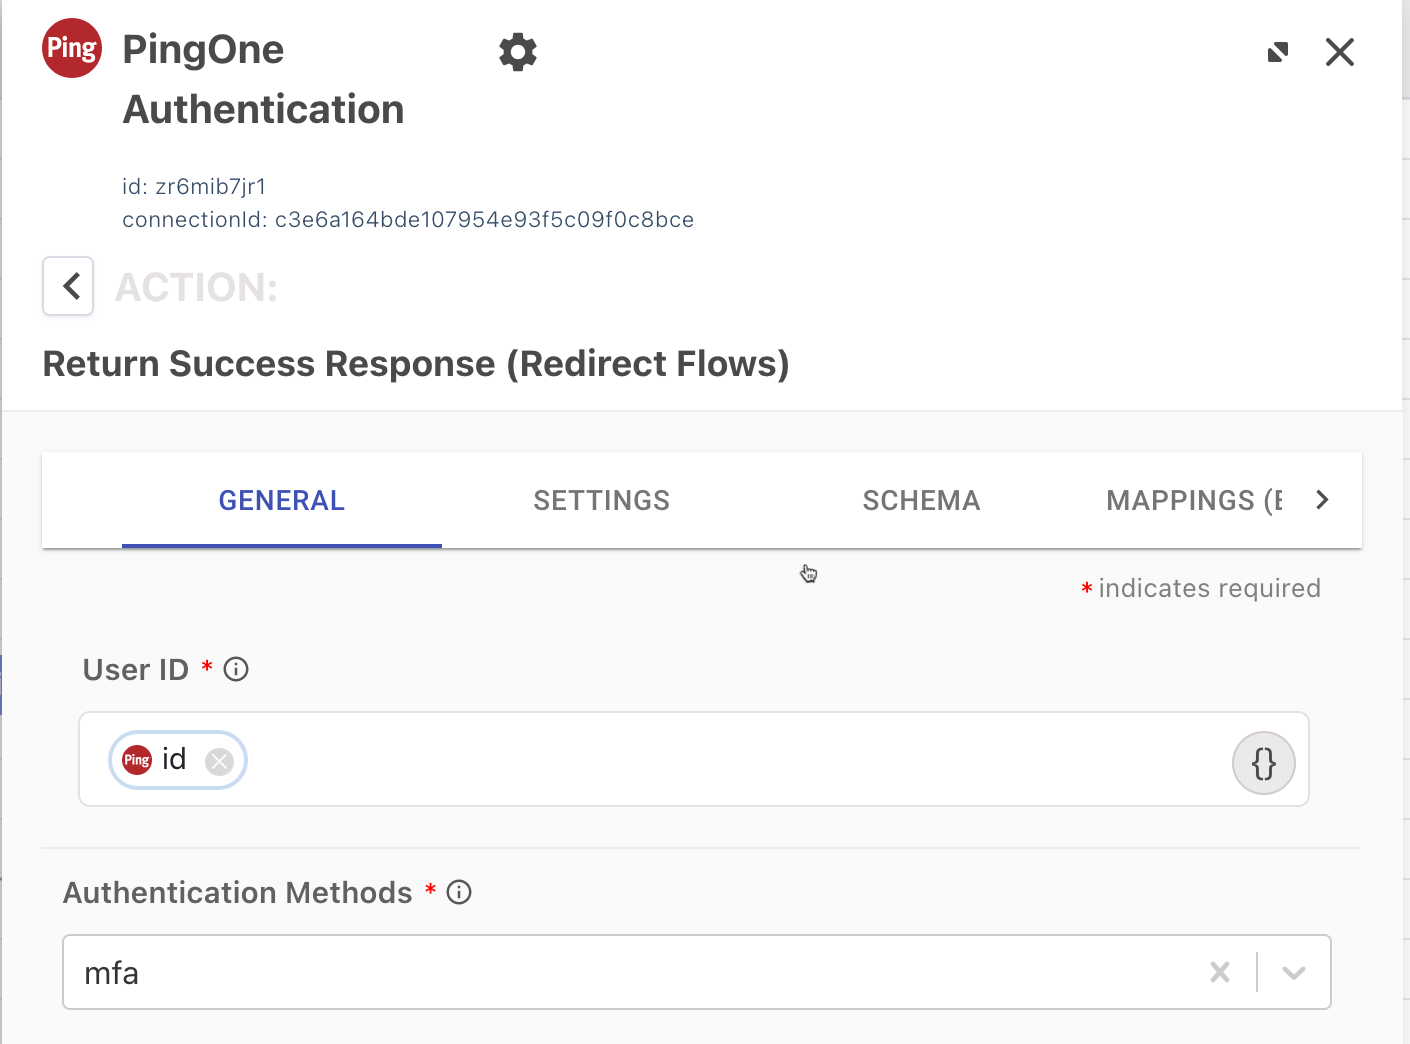
Review the default configuration settings for the Mint Tokens - Return Success Response node:
-
Click the node to open the configuration settings.
-
On the General tab, make sure User ID is mapped to
idfrom the Entra ID OIDC authentication - Sign On with External Identity Provider node. -
In the Authentication Methods list, make sure mfa is selected.
-
Click Apply.
-
-
Add a DaVinci flow policy for the sample flow:
-
Go to the Applications tab and click Add Application.
-
In the Name field, enter a name for the application and click Create.
-
To edit the application, select the application in the Applications list.
-
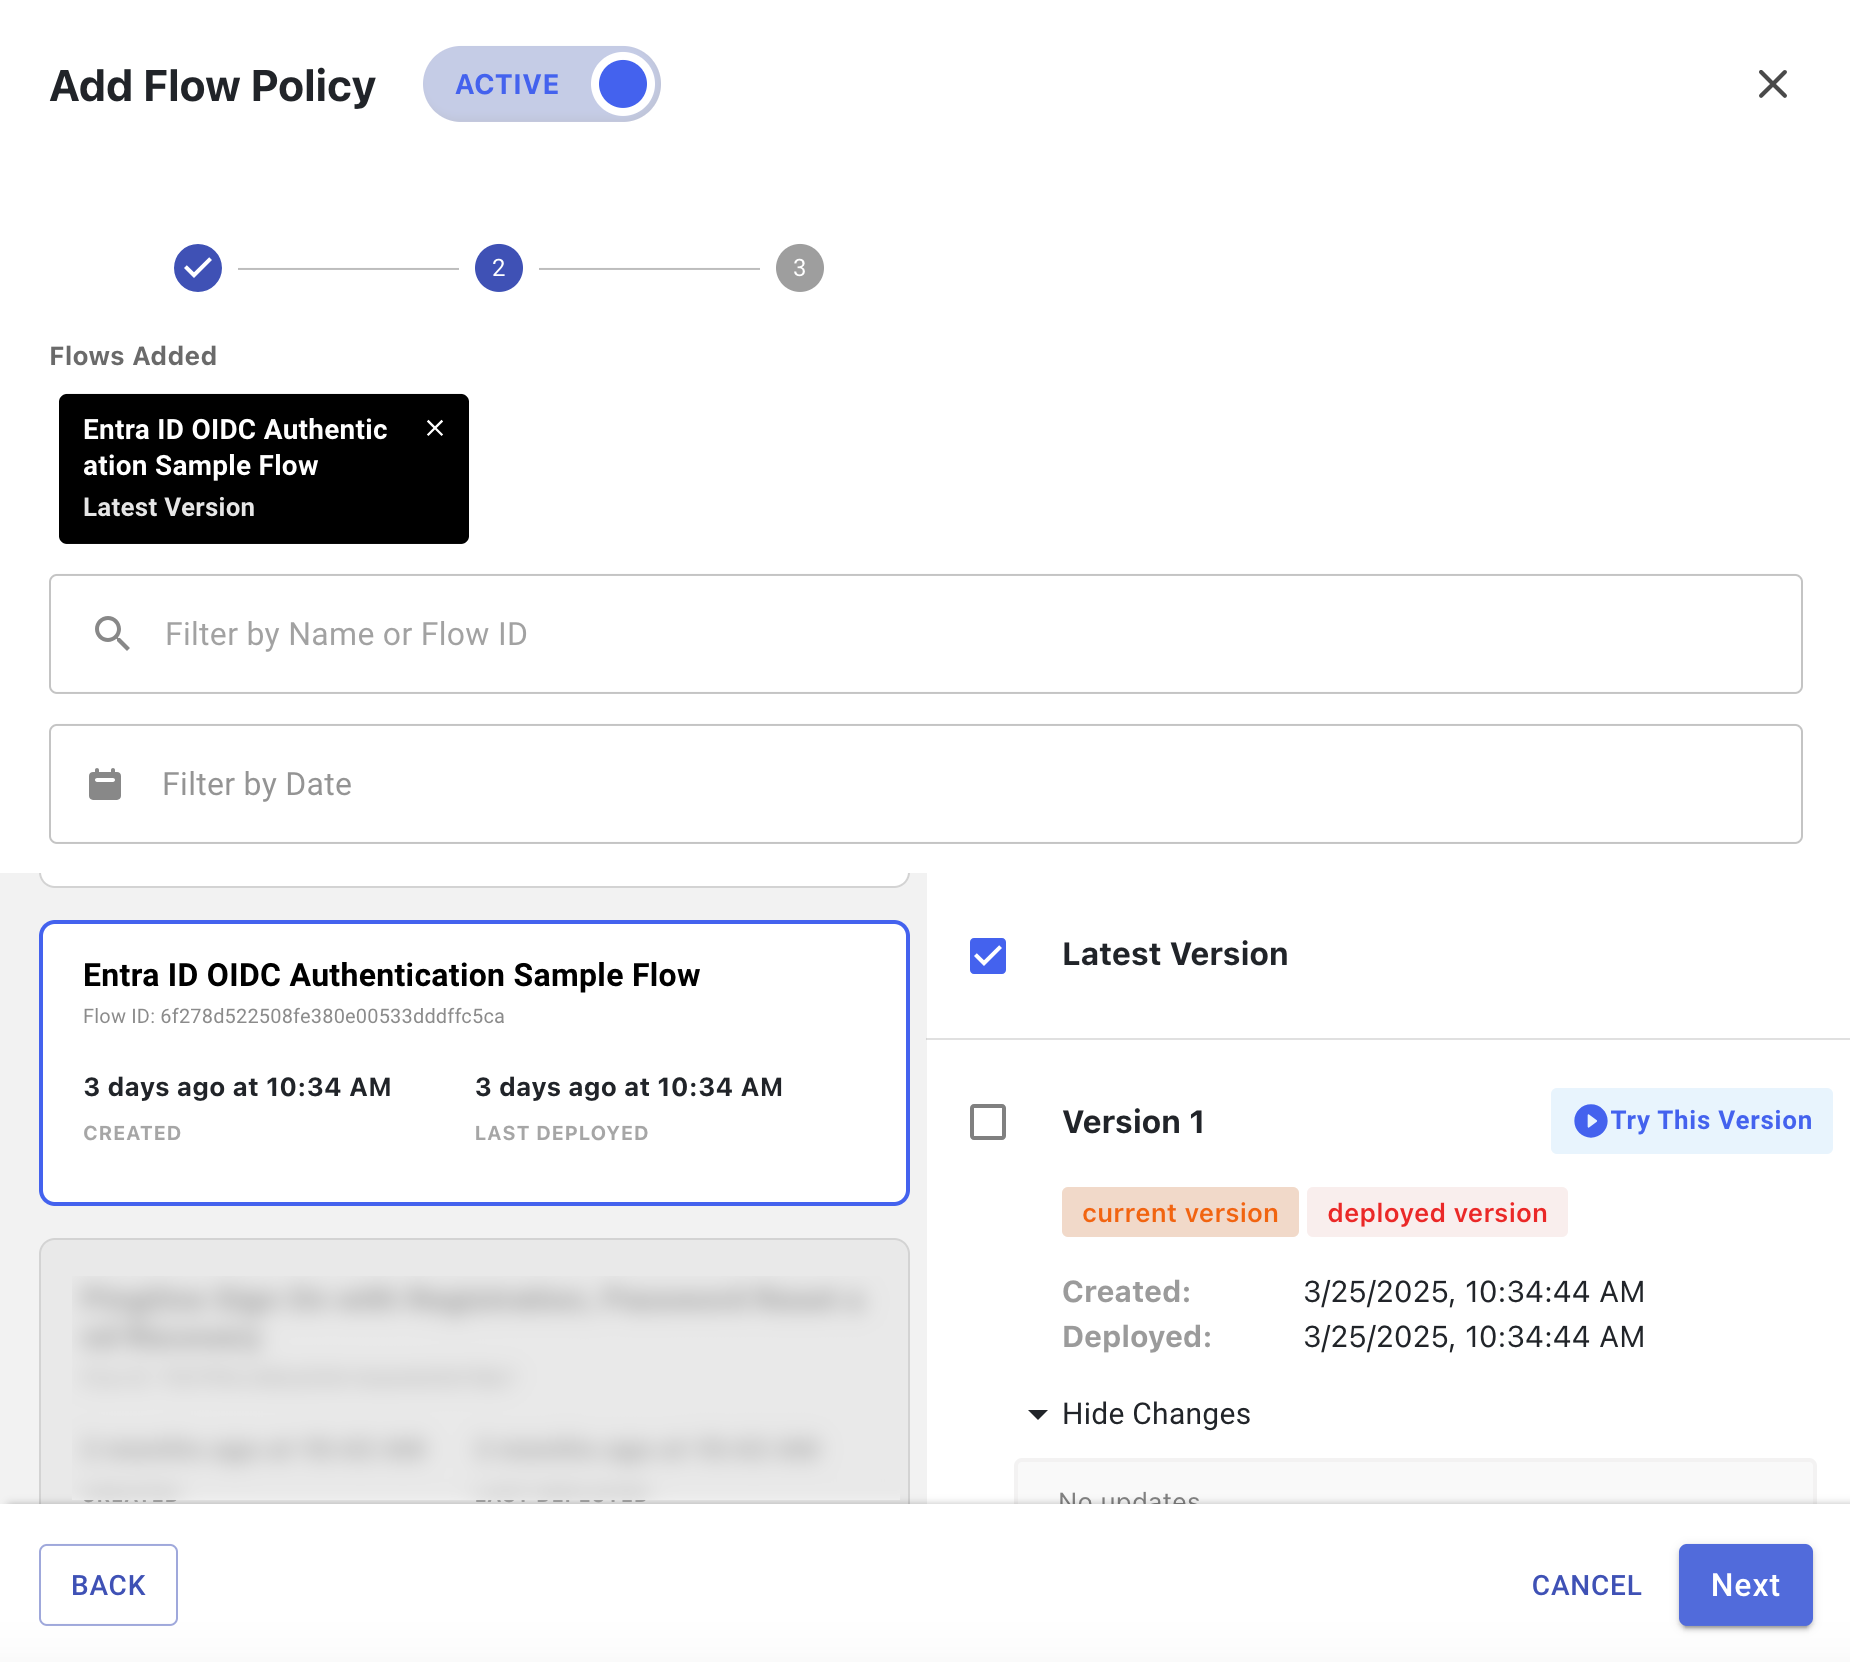
On the Flow Policy tab, click Add Flow Policy.
-
In the Policy Name field, enter a name for the flow policy.
-
Select PingOne Flow Policy to enable flows in the policy to be launched directly through PingOne.
This option can’t be changed after the flow policy is created. PingOne flow policies can only include flows and flow versions that have the PingOne Flow setting enabled. Learn more in Configuring a flow policy in the DaVinci documentation.
-
Click Next.
-
In the flow list, click Entra ID OIDC Authentication Sample Flow and select one or more versions of the flow to use.
-
Click Next.
-
(Optional) Add weight distribution and analytics information for each flow and flow version. Learn more in Configuring a flow policy in the DaVinci documentation.
-
Click Create Flow Policy.
-
Result:
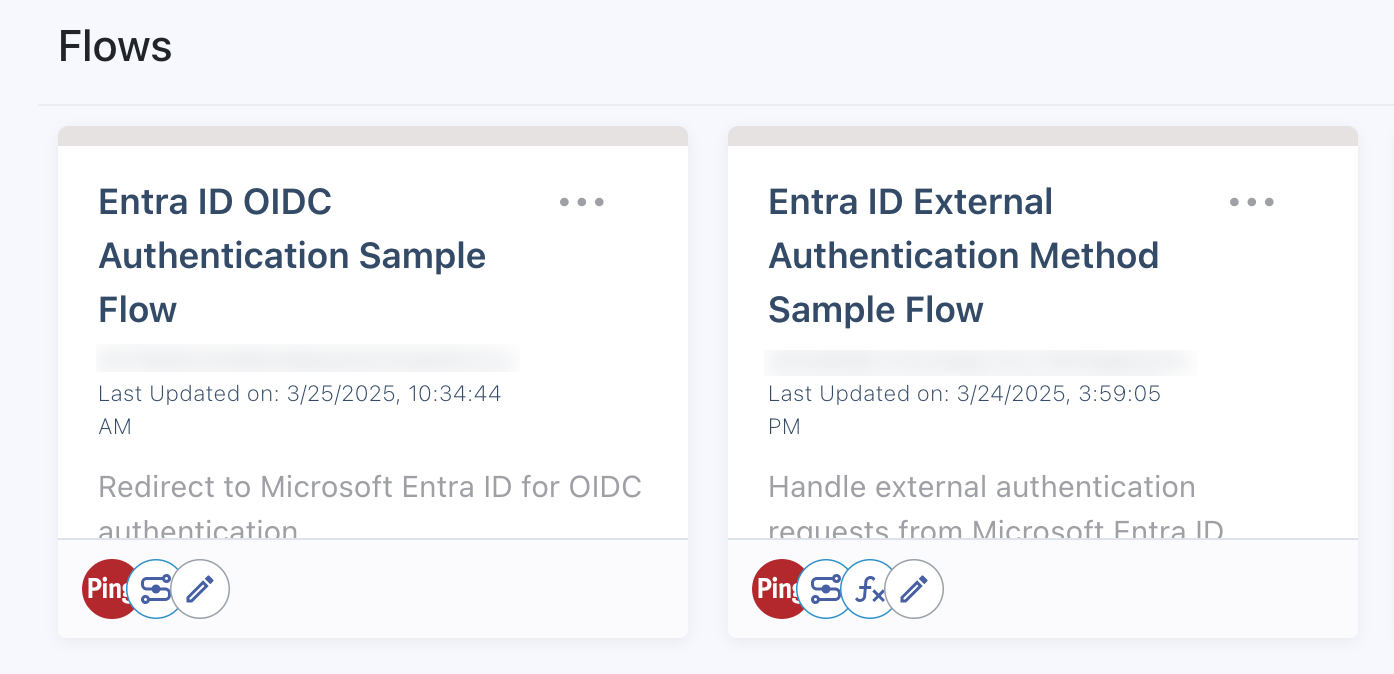
You now have two DaVinci flows:
-
A flow for users authenticating with PingOne as the external MFA for Entra ID
-
A flow for OIDC authentication to allow users to sign on to other applications
Adding the callback URL to the Entra admin center
If you created an authentication policy for OIDC authentication, you must also add the callback URL from the Microsoft IdP connection in PingOne to the application you registered in the Microsoft Entra admin center.
Steps
-
Go to the Microsoft Entra admin center.
-
In the sidebar, go to Identity > Applications > App registrations and click your application.
-
On the App registrations page, in the Manage section, click Authentication.
-
In the Platform configurations > Web > Redirect URIs section, click Add URI.
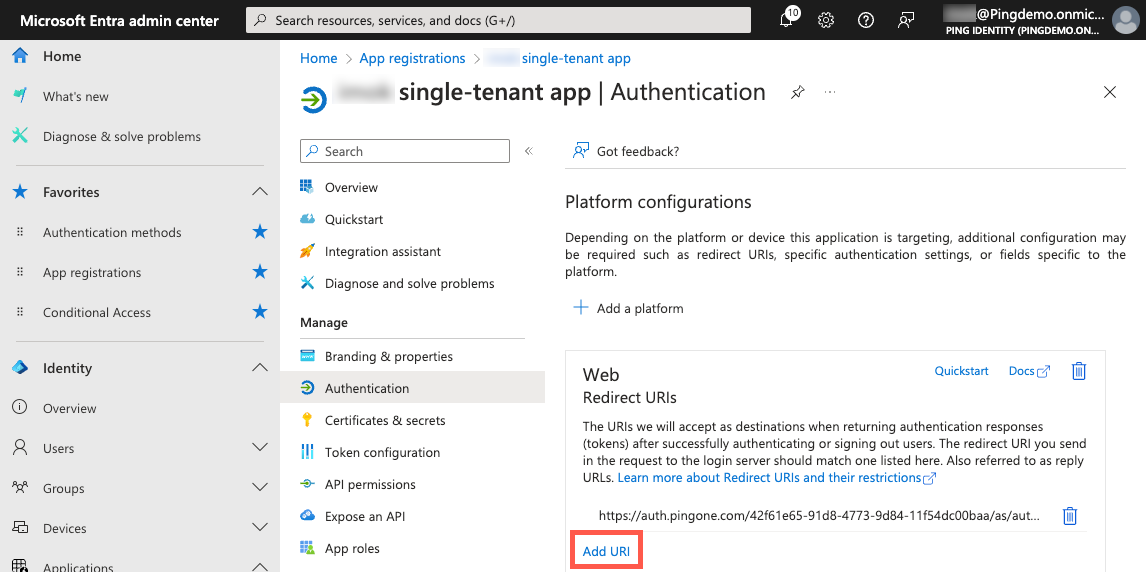
-
Paste the Callback URL that you copied from the PingOne admin console.
The following examples show the URL format:
Example 1:
https://auth.pingone.<region>/<envID>/rp/callback/microsoftExample 2:
https://<customDomain>/rp/callback/microsoft -
Click Save.
Result
The Redirect URIs section displays both URLs you’ve added:
-
Authorization URL
-
Callback URL

Assigning the DaVinci OIDC flow policy to an application in PingOne
After you create a DaVinci flow and flow policy for OIDC authentication and add the callback URL to the application in Entra ID, assign the DaVinci OIDC flow policy to applicable applications in PingOne, such as the PingOne Self-Service - MyAccount application or other applications you’ve added.
Steps
-
In the PingOne admin console, go to Applications > Applications and click the relevant application to open the details panel.
-
On the Policies tab, click Add policies.
-
On the DaVinci Policies tab, select the DaVinci OIDC flow policy that you created in Adding a DaVinci flow and flow policy for OIDC authentication.

-
Click Save.
Next steps
Repeat these steps for any other applications to which you want users to be able to sign on, for example Another App in the following screenshot.

Validation
Now that you’ve set up external MFA in Entra ID and configured PingOne and PingID as the external MFA provider, you’re ready to validate that your Entra ID users can use PingID to complete MFA.
-
Open a new browser window in incognito mode.
-
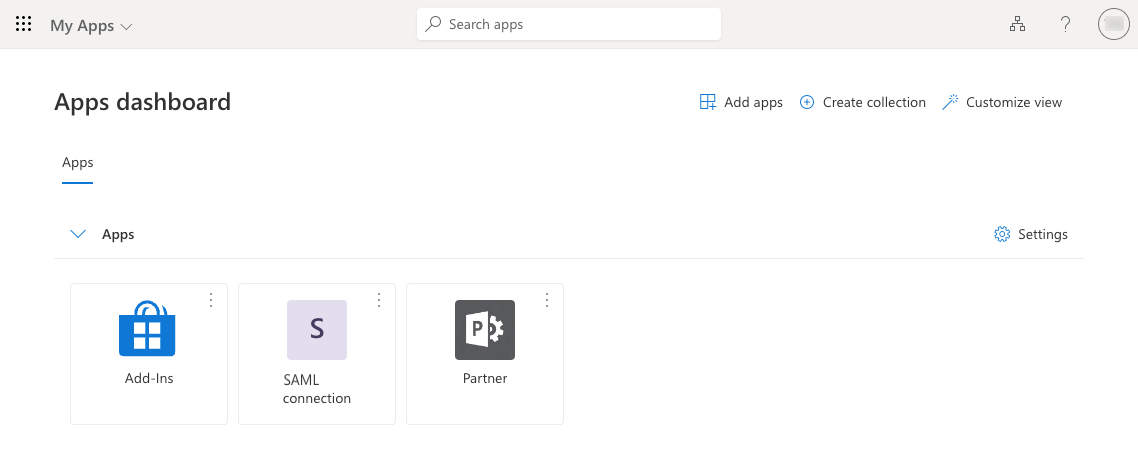
In the Entra admin center, locate the application you added to the conditional access policy that requires MFA and click the URL for the application.
In this example, My Apps at https://myapps.microsoft.com.
-
Sign on to the application and complete the first-factor authentication at Microsoft using a test user’s credentials.
Result:
Entra ID prompts the user to complete MFA action based on what Entra thinks is the most secure method if:
-
You, as an Entra ID admin, have activated system-preferred MFA and included the test user as the target user.
-
The test user has installed and successfully used the system-preferred MFA method.
In this example, the test user has installed and used both Microsoft Authenticator and verification code by text message, so Entra ID prompts the user to enter the code from Microsoft Authenticator.
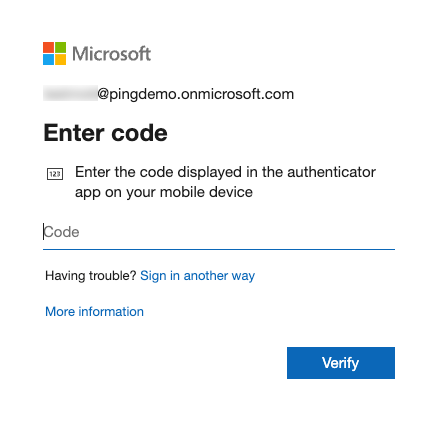
If you haven’t activated system-preferred MFA, the user won’t see the Enter code modal and is prompted to verify their identity.
-
-
To use your external MFA, click Sign in another way at the bottom of the Enter code modal.
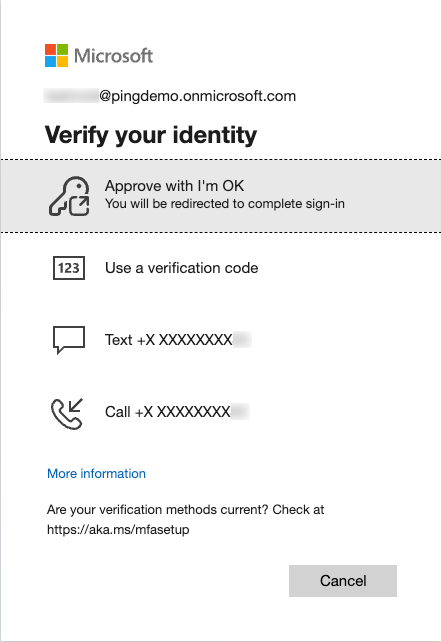
Result:
After selecting Sign in another way or if system-preferred MFA doesn’t apply, Entra ID displays the Verify your identity modal.
-
Select the external MFA.
Result:
Entra ID redirects the browser to PingOne.
-
If the test user hasn’t yet paired the PingID app, they’re shown a Welcome to PingID page. Click Start to start the pairing process.

Result:
After pairing, the PingID app prompts the user to complete the MFA requirement.
-
After PingID is paired for the test user, complete the MFA prompt from the PingID app.
Result:
PingOne returns an ID token to Entra ID, and Entra ID processes the ID token and signs the test user on to the application.
-
Sign off of the application.
-
In the Entra admin center, locate the same application and authenticate to the application again as the test user.
Result:
This time, PingID shouldn’t prompt the test user to pair a device. Instead, the PingID app should prompt the test user to complete the MFA requirement.
When the test user completes the MFA requirement, PingOne returns an ID token to Entra ID, and Entra ID processes the ID token and signs the test user on to the application.