Managing administrator roles using external groups
Before you begin
Ensure that you have one administrator user with direct sign-on access to PingOne. Add this user to the Administrators environment to keep them separate from your end users.
|
This task uses PingOne Admin User to refer to this user. |
About this task
You can leverage just-in-time provisioning and use external groups, such as those in an identity store accessed through an external identity provider (IdP), to manage administrator role assignment in PingOne.
For example, you configure PingOne to use an external IdP with Active Directory (AD) as the identity store. You then create a group in the Active Directory identity store. You add users to this group and provision it to PingOne to ensure that these users have access to PingOne with the appropriate roles.
To use an external group to manage administrator roles in PingOne:
Steps
-
Add a custom OIDC or SAML external IdP in PingOne.
Managing roles using external groups is currently supported only for custom OIDC or SAML external IdPs.
When you get to the step for mapping attributes, you must map at least the following PingOne user attributes to the corresponding attributes for the identity provider:
-
Username
-
Email Address
-
External Group Names
Example:
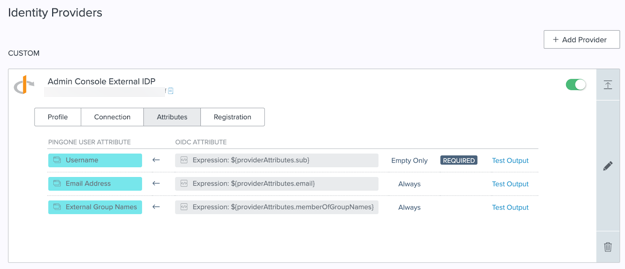
The values in the previous image are for example purposes only. The external attribute names will vary depending on the provider.
Set Update Condition for the Email Address and External Group Names attributes to Always. This ensures that these attributes are updated in PingOne whenever they are updated in the external IdP and that their access and permissions are always in sync.
Map additional attributes as needed.
When authenticating into PingOne from an external IdP, ensure that you enable MFA as part of your authentication policy.
-
-
Create the applicable groups in your external identity store.
-
During the initial group set up, add the PingOne Admin User to each external group that you want to provision to PingOne.
You can add more users, but at a minimum each group must contain one user with direct access to PingOne before you continue. The process for adding users to groups depends on the external identity store that you are using. Follow the steps in the documentation for your identity store.
-
Sign on to PingOne as the PingOne Admin User.
Result:
The external groups are provisioned to PingOne using just-in-time provisioning.
Learn more in Just-in-time provisioning of external groups.
-
Assign the appropriate admin roles to the groups in PingOne.
Learn more on the Using groups tab in Managing roles using groups.
You must assign at least one role to each group, or the users will be unable to sign on to PingOne.
These roles are assigned to all users currently in the group and to any users added to the group in the future.
-
Add users to the external group in the external identity store as needed to ensure that they can access PingOne with the appropriate role assignments.
Similarly, remove users from the external group to remove their access to PingOne or to move them to a group with different role assignments.
Next steps
You should audit the users in your external directory regularly to ensure that their group membership and level of access is correct.