Registering PingFederate as an application in Entra ID
To allow PingFederate to process social sign-on requests with Microsoft, add PingFederate as an OAuth application in the Entra ID (formerly Microsoft Azure) portal.
You can find more information in Register an application in the Microsoft Entra ID documentation.
Steps
-
Sign on to the Microsoft Entra ID admin center and go to the tenant you want to register the application in.
To ensure you have the correct permissions for creating an application, you must use an account that has at least the Application Developer role.
-
Go to Entra ID > App registrations. Click New registration.
-
On the Register an application page:
-
In the Name field, enter a name for the application.
-
In the Supported account types section, select the account types that have permission to access the application.
The default selection is Personal Microsoft accounts only.
Advanced configurations can provide access to organizational accounts in addition to, or instead of, personal Microsoft accounts. Learn more about the available options in Register an application in the Microsoft documentation.
Note that each individual organization must have
User.Read.Allset in its API permissions. External organizations might not have this set.Remember your Support account types selection. You’ll make the same selection in Microsoft IdP Adapter settings reference.
-
In the Redirect URI section, select Web and enter the PingFederate Authorization Callback Endpoint.
The default value is
https://<pf_host>:<pf_port>/ext/microsoft-authn.If you set a custom value here, write it down. You’ll use it again in Microsoft IdP Adapter settings reference.
You can find more information about redirect URI configuration in Add a redirect URI in the Microsoft Entra ID documentation.
-
Click Register.
-
-
On the application Overview page, in the Essentials section, note the Application (client) ID. If you selected the Single tenant option for Supported Account Types, also note the Directory (tenant) ID.
You’ll use this information in Microsoft IdP Adapter settings reference.
-
Add a client secret:
-
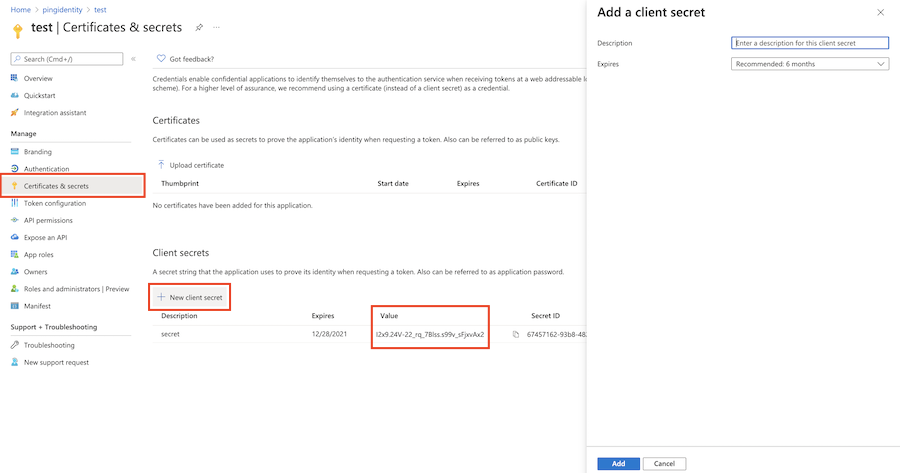
Go to the Certificates & secrets page, click the Client secrets tab, then click + New client secret.
-
On the Add a client secret page, in the Description field, enter a meaningful description.
-
In the Expires list, select an expiration period, then click Add.
Microsoft recommends that you set an expiration value of less than 12 months. Learn more in Add a client secret in the Microsoft documentation.
-
Note the client secret Value.
The secret value is never displayed again after you leave this page.
You’ll use this information in Microsoft IdP Adapter settings reference.
-