Migrating a custom domain to Cloudflare
As part of our continued efforts to support best practice security measures in PingOne, we’ll be using Cloudflare instead of Amazon CloudFront as our custom domain ingress infrastructure.
Custom domains configured after March 17, 2025 are already using Cloudflare, and no action is required.
If you configured your custom domain before March 17, 2025, your domain is routing to CloudFront and you should consider migrating your domain to use Cloudflare.
|
If you currently use a reverse proxy or Web Application Firewall (WAF) with a CloudFront custom domain that you plan to migrate, Cloudflare DNS must not be the authoritative nameserver for your custom domain or the provider of the reverse proxy or WAF. Before migrating your custom domain to Cloudflare, consult with your network infrastructure team to discuss these limitations. Note that Cloudflare DNS could be in use directly or through an intermediate supplier. These limitations apply to all custom domains created since March 17, 2025, as well as to any CloudFront custom domains that you are considering for migration to Cloudflare. |
Any custom domains that aren’t migrated by late 2026 will be migrated automatically by Ping Identity. Migrating now gives you more control over the timing of the migration and allows you to take advantage of additional security features developed only for Cloudflare domains as soon as they are available.
|
Create a new custom domain in a test environment and ensure that everything works properly for your use cases before you migrate any custom domains in your Production environments. |
The easiest way to migrate your custom domain is to delete your existing domain and create it again. When you add the domain again, it will automatically start routing to Cloudflare. If your custom domain isn’t receiving live traffic yet, or if your applications aren’t yet configured to use the custom domain, it’s safe to delete it and create it again. Learn more in Deleting a custom domain or trusted email domain and Setting up a custom domain.
If deleting your existing custom domain might cause an outage, follow the steps in this topic.
Preparing for migration
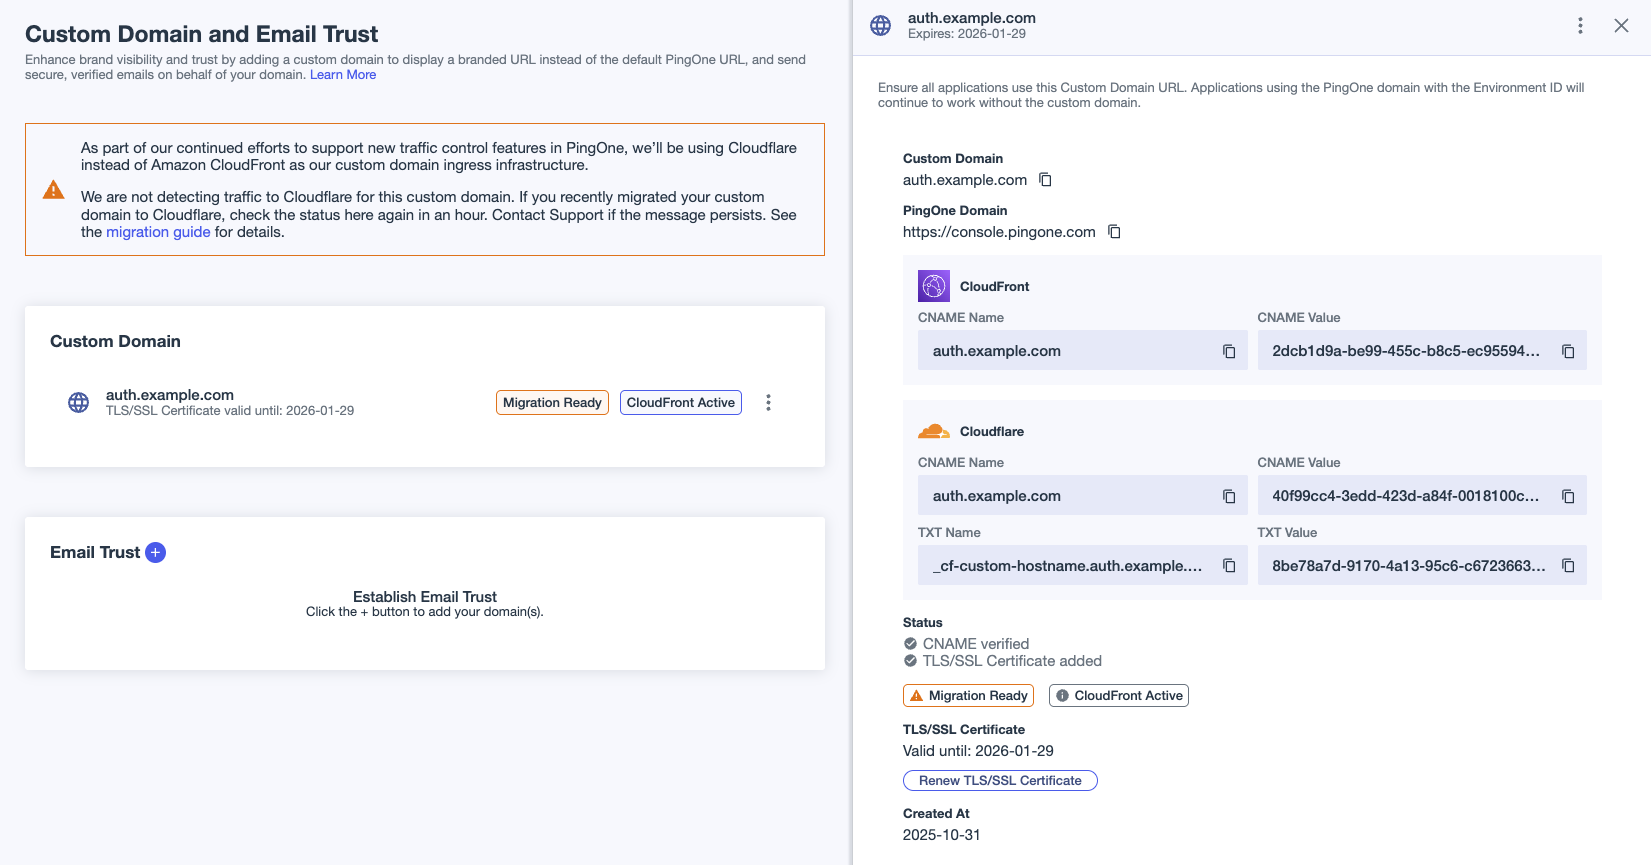
To prepare your existing domain for migration, you must renew your TLS/SSL certificate or upload your existing certificate again. If your certificate is expired, you’ll need to generate and upload a new one. Messages and labels displayed on the Custom Domain and Email Trust page will help you understand where you are in the process.
The following diagram illustrates the different stages of the migration:
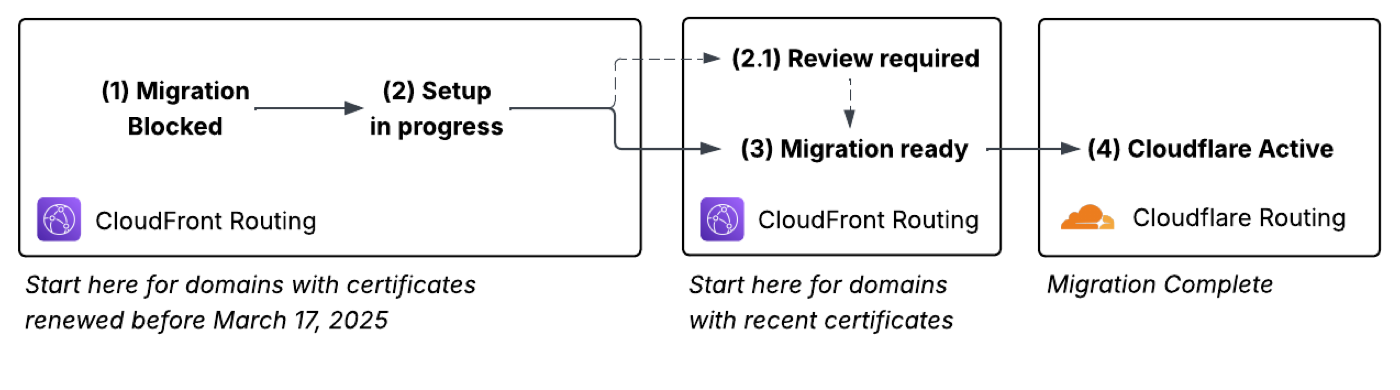
| 1. |
Your custom domain starts in Migration Blocked status and is routing to CloudFront. |
||
| 2. |
After you upload your certificate, the domain moves to Setup in Progress status. The domain continues to route to CloudFront.
|
||
| 3. |
When setup completes, the domain moves to Migration Ready status and continues to route to CloudFront. |
||
| 4. |
After you modify your DNS configuration and the changes propagate to the DNS, the domain moves to Cloudflare Active status. The migration is complete. |
Before you begin
Before you begin this process, ensure that:
-
You have access to your DNS manager.
-
You have a valid TLS/SSL certificate.
-
The custom domain is labeled CloudFront Active. This label indicates that your custom domain is currently routing to Amazon CloudFront and should be migrated to Cloudflare.
-
Any inbound traffic policies are either disabled or deleted. Learn more in Adding or editing inbound traffic policies for custom domains.
If a Certificate Expired label is displayed, you must renew your TLS/SSL certificate to continue.
|
If you’re using an LDAP gateway with Kerberos, you must add a Cloudflare SPN applicable to the region in which your organization resides. If your custom domain was created between March 17 and August 11, 2025, you must add two SPN references. Custom domains created during that time period have unique references for each custom domain, such as If you don’t add the necessary SPN references, a Kerberos outage can occur. |
Steps
-
In the PingOne admin console, go to Settings > Domains and go to the applicable step or section based on the labels displayed on the custom domain entry:
-
Migration Blocked and CloudFront Active: Continue to step 2 in this section.
-
Certificate Expired: Continue to step 2 in this section.
-
Migration Ready and CloudFront Active: Go to Testing the migration locally before applying DNS configuration changes.
-
Review Required and CloudFront Active: Go to Review Required.
-
-
In the TLS/SSL Certificate section, click Renew TLS/SSL certificate.
If your existing certificate is still valid, you can upload it again to prepare for the migration.
If you don’t have a TLS/SSL certificate or it has expired, generate a new certificate outside of PingOne. Learn more in Generating a CSR for a custom domain.
Ensure that your certificate meets the following requirements:
-
A minimum encryption of RSA-2048 or ECDSA-256 is used.
-
The certificate isn’t self-signed.
-
The certificate chain leads to a globally trusted CA. If your certificate was issued by an intermediate CA, include the full intermediate certificate chain. Omitting it can cause validation errors for public clients, including PingOne services.
-
The certificate is valid.
-
If using a wildcard and Subject Alternative Name (SAN) certificate, the certificate matches the domain name.
-
-
In the Renew TLS/SSL Certificate modal, enter the following information and then click Save:
-
Private Key: A PEM-encoded unencrypted private key that matches the certificate’s public key.
-
Certificate: A PEM-encoded certificate to import.
-
Intermediate Certificates: A PEM-encoded certificate chain that leads to a globally trusted CA.
-
|
Don’t include the end-entity certificate. |
Result
A Valid until date is listed in the TLS/SSL Certificate section of the custom domain details panel, and a TXT Record entry is displayed in the Cloudflare section under the CNAME fields. One of the following status labels is displayed:
- Setup in Progress
-
The steps to prepare your custom domain for migration have been completed, but the domain setup is updating in PingOne. Check back in 10 minutes.
- Review Required
-
The preparation for migration can’t be completed. If your custom domain isn’t publicly accessible, possibly because it’s behind a VPN or using reverse proxy, you need to complete domain control validation (DCV) for setup to complete. Copy the values from the TXT Name and TXT Value fields in the Cloudflare section of the details panel for the custom domain. Add these values to your DNS configuration.
If Review Required is still displayed after 10 minutes, try renewing your certificates again. If Review Required is still displayed after another 10 minutes, open a Support case. Do not continue with the migration until the issue is resolved.
After 10 minutes or so, the Migration Ready label should be displayed indicating that you can proceed with the migration. The CloudFront Active label will also be displayed. Your custom domain is still active and routing traffic to CloudFront.

A Cloudflare section is displayed on the details panel after the CloudFront section. Note that the CNAME Name in both sections is the same. The CNAME Name for your domain doesn’t change for the migration. Only the CNAME Value changes.
Testing the migration locally before applying DNS configuration changes
When you migrate a custom domain by changing the CNAME value in your DNS configuration, you will affect live production environments. To test the changes locally first, you can add a line to your hosts file.
Local testing helps you discover unexpected issues that the Cloudflare configuration might cause so that you can resolve them before moving live traffic.
Steps
To test your changes locally, complete the following steps:
-
In a terminal or command window, run
nslookupand make sure that traffic is routing to CloudFront by verifying that the response contains*.cloudfront.net. -
In the PingOne admin console, go to Settings > Domains and click the custom domain entry to open the details panel.
-
Copy the CNAME Value from the Cloudflare section.
-
In a terminal window, run
nslookup <cloudflareCNAMEValue>where<cloudflareCNAMEValue>is the value you copied in the previous step:The response should look similar to the following:
Cloudflare routing exampleServer: 127.0.0.1 Address: 127.0.0.1#53 Non-authoritative answer: <cloudflareCNAMEValue> canonical name = cloudflare.ping-ccd.com. Name: cloudflare.ping-ccd.com Address: <CustomDomainIPAddress>
If your custom domain was created between March 17, 2025 and August 11, 2025, the name in the response will look something like
<UUID>.ping.ccd.com.This example assumes the organization resides in the North America (US) region. If your organization is in a different region, the end of the canonical name differs depending on that region:
-
North America (Canada):
ping-ccd.ca -
Europe:
ping-ccd.eu -
Australia:
ping-ccd.com.au -
Asia-Pacific:
ping-ccd.asia -
Singapore:
ping-ccd.sg
-
-
Copy the IP address from the response.
-
Open the applicable
hostsfile for your operating system:-
For MacOS, open
/etc/hosts. -
For Windows, open
C:\Windows\System32\drivers\etc\hosts.
-
-
On a new line in the
hostsfile, add an entry similar to the following:<IPAddressFromNslookup> <cloudflareCNAMEValue>
Local traffic to the custom domain should now be routing to Cloudflare.
-
To verify that traffic is routing to Cloudflare, check the
ping-endpoint.jsonfile for"server": "v2":-
From a terminal window, run the following command:
> curl -H "Cache-Control: no-cache, no-store, must-revalidate" \
    -H "Pragma: no-cache" \
    -H "Expires: 0" \
    "https://<customDomainHostname>/.well-known/ping-endpoints.json"
If traffic is routing to Cloudflare, the response will be similar to the following example, in which the
"server": "v2"JSON property is included at the end of the response:{ "uploadUrl": "https://uploads.pingone.com/environments/418ffffe-44aa-4072-8535-549a 9fffbd0f", "apiUrl": "https://api.pingone.com/v1/environments/418ffffe-44aa-4072-8535-549a9 fffbd0f", "authUrl": "https://<customDomainHostname>", "assetsUrl": "https://assets.pingone.com", "server": "v2" }If traffic is routing to CloudFront, the response will be similar to the following example, which doesn’t include the
"server": "v2"JSON property:{ "uploadUrl":"https://uploads.pingone.com/environments/418ffffe-44aa-4072-8535- 549a9fffbd0f", "apiUrl":"https://api.pingone.com/v1/environments/418ffffe-44aa-4072-8535-549a9fffbd0f", "authUrl":"https://<customDomainHostname>", "assetsUrl":"https://assets.pingone.com" }
-
Next steps
After you’ve verified that traffic is routing to Cloudflare using this local setup, test your single sign-on (SSO) use cases using the custom domain. If everything works as expected, remove the line from your hosts file that you added in step 7 and then complete the migration by updating your DNS configuration.
Completing the migration
Complete the following steps to update your DNS configuration and complete the migration to Cloudflare.
|
The specifics of DNS configuration depend on your DNS manager. |
Before you begin
If you tested your migration locally, remove the <IPAddressFromNslookup> <cloudflareCNAMEValue> line from your hosts file before continuing.
Steps
-
Lower the time-to-live (TTL) setting for the CNAME record in your DNS configuration:
-
In the PingOne admin console, go to Settings > Domains.
-
Click the custom domain entry to open the details panel.
-
Locate the CNAME entry in your DNS configuration that matches the CNAME Name field of the CNAME entries in the custom domain details panel in PingOne.
-
Set the TTL to 60 seconds.
Setting the TTL to 60 seconds ensures that traffic quickly switches from CloudFront to Cloudflare after you update the CNAME record value and prevents a situation where some users are directed to CloudFront and some to Cloudflare. For example, if the TTL is set to 86400 seconds (24 hours), after you change the CNAME record value, DNS servers will continue to cache the old CNAME record value for up to 24 hours.
-
-
Wait for the period of time that the TTL was set to before you lowered it. For example, if the TTL was originally set to 86400, wait 86400 seconds (24 hours) before continuing.
-
Update the CNAME
valueentry in your DNS configuration:-
In the PingOne admin console, go to Settings > Domains.
-
Click the custom domain entry to open the details panel.
-
In the Cloudflare section, copy the entry in the CNAME Value field.
-
Locate the CNAME entry in your DNS configuration that matches the CNAME Name field of the CNAME entries in the custom domain details panel in PingOne.
Replace the CNAME
valuein the DNS configuration with the value you copied in the previous step.Some DNS providers don’t support a trailing period in the CNAME. If you’re using one of these DNS providers, omit the trailing period from the CNAME record.
Do not change the CNAME
nameentry in the DNS configuration because that will cause an outage and stop traffic routing through your custom domain.
-
Result
After updating the DNS value, it can take up to an hour for the Custom Domain and Email Trust page in PingOne to reflect the change and show the Cloudflare Active label. This label indicates that PingOne is detecting traffic to Cloudflare, and no further action is required.
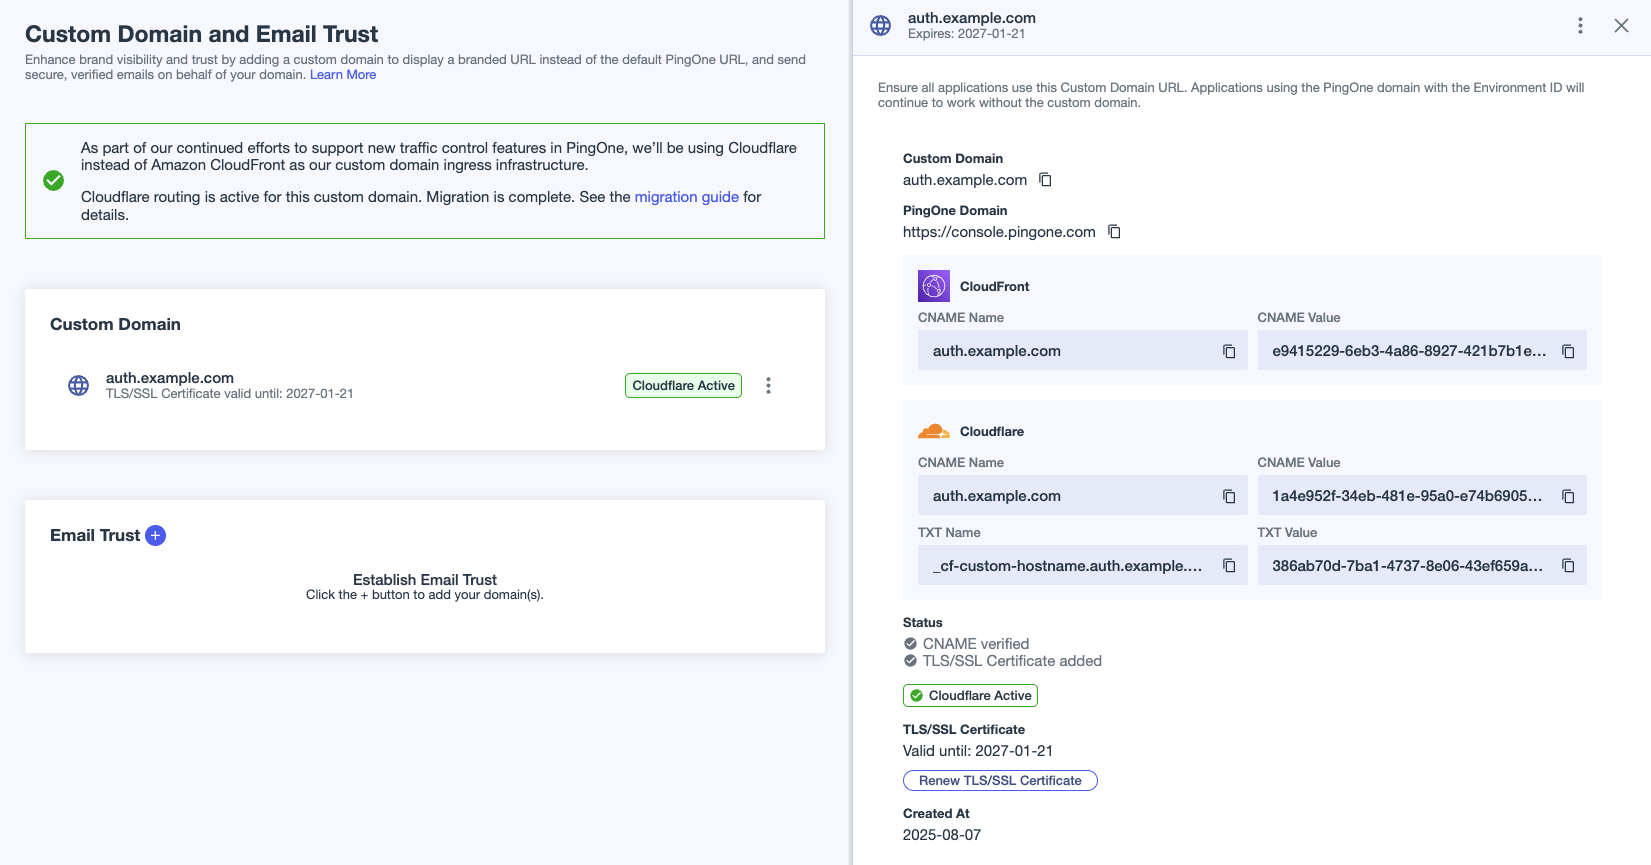
|
The Cloudflare Active and CloudFront Active labels are applied based on the response from the custom domain when the Domains page is loaded. The response can be affected by DNS and browser caching, especially during an active migration. You can find information about performing a final check to ensure that your custom domain is routing to Cloudflare in Verifying that custom domain traffic is routing to Cloudflare. |
Enabling mTLS for the custom domain (optional)
To configure inbound traffic policies to match requests using a certificate’s SHA-256 thumbprint, you must enable mTLS for the custom domain.
|
Only custom domains routing to Cloudflare can be configured to use mTLS. |
To enable mTLS on the custom domain, do the following.
Steps
-
In the PingOne admin console, go to Settings > Domains.
-
Click the custom domain entry to open the details panel.
-
In the Mutual TLS (mTLS) Support section, click Enable Support.
-
On the confirmation modal, click Enable.
|
Changes might take up to 10 minutes to take effect. mTLS isn’t compatible with some clients, including Microsoft Entra ID hybrid join. Verify compatibility before enabling mTLS. |
Result
You can now configure inbound traffic policies to use mTLS thumbprint as a match criteria for requests. Learn more in Adding or editing inbound traffic policies for custom domains.
Disabling mTLS for the custom domain
To disable mTLS on the custom domain, do the following.
-
In the PingOne admin console, go to Settings > Domains.
-
Click the custom domain entry to open the details panel.
-
In the Mutual TLS (mTLS) Support section, click Disable Support.
-
On the confirmation modal, click Disable.
|
Changes might take up to 10 minutes to take effect. Disabling mTLS can interrupt traffic to your custom domain if you’ve configured inbound traffic policies to use mTLS thumbprint as a match criteria. |
Testing the custom domain
Test your custom domain to ensure that it resolves to the correct location.
Steps
-
Open a web browser and enter the address of your custom domain, such as
https://auth.example.com/myaccount. -
Verify that you’re presented with the sign-on screen for your application or other applicable resource.
If the domain isn’t working as you expected after the migration, you can revert it by replacing the CNAME value in your DNS configuration with the CNAME Value from the CloudFront section of the custom domain details panel in PingOne.