Adding or editing inbound traffic policies for custom domains
Inbound traffic policies allow you to set rules for processing requests to your custom domain based on the source of the request.
Your custom domain must be routing to Cloudflare to use inbound traffic policies.
Learn more in Inbound traffic policies.
Before you begin
To use inbound traffic policies, you must:
-
Have a custom domain configured for the environment. Learn more in Setting up a custom domain.
-
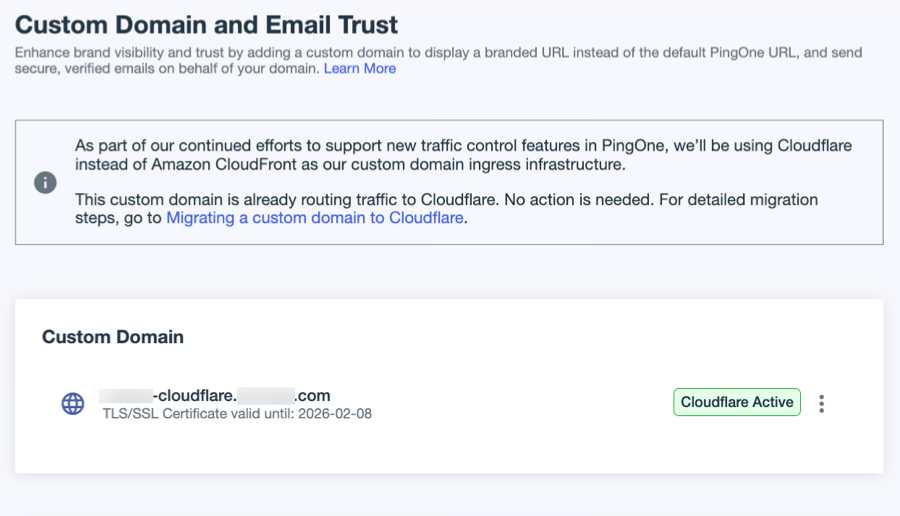
Ensure that the custom domain is routing to Cloudflare by going to Settings > Domains in the PingOne admin console and checking for the Cloudflare Active label.
-
Ensure that your custom domain allows all requests to
https://<customdomain>/.well-known/ping-endpoints.json. PingOne must be able to successfully issue an HTTP GET call to this URL to confirm that your custom domain is routing to Cloudflare. If this request is blocked, you won’t be able to configure inbound traffic policies.
Learn more in Migrating a custom domain to Cloudflare.
|
The following restricted headers aren’t allowed in any of the header configuration fields in the policy. This restriction applies to the Header (Single Value) and Header (List) options in the Client IP Source Selection section, and to any Accepted Custom Headers.
Additionally, although you can use a mix of cases in the header fields in the policy, case is ignored at runtime. |
Steps
-
In the PingOne admin console, go to Settings > Inbound Traffic Policies and do one of the following:
-
To add a new inbound traffic policy, click the icon.
-
To edit an existing inbound traffic policy, browse or search for the policy you want to edit, and click it to open the details panel. Then click the Pencil icon ().
-
-
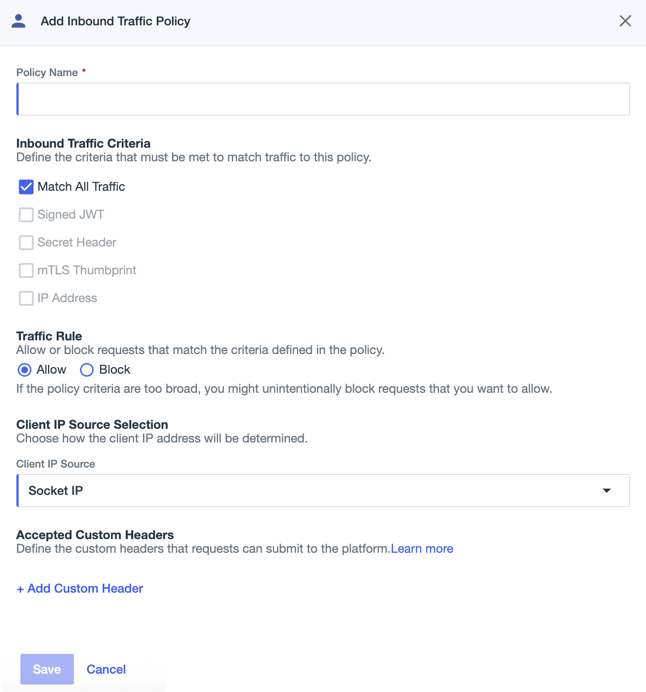
Enter a name for the policy.
The name must be unique to the environment and is only used to identify the policy in the PingOne admin console.
Use the name to identify the source of the requests addressed by the policy.
-
In the Inbound Traffic Criteria section, select and configure the criteria used to determine whether requests match the policy.
Requests are matched to the first enabled policy on the Inbound Traffic Policies page for which all defined inbound traffic criteria are met.
Inbound Traffic Criteria Option Description and Configuration Match All Traffic
All requests are considered a potential match to the policy.
If you select this option, all other options are disabled.
Signed JWT
Requests must include an
X-Ping-Itp-Jwtheader that contains a JSON Web Token (JWT) value signed by a private key corresponding to one of the public keys in the JWKS configured on this page. The JWT is in JWS compact serialization format and must have the following header and payload:{ "typ": "JWT", "alg": "RS256", "kid": "<kid in jwks>" } . { "iss": "<policyId>", "aud": "<environmentId>", "exp": "<seconds from epoch>" }where:
-
RS256is the only supported signing algorithm. -
kidmust refer to one of the public keys in the JWKS field.You are responsible for maintaining the confidentiality of the private key. If a private key is compromised, you must remove the public key from the JWKS configured on the Inbound Traffic Policies page immediately.
-
issis the ID of the inbound traffic policy that’s using this Signed JWT criteria. You can find this ID under the policy name in the Inbound Traffic Policies list and in the policy details panel. -
audis the ID of the environment associated with the custom domain to which the request is submitted. You can find this ID on the Environment Properties page. -
expis optional and is the number of seconds from epoch after which the JWT is considered expired and no longer accepted by the Signed JWT criteria.Include
expfor security purposes and set it to 300 seconds (5 minutes). This value allows for clock drift while still limiting the lifespan of the JWT.
Select this option and then paste in the JSON for the JWKS in the JWKS field.
You can paste the JSON in a single line or in multiple lines.
Secret Header
Requests must include an
X-Ping-Itp-Secretheader that contains a secret with a value that, when hashed, matches one of the SHA-256 hash values in the list.You are responsible for maintaining the confidentiality of the secret. If a secret is compromised, you must remove the hash configured on the Inbound Traffic Policies page immediately.
Select this option and click + Add Secret to open the Add Secret modal. In the modal, select one of the following options:
-
Secret: Enter secret text in the Secret field or click Generate to allow PingOne to generate a secret for you.
-
Hashed Secret: Paste a secret hash in the Secret field.
Before you exit the modal, copy the secret and paste it to a secure location in case you need to use it later. When the secret is added to your policy criteria, the value will be hashed, and you won’t be able to view the original secret text.
Click Add Secret to add the secret hash to your policy. You can add a maximum of five secret hashes.
To remove a secret hash, click the Delete icon ().
mTLS Thumbprint
Requests must use an mTLS connection where the certificate’s SHA-256 thumbprint matches one of the thumbprints in the list.
To use this option, you must use the PingOne API to enable mTLS for the custom domain. Learn more in Custom Domains in the PingOne API documentation.
Select this option and click + Add Thumbprint to open the Add mTLS Thumbprint modal. Paste your PEM-encoded X.509 certificate to generate the thumbprint, then click Add mTLS Thumbprint to add the thumbprint to your policy.
You can add a maximum of five thumbprints.
To remove a thumbprint, click .
IP Address
Requests must use a connection for which the socket IP address matches one of the entries in this list.
The socket IP address refers to the final or actual connection to the custom domain. For requests made through an intermediate connection, the socket IP address might differ from the client’s logical IP address. Learn more in step 5.
Select this option to enter up to five IP ranges in CIDR notation. Both IPv4 and IPv6 addresses are supported.
To remove an IP range, click the X on the entry.
-
-
In the Traffic Rule section, select one of the following options:
-
Allow: Requests matching this policy are allowed to pass. If you select Allow, continue to step 5.
-
Block: Requests matching this policy are blocked. If you select Block, there are no additional options to configure. Go to step 7.
If the policy criteria are too broad, and you select Block, you might unintentionally block requests that you want to allow. Use more specific criteria to block traffic.
-
-
Select an option in the Client IP Source Selection section to configure how the client IP address for the request is determined.
This IP address represents the logical end user or device that’s making the request in cases where there is an intermediate connection through which the request is submitted. The client IP address is used for IP-based operations, such as rate limiting, and to populate the
global.ipvariable in PingOne DaVinci. Learn more in Including variables and other data in DaVinci flows in the PingOne DaVinci documentation.-
Socket IP: If you select Socket IP, no configuration is required. The client connects directly to the custom domain using the socket IP as the client IP address.
If you selected Match All Traffic in the Inbound Traffic Criteria section, Socket IP is the only option enabled.
-
Header: Select this option and enter the Header Name. Requests must include this header, and the value must be an IPv4 or IPv6 address.
-
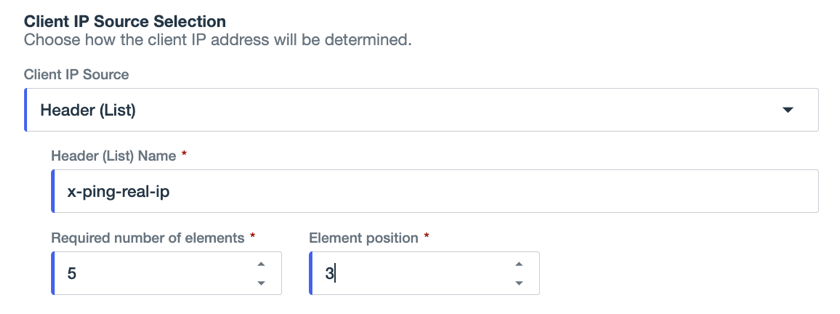
Header (List): Select this option and enter the Header (List) Name.
-
For Required number of elements, select the number of elements that make up the header value. Request headers must include a header value with the exact number of elements specified or the request will be rejected.
-
For Element position, select the position of the element within the header in which the IP source is expected. Request headers must include an IPv4 or IPv6 address in this exact position or the request will be rejected. Element position is counted from left to right starting at 1.
-
Use Socket IP or Header (Single Value) if possible. The Header (List) option should be used only if you’re certain of the number of elements and element position. Even then, the Header (List) option can be more prone to errors. If the number or order of header elements changes after you’ve configured your traffic policy, you might inadvertently block all of the requests to your custom domain or associate the client with an incorrect IP address.
-
-
To define custom headers that can be included in requests, add the headers in the Accepted Custom Headers section.
If the header must be present in requests, select the Required checkbox. Requests that don’t include required headers will be blocked.
You can add up to 15 custom headers. The combined length of all custom headers in the policy can be no more than 768 characters. Requests with custom headers exceeding these limits will be blocked.
To remove a header, click .
The policy is added to the bottom of the list on the Inbound Traffic Policies page and is disabled by default. Enable it by clicking the toggle to the right (blue).
|
It can take up to 60 seconds for the new or updated policy to take effect. |
Next steps
Because inbound traffic policies are processed in the order in which they are listed on the Inbound Traffic Policies page, ensure that they’re in the intended order.
To reorder the policies, click Reorder, drag and drop the policies into the order in which you want them to be matched, and click Save.