Configuring a CIBA flow
Client-initiated backchannel authentication (CIBA) is an OpenID Connect (OIDC) extension that enables an end user to use an application on one device and grant consent to the application request on another device. Learn more in the OIDC CIBA specification.
The following devices are involved:
-
A consumption device: A device the end user interacts with that initiates a CIBA request, such as a point-of-sale system.
-
An authentication device: The device used by the end user, such as their mobile phone, to grant or deny consent to authenticate with the OpenID Provider.
To qualify as an authentication device, the user’s device must meet requirements, including that the authorization server must recognize the device and must be able to map it to the identified user based on the
login_hintparameter in the CIBA request. Thelogin_hintparameter is a hint related to the end user being authenticated, such as their username or email address. Learn more about CIBA requests in the OIDC CIBA specification.
CIBA provides increased security and improves the user experience by allowing end users to seamlessly grant or deny authentication requests on their mobile device.
Example use case
-
The user attempts to purchase $50 worth of gas into a gas station pump point-of-sale terminal (consumption device).
-
The point-of-sale system initiates a CIBA request to PingOne.
-
PingOne sends an email to the user’s verified email address containing a magic link that prompts the user to grant or deny the authentication request.
-
The user grants the authentication request sent to their email address from their mobile phone (authentication device)
-
The point-of-sale system allows the user to get $50 worth of gas.
How it works
The high-level process with PingOne as the OpenID provider is as follows:

-
1 The user interacts with the consumption device, and the application on the consumption device sends a backchannel request (
/cibaAuthorizationendpoint) to PingOne as the OpenID provider.A CIBA request contains the following parameters in the request body:
Parameter Description client_idThe application’s client ID. Required when the application’s Token Endpoint Authentication Method is set to Client Secret Post. Learn more about the CIBA Authorize endpoint in the PingOne API documentation.
client_secretThe application’s client secret. Required when the application’s Token Endpoint Authentication Method is set to Client Secret Post. Learn more about the CIBA Authorize endpoint in the PingOne API documentation.
scopeThe
openidscope value is required. You can optionally include theoffline_accessscope value to request a refresh token if the application has the refresh token grant type enabled.binding_message(optional)The message displayed to the end user on the consumption device and authentication device, matching the authentication request to the transaction and ensuring the user knows what they’re approving.
A CIBA request must also include one of the following three parameters for the application on the consumption device to identify the target end user:
Parameter Description login_hintA string PingOne uses to map to a user, such as username or email address.
id_token_hintAn ID token issued by PingOne representing a previous authentication for the target end user.
login_hint_tokenA JSON Web Token (JWT) created by the application on the consumption device, containing the user ID as a claim.
Learn more about CIBA request parameters in the PingOne API documentation.
-
2 PingOne returns a CIBA response to the application on the consumption device.
For example:
{ "auth_req_id": "003d2608-adeb-49af-8e8d-ec22f2a6198d", "expires_in": 120, "interval": 2 } -
3 PingOne invokes the PingOne DaVinci CIBA flow to launch the out-of-band authentication request.
-
4 The DaVinci CIBA flow locates the user based on the information from the CIBA request and sends an email to the user’s email address on record containing a magic link.
-
5 The application on the consumption device receives the CIBA response and begins polling PingOne for tokens, waiting for the user’s authentication response. Learn more about poll mode in the OpenID CIBA Flow specification.
-
If the user hasn’t responded to the out-of-band authentication request, PingOne returns the following token response:
{ "error": "authorization_pending", "error_description": "The request could not be completed. There was an issue processing the request.: The authorization request is still pending. (Correlation ID: <id>)" } -
If the application on the consumption device sends token requests too frequently, PingOne returns the following token response:
{ "error": "slow_down", "error_description": "The request could not be completed. There was an issue processing the request.: The authorization request is still pending. Please slow down the poll requests. (Correlation ID: <id>)" } -
If the user declines the authentication request, PingOne returns the following token response:
{ "error": "access_denied", "error_description": "The request could not be completed. There was an issue processing the request.: The authorization request has been denied. (Correlation ID: <id>)" } -
If the CIBA request has expired, PingOne returns the following token response:
{
    "error": "expired_token",
    "error_description": "The request could not be completed. There was an issue processing the request.: The authorization request for the provided auth_req_id has expired. (Correlation ID: <id>)"
}
-
-
6 The user opens the email sent to their authentication device and decides whether to grant or deny the out-of-band authentication request.
-
7 The consumption device sends another poll request to PingOne, and if the user grants the authentication request, PingOne returns an access token and ID token.
Goals
After completing this use case, you’ll know how to:
-
Configure a CIBA flow using PingOne and DaVinci.
-
Send email notifications for out-of-band authentication requests to your users.
-
Enable your users to grant or deny authentication requests initiated from a consumption device.
What you’ll do
-
Create notification templates for CIBA authorization email requests to the end user.
-
Configure a DaVinci CIBA sample flow to orchestrate the user experience and send email notifications to the end user.
-
Add an OIDC application to launch the DaVinci flow.
Before you begin
-
Ensure you have a PingOne organization and environment with the PingOne SSO, PingOne MFA, and DaVinci services added. Learn more in Starting a PingOne trial.
-
Download the PingOne CIBA sample flow from the Ping Identity Marketplace and extract the contents of the
.ziparchive to a folder on your computer. -
Create a notification policy in PingOne to set notification limits that can be sent to users per day. Learn more in Notification Policies.
Tasks
Creating the email templates
Create two notification templates for the authentication request emails sent to the end user:
-
Email with an authorization binding message, matching the authentication request to the transaction
-
Generic email without a binding message requesting the user’s approval
Steps
-
In the PingOne admin console, go to User Experience > Notification Templates.
-
Create an email template for the authorization binding message:
-
Click to create the first of the two email templates.
-
In the Add Notification modal, do the following:
-
In the Type list, select General.
-
Enter a name for the template, such as
CIBA with binding message. -
Click Create.
-
-
In the Email section, click the Pencil icon () next to the Subject field and define the subject of the email, such as
Authentication request from ${appName}. -
Click the Checkmark icon () to save the subject.
-
Click in the New Email field to configure the email message.
For example:
${appName} wants to access your account. <p> Open this link in your browser to review the request: ${magicLink} <p> The authorization binding message for this request is ${bindingMessage} <p> If you do not recognize this request, ignore this email. <p> Request ID: ${authReqId} -
Click to save the message.

-
-
Create an email template for the generic message without the authorization binding:
-
Click to create the second email template.
-
In the Add Notification modal, do the following:
-
In the Type list, select General.
-
Enter a name for the template, such as
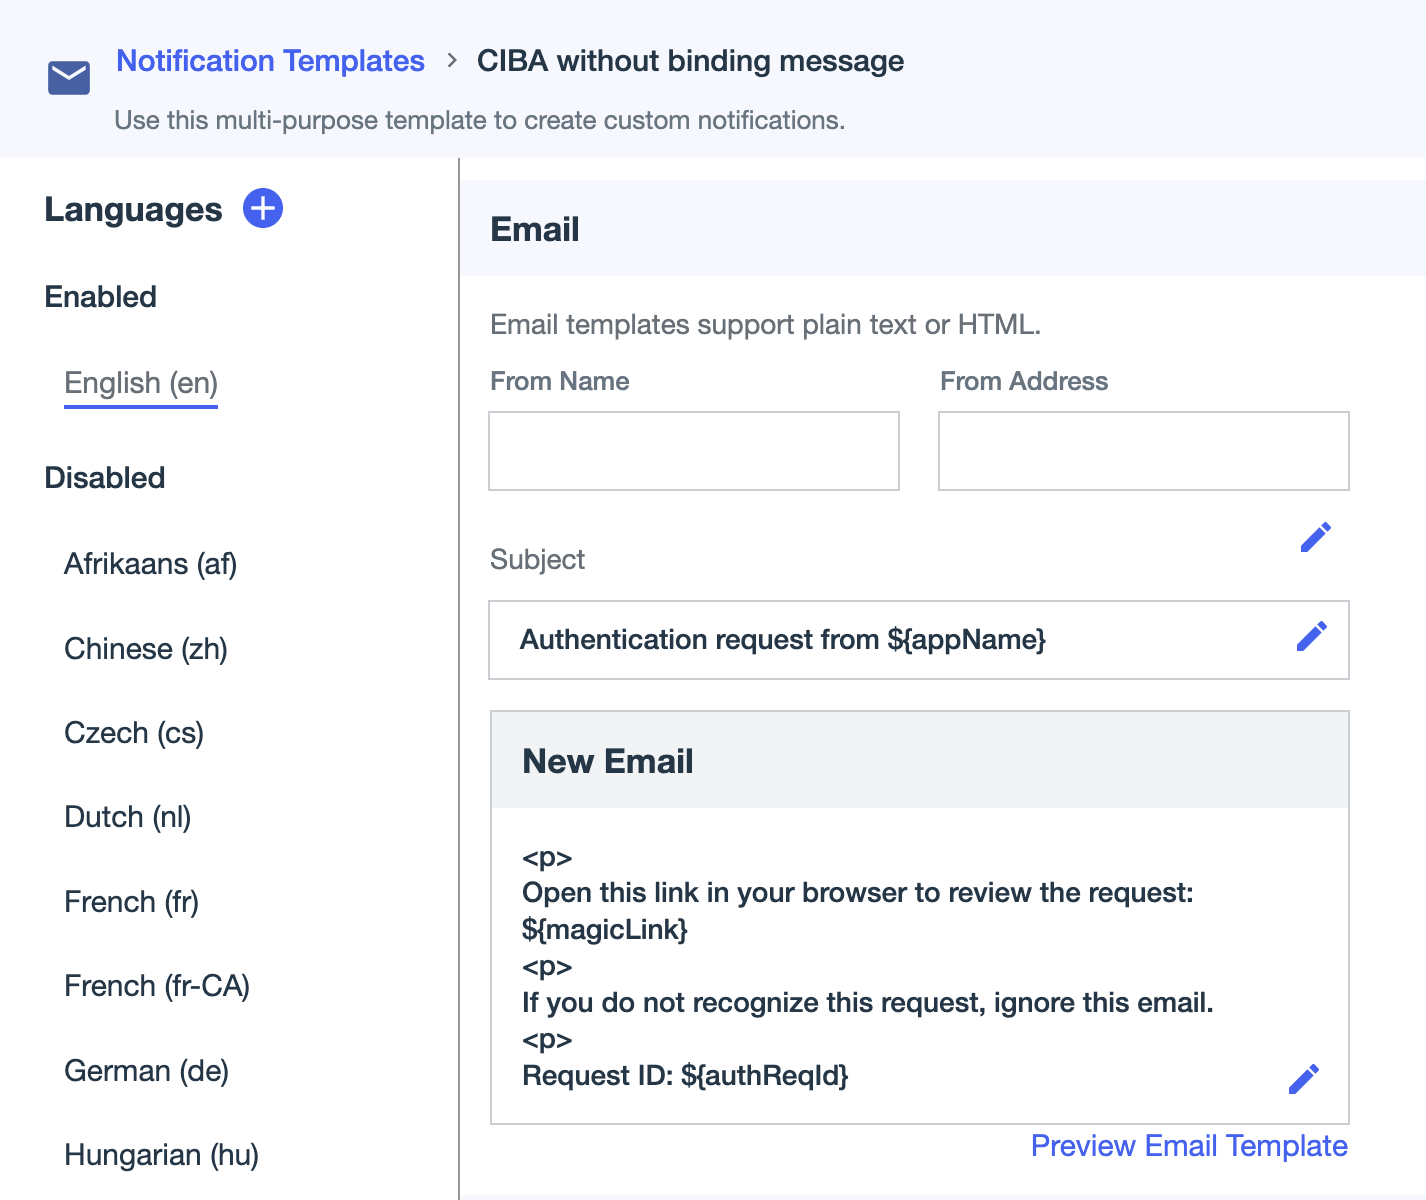
CIBA without binding message. -
Click Create.
-
-
In the Email section, click in the Subject field to define the subject, such as
Authentication request from ${appName}. -
Click to save the subject.
-
Click in the New Email field to define the message.
For example:
${appName} wants to access your account. <p> Open this link in your browser to review the request: ${magicLink} <p> If you do not recognize this request, ignore this email. <p> Request ID: ${authReqId} -
Click to save the email message.
-
-
Go to User Experience > Notification Policies and click the Copy to clipboard icon () for the notification policy ID you plan to use for sending notifications. You’ll add the notification policy ID to the DaVinci flow.
Configuring the DaVinci flow
Add the notification template IDs in your DaVinci flow so that DaVinci can send notifications to your end users requesting their authentication response.
Steps
-
In DaVinci, on the Flows tab, click Add Flow and select Import Flow.
-
Upload the
ciba-flow.jsonfile from the sample flow.zipfile and click Import. -
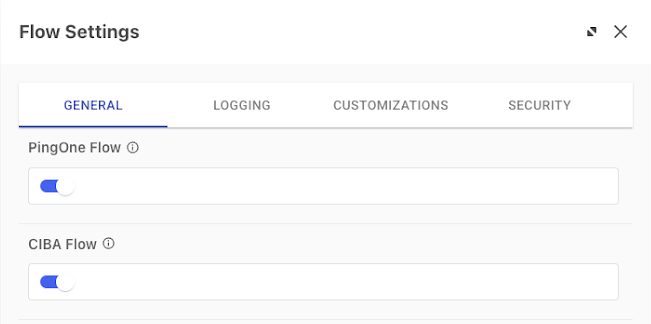
Enable the required flow settings:
-
Click the More Options (⋮) icon and then click Flow Settings to open the flow settings panel.
-
Click to enable the PingOne Flow toggle.
-
Enable the CIBA Flow toggle.
-
Click Save.
-
-
In the flow, configure the Binding message check node False and True paths.
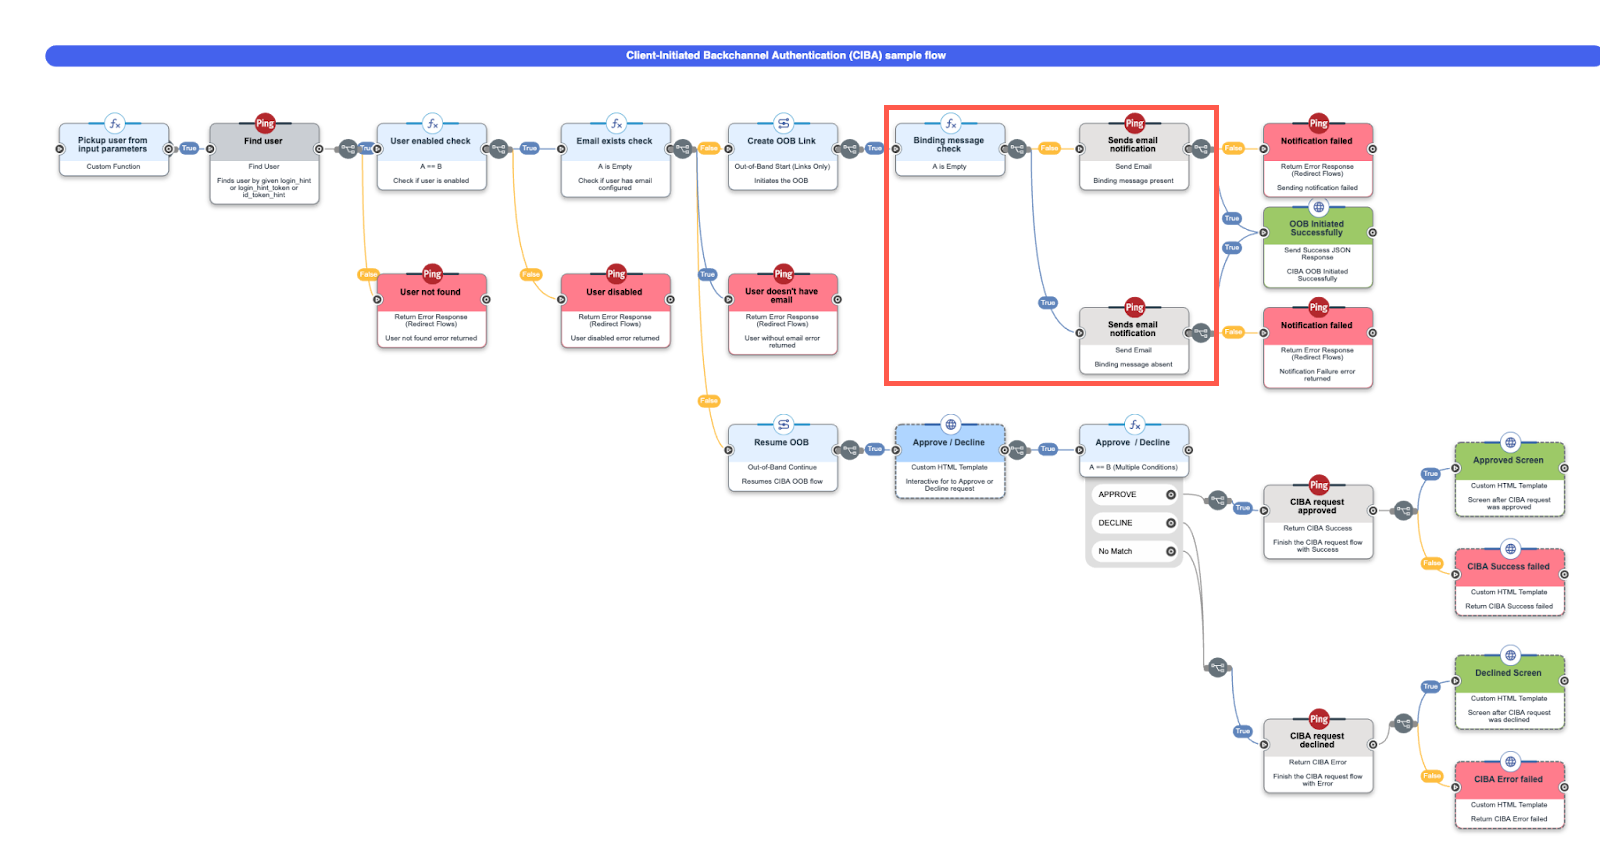
- False path
-
-
Locate the Binding message check node.
-
From the False path, click the Sends email notification node.
-
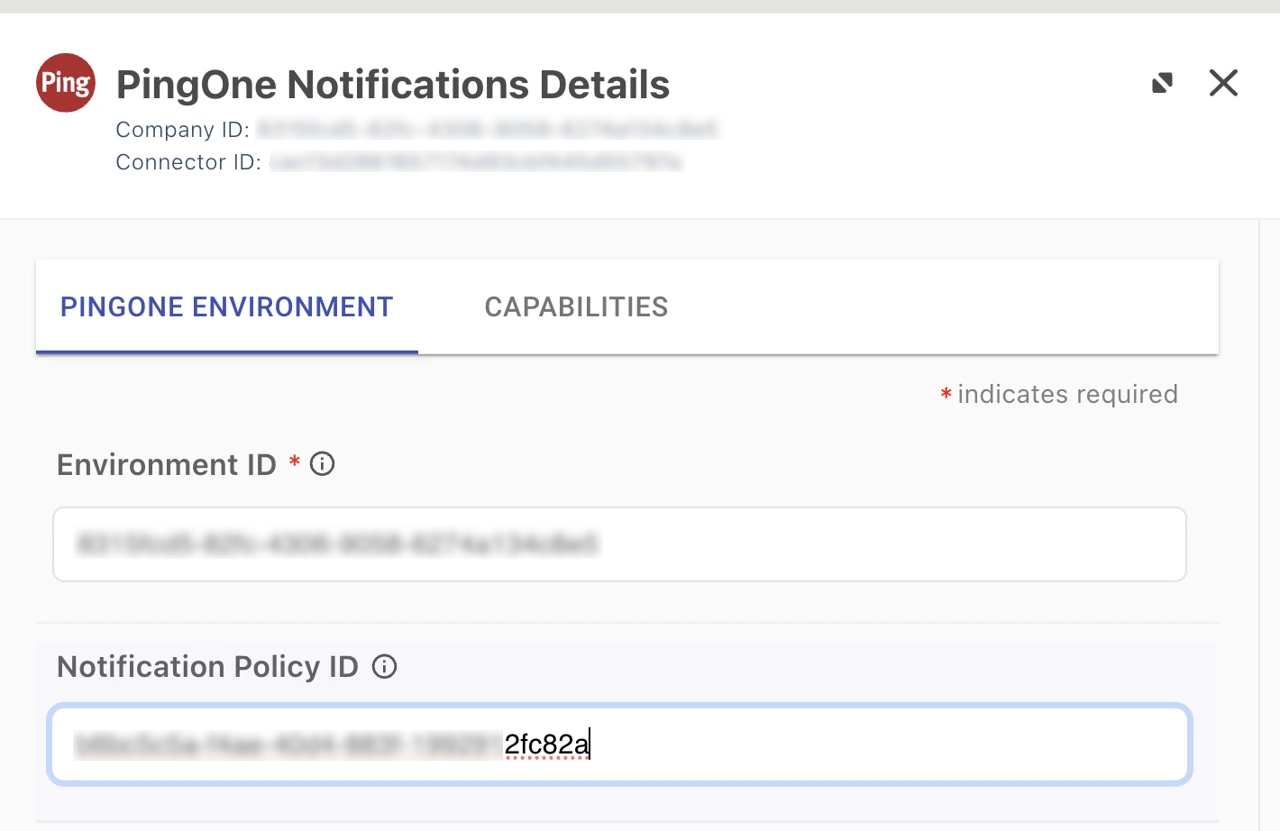
In the configuration settings panel, click the Gear icon () at the top. In the PingOne Notification Details modal, paste the notification policy ID you copied from PingOne into the Notification Policy ID field.
-
Click Apply and then click Close.
-
In the configuration settings panel, for Notification Name, select the email template with the binding message.
-
Click Apply and then click Close.
-
- True path
-
-
From the True path, click the Sends email notification node.
-
In the configuration settings panel, for Notification Name, select the email template without the binding message.
-
Click Apply and then click Close.
-
-
Save and deploy the flow.
-
Add a DaVinci flow policy for the CIBA flow:
-
Go to the Applications tab and click Add Application.
-
In the Name field, enter a name for the application and click Create.
-
To edit the application, select the application in the Applications list.
-
On the Flow Policy tab, click Add Flow Policy.
-
In the Policy Name field, enter a name for the flow policy.
-
Select PingOne Flow Policy to enable flows in the policy to be launched directly through PingOne.
-
Click Next.
-
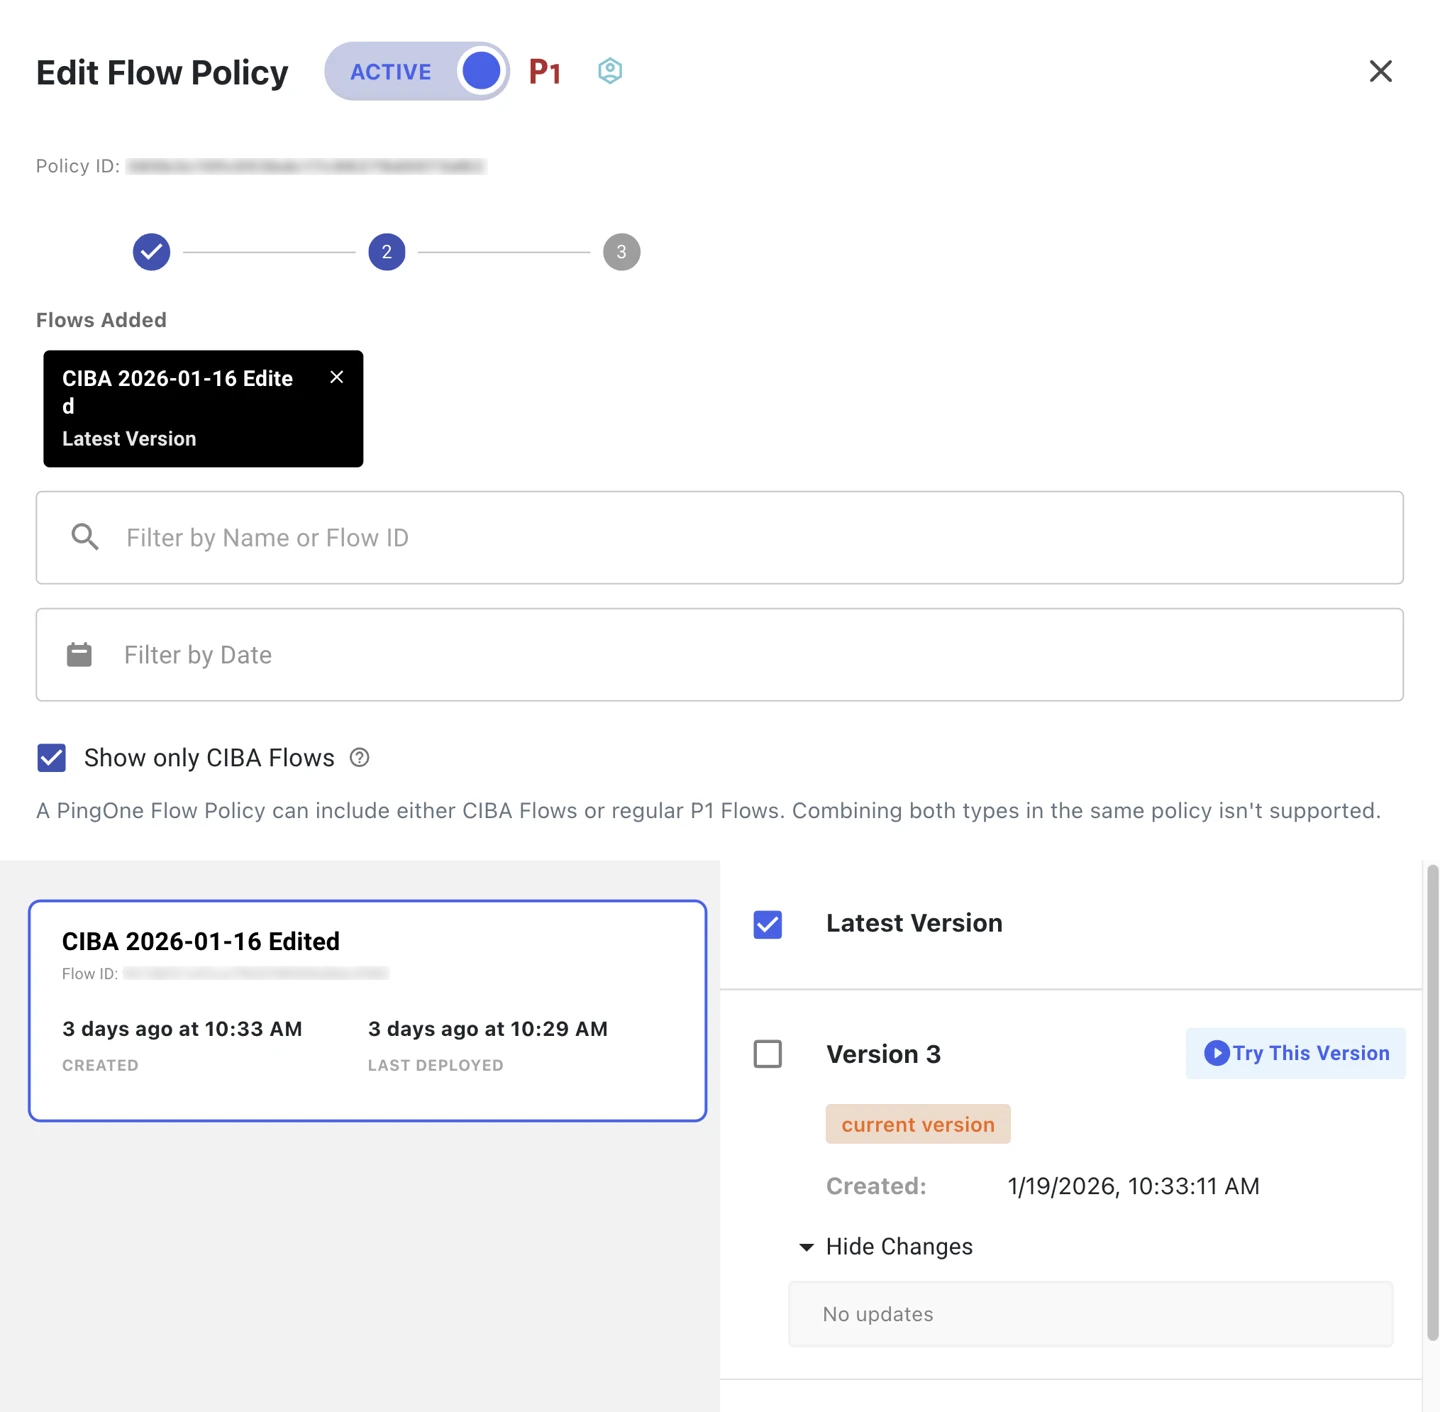
In the flow list, select the Show only CIBA Flows checkmark to filter the results to only CIBA flows.
-
Click the CIBA sample flow you imported and select either Latest Version or the most recent version of it.
-
Click Next.
-
(Optional) Add weight distribution, such as
100for 100 percent, and analytics information for each flow and flow version. Learn more in Configuring a flow policy in the DaVinci documentation. -
Click Create Flow Policy.
-
Adding an application
Create an OIDC application in PingOne and add the DaVinci flow policy so that PingOne can launch the CIBA flow.
Steps
-
In the PingOne admin console, go to Applications > Applications.
-
Click the icon.
-
Create the application profile by entering the following:
-
Application Name: Enter a unique identifier for the application, such as
CIBA app. -
Description (optional): A brief description of the application.
-
Icon (optional): A graphic representation of the application. Use a file up to 1 MB in JPG, JPEG, GIF, or PNG format.
-
Application Type: Click OIDC Web App.
-
Click Save.
-
-
Edit the application configuration as follows:
-
On the Configuration tab:
-
Select CIBA for Grant Type and clear other pre-selected grant types and response types.
-
In the Token Endpoint Authentication Method list, select any authentication method except None. The default is Client Secret Basic.
-
Click Save.
-
-
On the Policies tab:
-
Click Add Policies.
-
On the DaVinci Policies tab, select the DaVinci CIBA flow policy you created in Configuring the DaVinci flow.
-
Click Save.
-
-
Validation
Now that you’ve configured a CIBA flow, validate the flow works:
-
Deploy and test the flow and verify the end-user paths function as expected.
-
Check the PingOne audit log for the CIBA Authentication Succeeded event, which applies to when the user approves or declines the request:
-
Go to Monitoring > Audit and enter the report parameters to filter the results to include your flow test.
-
Click Run.
-
Verify that a CIBA Authentication Succeeded event type displays in the results.
-
Troubleshooting
To troubleshoot issues when configuring the CIBA flow, check the PingOne audit log for the CIBA Authentication Failed event:
-
Go to Monitoring > Audit and enter the report parameters to limit the results to the show your flow testing.
-
Click Run.
-
Look for a CIBA Authentication Failed event type in the results.
-
Click View in the Details column for any CIBA Authentication Failed event types and review the event details to determine what issues caused the flow to fail.